
A bar golf simulator setup combines two things people genuinely enjoy, golf and a good drink, into one space that's equal parts entertainment and social hub. Whether you're converting a basement into...
Bar Golf Simulator Setup: Layout, Gear, AV, And Safety Tips
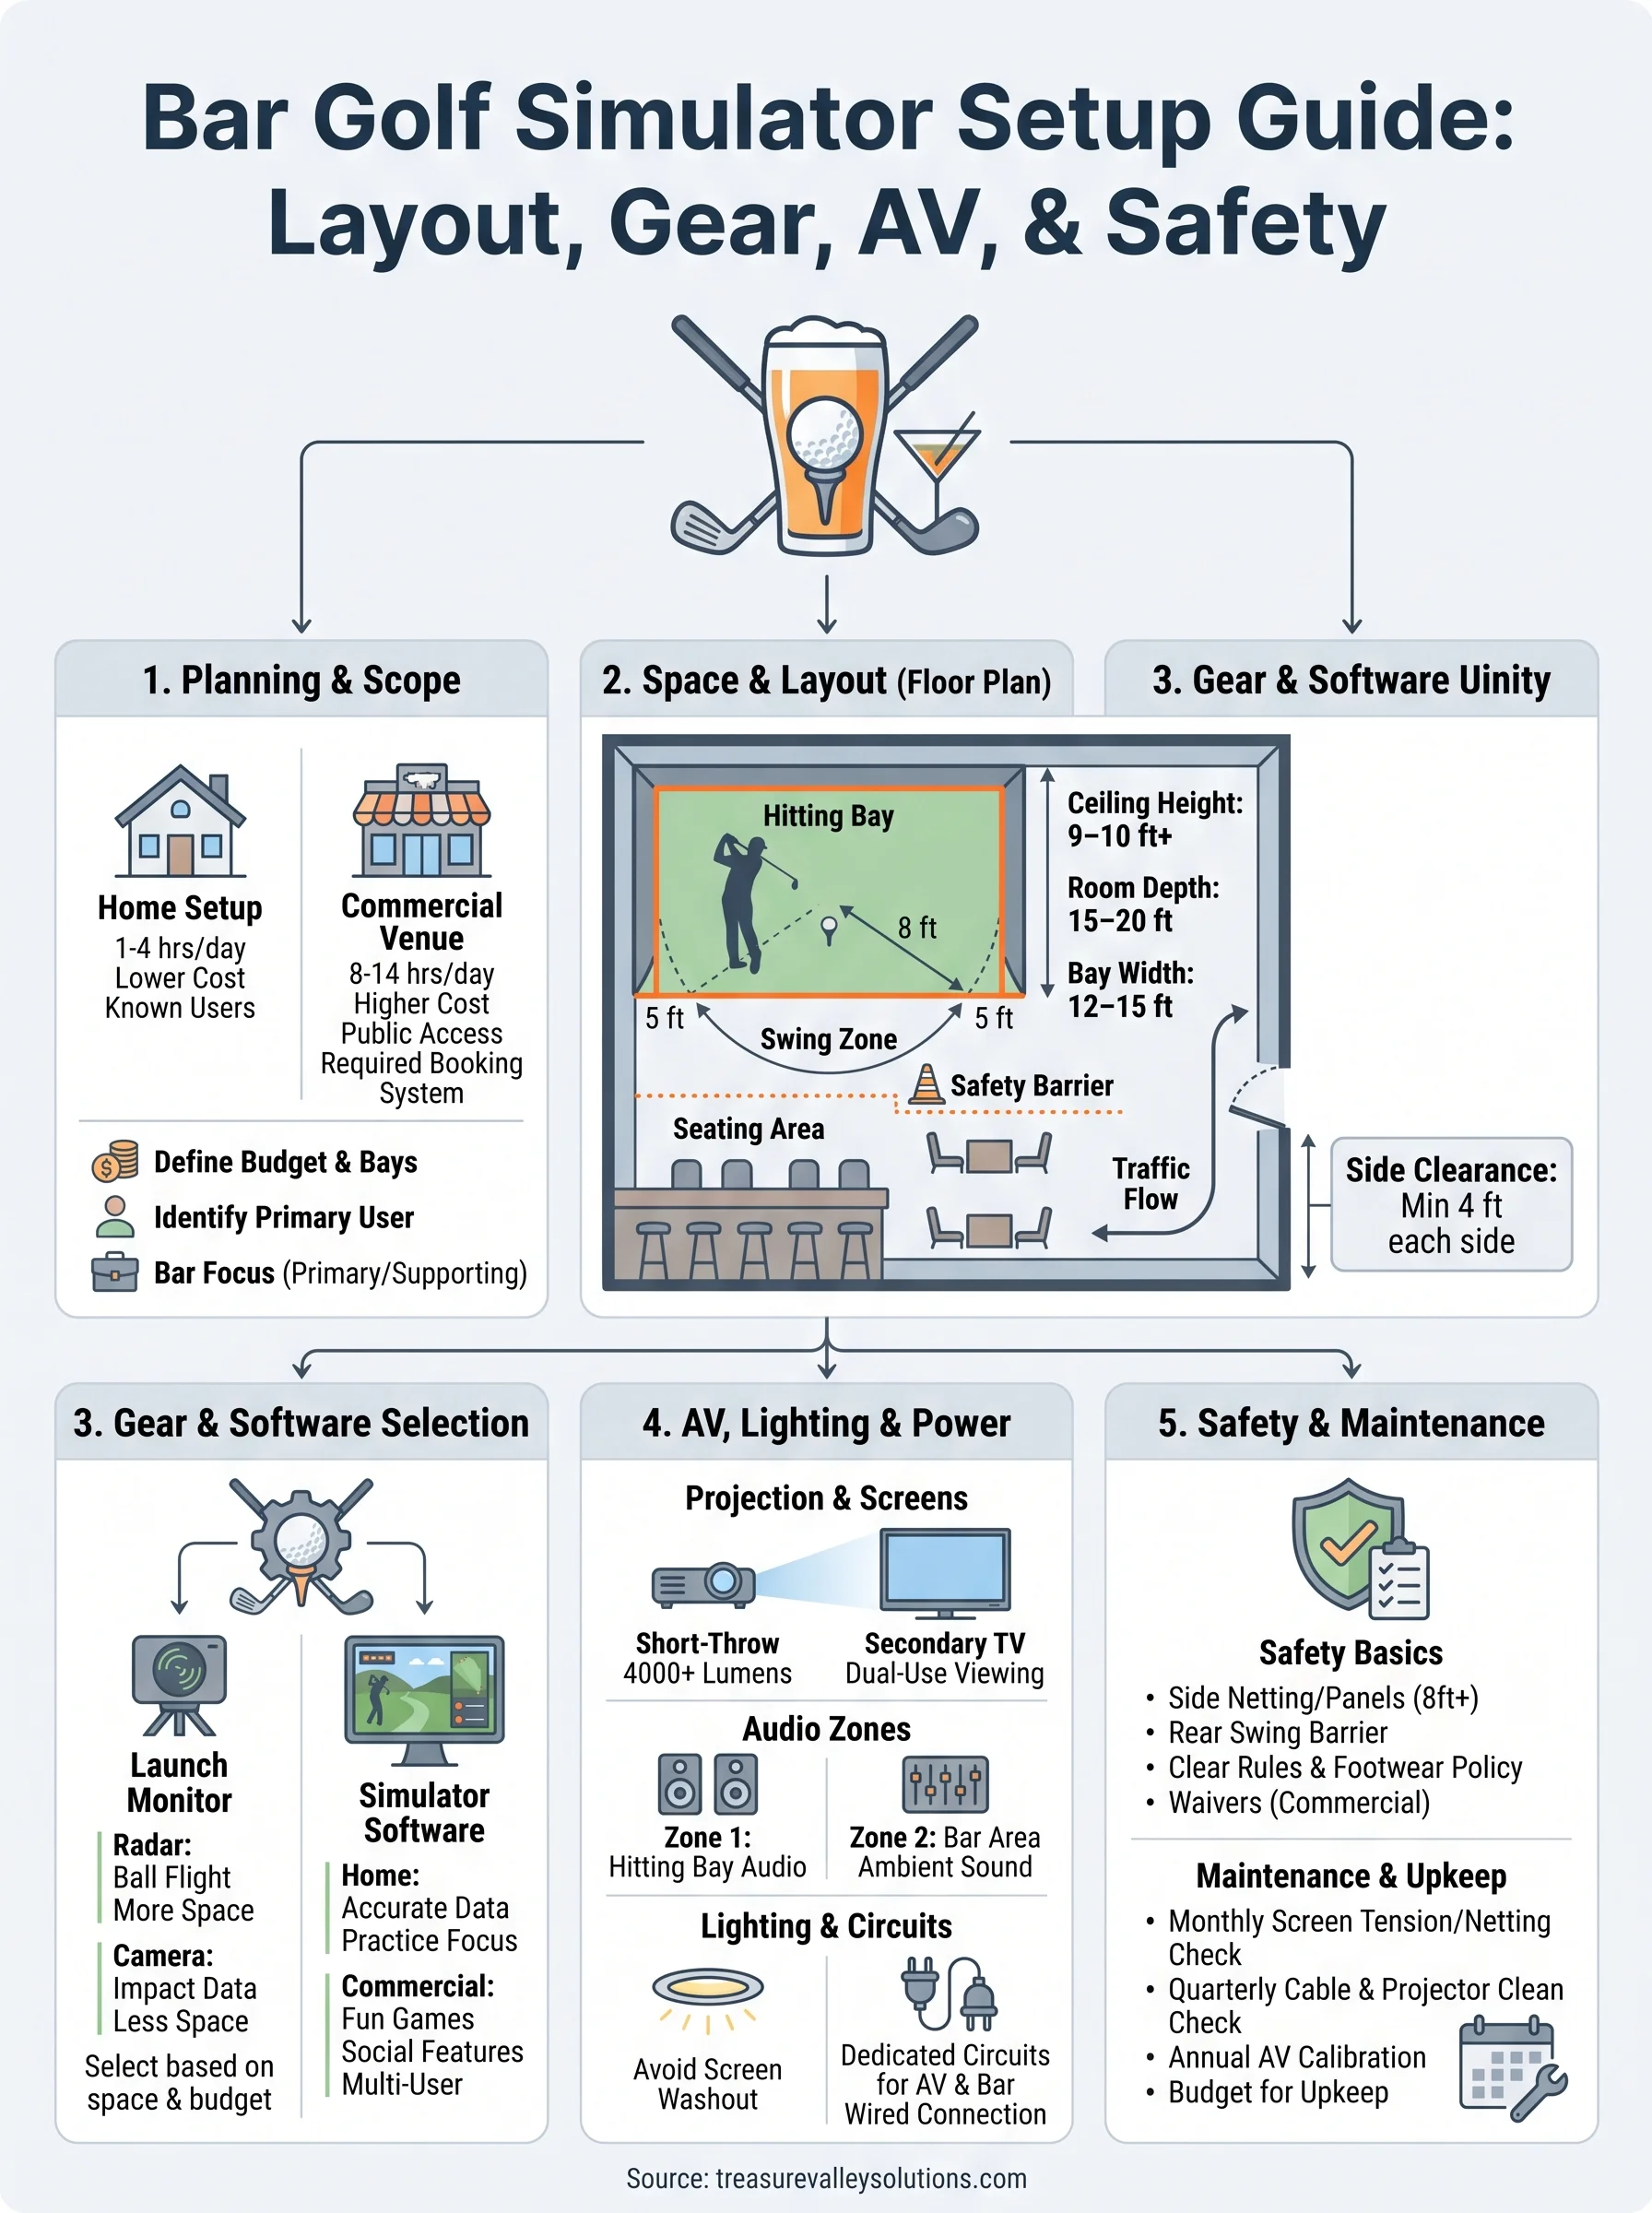
A bar golf simulator setup combines two things people genuinely enjoy, golf and a good drink, into one space that's equal parts entertainment and social hub. Whether you're converting a basement into the ultimate hangout or building out a commercial indoor golf venue, getting this right takes more than buying a launch monitor and hanging a screen. The layout, audiovisual equipment, lighting, ventilation, and safety considerations all need to work together, or you end up with an expensive room that frustrates everyone who uses it.
The difference between a setup that impresses and one that collects dust usually comes down to planning. How much ceiling height do you actually need? Where does the projector go relative to the impact screen? How do you run audio so people at the bar can talk without shouting over swing feedback sounds? These are the kinds of real-world questions that matter once you move past the Pinterest inspiration phase and start committing to a build.
At Treasure Valley Solutions, we design and install the AV, lighting, and automation systems that bring spaces like these to life, from projector placement and surround sound to smart controls that let you adjust everything from a single screen. We've put together this guide to walk you through layout planning, gear selection, AV integration, and safety essentials so your bar golf simulator build hits every mark from day one.
Decide what you're building and who it's for
Before you price out a single piece of equipment, you need to answer a straightforward question: what type of space are you actually building, and who will use it most? A home bar golf simulator setup for weekend friends runs differently than a commercial venue charging per hour. The answer shapes every decision that follows, from how durable your screen needs to be to whether you need a booking system wired into the room.
Home setup vs. commercial venue
Two paths exist here, and they carry very different cost structures and build requirements. A home setup typically serves a known group of people who respect the equipment, so you can make different trade-offs on materials and control systems. A commercial venue needs to survive 10 to 14 hours of daily use from strangers, which means thicker impact screens, commercial-grade projectors, and an access control system tied into the space.
The single biggest mistake builders make is designing a commercial-style layout with home-grade components, or the reverse: over-engineering a basement bar with unnecessary commercial hardware.
Here is a quick breakdown of how these two paths differ across key factors:
| Factor | Home Setup | Commercial Venue |
|---|---|---|
| Daily usage hours | 1-4 hours | 8-14 hours |
| Component durability | Standard residential | Commercial-grade |
| Booking/access system | Not required | Required |
| AV complexity | Moderate | High |
| Liability/insurance needs | Low | High |
| Budget range | $8,000-$40,000 | $30,000-$150,000+ |
Know your primary user
Your primary user determines the experience you design toward. A home bar built for a competitive golfer who practices seriously needs accurate launch monitor data on a large screen with minimal distractions. A commercial venue targeting casual players and corporate groups needs easy-to-use software, social features, and comfortable seating that supports groups of four to eight people watching together. Getting this wrong means you optimize for the wrong thing entirely.
Skill level matters just as much. Beginners want fun, forgiving software with mini-games and simple setup between sessions. Serious golfers want accurate ball data, course fidelity, and the ability to replay shots with side-by-side swing analysis on screen. If you are building commercially, you will need simulator software that handles both user types, and that factors directly into which launch monitor and platform you select in later steps.
Define the scope before you spend anything
Write down three core elements of your project before contacting any vendor: the maximum budget, the intended use frequency, and the number of bays. One bay serves most home setups and many small commercial builds. Two or three bays dramatically change the room layout, the AV wiring plan, the audio zoning, and the network load. Knowing your scope upfront prevents mid-build pivots that cost far more than proper planning would have.
Also decide whether the bar is the primary draw or a supporting feature. Some builds center the simulator and tuck a small bar into the corner. Others build a full bar with food service and add the simulator as an amenity. That distinction changes how you allocate square footage, where you run plumbing and electrical, and how you design the traffic flow between the hitting bay and the seating area. Lock that answer down now, and every step that follows gets easier.
Step 1. Confirm space, ceiling height, and clearances
Measurement comes before every other decision in a bar golf simulator setup. Pull out a tape measure and document your exact ceiling height, room width, and room depth at the specific point where the golfer will stand before you price a single piece of equipment. Rooms that look large enough often fall short once you account for the screen wall, the hitting mat, the projector mount, and the safe zone behind the golfer. Getting these numbers wrong locks you into expensive mid-build corrections.
Ceiling height requirements
Golf swings reach their highest point directly over the hitting position, not out toward the screen. Most full driver swings peak at 9 to 10 feet, which means your ceiling at the golfer's stance needs to clear that height with a minimum of 6 additional inches of buffer. Shorter irons peak lower, around 8 to 8.5 feet, but designing to the minimum for irons leaves no margin for taller golfers or guests who swing more upright.
A ceiling height of 10 feet clears nearly all standard golf swings and represents the practical minimum for a setup that serves a mixed group of players.
Always check the mat position specifically, not just the center of the room. Ceiling beams, light fixtures, and HVAC ducts frequently reduce usable height below what the overall room measurement suggests. Document every obstruction before your design is finalized, and factor them into your projector mount and screen frame planning as well.
Floor footprint and side clearances
Your hitting bay needs adequate depth behind the golfer as well as clearance on both sides to prevent club strikes against walls, bar furniture, or structural columns. Use this table as a starting checklist before you commit to a layout:
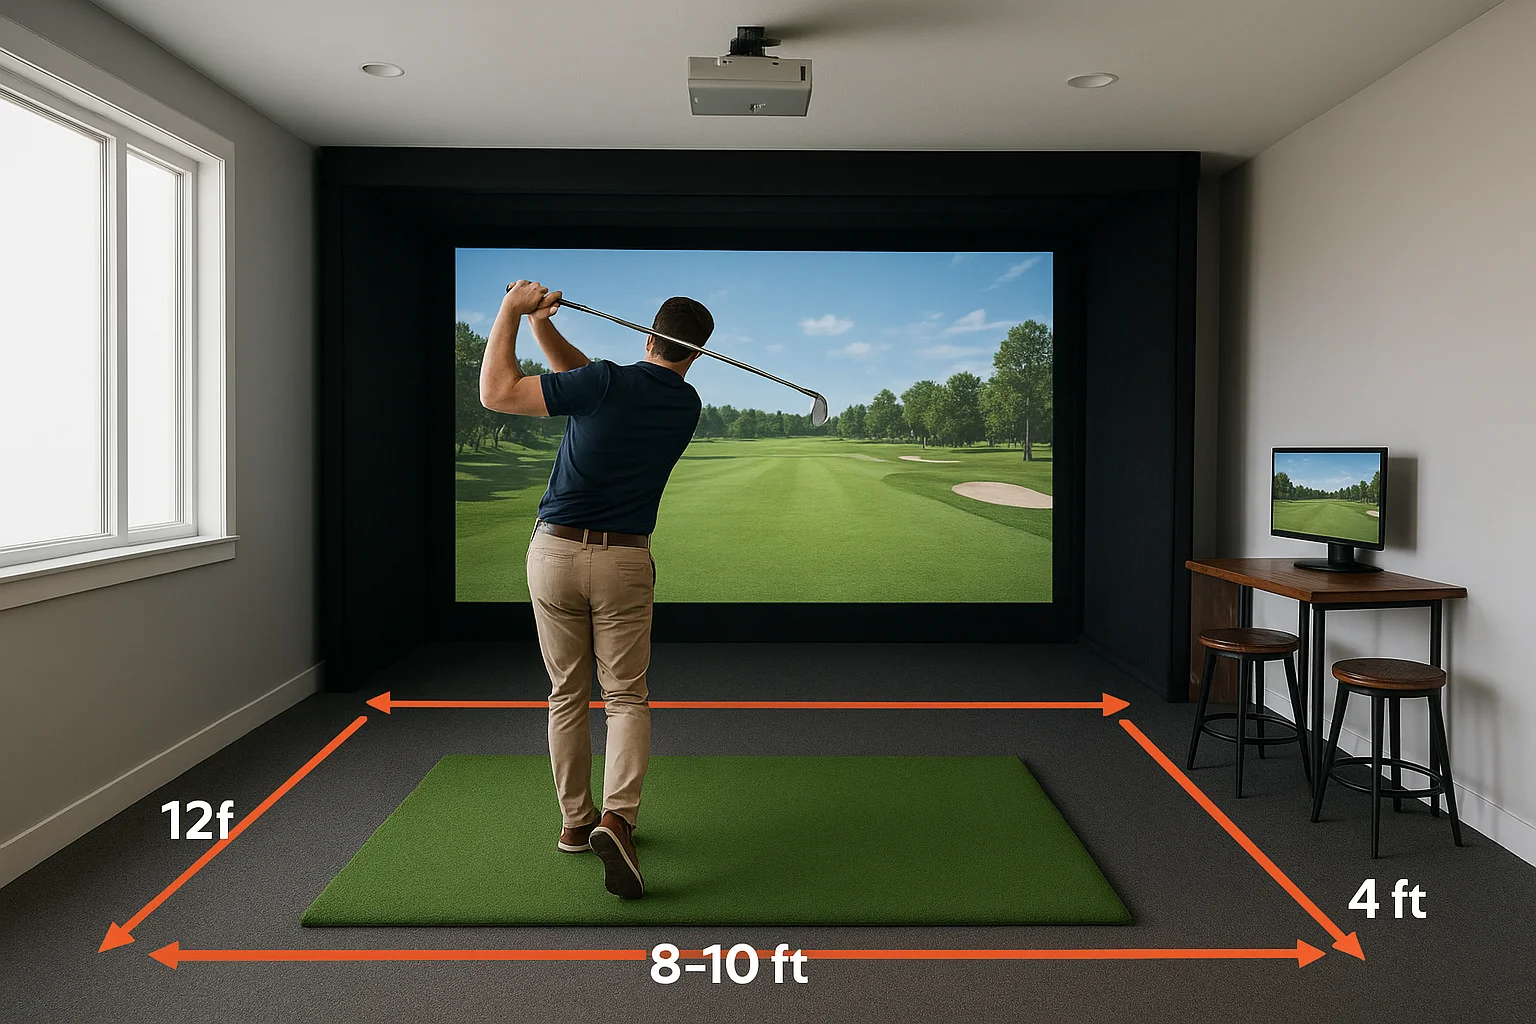
| Dimension | Minimum | Recommended |
|---|---|---|
| Ceiling height | 9 ft | 10 ft+ |
| Room depth (screen to back wall) | 15 ft | 18-20 ft |
| Room width per bay | 12 ft | 15 ft |
| Side clearance from swing center | 4 ft each side | 5 ft each side |
| Distance from mat to screen | 8-10 ft | 10-12 ft |
Side clearances matter more than most builders expect. A right-handed golfer swings through to the left, and any wall, stool, or column within 4 feet of the swing plane creates a genuine injury and damage risk. Walk your space with a golf club and physically simulate a full follow-through at normal speed to identify every obstacle before you finalize your design. If you plan to add bar seating within the same room, keep it behind the golfer's back line and at least 6 feet from the center of the hitting position.
Step 2. Lay out the bay and bar traffic flow
Once you have confirmed your clearances, you need to draw the actual floor plan before moving a single piece of furniture or drilling anything. Layout in a bar golf simulator setup is primarily about separating active swing space from foot traffic, which sounds obvious but gets ignored constantly in early-stage builds. People walk behind the golfer to reach the bar, to grab drinks, to use the bathroom, and if that path crosses the swing zone, you have a safety problem built directly into your design.
Position the hitting bay first
Your hitting bay anchors the entire room layout, so place it before you plan anything else. Center the bay on the long wall where your screen will mount, and mark the golfer's stance position with tape on the floor. From that point, extend 5 feet to each side and 8 feet behind to define the swing zone boundary. Everything else in the room works around that boundary, not the other way around.
Treat the swing zone boundary like a physical wall when planning bar seating, service paths, and entry points.
Use this layout reference to assign functions to the remaining floor space:
| Zone | Location Relative to Bay | Primary Use |
|---|---|---|
| Hitting bay | Front-center | Golfer stance, mat, screen |
| Viewer seating | Behind swing zone (6+ ft) | Watching, socializing |
| Bar counter | Side wall or rear wall | Drinks, service |
| Traffic path | Along perimeter walls | Movement to/from bar and exits |
| Dead zone | Side clearance areas | No furniture, no traffic |
Route bar traffic around the swing zone
Your bar and seating area should sit behind and to the side of the hitting bay, never directly parallel to the golfer's swing plane. The safest traffic path runs along the rear wall, keeping guests and staff moving parallel to the screen rather than cutting across the swing zone to reach the bar. In a commercial build, consider a low barrier or railing at the rear edge of the swing zone to physically redirect people rather than relying on signage alone.
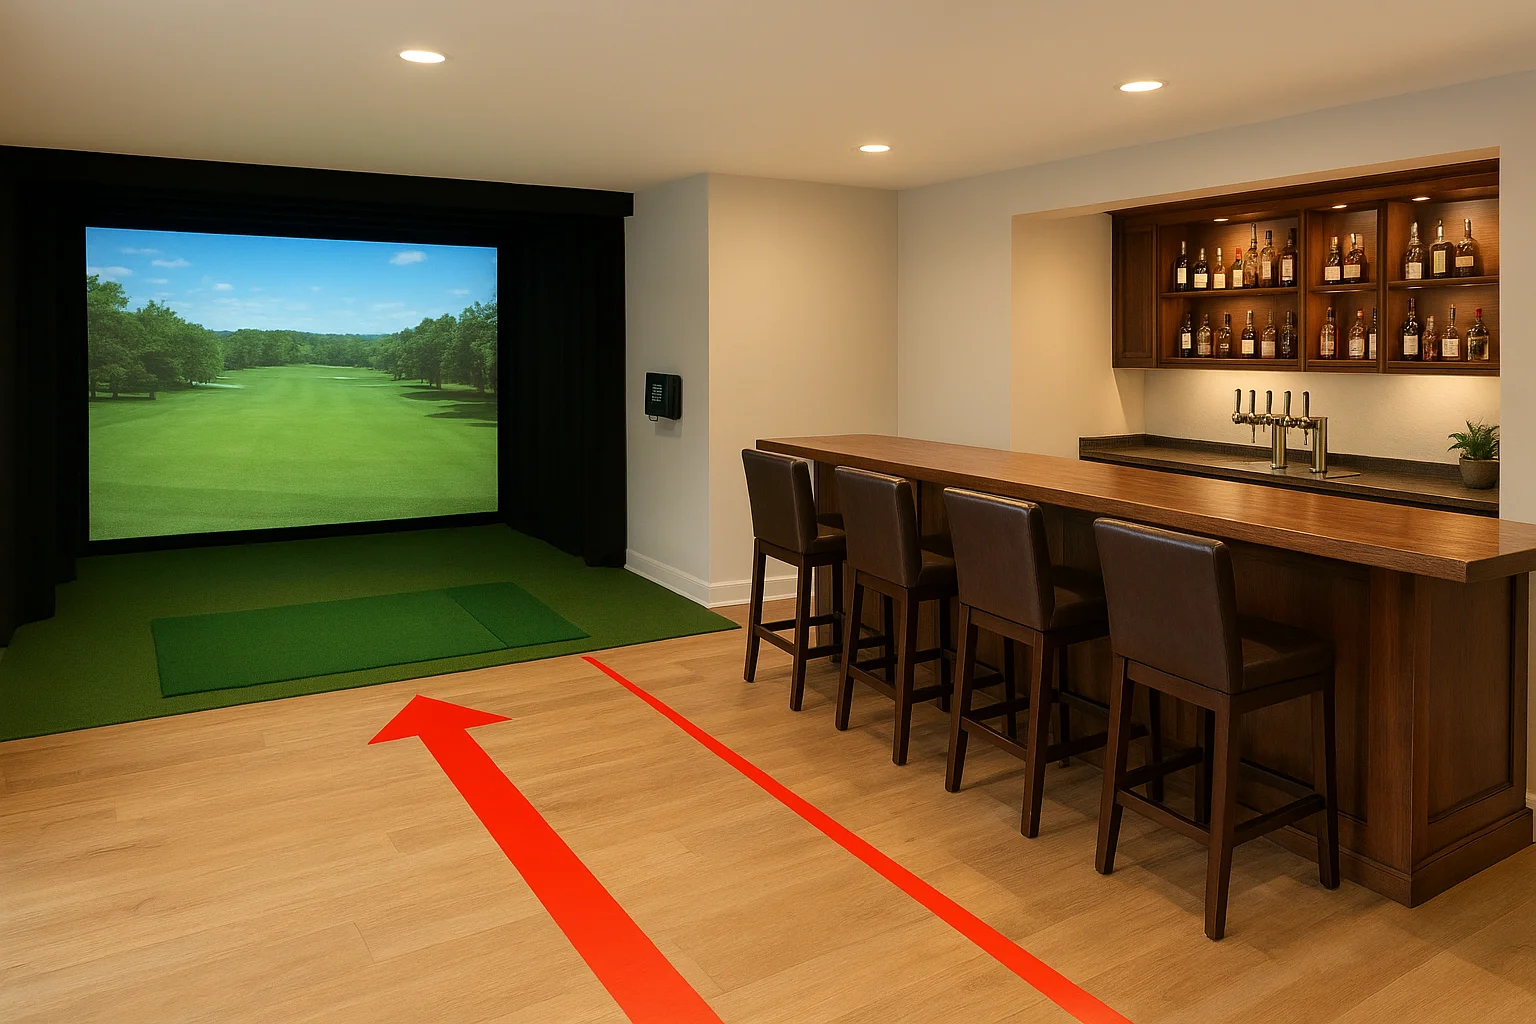
Keep the bar counter accessible without entering the hitting area. If someone needs to squeeze past the golfer to order a drink, your layout has a problem that no signage or house rule will fully fix. Resolve it at the design stage by positioning your bar service point so that the natural path to it never intersects the swing zone, even when the room is at full capacity.
Step 3. Choose a launch monitor and simulator software
Your launch monitor is the core data engine of your bar golf simulator setup. It captures the ball and club data that the simulator software turns into a virtual shot on screen. Two main technology types exist: radar-based monitors track the ball through flight, while camera-based monitors capture data at the moment of impact. Each type carries different trade-offs in room depth requirements, accuracy, and price that affect your build directly.
Your simulator software choice locks you into a compatible hardware ecosystem, so evaluate both together before purchasing either one.
Picking the right launch monitor
The monitor you choose depends on your ceiling height, available room depth, and total budget. Radar-based units need the ball to travel farther before generating reliable data, so they demand more room depth behind the screen. Camera-based units capture data at impact and work well in shorter rooms of 15 to 18 feet, making them the default choice for most home builds. For most residential setups, a mid-tier camera-based unit sits in the $2,500 to $7,000 range and delivers accurate enough data for both practice sessions and casual play.
Here is a comparison of common launch monitor tiers to help you match hardware to your build type:
| Tier | Price Range | Technology | Best For |
|---|---|---|---|
| Entry | $500-$2,500 | Camera or radar | Home casual play |
| Mid | $2,500-$7,000 | Camera | Home serious/light commercial |
| Pro | $7,000-$25,000+ | Camera or radar | Commercial venues |
Choosing simulator software
Simulator software controls the visual experience your players interact with, and it varies widely in course fidelity, game modes, and multiplayer support. Confirm compatibility with your chosen launch monitor before purchasing any software license, because not every platform supports every monitor, and discovering that mismatch after the fact is an expensive problem.
Commercial venues typically need subscription-based platforms with remote management tools and session reporting built in, since casual groups prioritize fun games like closest to the pin over raw shot accuracy. Serious home builds benefit more from software that displays full shot data including spin rate, launch angle, and ball speed on the same screen the golfer watches during a round, keeping the feedback loop tight and the practice session productive.
Step 4. Build the screen wall, enclosure, and hitting area
Your screen wall, enclosure, and hitting surface work together as a system. If any one of these three elements is underdone, the whole bar golf simulator setup suffers, whether that means a screen that tears early, a frame that flexes under repeated impact, or a mat that shifts mid-swing. Build each component to the correct spec from the start, and the entire bay performs reliably for years.
Pick your impact screen and mount it correctly
Impact screens take repeated high-speed strikes, so material quality and frame tension determine how long yours lasts. Standard woven polyester screens handle most residential use well, while commercial venues need heavier-duty screen fabric rated for continuous daily play. Mount the screen in a rigid steel or aluminum frame, and tension it evenly across all four sides to prevent dead spots and inconsistent ball bounce-back that frustrate players and accelerate screen wear.
A screen mounted with uneven tension will deform over time and start returning balls unpredictably, which creates a genuine safety risk for players standing close to the impact zone.
Use this checklist when specifying your screen and frame:
- Screen material: woven polyester for residential, reinforced multi-layer fabric for commercial
- Frame material: steel or aluminum box section, minimum 1.5-inch profile
- Mounting method: wall-anchored frame with adjustable tensioning at all four corners
- Screen size: minimum 10 feet wide by 8.5 feet tall for a standard bay width
- Surround padding: foam padding around the frame perimeter to absorb off-center shots
Build the enclosure walls and hitting surface
Your enclosure needs side netting or rigid side panels extending from the screen frame back toward the golfer's position to capture shots that miss the screen entirely. A minimum of 8 feet of side containment on each side prevents errant balls from reaching bar patrons, furniture, or expensive AV equipment. Use black netting at a minimum, and choose rigid composite panels in commercial builds where daily use demands higher durability than netting can provide.
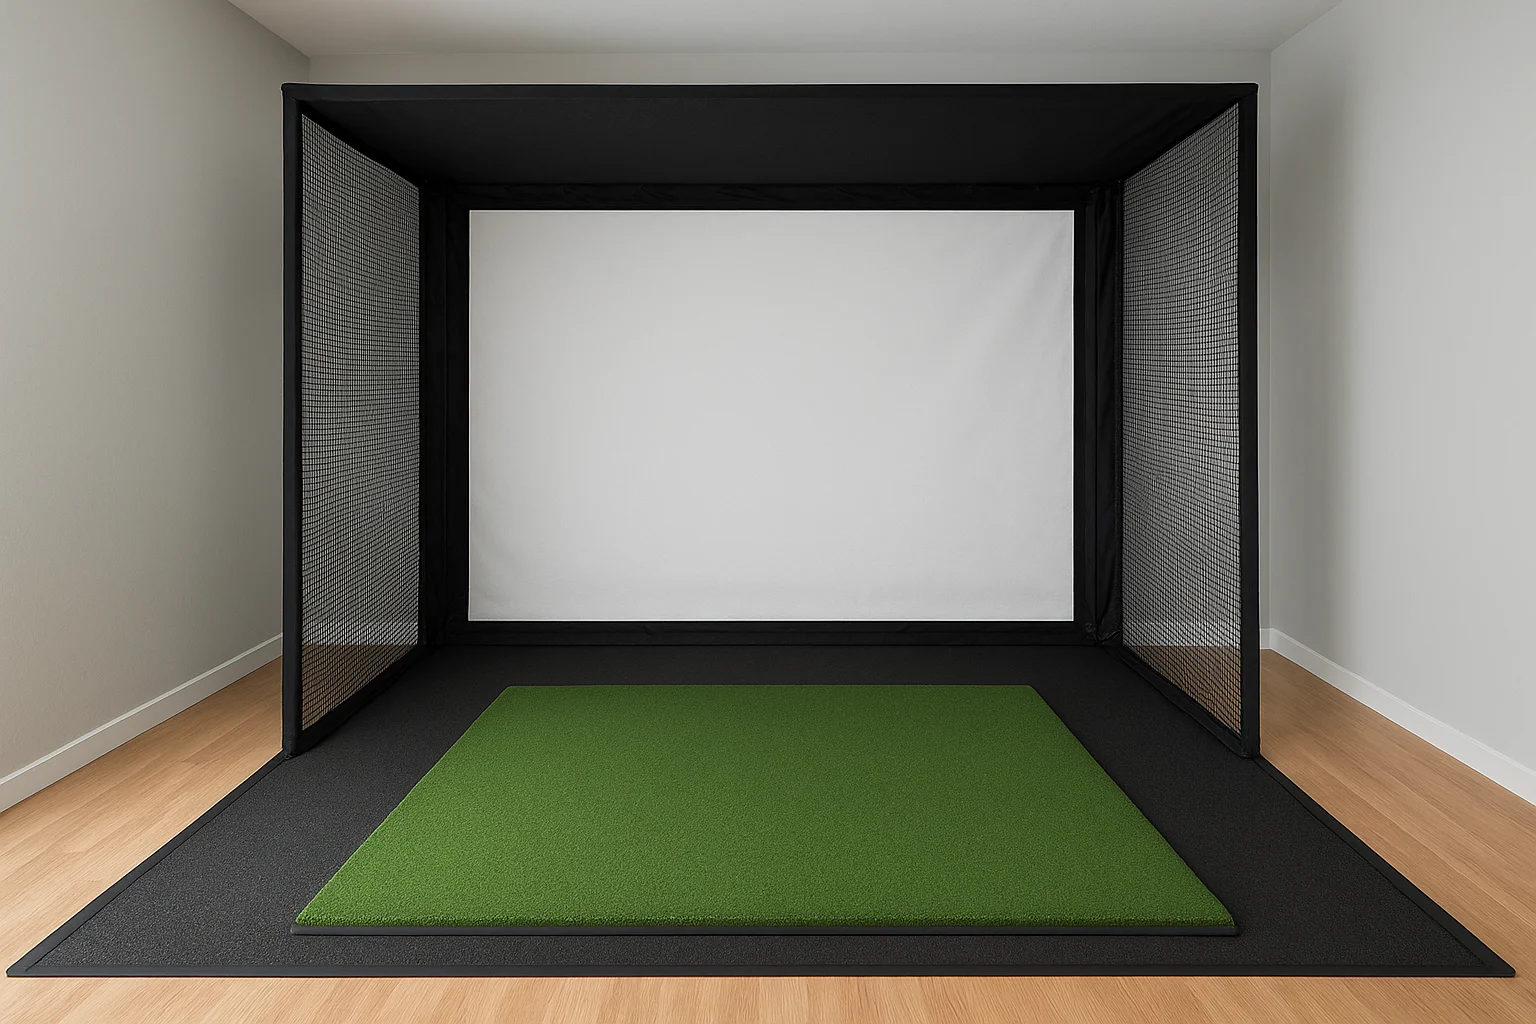
The hitting mat needs to be at least 5 feet wide by 5 feet deep to accommodate left- and right-handed players without forcing either to set up with a foot off the surface. Choose a mat with a dense turf surface bonded to a thick rubber base layer to protect your subfloor from repeated iron strikes. Anchor it to the floor with non-slip underlayment or commercial-grade carpet tape so the mat stays flat and stationary through full swing sequences.
Step 5. Plan projection, TVs, and dual-use viewing
Your projection setup determines image quality during play, but your broader AV plan determines whether the bar area stays engaged when someone is mid-round. In a bar golf simulator setup, you are solving two viewing problems at once: the golfer needs a large, bright, accurate image on the impact screen, and everyone else at the bar needs to see what's happening without craning toward the hitting bay. Plan both from the start rather than adding bar screens as an afterthought.
Choose your projector placement and spec
Your projector needs to throw a sharp, bright image without placing the unit in the golfer's swing path or creating shadows when the player addresses the ball. Short-throw and ultra-short-throw projectors solve this problem cleanly by mounting close to or above the screen rather than from the rear of the room, which keeps the beam out of the hitting lane entirely. For most bays, a minimum brightness rating of 4,000 lumens handles typical interior lighting without washing out the image during daytime play.
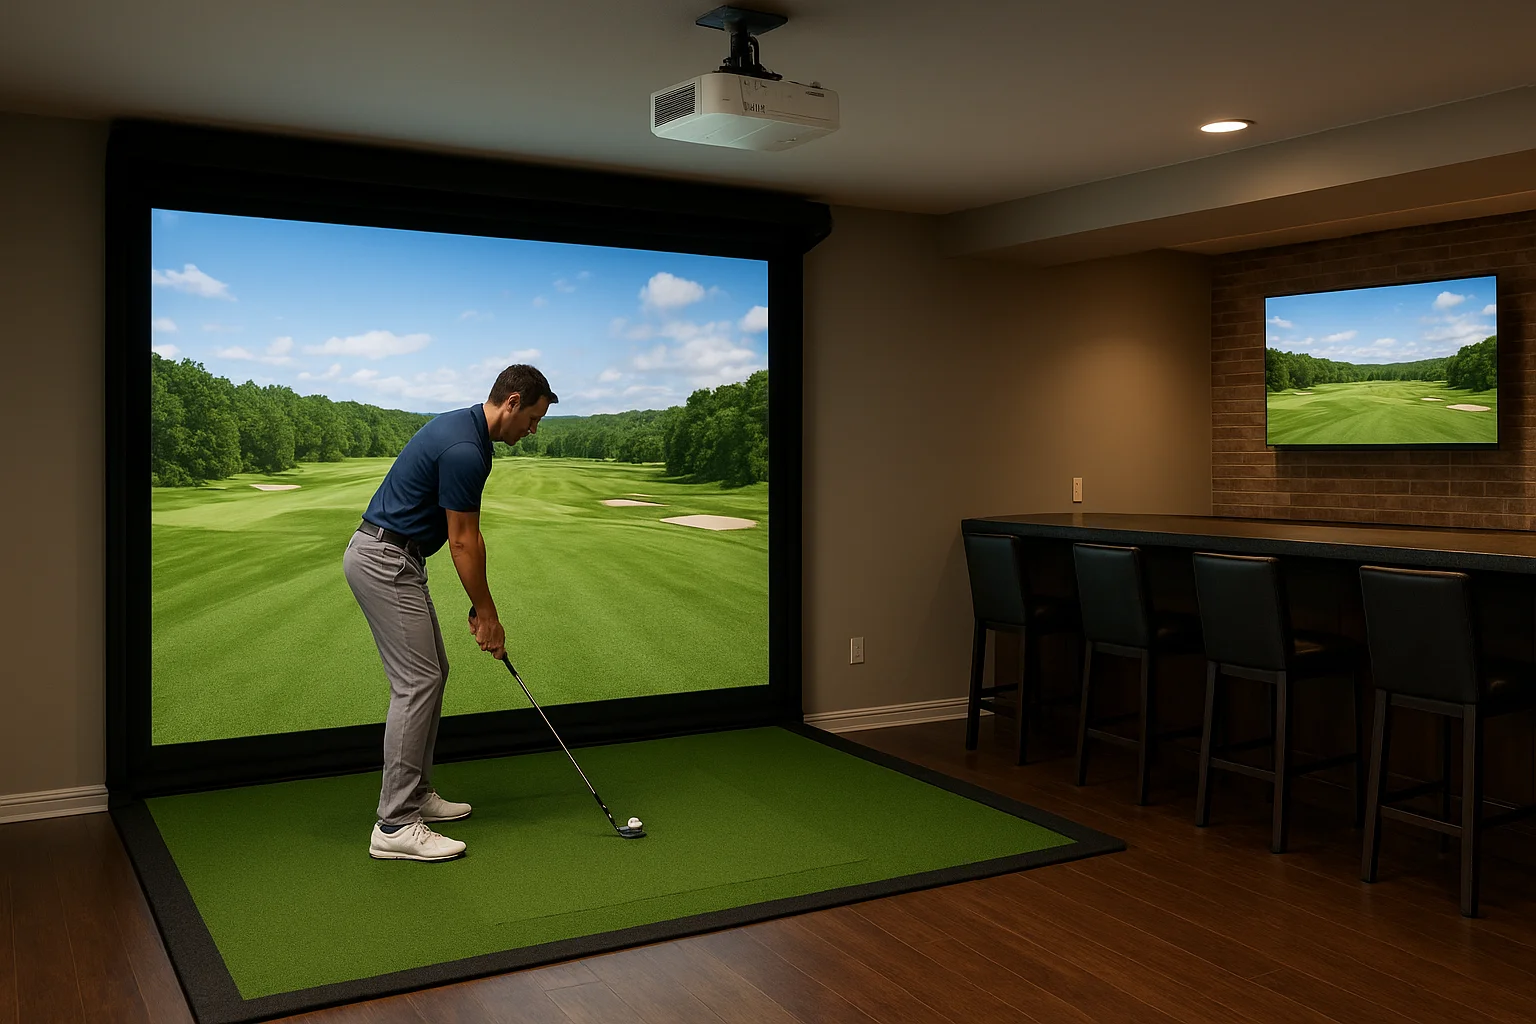
If your room has ambient light from windows or bar lighting, spec your projector at 5,000 lumens or higher to maintain image contrast during active sessions.
Use this reference table when evaluating projector placement options for your bay:
| Mount Position | Throw Type | Room Depth Needed | Shadow Risk |
|---|---|---|---|
| Ceiling rear | Standard | 15 ft+ | Moderate |
| Ceiling mid-room | Short-throw | 10-14 ft | Low |
| Above screen | Ultra-short-throw | 8-10 ft | Minimal |
Add secondary TVs for the bar area
Bar patrons sitting behind the swing zone need their own dedicated screen showing the simulator feed so they can follow shots without moving toward the hitting bay. Mount one or two 55-inch to 75-inch commercial-grade displays on the rear or side walls of the bar area, positioned so the viewing angle stays comfortable from bar stools rather than forcing guests to look sideways or upward. Run the signal from your simulator PC to these screens using a reliable HDMI distribution system, and confirm the resolution and refresh rate match across all displays so the feed looks consistent.
Your displays should also support secondary content modes for when no one is actively playing, showing sports programming or a venue-branded screen to keep the bar atmosphere active between bookings or sessions.
Step 6. Add audio, lighting, and simple control
Audio, lighting, and control systems are where your bar golf simulator setup shifts from a functional room into an actual experience people want to come back to. These elements are often added last and budgeted last, which leads to underbuilt systems that either distract from the game or make the bar feel flat. Plan them in parallel with your AV and screen build so the wiring and mounting points land in the right places the first time.
Set up audio zones that serve both areas
Your room needs at least two distinct audio zones: one covering the hitting bay and one covering the bar and seating area. The simulator software plays course sounds, swing feedback, and game audio directly through the hitting bay speakers, while the bar zone runs at a lower, conversational volume so guests can talk without shouting. Mount ceiling speakers in the bay angled toward the golfer's position, and use a separate pair of ceiling or wall speakers over the bar counter to keep the zones acoustically clean.
Mixing both zones through a single speaker pair at a single volume level forces you to choose between audio that serves the golfer and audio that serves the bar, and neither group ends up happy.
Run both zones through a multi-zone amplifier or AV receiver that lets you adjust volume per zone independently. A basic two-zone amplifier handles most home builds cleanly, while commercial venues benefit from a rack-mounted multi-zone processor that ties into the room's control system.
Use lighting to define the bay and protect the image
Lighting in the hitting bay needs to avoid washing out the projected image while still keeping the space safe for players addressing the ball. Use warm, low-output downlights positioned behind and to the sides of the golfer rather than between the projector and screen, and place them on a dimmer so players can drop the bay lighting during active sessions. Bias lighting along the side walls of the enclosure adds depth without creating hotspots on the screen surface.
The bar area can run at full brightness independently. Install separate lighting circuits for the bay and bar zones so guests can stay comfortable at the counter while the hitting bay dims for play. A simple scene controller or smart dimmer switch handles this in most residential builds without requiring a full automation system, keeping the control solution practical and easy for any guest to operate.
Step 7. Get power, cabling, and network right
Power, cabling, and network infrastructure are the foundation every other component in your bar golf simulator setup depends on. Most builders treat these as final-stage tasks, but running conduit and pulling cables after walls are finished costs significantly more time and money than planning them into the rough-in phase. Get an electrician and a low-voltage cabling contractor involved during the framing stage so every wire lands in the right place before drywall goes up.
Plan your electrical circuits first
Your simulator bay draws more power than most people expect. A short-throw or ultra-short-throw projector, simulator PC, launch monitor, amplifier, and bar equipment running simultaneously can exceed 15 amps on a single circuit without difficulty. Run at least two dedicated 20-amp circuits into the bay: one for AV and computing equipment, and one for lighting and any bar appliances within the same room. Keeping these circuits separate prevents a lighting surge or appliance draw from disrupting your simulator mid-session.
Plug your projector and simulator PC into a surge-protected UPS unit so a power fluctuation does not corrupt an active session or damage hardware.
Use this circuit planning reference as a starting checklist for your electrician:
| Circuit | Recommended Amperage | Equipment Served |
|---|---|---|
| AV and computing | 20A dedicated | Projector, PC, launch monitor, amplifier |
| Lighting | 20A dedicated | Bay lights, bar lighting, dimmers |
| Bar appliances | 20A dedicated | Refrigerator, blender, display screens |
Run cables during the build, not after
Low-voltage cabling for HDMI, speaker wire, and network connections should run inside the walls during the same phase as your electrical rough-in. Label every cable at both ends before drywall covers them. Use in-wall rated HDMI cable or a fiber HDMI extender for runs longer than 25 feet to avoid signal degradation between your simulator PC and secondary bar displays. Run conduit rather than pulling cables directly so future upgrades or replacements do not require opening walls again.
Set up a dedicated network for the simulator
Simulator software, course downloads, and multiplayer sessions generate consistent network demand that can conflict with general bar Wi-Fi traffic in a commercial build. Connect your simulator PC directly to the router via a wired Gigabit Ethernet connection rather than relying on wireless, which reduces latency and eliminates the dropped-connection issues that interrupt sessions at the worst possible moment. In a commercial venue, put simulator hardware on a separate VLAN to isolate it from guest Wi-Fi traffic entirely.
Step 8. Cover safety, durability, and liability basics
Safety in a bar golf simulator setup is not a box you check once at the end of the build. It requires deliberate decisions at the design, material, and policy level, because a room that combines fast-moving golf balls with alcohol and mixed groups of guests carries real injury and liability risk if you skip the basics.
Protect players and bystanders
Your physical barriers determine how much of the room is actually safe during an active session. Extend side netting or rigid containment panels at least 8 feet back from the screen on both sides of the bay to catch any off-center shot before it reaches the bar area. Mount a physical barrier or low railing at the rear edge of the swing zone to stop guests from wandering into the hitting area mid-swing, and position it far enough back that the golfer has full follow-through clearance before the boundary begins.
A rope barrier or stanchion line at the rear swing boundary reduces walk-in incidents more effectively than any posted sign.
Post clear, visible rules at the entrance to the hitting bay covering swing rules, footwear requirements, and the no-alcohol-in-hand-while-swinging policy. Keep a first aid kit mounted on the wall within the room and confirm your fire exit paths remain unobstructed by furniture, netting frames, or cable runs.
Handle durability and commercial liability
Commercial builds carry insurance and documentation requirements that residential setups do not, and skipping these creates financial exposure the moment an incident occurs. Work with your insurance provider to confirm your general liability policy explicitly covers indoor sports simulation and alcohol service in the same space, since standard commercial policies may not include both without a rider.
Use this checklist to confirm your liability and durability foundations before you open the space to paying guests:
- Impact screen: rated for commercial daily use with manufacturer documentation on impact tolerance
- Frame and enclosure: anchored to structural walls or floor, not freestanding
- Waivers: signed digital or paper waiver on file for every paying session
- Inspection schedule: monthly check of screen tension, netting attachment points, and mat anchoring
- Incident log: written record of any equipment contact, injury, or property damage
- Certificate of insurance: current copy on file naming the venue address and activity type
Inspect your screen tension and netting anchor points monthly, and replace any component that shows visible wear before it fails during a session rather than after.
Step 9. Estimate costs, timeline, and upkeep
Understanding what your bar golf simulator setup actually costs, how long it takes to build, and what ongoing maintenance looks like prevents the budget overruns and scheduling surprises that derail more builds than any technical problem does. Lock in realistic numbers before you commit to a contractor or place your first equipment order.
Break down your budget by category
Your total project cost splits across several distinct categories, and treating them as one lump sum makes it easy to underestimate the less exciting line items like cabling, electrical, and enclosure framing that don't show up in simulator marketing materials. Use this reference table to build your budget by component type:
| Category | Home Setup Range | Commercial Setup Range |
|---|---|---|
| Launch monitor | $2,500-$7,000 | $7,000-$25,000 |
| Simulator software (annual) | $500-$2,000 | $2,000-$8,000 |
| Impact screen and frame | $1,500-$4,000 | $4,000-$10,000 |
| Projector | $1,500-$4,000 | $4,000-$10,000 |
| AV and audio | $2,000-$6,000 | $8,000-$20,000 |
| Lighting and controls | $1,000-$3,000 | $3,000-$10,000 |
| Electrical and cabling | $1,500-$4,000 | $5,000-$15,000 |
| Enclosure, mat, and netting | $1,000-$3,000 | $3,000-$8,000 |
| Bar build-out (if needed) | $3,000-$15,000 | $15,000-$60,000 |
Underestimating your electrical and cabling budget is the single most common reason projects stall mid-build when contractors discover additional circuit requirements.
Plan your build timeline realistically
A well-organized residential build typically runs four to eight weeks from final design to first swing, assuming equipment lead times fall within normal ranges. Commercial builds with permitting, contractor coordination, and multi-bay layouts routinely run 12 to 20 weeks, and rushing any phase to compress that timeline creates installation problems that take longer to fix than the time you saved.
Order your launch monitor, projector, and impact screen materials before your contractor starts framing the enclosure, since equipment lead times of two to six weeks are common and waiting on gear stalls the entire crew.
Schedule regular maintenance to protect your investment
Your ongoing upkeep schedule protects every component you installed and keeps the experience reliable for players. Run through these checks on a consistent schedule:
- Monthly: inspect screen tension, netting anchor points, and mat positioning
- Quarterly: test all cable connections, clean projector lens and filter, update simulator software
- Annually: full AV system calibration, electrical connection inspection, and screen material assessment
Budgeting $500 to $1,500 per year for residential upkeep and $2,000 to $5,000 for commercial maintenance keeps your system performing at the level your players expect.
Next steps
A successful bar golf simulator setup comes down to decisions made early, not gear bought late. You now have a complete framework covering space requirements, layout planning, launch monitor selection, screen construction, AV integration, audio zoning, electrical planning, safety barriers, and realistic budget ranges. Every step in this guide builds directly on the one before it, so skipping ahead creates problems that are far more expensive to fix after installation than to solve during design.
Your next move is to measure your space, document your ceiling height and clearances, and write down your budget and intended use before you contact any vendor or contractor. Those three pieces of information shape every recommendation that follows. If you want help designing the AV, lighting, and control systems that tie your entire build together, our team at Treasure Valley Solutions works with exactly these kinds of projects. Reach out to start planning your build and we will walk through your space with you.