A dedicated golf simulator turns any spare room, garage, or basement into a year-round practice facility, no tee times, no weather delays, no waiting. But a proper golf simulator installation involves...
Golf Simulator Installation: Step-By-Step Home Setup Guide
A dedicated golf simulator turns any spare room, garage, or basement into a year-round practice facility, no tee times, no weather delays, no waiting. But a proper golf simulator installation involves more than just hanging a screen and plugging in a launch monitor. You're dealing with projector placement, impact screen tensioning, electrical requirements, network connectivity, and room dimensions that all need to work together for an accurate and enjoyable experience.
That's where the project gets real. Ceiling height, throw distance, lighting control, and cable management each play a role in whether your setup feels like a professional bay or a frustrating compromise. Getting these details right from the start saves you from costly rework, and from putting a projector mount through a load-bearing beam. At Treasure Valley Solutions, we handle custom AV design and installation across the Boise and Meridian area, and golf simulators sit right at the intersection of what we do best: display technology, audio, networking, and clean integration into your space.
This guide walks you through the full process step by step, from choosing the right room and specifying equipment to wiring, calibration, and final testing. Whether you're planning a DIY build or hiring a professional installer, you'll leave with a clear understanding of what it takes to get a golf simulator up and running the right way.
What you need before you start
Before you buy a single piece of gear, you need a clear picture of what a successful golf simulator installation actually requires. Skipping the planning phase is the most common reason projects stall or go over budget. Three categories cover most of what you need to assess upfront: your room's physical dimensions, the core equipment list, and your electrical and network infrastructure.
Room dimensions and clearances
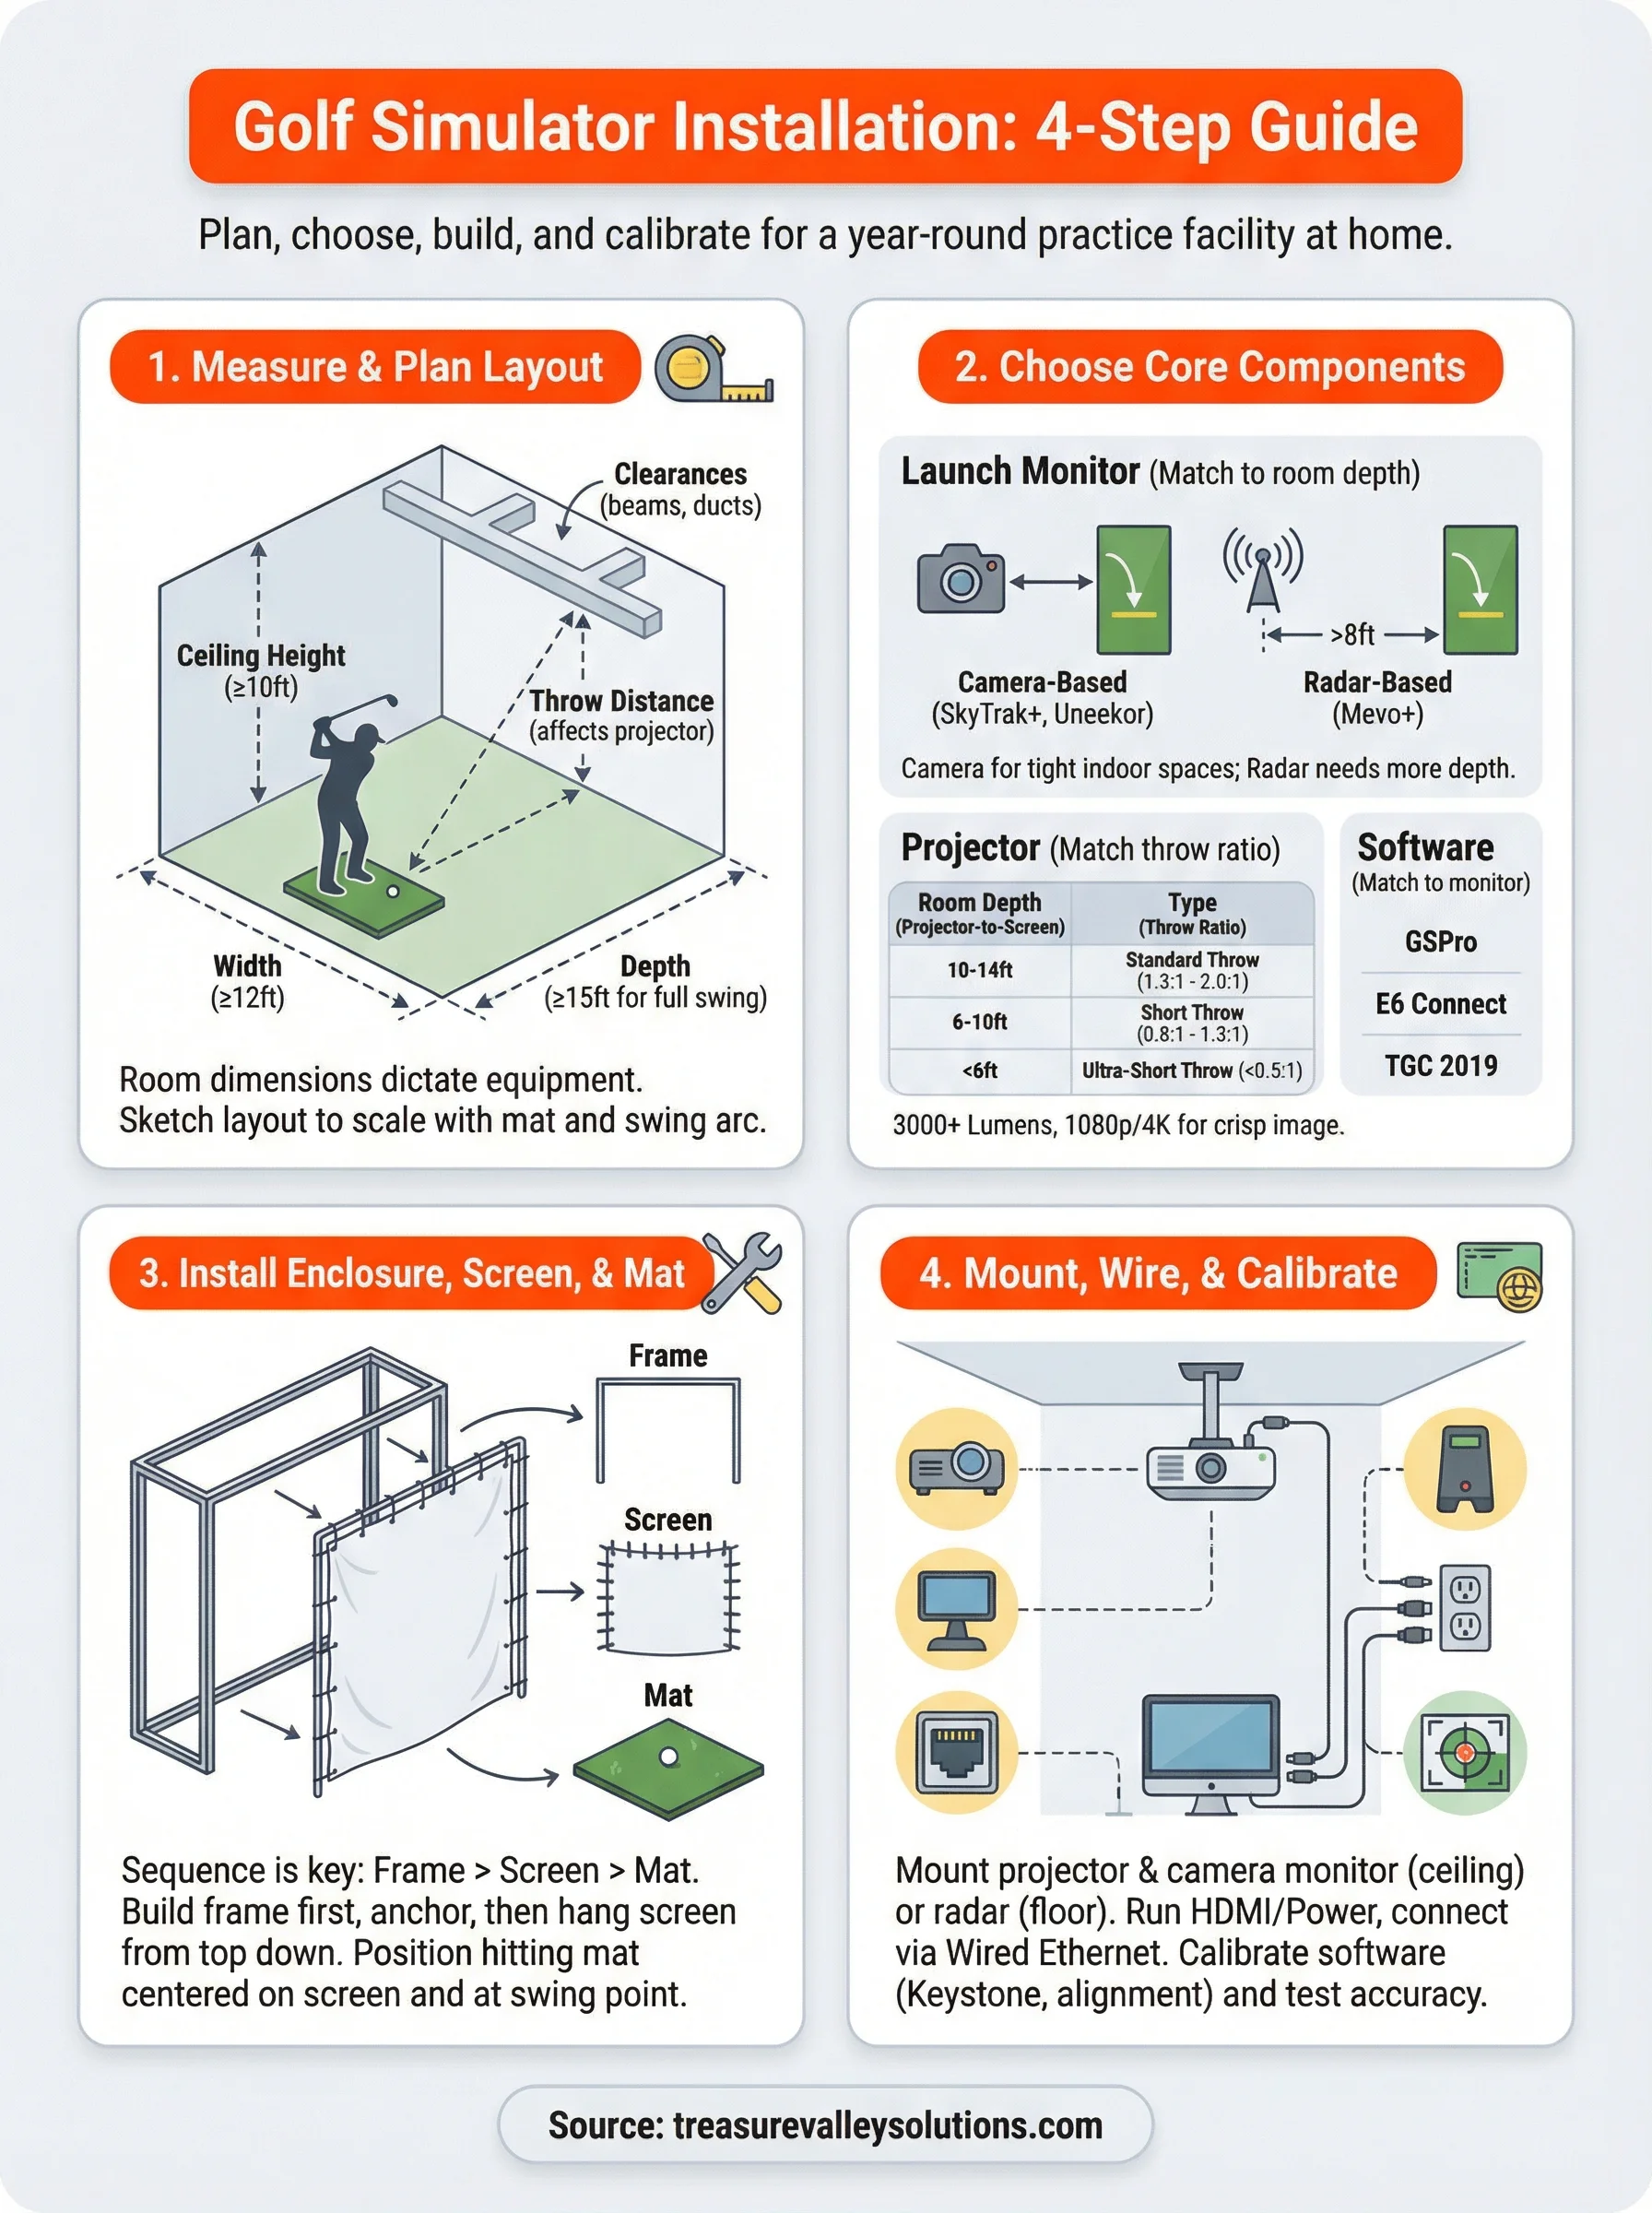
Your room needs to meet minimum size thresholds before anything else works. For a single-bay simulator, the standard minimums are 10 feet of ceiling height, 12 feet of width, and 15 feet of depth. These numbers give you enough overhead clearance for a full swing, enough width to avoid clipping a side wall with your backswing, and enough depth for the projector throw distance to fill the screen correctly.
If your ceiling is under 10 feet, you'll either need a short-throw projector or a different room. No amount of reconfiguration fixes a low ceiling.
Measure your actual usable space, not the room's structural footprint. HVAC ducts, exposed beams, and overhead lighting fixtures all cut into your real clearance and need to be factored in before you commit to a layout.
Core equipment list
Every simulator setup requires the same fundamental components. Here's what you need to source before installation day:
| Component | What to look for |
|---|---|
| Launch monitor | SkyTrak+, Mevo+, or Uneekor for home use |
| Impact screen | Woven fabric rated for direct-hit force |
| Projector | Short-throw or ultra-short-throw, 3000+ lumens |
| Enclosure frame | Steel or aluminum, sized to your screen |
| Hitting mat | Minimum 4x6 feet, turf height matched to your swing |
| Simulator software | GSPro, E6 Connect, or TGC 2019 |
Projector brightness matters more than most people expect. Even with blackout curtains, ambient light from a computer monitor or display in the same room can wash out your image if you go under 3,000 lumens.
Electrical and network requirements
Your simulator needs at least two dedicated 20-amp circuits: one for the projector and one for the computer or console running the software. Running both on a shared circuit risks tripped breakers mid-session. Plan for this during the rough-in phase if you're building out a new space.
Beyond power, a wired ethernet connection to the simulator PC keeps your software licensing stable and your course downloads fast. Wi-Fi introduces connection drops and latency that disrupt play, especially with cloud-based simulator platforms that stream course data in real time.
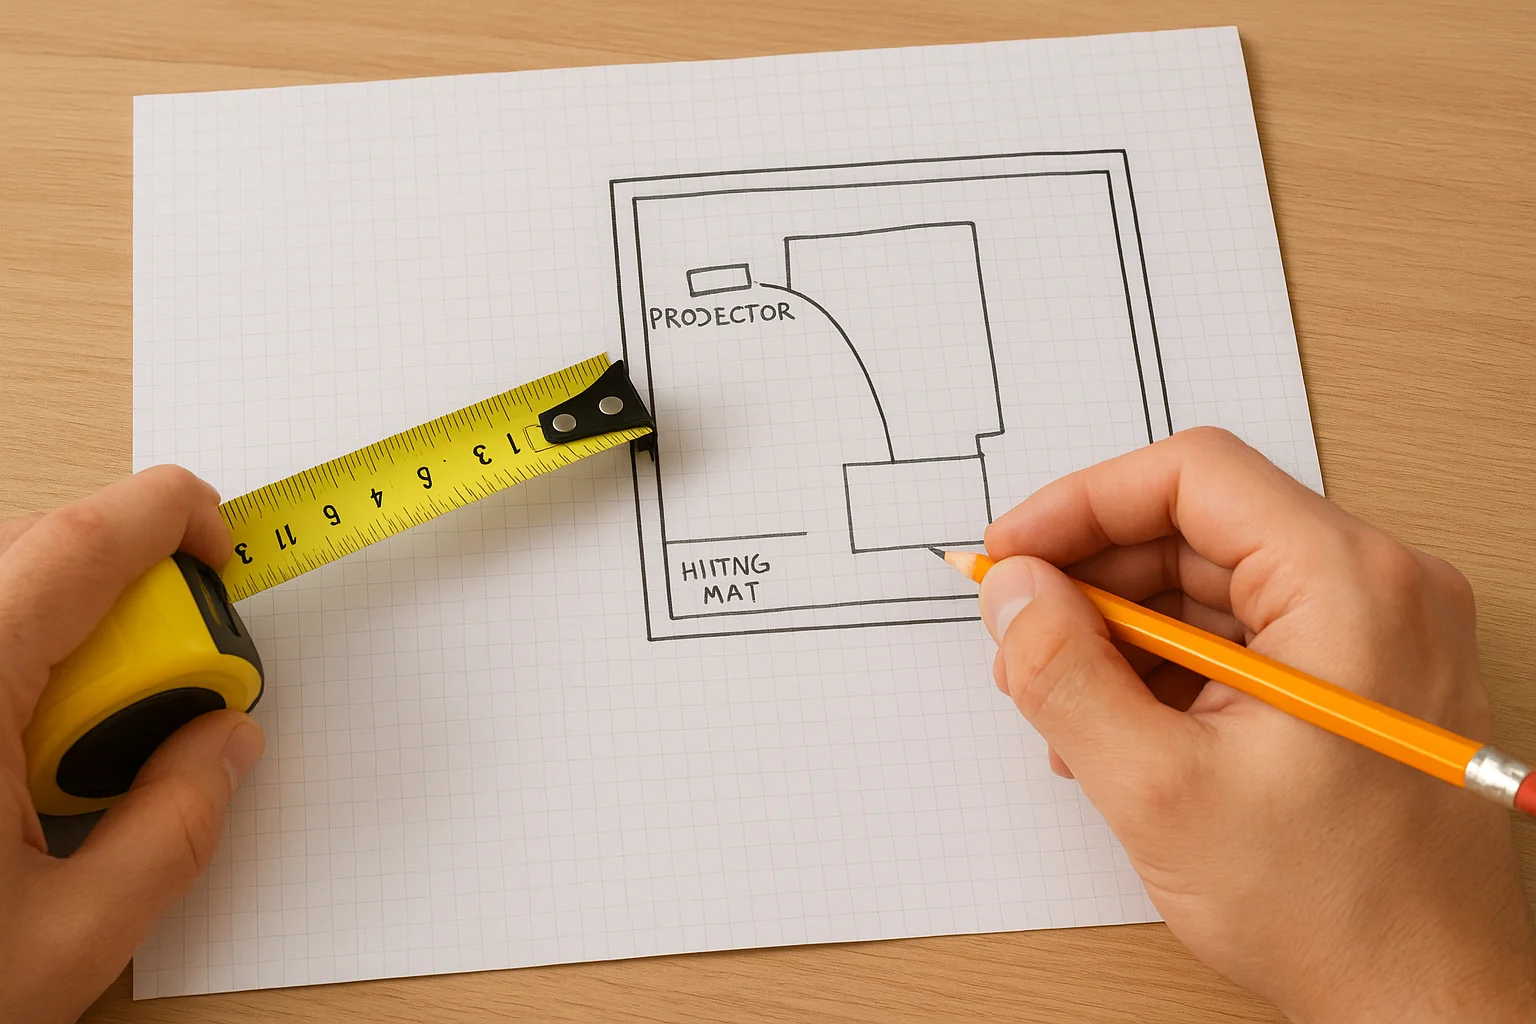
Step 1. Measure the room and plan the layout
Pull out a tape measure before you touch any equipment. Room dimensions determine every other decision in your golf simulator installation, from which projector you buy to where the hitting position lands. Measure the full length, width, and ceiling height, and note any obstructions like beams, ducts, or light fixtures that reduce your actual usable space.
Map your exact clearances
You need three critical numbers: ceiling height at the swing point, distance from the hitting mat to the screen, and lateral width between the side walls. Ceiling height should be at least 10 feet directly above where you'll swing, not just at the peak of the room. Width needs a minimum of 12 feet to keep your backswing from clipping a wall or enclosure frame.
Measure ceiling height at the exact spot where your club will be at the top of your swing, not at the structural peak of the room.
The depth of the room controls your projector choice more than any other single factor. A standard-throw projector needs 10 to 14 feet from lens to screen to fill a standard impact screen. If your room runs shorter than that, you'll need a short-throw or ultra-short-throw unit, which affects your budget and mount placement significantly.
Sketch a layout to scale
Draw a simple top-down floor plan on graph paper or use a free tool like Google Slides to map the space to scale. Mark the screen wall, hitting position, projector mount location, and any doors or windows that affect enclosure placement. Include the mat position and swing arc in your sketch so you can confirm side clearances before you order framing materials. This document becomes your reference for every step that follows.
Step 2. Choose your core components
Your equipment choices shape the accuracy, durability, and long-term enjoyment of your golf simulator installation. The planning section gave you a general equipment overview, but now you need to make specific selections based on your room size and software platform before placing orders.
Pick a launch monitor that matches your goals
Launch monitors fall into two categories: camera-based and radar-based. Camera-based units capture ball data at impact without requiring significant ball flight distance, making them the better fit for tight indoor rooms. Radar-based monitors need at least 7 to 8 feet of real ball flight before the screen to produce accurate club and ball data, which limits your placement options in shorter rooms.
If your room is under 15 feet deep, a camera-based launch monitor gives you more reliable data than a radar unit in the same space.
The three most common home-use options break down like this:
- SkyTrak+: Camera-based, budget-friendly, integrates with GSPro and E6 Connect
- Uneekor QED: Camera-based, ceiling-mounted, best for permanent bay builds
- Mevo+: Radar-based, portable, requires more room depth for accurate readings
Match your projector to your room depth
Your room depth measurement from Step 1 determines your projector throw ratio. Use this table to find the right category:
| Room depth (projector to screen) | Projector type |
|---|---|
| 10 to 14 feet | Standard throw (1.3:1 to 2.0:1) |
| 6 to 10 feet | Short throw (0.8:1 to 1.3:1) |
| Under 6 feet | Ultra-short throw (under 0.5:1) |
Brightness is the next decision. Rooms with any ambient light need a minimum of 3,000 lumens, while 4,000 or higher produces a noticeably crisper image during play. Choose a projector with 1080p or 4K resolution rated for gaming to minimize motion blur during ball flight animation.
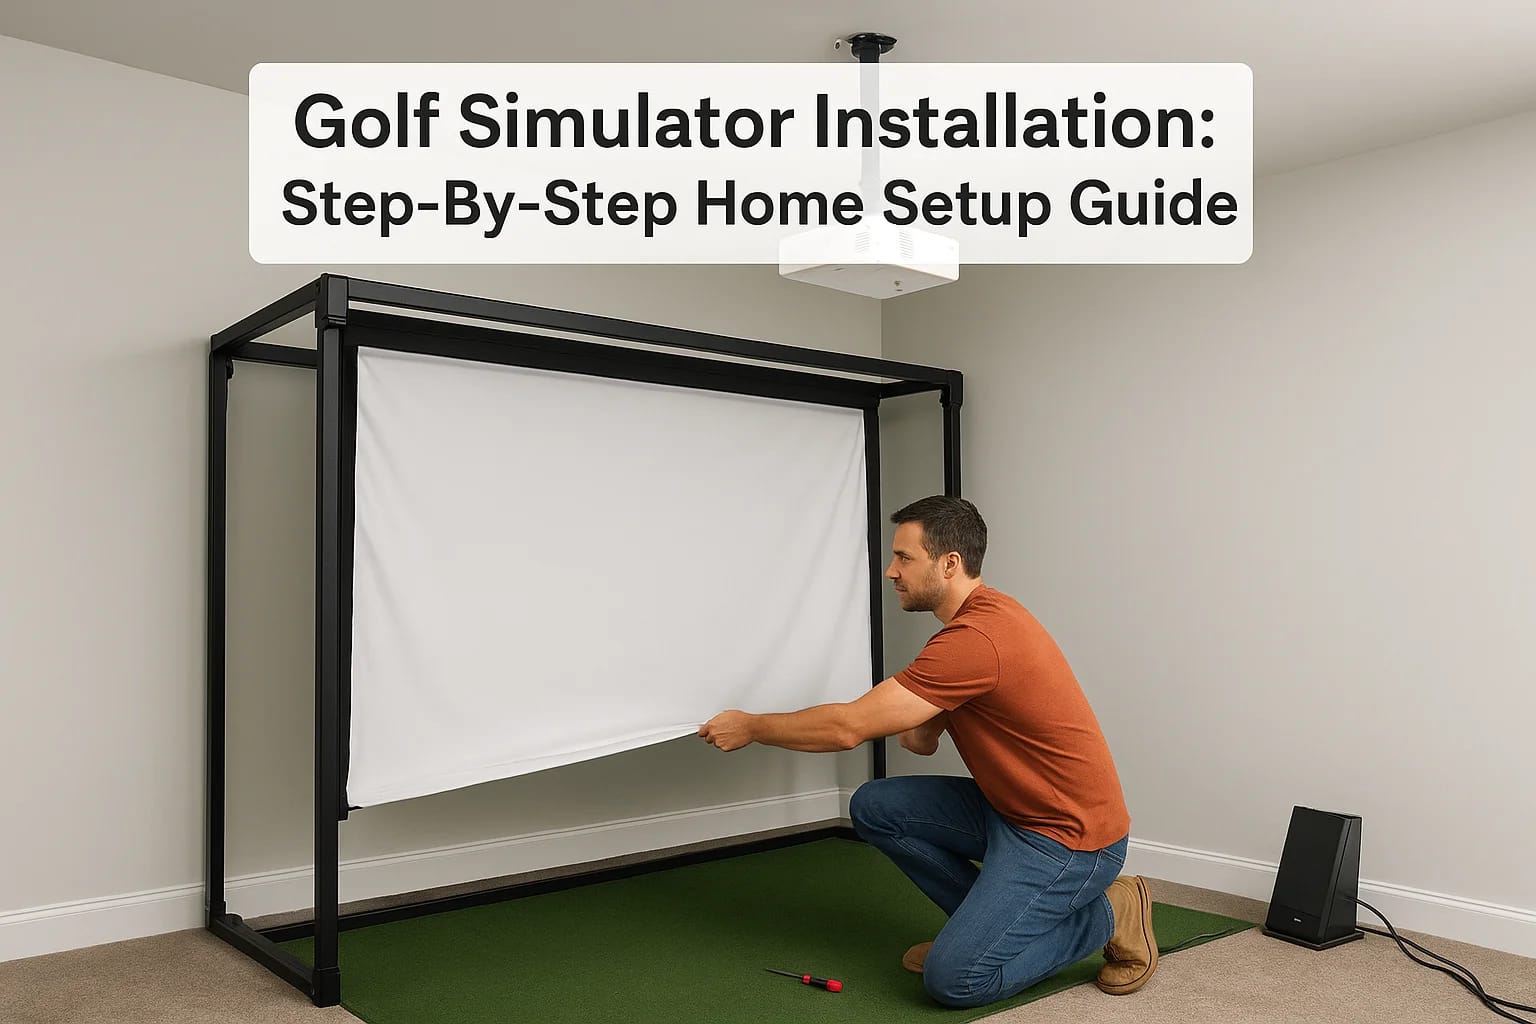
Step 3. Install the enclosure, mat, and screen
With your room measured and components ordered, physical installation begins here. This stage of your golf simulator installation requires careful sequencing: build the frame first, then hang the screen, then place the mat. Rushing or reversing this order creates rework, especially when tensioning the screen after the frame is already anchored to the wall.
Build and position the enclosure frame
Most enclosure kits ship as bolt-together steel or aluminum sections with labeled dimensions. Follow the manufacturer's assembly diagram and hand-tighten all hardware before fully torquing any bolts. This lets you make minor position adjustments before everything locks in place. Position the frame flush against the target wall and confirm it sits plumb and level with a spirit level before tightening the final connections.
Once your frame is anchored, confirm all four corners are square before hanging anything on it.
After the frame is secured, route any cable pass-throughs or grommets that the screen or side panels require. Doing this before the screen goes up keeps wiring clean and avoids threading cables behind tensioned fabric later.
Hang the screen and position the mat
Attach the impact screen to the top rail of the enclosure first, then work the side attachment points in equal increments from the top down on both sides simultaneously. Even tension across the screen prevents wrinkles that distort the projected image during play. Most screens use bungee cords or hook-and-loop attachment points at regular intervals along the frame.
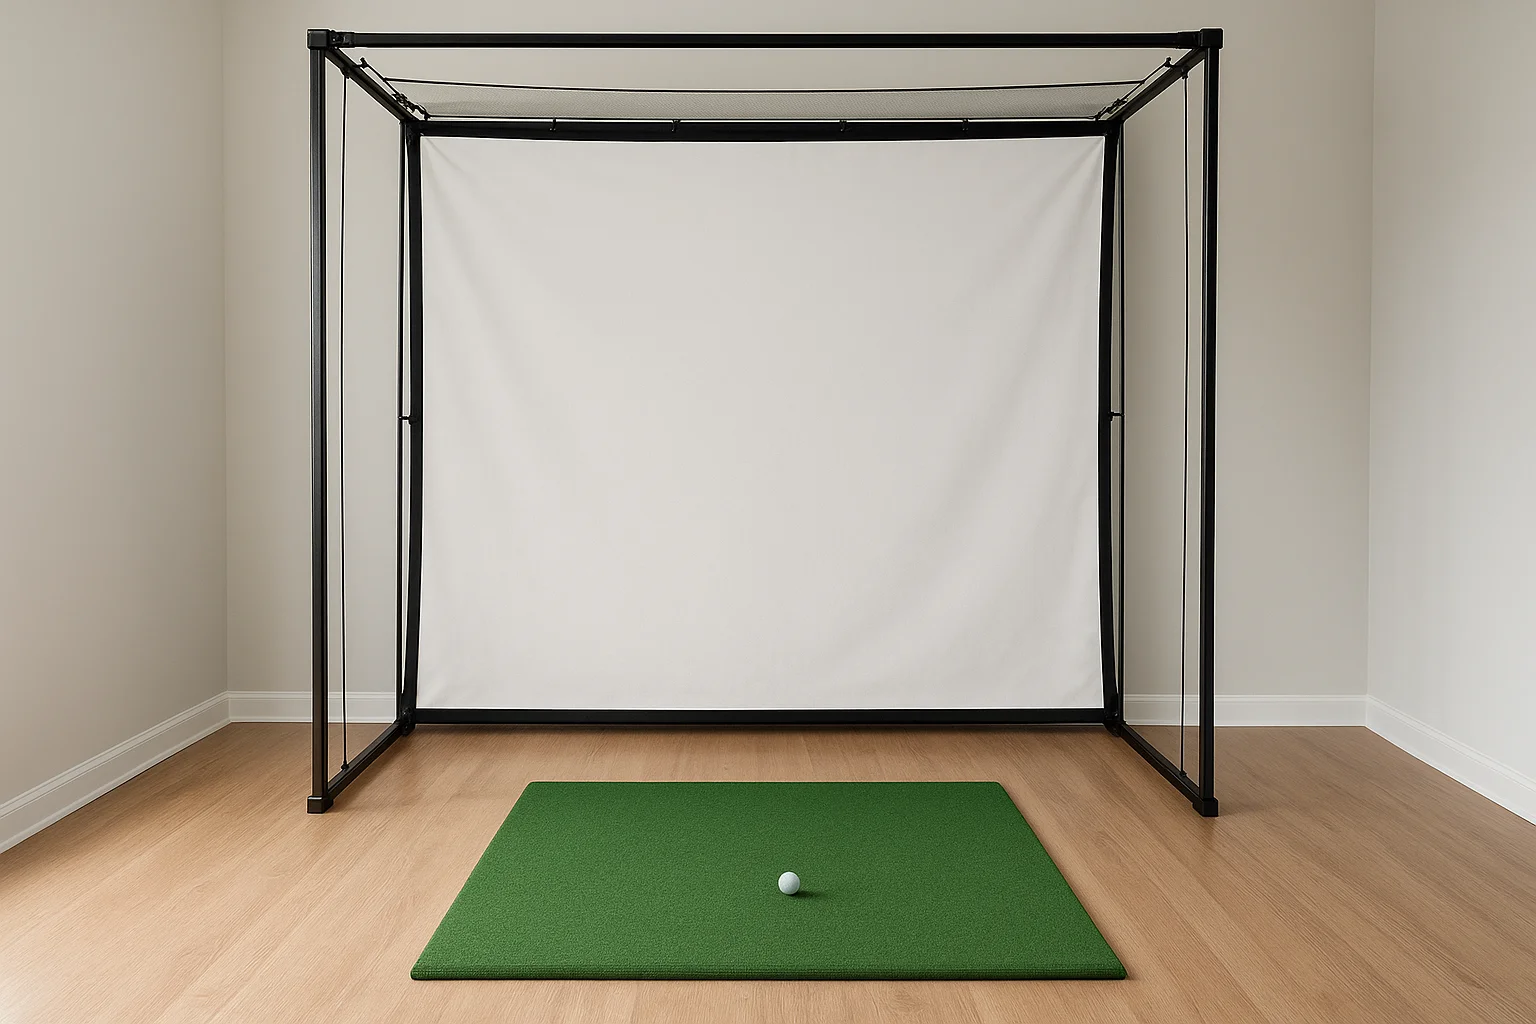
Place the hitting mat so the ball position sits centered on the screen's midline and at your planned swing-point distance. Check this against your Step 1 layout sketch before you finalize mat placement.
Step 4. Mount gear, set up wiring, and calibrate
With your enclosure and screen in place, you're ready to install the remaining hardware and bring the full golf simulator installation online. This step covers projector mounting, launch monitor placement, cable runs, and final calibration, and the order you do these tasks matters for keeping your work clean and repeatable.
Mount the projector and launch monitor
Start with the projector ceiling mount directly above your planned throw distance from Step 1. Use a mount rated for at least twice your projector's weight and anchor it into a ceiling joist, not just drywall. Confirm the projector lens aligns with the horizontal center of your impact screen before tightening the mount hardware.
Position your launch monitor before you finalize projector placement, since both devices compete for the same ceiling space in a compact bay.
Place your camera-based launch monitor directly above the hitting position using the manufacturer's recommended height and angle, typically 8 to 9 feet high and angled slightly forward. If you're using a radar unit, set it on a tripod at hitting height, offset to the side as the manufacturer specifies.
Run cables and manage power
Route your HDMI and power cables from the projector back to your simulator PC using cable raceways or in-wall conduit where possible. Keep signal cables separated from power cables to reduce interference. Connect your simulator PC to the network via ethernet rather than Wi-Fi for stable software performance.
Calibrate and test
Open your simulator software and run the projector alignment and keystone correction tool to square the image to your screen. Then hit 10 to 15 shots with your launch monitor active and compare the data output against known carry distances for each club to confirm accuracy before your first full session.
Wrap-up and next steps
A complete golf simulator installation comes down to four things done in the right order: accurate room measurement, matched equipment selection, clean physical installation, and thorough calibration. Each step feeds directly into the next, which is why skipping or rushing any phase creates problems that are harder to fix after your enclosure is anchored and your screen is tensioned.
If your room measurements, equipment list, and wiring plan are ready, you have everything you need to move forward. Most installations that go sideways do so because of underpowered circuits, wrong projector throw distances, or a launch monitor placed outside its optimal range, and this guide gives you the information to avoid all three.
Treasure Valley Solutions handles custom AV builds including golf simulator bays for homeowners across the Boise and Meridian area. If you want a professional to take this off your plate, see examples of our past work and reach out to talk through your project.