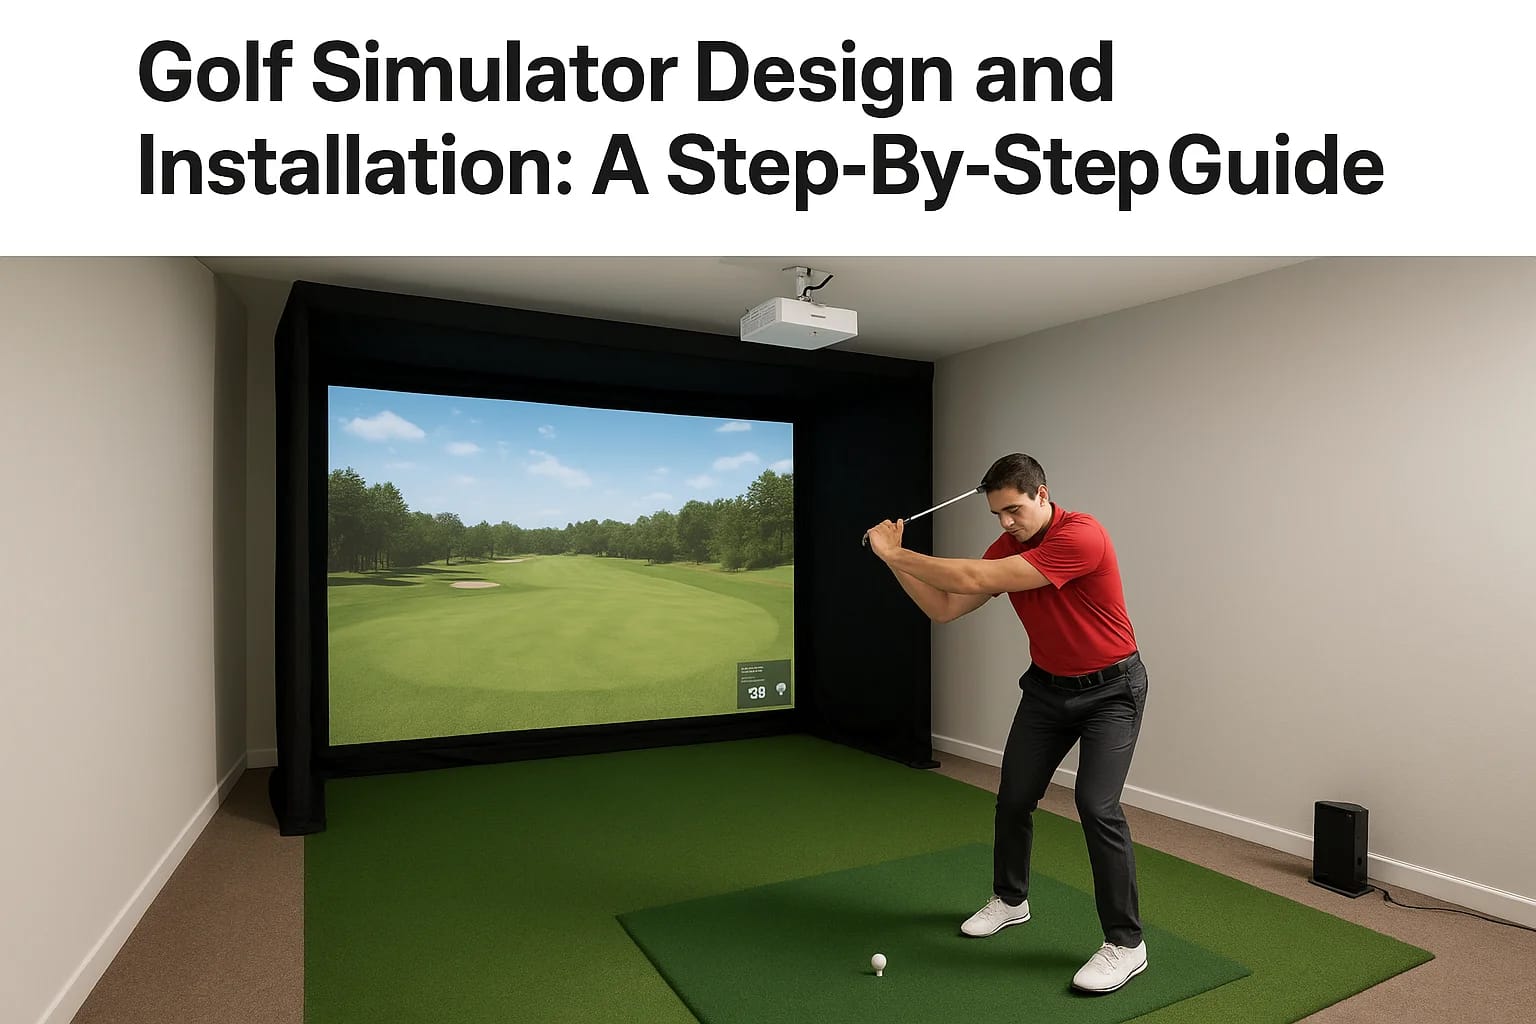
A dedicated golf simulator room is one of those projects that sounds straightforward until you start making decisions. Screen size, projector placement, launch monitor positioning, lighting control, a...
Golf Simulator Design And Installation: A Step-By-Step Guide
A dedicated golf simulator room is one of those projects that sounds straightforward until you start making decisions. Screen size, projector placement, launch monitor positioning, lighting control, acoustic treatment, network connectivity, golf simulator design and installation involves a surprising number of technical layers that all need to work together.
Get it right, and you have a space that's genuinely fun to use year-round. Get it wrong, and you're stuck with a dim picture, unreliable ball tracking, or a room that just doesn't feel good to spend time in. The difference almost always comes down to planning.
This guide walks you through the full process, from choosing the right room and mapping out dimensions to selecting equipment, running cables, and dialing in your setup. Whether you're building a simulator into a new home, converting a garage, or adding one to a commercial space, each step matters.
At Treasure Valley Solutions, we design and install custom AV and technology systems across the Boise and Meridian area, and golf simulator builds are a natural extension of that work. We handle everything from projector mounting and screen integration to lighting control and smart home connectivity, so the finished space actually performs the way it should.
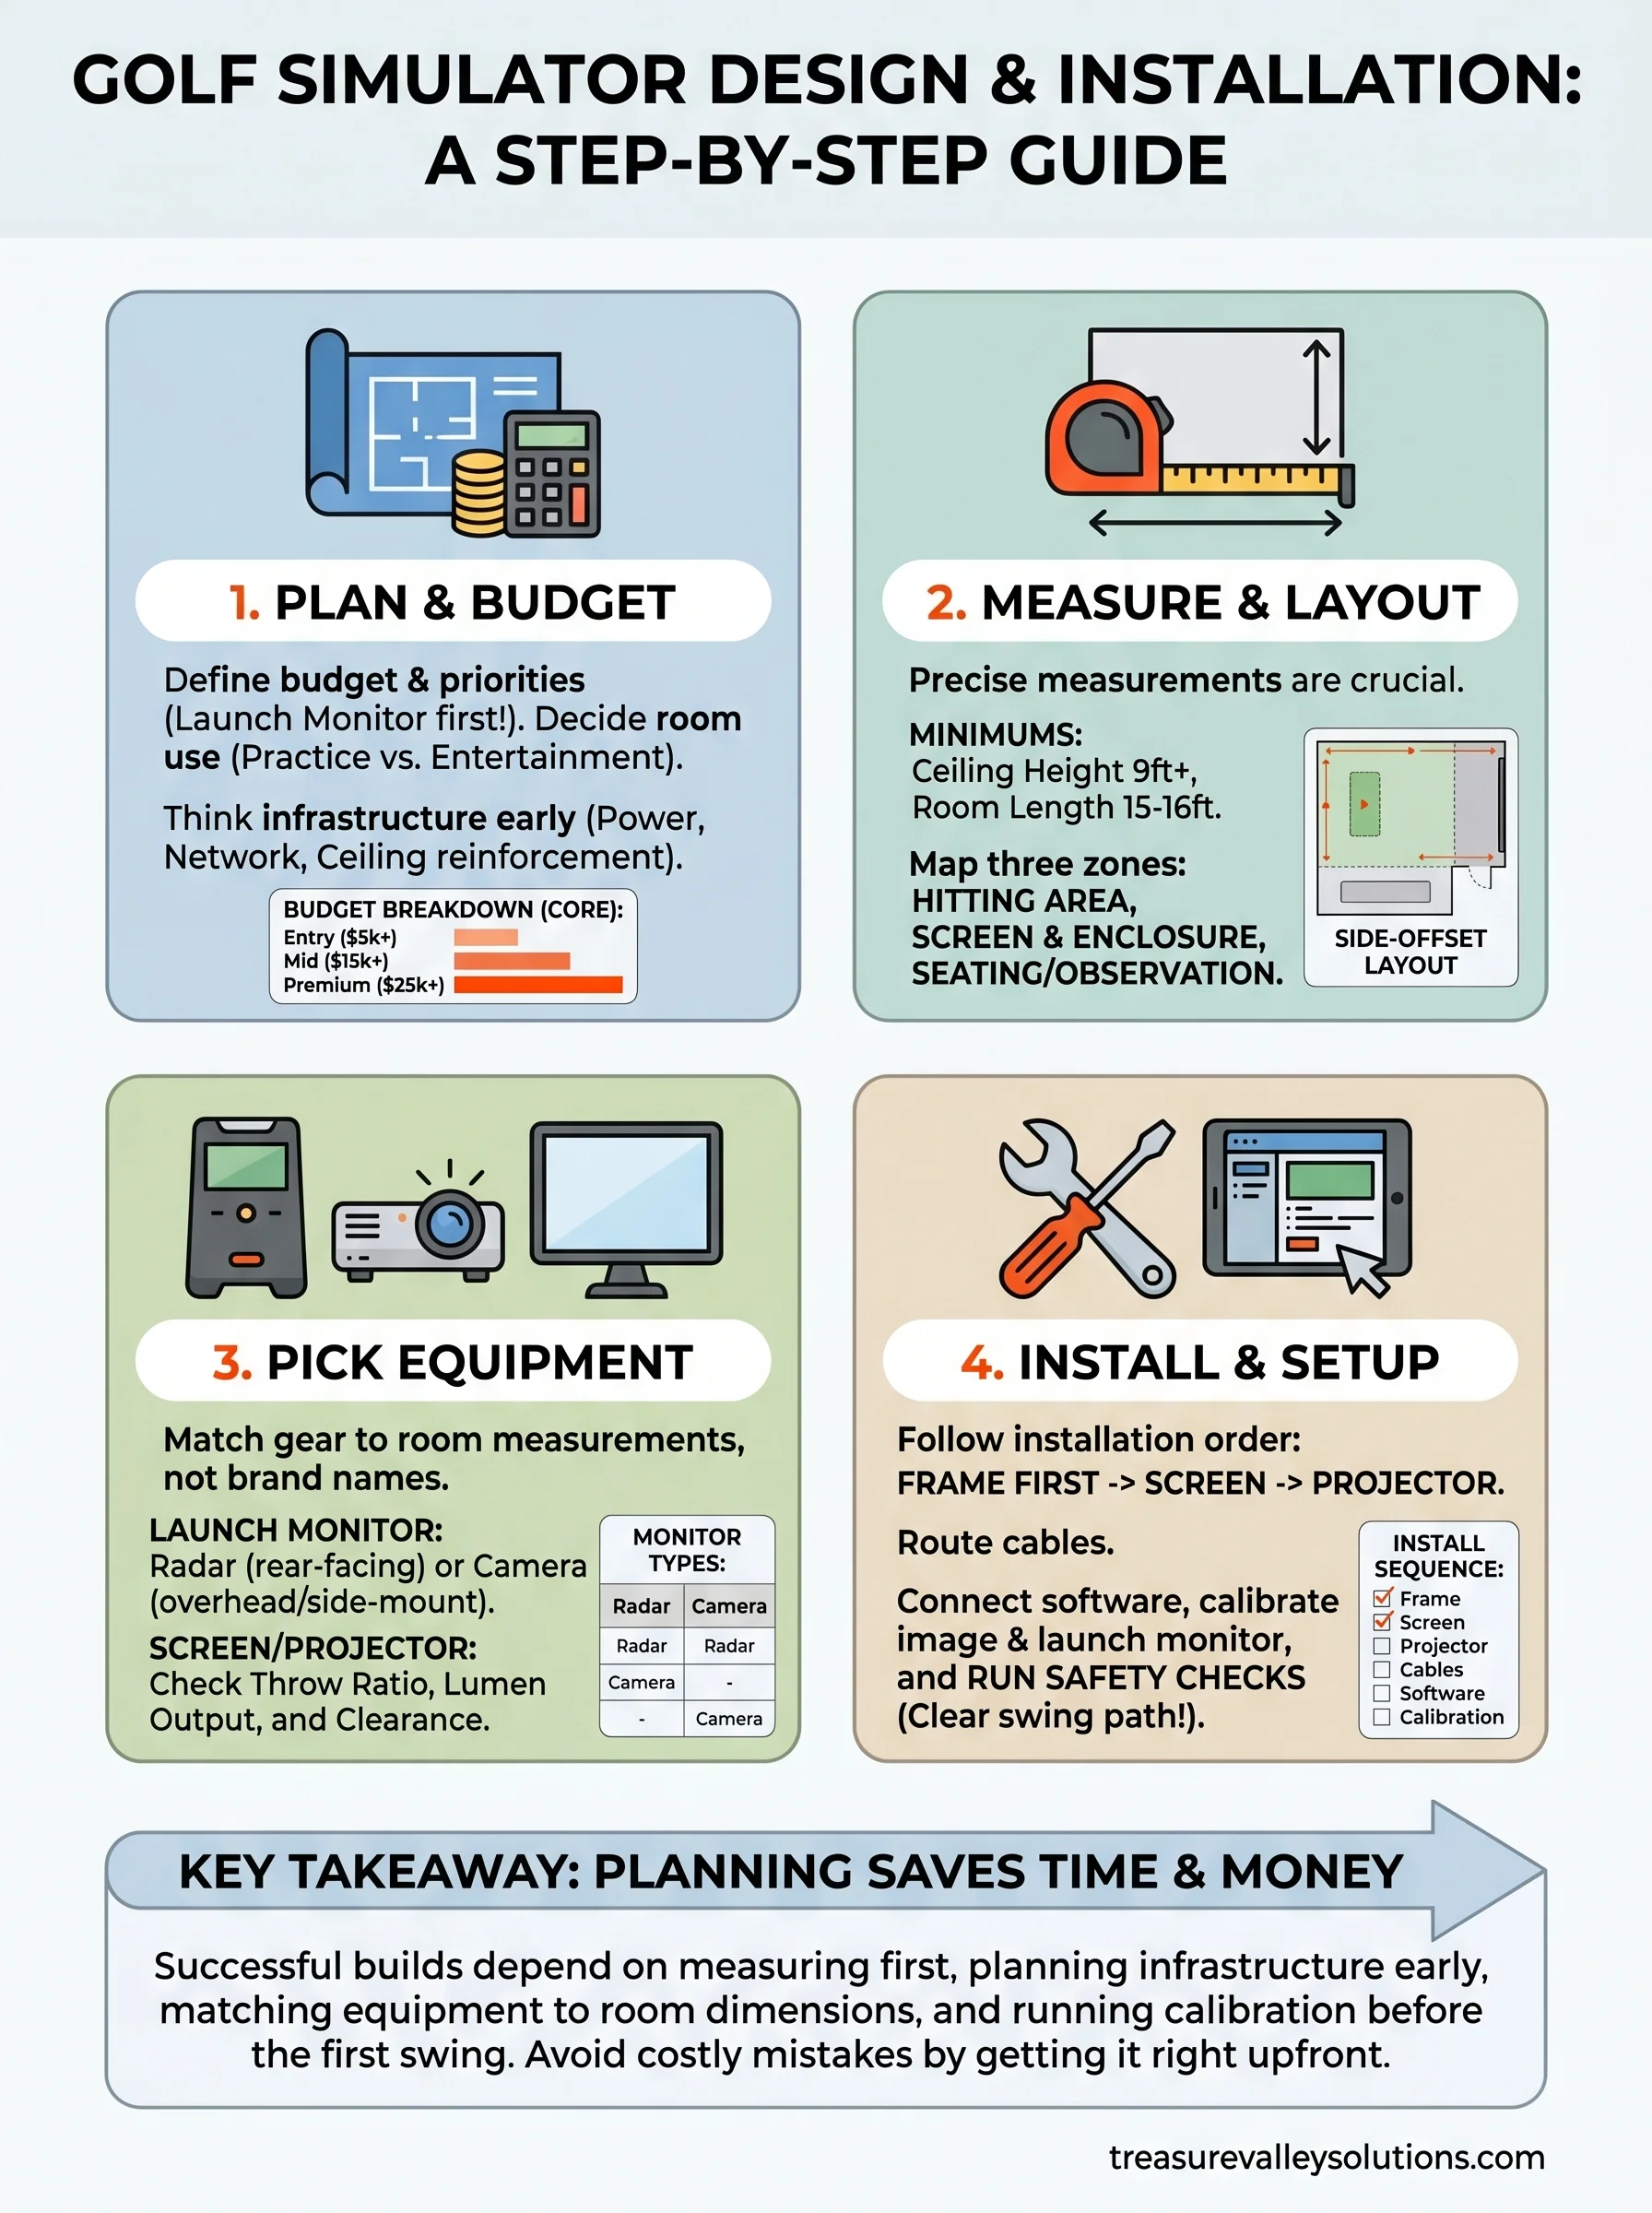
What to plan before you build a golf simulator
Planning is where most golf simulator projects either succeed or run into expensive problems. Before you buy a single piece of equipment, you need a clear picture of your room, your goals, and your budget. Skipping this step leads to gear that doesn't fit the space, projectors mounted in the wrong position, or cables run through finished walls after the fact. A little time spent planning upfront saves significant time and money later.
Define Your Budget and Priorities
Your budget shapes every other decision, so nail this number down before you start shopping for hardware. Golf simulator setups range widely, from around $5,000 for an entry-level single-screen setup to $30,000 or more for a fully custom room with professional-grade launch monitors, high-lumen projectors, and integrated lighting control. The core spending categories are the launch monitor, hitting screen and enclosure, projector, simulator software, and installation labor.
Here is a straightforward budget breakdown to help you plan:
| Component | Entry-Level | Mid-Range | Premium |
|---|---|---|---|
| Launch monitor | $500-$2,000 | $2,000-$6,000 | $6,000+ |
| Screen + enclosure | $500-$1,500 | $1,500-$3,500 | $3,500+ |
| Projector | $500-$1,000 | $1,000-$3,000 | $3,000+ |
| Software (annual) | $200-$500 | $500-$1,500 | $1,500+ |
| Installation | $500-$1,500 | $1,500-$3,500 | $3,500+ |
Prioritize the launch monitor over everything else. Accurate ball and club tracking is what makes a simulator worth using, and it is harder to upgrade later without reconfiguring the entire setup.
Decide How the Room Will Be Used
Think beyond just hitting balls. Will you use the space for serious practice, entertainment, or both? A room built primarily for practice needs precise data output, a high-accuracy launch monitor, and adequate ceiling clearance. A room built for entertainment benefits from better seating, ambient lighting control, and integrated audio, all of which need to be planned before a single cable is pulled.
Commercial spaces and multi-user environments add another layer of requirements. You may need durable wall and floor materials, access control integration, or connectivity with a booking system. Residential builds in a garage or bonus room have different structural and electrical demands than a basement conversion, and those differences affect both the timeline and the budget.
Think Through Infrastructure Early
Golf simulator design and installation depends heavily on infrastructure that is easy to plan for and costly to retrofit. You need to map out power, network drops, and ceiling reinforcement before construction or renovation begins. Every system in the room needs a home run back to a central point whether that is an AV rack, a network switch, or a breaker panel.
Make a list of every system that needs power or data before you finalize your layout:
- Dedicated 20-amp circuit for the projector
- Ethernet drop at the launch monitor location
- HDMI or ethernet run from the projector mount to your AV rack
- Ceiling junction box for overhead lighting fixtures
- Conduit installed now if you expect to modify the room later
Step 1. Measure the room and choose the layout
Before you order anything, take precise measurements of your room and record them. Ceiling height, room length, and room width are not rough estimates here; they are the numbers that determine whether your chosen screen fits, whether your projector has enough throw distance, and whether you can actually complete a full swing without hitting the ceiling or a side wall.
Minimum Dimensions to Hit First
Most full-swing setups require a minimum ceiling height of 9 feet, though 10 feet is the practical standard and anything above that gives you more flexibility with taller players and driver swings. Room length drives your projector placement, and a minimum of 15 to 16 feet between the hitting position and the screen gives you enough swing clearance plus adequate throw distance for most short-throw projectors.
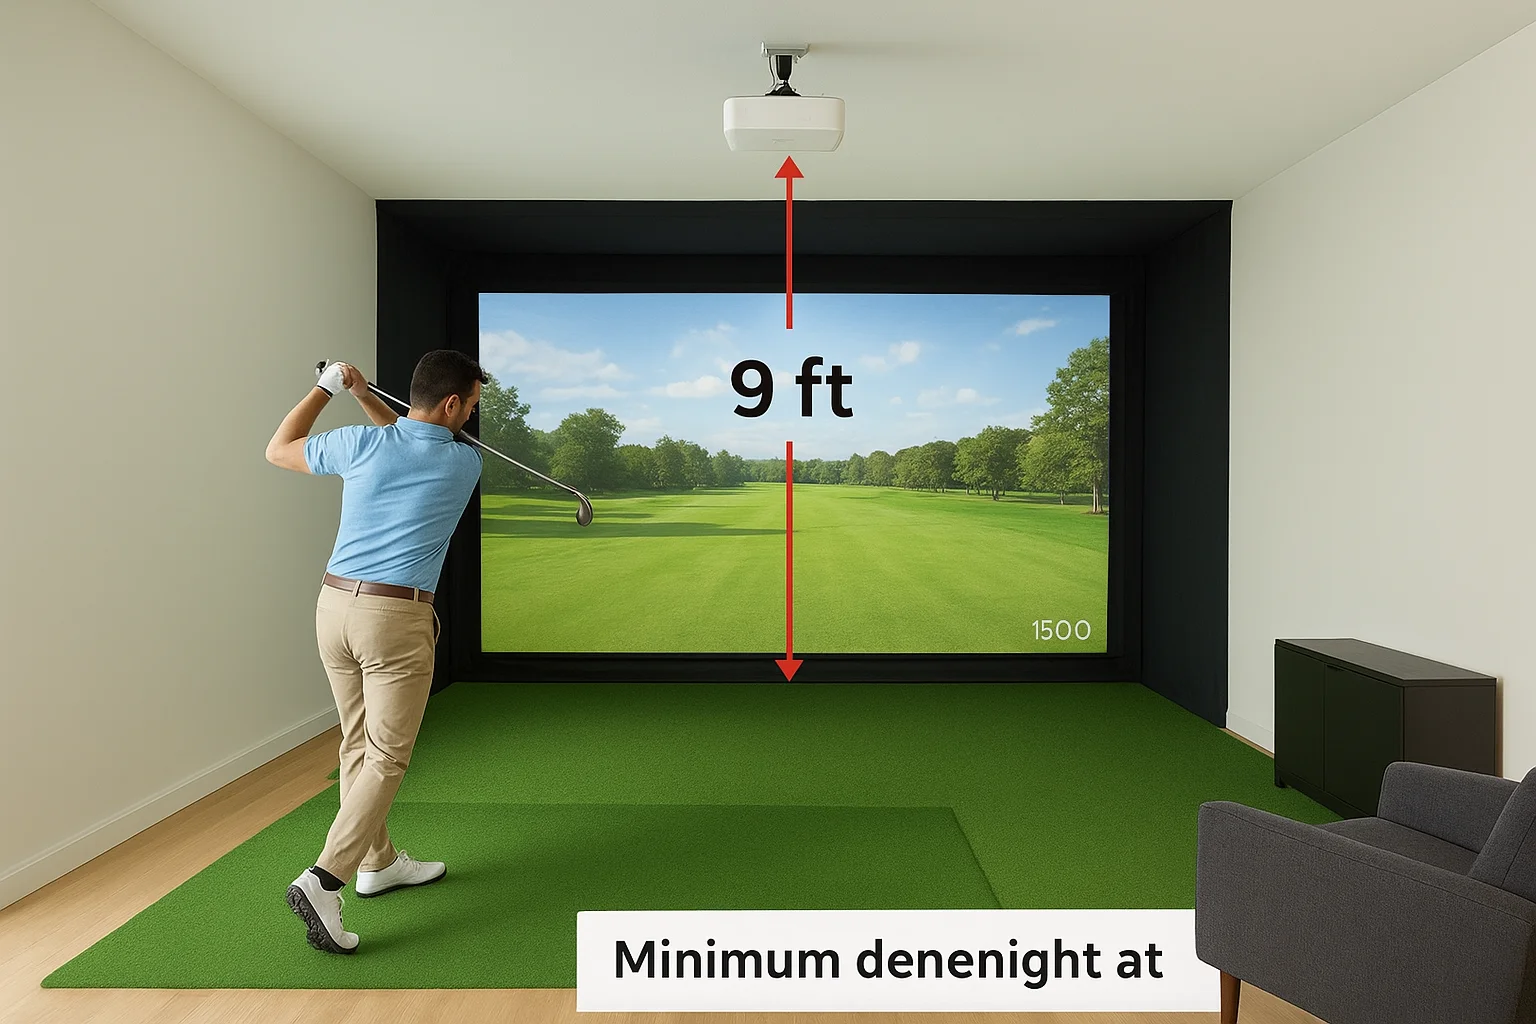
If your ceiling comes in under 9 feet, focus on putting simulators or approach-shot setups rather than forcing a full-swing build into a space that will not work safely.
Use this checklist when you measure your room:
- Ceiling height at the hitting position (not just the center of the room)
- Floor-to-ceiling clearance along the full swing path, including follow-through
- Room length from the hitting mat to the back wall
- Room width, with at least 5 feet on each side of the hitting position
- Location of HVAC vents, light fixtures, and beams that could block mounting
Choosing a Layout That Fits the Space
Once you have your numbers, map out the three primary zones: the hitting area, the screen and enclosure zone, and the seating or observation area behind the hitter. Sketching this on paper or using a free floor plan tool helps you see conflicts before construction starts.
Golf simulator design and installation in tight rooms often benefits from a side-offset layout, where the screen sits slightly off-center to allow more side clearance for the swing path without requiring a wider room.
Step 2. Pick the right equipment for your goals
Equipment selection flows directly from your room measurements and goals. You now know your ceiling height, room length, and layout, so use those numbers to filter your options rather than buying based on brand recognition alone. Mismatched equipment is one of the most common reasons golf simulator setups underperform from day one.
The Launch Monitor
The launch monitor is the most important purchase you will make. Radar-based monitors like the Bushnell Launch Pro work well when placed behind the ball and require a specific distance from the hitting position to the unit. Camera-based systems like the Foresight GC3 mount overhead or to the side, which changes your ceiling and clearance requirements. Match the monitor type to your room layout, not the other way around.
If you plan to use the simulator for serious practice, prioritize a monitor that tracks club data such as club path, face angle, and attack angle in addition to ball flight data.
| Monitor Type | Placement | Best For |
|---|---|---|
| Radar (rear-facing) | Behind ball | Open rooms, longer setups |
| Camera (overhead) | Ceiling mount | Tighter spaces, commercial builds |
| Camera (side-mount) | Side enclosure | Low-ceiling residential rooms |
The Screen, Enclosure, and Projector
Your screen size and enclosure dimensions need to match your room width and the throw distance your projector can cover. For most residential builds, a 10x12 foot impact screen paired with a short-throw projector in the 8,000 to 12,000 lumen range gives you a clear, bright image even in a room that is not fully blacked out. Projector placement in any solid golf simulator design and installation should always be confirmed against the manufacturer's throw ratio before you mount anything permanently. Run through this checklist before you finalize your projector selection:
- Confirm the throw ratio matches your distance from the screen
- Verify lumen output handles your room's ambient light level
- Check that the mounting position clears the full swing path
Step 3. Install the enclosure, screen, and projector
Installation order matters here. Starting with the enclosure frame before you touch the screen or projector keeps everything square and gives you fixed reference points for the rest of the build. Rushing this step or reversing the order creates alignment problems that are frustrating to fix after the room is finished.
Build the Enclosure Frame First
The enclosure is the structural backbone of your golf simulator design and installation, so treat it that way. Most enclosure kits use steel uprights and cross members that bolt together and anchor to the floor or ceiling. Verify that the frame is level and plumb at every connection point before you tighten anything permanently, because a frame that is even slightly out of square will cause the screen to hang unevenly and affect image geometry.
Follow this sequence when assembling the frame:
- Mark your floor anchor points using a chalk line off your layout measurements
- Assemble the vertical uprights and check plumb with a level
- Install horizontal cross members and confirm the top rail is level
- Anchor the base to the floor using the hardware included with your kit
- Verify the finished frame dimensions match your screen size before moving forward
Mount the Screen and Projector
Hang the impact screen across the front of the enclosure using the grommet attachments along the top rail first, then work down the sides to tension it evenly. A screen with uneven tension produces image distortion that no software calibration can fully correct, so take the time to distribute tension uniformly before you attach the bottom row.
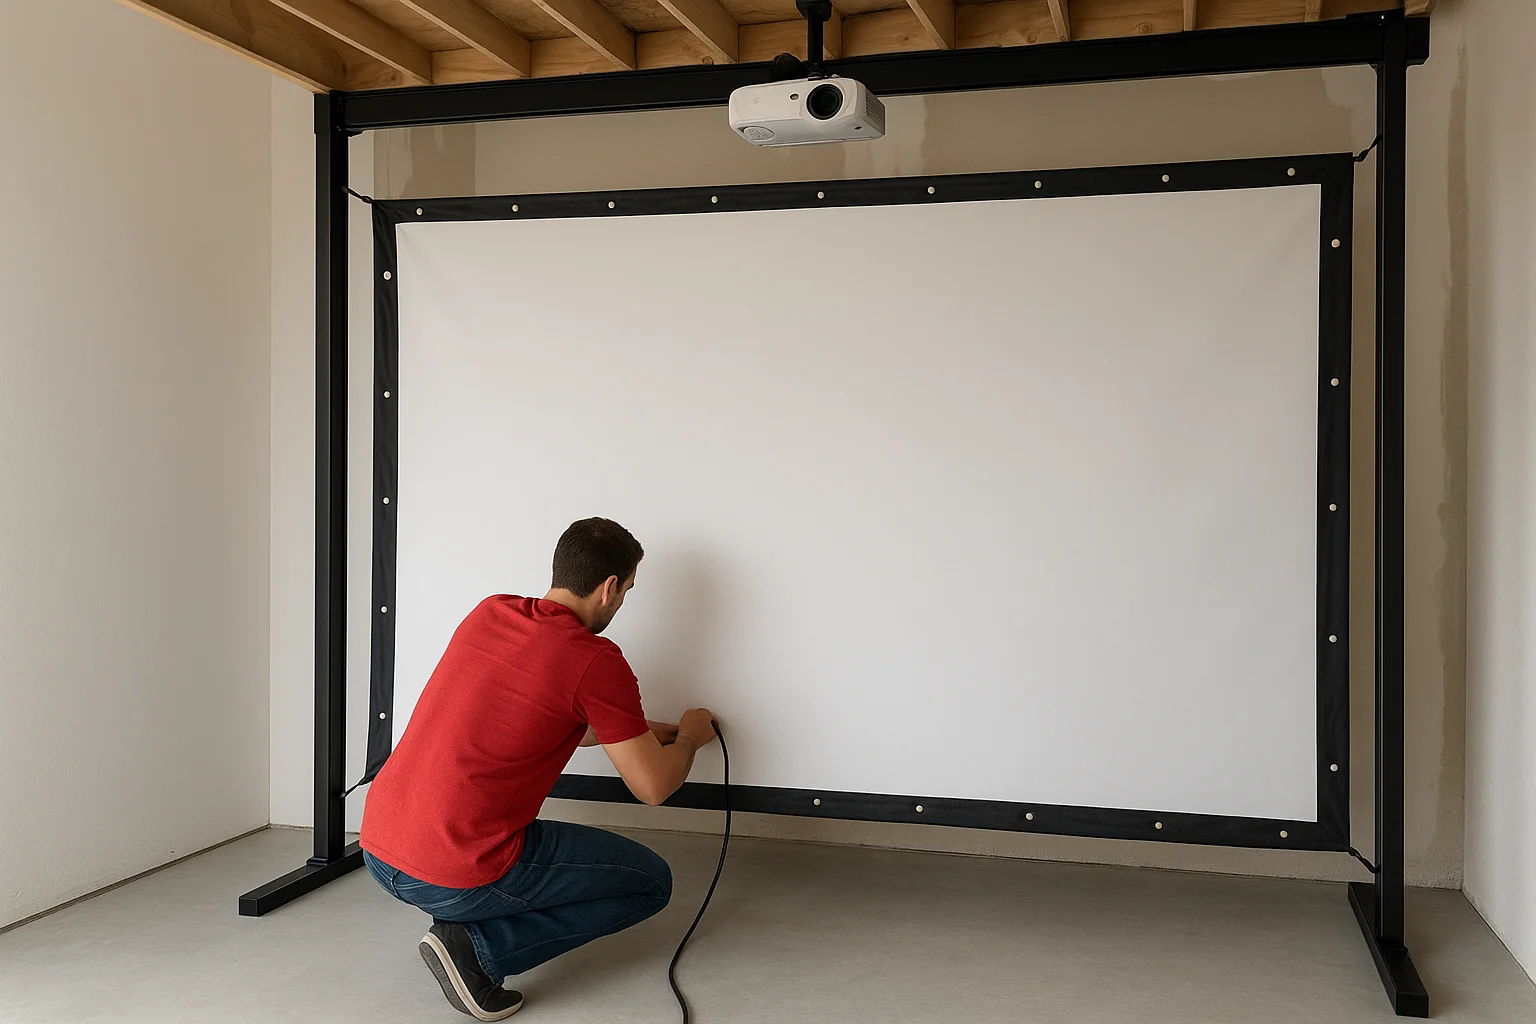
Mount your projector on a ceiling plate or a dedicated boom arm that keeps the lens centered on the screen and clear of the swing path before you power anything on.
Once the projector is physically mounted, route all cables through conduit or cable management channels along the wall or ceiling so nothing crosses the hitting area at floor level.
Step 4. Set up software, calibration, and safety checks
With the hardware installed, software setup and calibration are what tie your entire golf simulator design and installation together. A well-mounted projector and a quality launch monitor still need precise configuration before they perform reliably, so do not treat this step as an afterthought.
Connect and Configure Your Software
Power everything on in sequence: projector first, then the launch monitor, then the simulator PC or dedicated gaming machine. Most simulator software platforms require you to complete a room profile during first launch, where you input your screen size, projector distance, and launch monitor type. Fill these fields accurately because the software uses them to scale ball flight and shot data to your specific space.
Run through this setup checklist before you attempt your first calibration swing:
- Confirm the PC or streaming device is connected to your network via ethernet, not Wi-Fi
- Set projector resolution to match the simulator software's recommended output (typically 1080p or 4K)
- Install the latest firmware update for your launch monitor before pairing it to the software
- Set the launch monitor's hitting distance parameter to match your actual mat-to-unit measurement
Getting the hitting distance parameter wrong by even a few inches will throw off your carry distances and spin numbers across every session.
Run Calibration and Safety Checks
Projector calibration comes next. Use the software's built-in alignment tool to adjust keystone correction until the image fills the screen evenly with no distortion along the edges. Then walk through at least five calibration shots at different clubs so the launch monitor confirms it is reading ball speed and launch angle within expected ranges for your setup.
Safety checks are non-negotiable before anyone takes a full swing. Verify that no cables cross the hitting area, that the enclosure frame has no sharp exposed hardware at head height, and that the screen has full, even tension so it absorbs impact correctly.
Next steps
A successful golf simulator design and installation comes down to working through each step in the right order: measure first, plan infrastructure early, match your equipment to your actual room dimensions, and run calibration before you take a single swing. Cutting corners at any stage creates problems that are genuinely difficult to fix once the room is finished and the walls are closed up.
If your room has unusual dimensions, low ceilings, or you want to integrate the simulator with smart lighting and audio controls, the project gets more complex fast. Getting a professional set of eyes on your space before you buy anything saves you from expensive mistakes. At Treasure Valley Solutions, we design and install custom technology spaces across the Boise and Meridian area, including full golf simulator builds from infrastructure planning through final calibration. Contact our team to schedule a consultation and we will help you build it right the first time.