
You don't need a massive dedicated room to swing a driver indoors. A small golf simulator room setup works well in spaces most people already have, a garage, basement, or spare bedroom, as long as you...
Small Golf Simulator Room Setup: Dimensions, Gear, Tips
You don't need a massive dedicated room to swing a driver indoors. A small golf simulator room setup works well in spaces most people already have, a garage, basement, or spare bedroom, as long as you plan around the right dimensions and choose gear that fits. The challenge isn't whether it's possible; it's knowing exactly what fits where before you start spending money.
That's where things get tricky. Between ceiling height, screen size, projector throw distance, and impact screen clearance, there are real constraints that can make or break your setup. Get one measurement wrong, and you're looking at a costly redo, or worse, a club through the drywall. The good news: with the right planning, even compact rooms can deliver a realistic and enjoyable simulator experience.
At Treasure Valley Solutions, we design and install custom AV and automation systems across the Boise and Meridian area, and golf simulators are one of the projects we get asked about most. This guide walks you through minimum room dimensions, the gear worth considering, and practical tips we've picked up from building these setups in real homes throughout the Treasure Valley.
Start with the real space requirements
Before you buy anything, you need to know the three numbers that control your entire build: ceiling height, room depth (front to back), and room width. These dimensions determine which projector works, what screen size fits, and whether you can swing without hitting a wall, light fixture, or ceiling joist. Skipping this step is the most common reason people end up retrofitting their setup, which costs far more time and money than getting it right from the start.
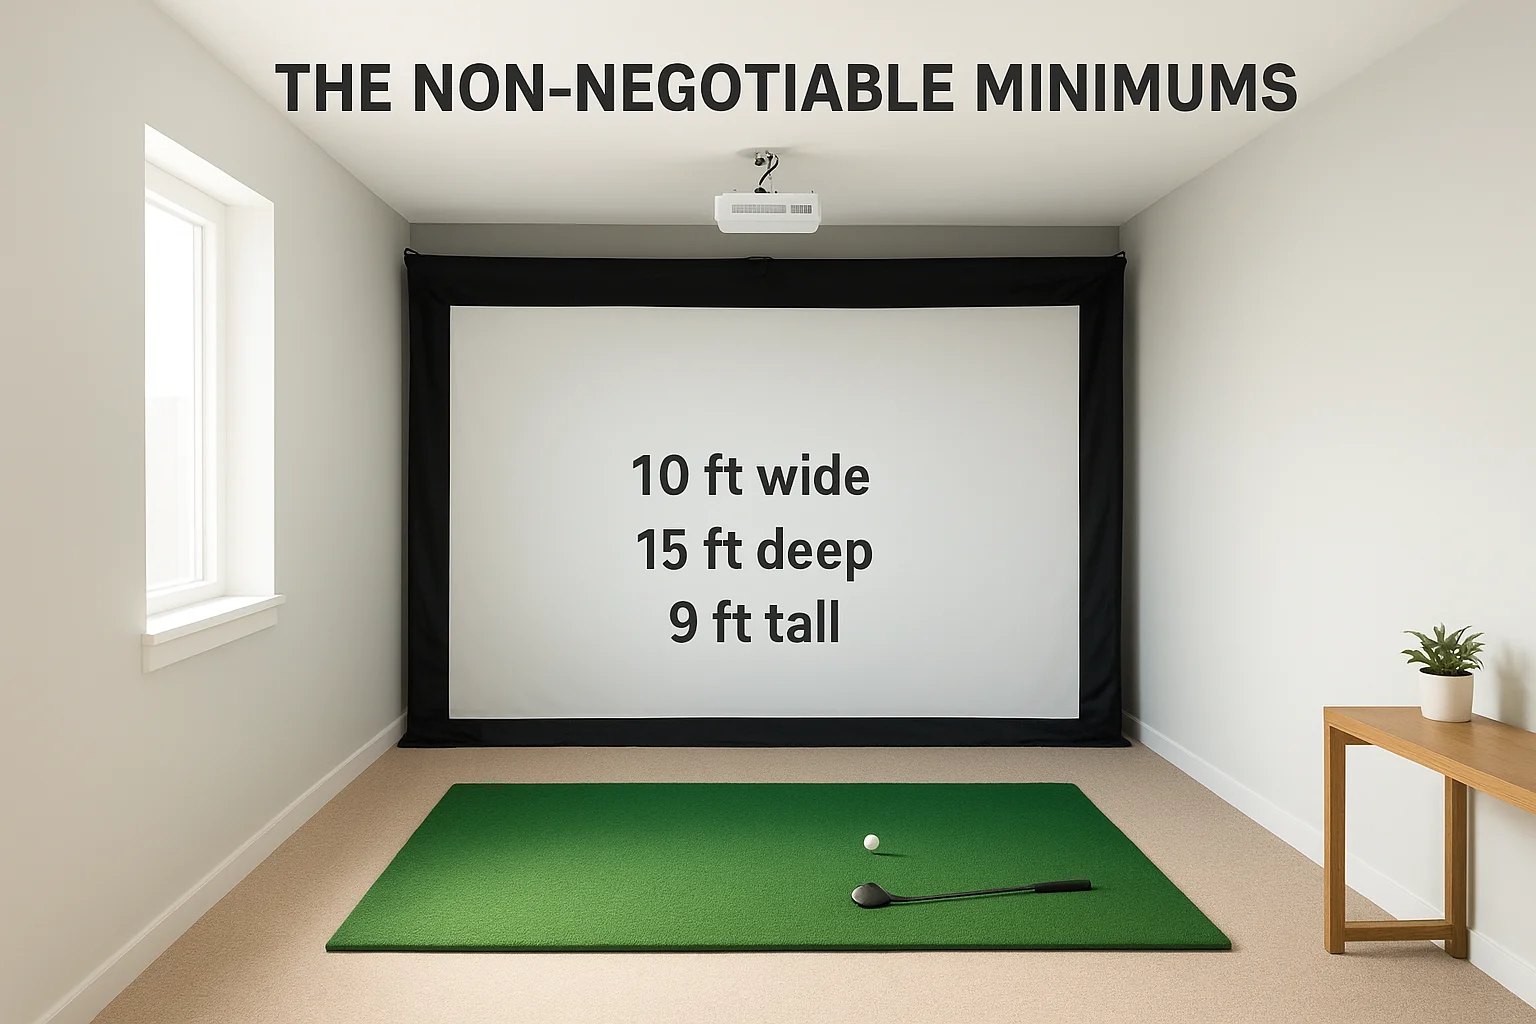
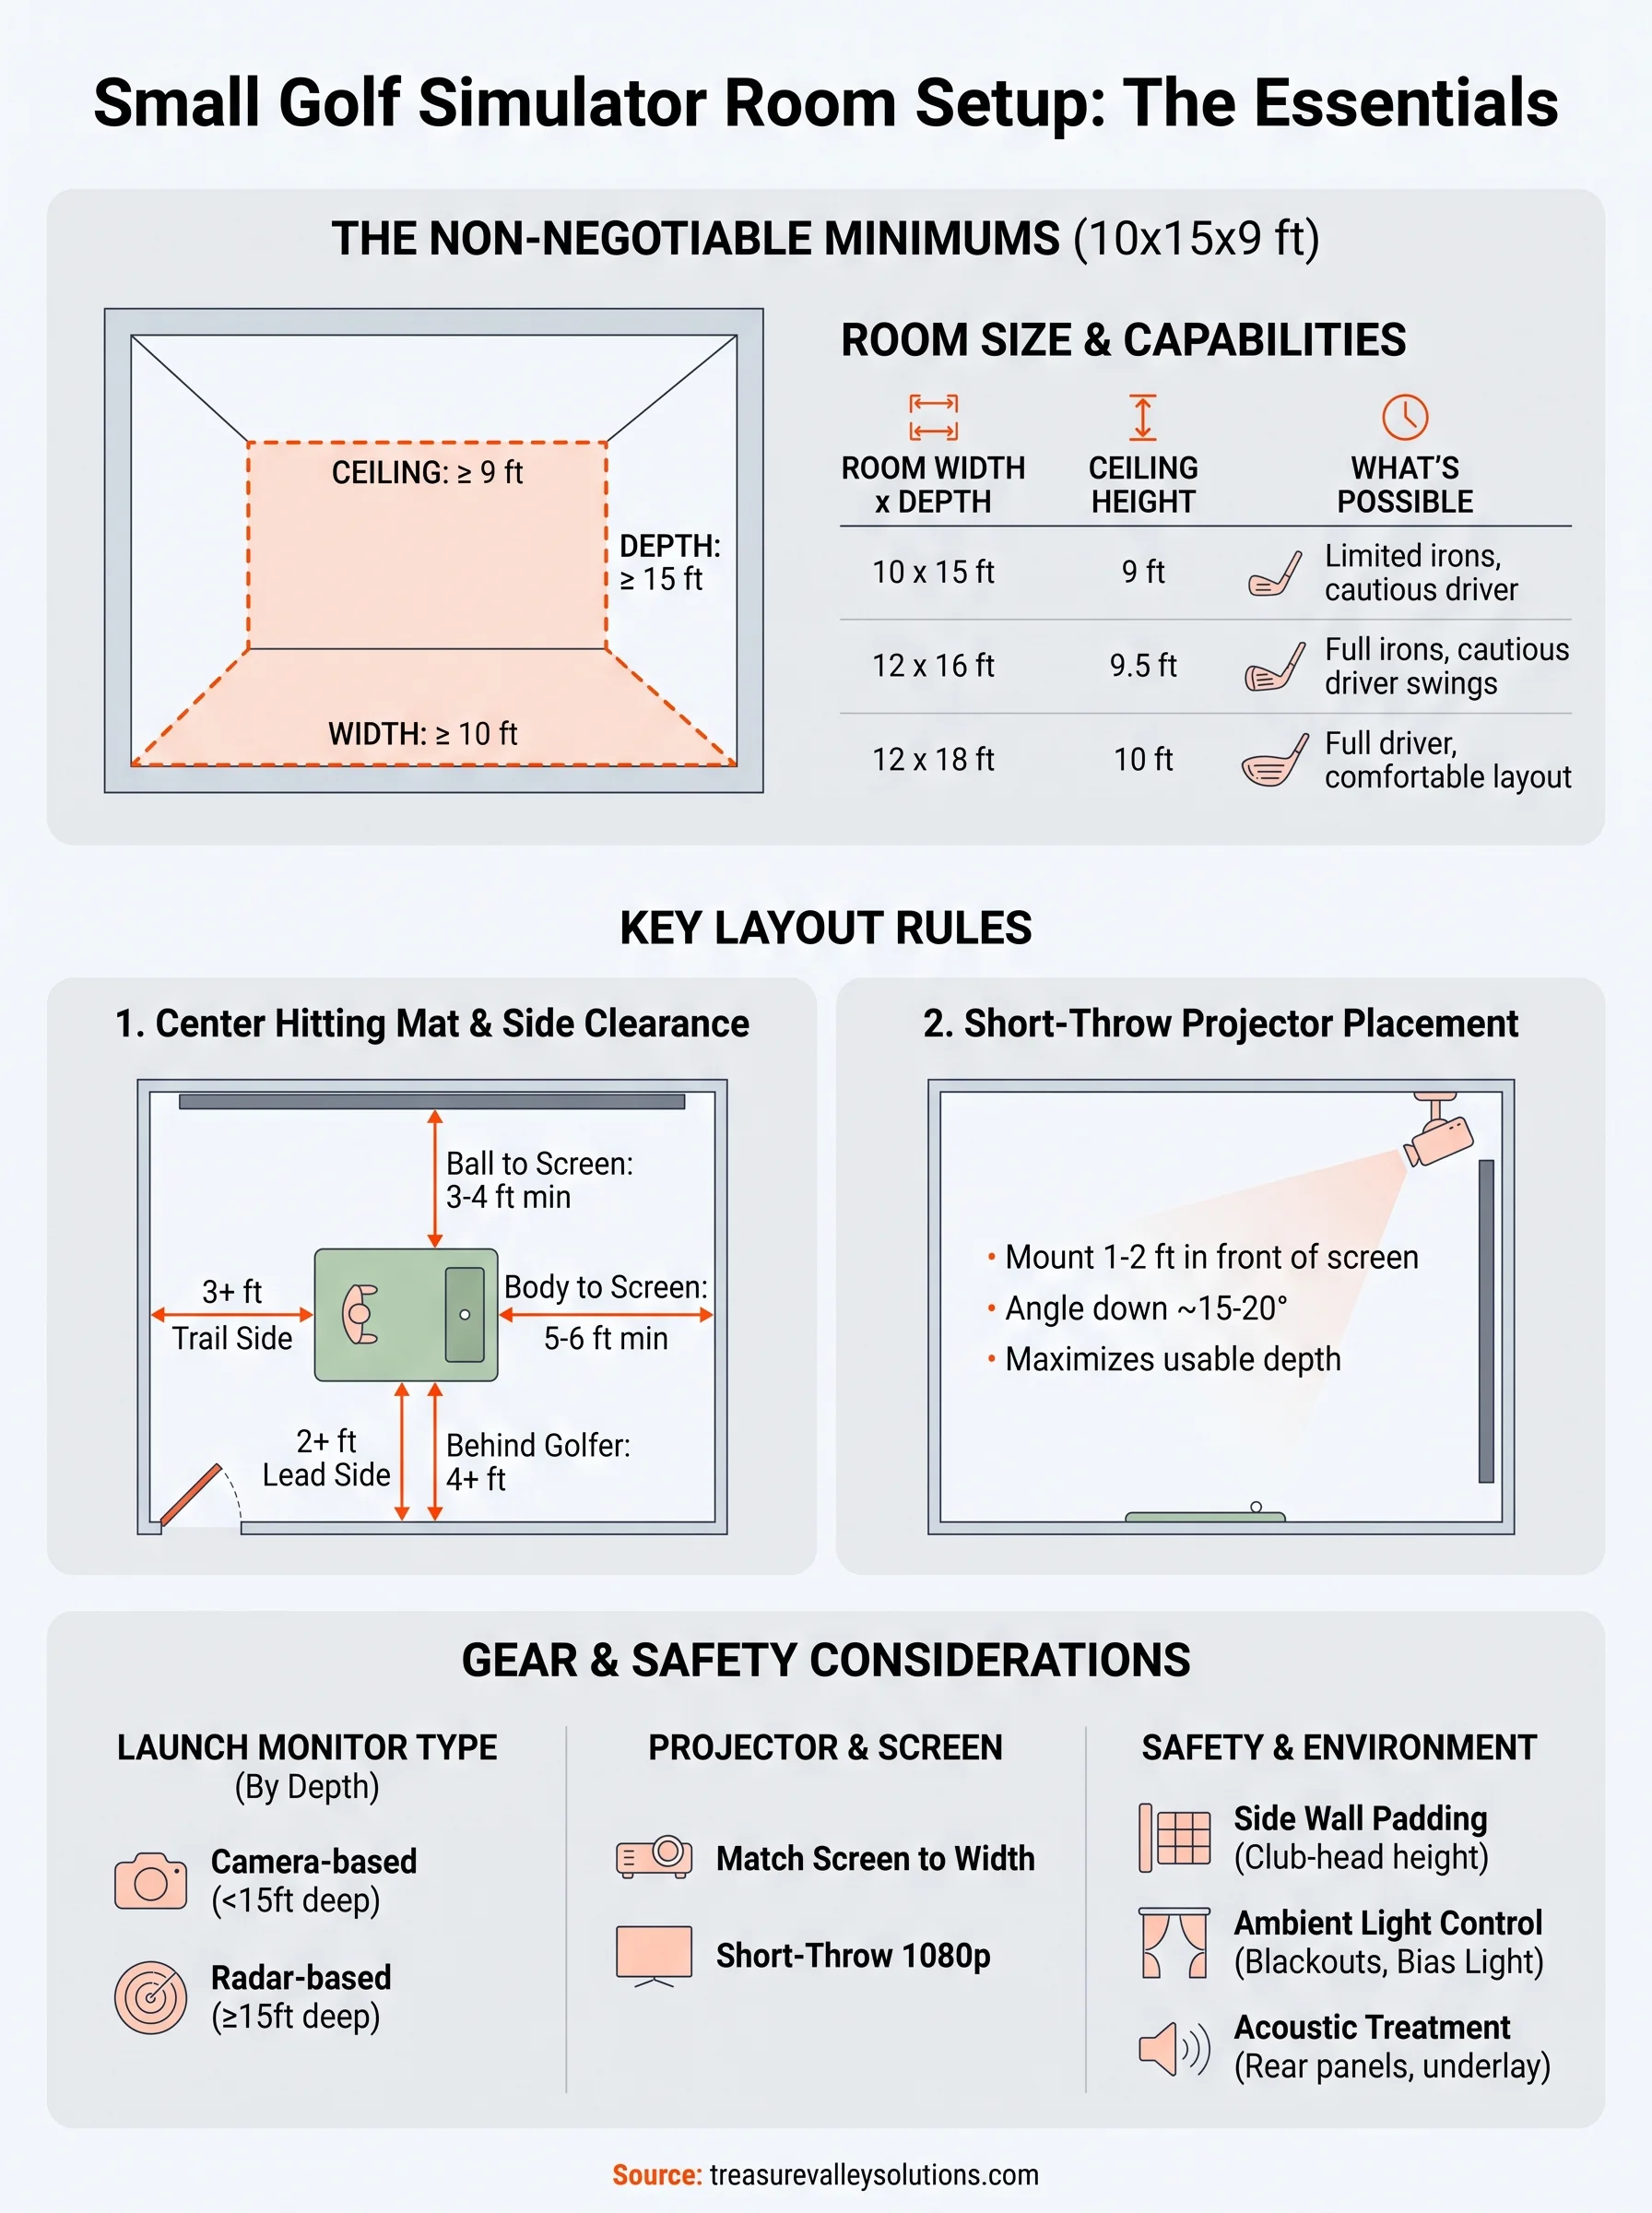
The non-negotiable minimums
The absolute floor for a functional small golf simulator room setup is a space that measures at least 10 feet wide, 15 feet deep, and 9 feet tall. At those minimums, you can fit a hitting mat, a standard impact screen, and a short-throw projector. You won't have extras, but you'll have a fully playable setup. Drop below any one of those three numbers and you'll face real tradeoffs on what gear you can use and how comfortably you can swing.
Here's a quick reference for how different room sizes affect what's possible:
| Room Width x Depth | Ceiling Height | What You Can Realistically Do |
|---|---|---|
| 10 ft x 15 ft | 9 ft | Short and mid irons, limited driver use |
| 12 ft x 16 ft | 9.5 ft | Full iron set, cautious driver swings |
| 12 ft x 18 ft | 10 ft | Full swing with driver, comfortable layout |
| 14 ft x 20 ft+ | 10+ ft | Ideal, room for seating and all clubs |
If your ceiling clears less than 9 feet, find a different space before you spend a dollar on gear.
Where most small rooms fall short
Ceiling height is the most common obstacle. Most basements and garages sit between 8 and 9 feet, and that puts driver swings at real risk. A standard driver swing arc peaks around 8 to 8.5 feet depending on your height and swing path, so an 8-foot ceiling leaves almost no margin for error. You can work around this with lower-lofted clubs and a adjusted stance, but most golfers don't want to fundamentally change their swing just to use a simulator in their own home.
Room depth is the second issue that catches people off guard. You need enough distance between the hitting position and the screen (typically 6 to 8 feet), plus enough room behind you for your backswing. A 15-foot deep room sounds like plenty until you subtract the screen frame, the projector mount, and any furniture. Measure your actual usable depth, not just the total room dimensions, before you commit to any screen or projector purchase. That distinction alone will save you from buying equipment that physically won't fit.
Step 1. Measure your room and swing clearance
Pull out a tape measure before you open a single product page. You need three critical measurements in hand: ceiling height at the exact hitting position, the room's front-to-back depth from the screen wall to the back wall, and the room's width. Don't measure from a corner or near a support beam. Stand where you'll actually swing and take every measurement from that specific spot.
Measure ceiling height at the swing point
Position yourself where the hitting mat will sit and hold the tape measure directly overhead. Your ceiling clearance measurement needs to account for the mat itself, which typically adds 1 to 2 inches off the floor. If you plan to mount overhead lighting or a projector, subtract that hardware's drop distance from your usable height. A 9-foot raw ceiling with a 6-inch projector mount and a 2-inch mat leaves you with 8 feet 4 inches of actual swing clearance.
Use this checklist before you finalize your room choice:
- Ceiling height at hitting position (subtract mat height)
- Ceiling height at full backswing arc (step back 2 feet and measure again)
- Any overhead obstructions: beams, ducts, or light fixtures
- Room depth from screen wall to rear wall
- Room width at the widest usable point
Check your personal swing arc
Your swing arc height depends on your height, club length, and swing plane, so pulling a generic number from a forum won't protect your ceiling. Stand in your normal address position with your driver and have someone mark the peak of your backswing on the wall beside you. Then measure from the floor to that mark. Add 6 inches of buffer to account for any variation in your swing, and that final number becomes your real minimum ceiling requirement for a functional small golf simulator room setup.
Most golfers need between 8.5 and 9.5 feet of clearance for a full driver swing, but measure yours specifically before committing to a space.
Step 2. Choose a layout that works in tight spaces
Once you know your room's measurements, layout decisions become much easier because you're working with real numbers instead of guesses. In a small golf simulator room setup, every foot matters, and where you place the screen, the hitting mat, and the projector relative to each other determines whether the space feels functional or cramped. Start from the screen wall and work backward.
Center the hitting position first
Your hitting mat placement is the anchor for every other decision in the room. Center it along the width of the room so you have equal clearance on both sides during your swing. For a right-handed golfer, the ball position sits roughly 3 feet from the screen, and your body will be another 2 to 3 feet behind that. Mark the mat position on the floor with tape before you mount anything to the walls or ceiling.
Your side clearance from the club head at full extension should be at least 3 feet on the trailing side and 2 feet on the lead side.
Use this layout checklist to confirm your hitting position works:
- Ball to screen: 3 to 4 feet minimum
- Body to screen: 5 to 6 feet minimum
- Side clearance (trail side): 3 feet minimum
- Side clearance (lead side): 2 feet minimum
- Behind the golfer to back wall: 4 feet minimum
Position the projector to maximize depth
In tight rooms, projector placement is where most setups gain or lose usable depth. A standard long-throw projector needs 10 to 14 feet of throw distance to fill a 10-foot screen, which eats up your entire room. Instead, plan your layout around a short-throw or ultra-short-throw projector mounted overhead close to the screen. This keeps the projector out of your swing path and frees up depth behind the hitting position. Mount it 1 to 2 feet in front of the screen, angled down at roughly 15 to 20 degrees, and you preserve every inch of usable floor space.
Step 3. Pick the right gear for small rooms
Gear selection for a small golf simulator room setup lives or dies by one rule: buy for the space you have, not the space you wish you had. The equipment choices you make here will either work with your room's constraints or fight against them. Focus on three components first: your launch monitor, your projector, and your impact screen, in that order.
Choose a launch monitor that fits your hitting distance
Your launch monitor sits between you and the screen, so its physical footprint and required ball flight distance matter as much as its feature list. Camera-based systems like the Uneekor QED or Garmin Approach R10 work well in tight rooms because they track the ball immediately at impact without needing extended flight distance. Radar-based units like the Bushnell Launch Pro need at least 6 to 8 feet of ball flight to read data accurately, which works in most setups but leaves less buffer in very short rooms.
For rooms under 15 feet deep, a camera-based launch monitor eliminates the guesswork around minimum ball flight requirements.
Here's a quick comparison of launch monitor types for small rooms:
| Type | Min. Ball Flight Needed | Best For |
|---|---|---|
| Camera-based | 1 to 3 feet | Very tight spaces, under 15 ft deep |
| Radar-based | 6 to 8 feet | Rooms 15 ft deep or more |
| Overhead camera | 0 feet | Ceiling-mount setups with low clearance |
Match your projector and screen to your throw distance
Your screen size should match your room width, not the other way around. In a 10-foot wide room, a 9-foot wide screen leaves 6 inches of clearance on each side, which is workable. Pair that screen with a short-throw projector rated for your available throw distance, which you already measured in Step 1. Avoid 4K projectors unless your budget allows, since 1080p performs well at typical simulator viewing distances and costs significantly less.
Step 4. Dial in safety, lighting, and sound
A small golf simulator room setup that looks great on paper can still be dangerous, distracting, or too loud to use comfortably if you skip this step. Safety padding, room lighting, and acoustic treatment each have a direct impact on how often you actually use the simulator and whether it stays in good shape long-term. Get these three details right and the room becomes a space you want to spend time in.
Protect the room and the people in it
Side walls and the ceiling area near your swing path need impact protection before you take a single swing. Foam padding or rubber wall panels on the side walls protect both the wall surface and anyone standing nearby if a club slips. Mount padding at club-head height, which runs from roughly 2 to 6 feet off the floor on the trail side of your swing. You don't need to cover every inch, just the surfaces within 3 feet of your maximum swing arc.
Cover at least the trailing-side wall from 2 to 6 feet high with impact-rated padding before you swing a single club indoors.
Use this checklist to cover your safety basics:
- Foam or rubber panels on trail-side wall within swing range
- Impact netting behind the hitting position if your screen sits under 10 feet away
- Non-slip mat under your hitting mat to prevent shifting during swings
- No loose cables on the floor in the hitting zone
Control ambient light without blacking out the room
Blackout curtains or roller shades on any windows give you precise control over how much ambient light enters the room during a session. Projector image quality drops fast when it competes with daylight or overhead fluorescents, so bias lighting behind the screen at around 6500K color temperature keeps your eyes comfortable without washing out the projected image.
Keep the sound contained
Acoustic panels on the rear wall absorb impact noise from the screen and reduce echo in hard-surfaced rooms like garages and basements. Adding a rubber underlayment beneath the hitting mat cuts the thud that travels through your floor when you take practice swings, which matters significantly if the simulator room sits above a living space or bedroom.
Next steps for your simulator room
You now have the measurements, layout logic, gear guidance, and safety checklist to build a small golf simulator room setup that actually works in the space you have. The process is straightforward when you follow it in order: measure first, plan your layout second, buy gear third, and finish with safety, lighting, and sound. Skipping ahead always costs more in the long run.
If you want professional help designing and installing the full setup, including projector mounting, screen framing, audio, and lighting control, Treasure Valley Solutions builds custom simulator rooms for homeowners throughout the Boise and Meridian area. We handle every detail from the initial design through post-installation programming so the room works the way you want it to from day one. Check out examples of our completed projects to see what a professionally built simulator room looks like, then reach out when you're ready to get started.