
Idaho winters are long, and summer tee times fill up fast, so it's no surprise that more Treasure Valley homeowners are figuring out how to build a golf simulator room right at home. A dedicated simul...
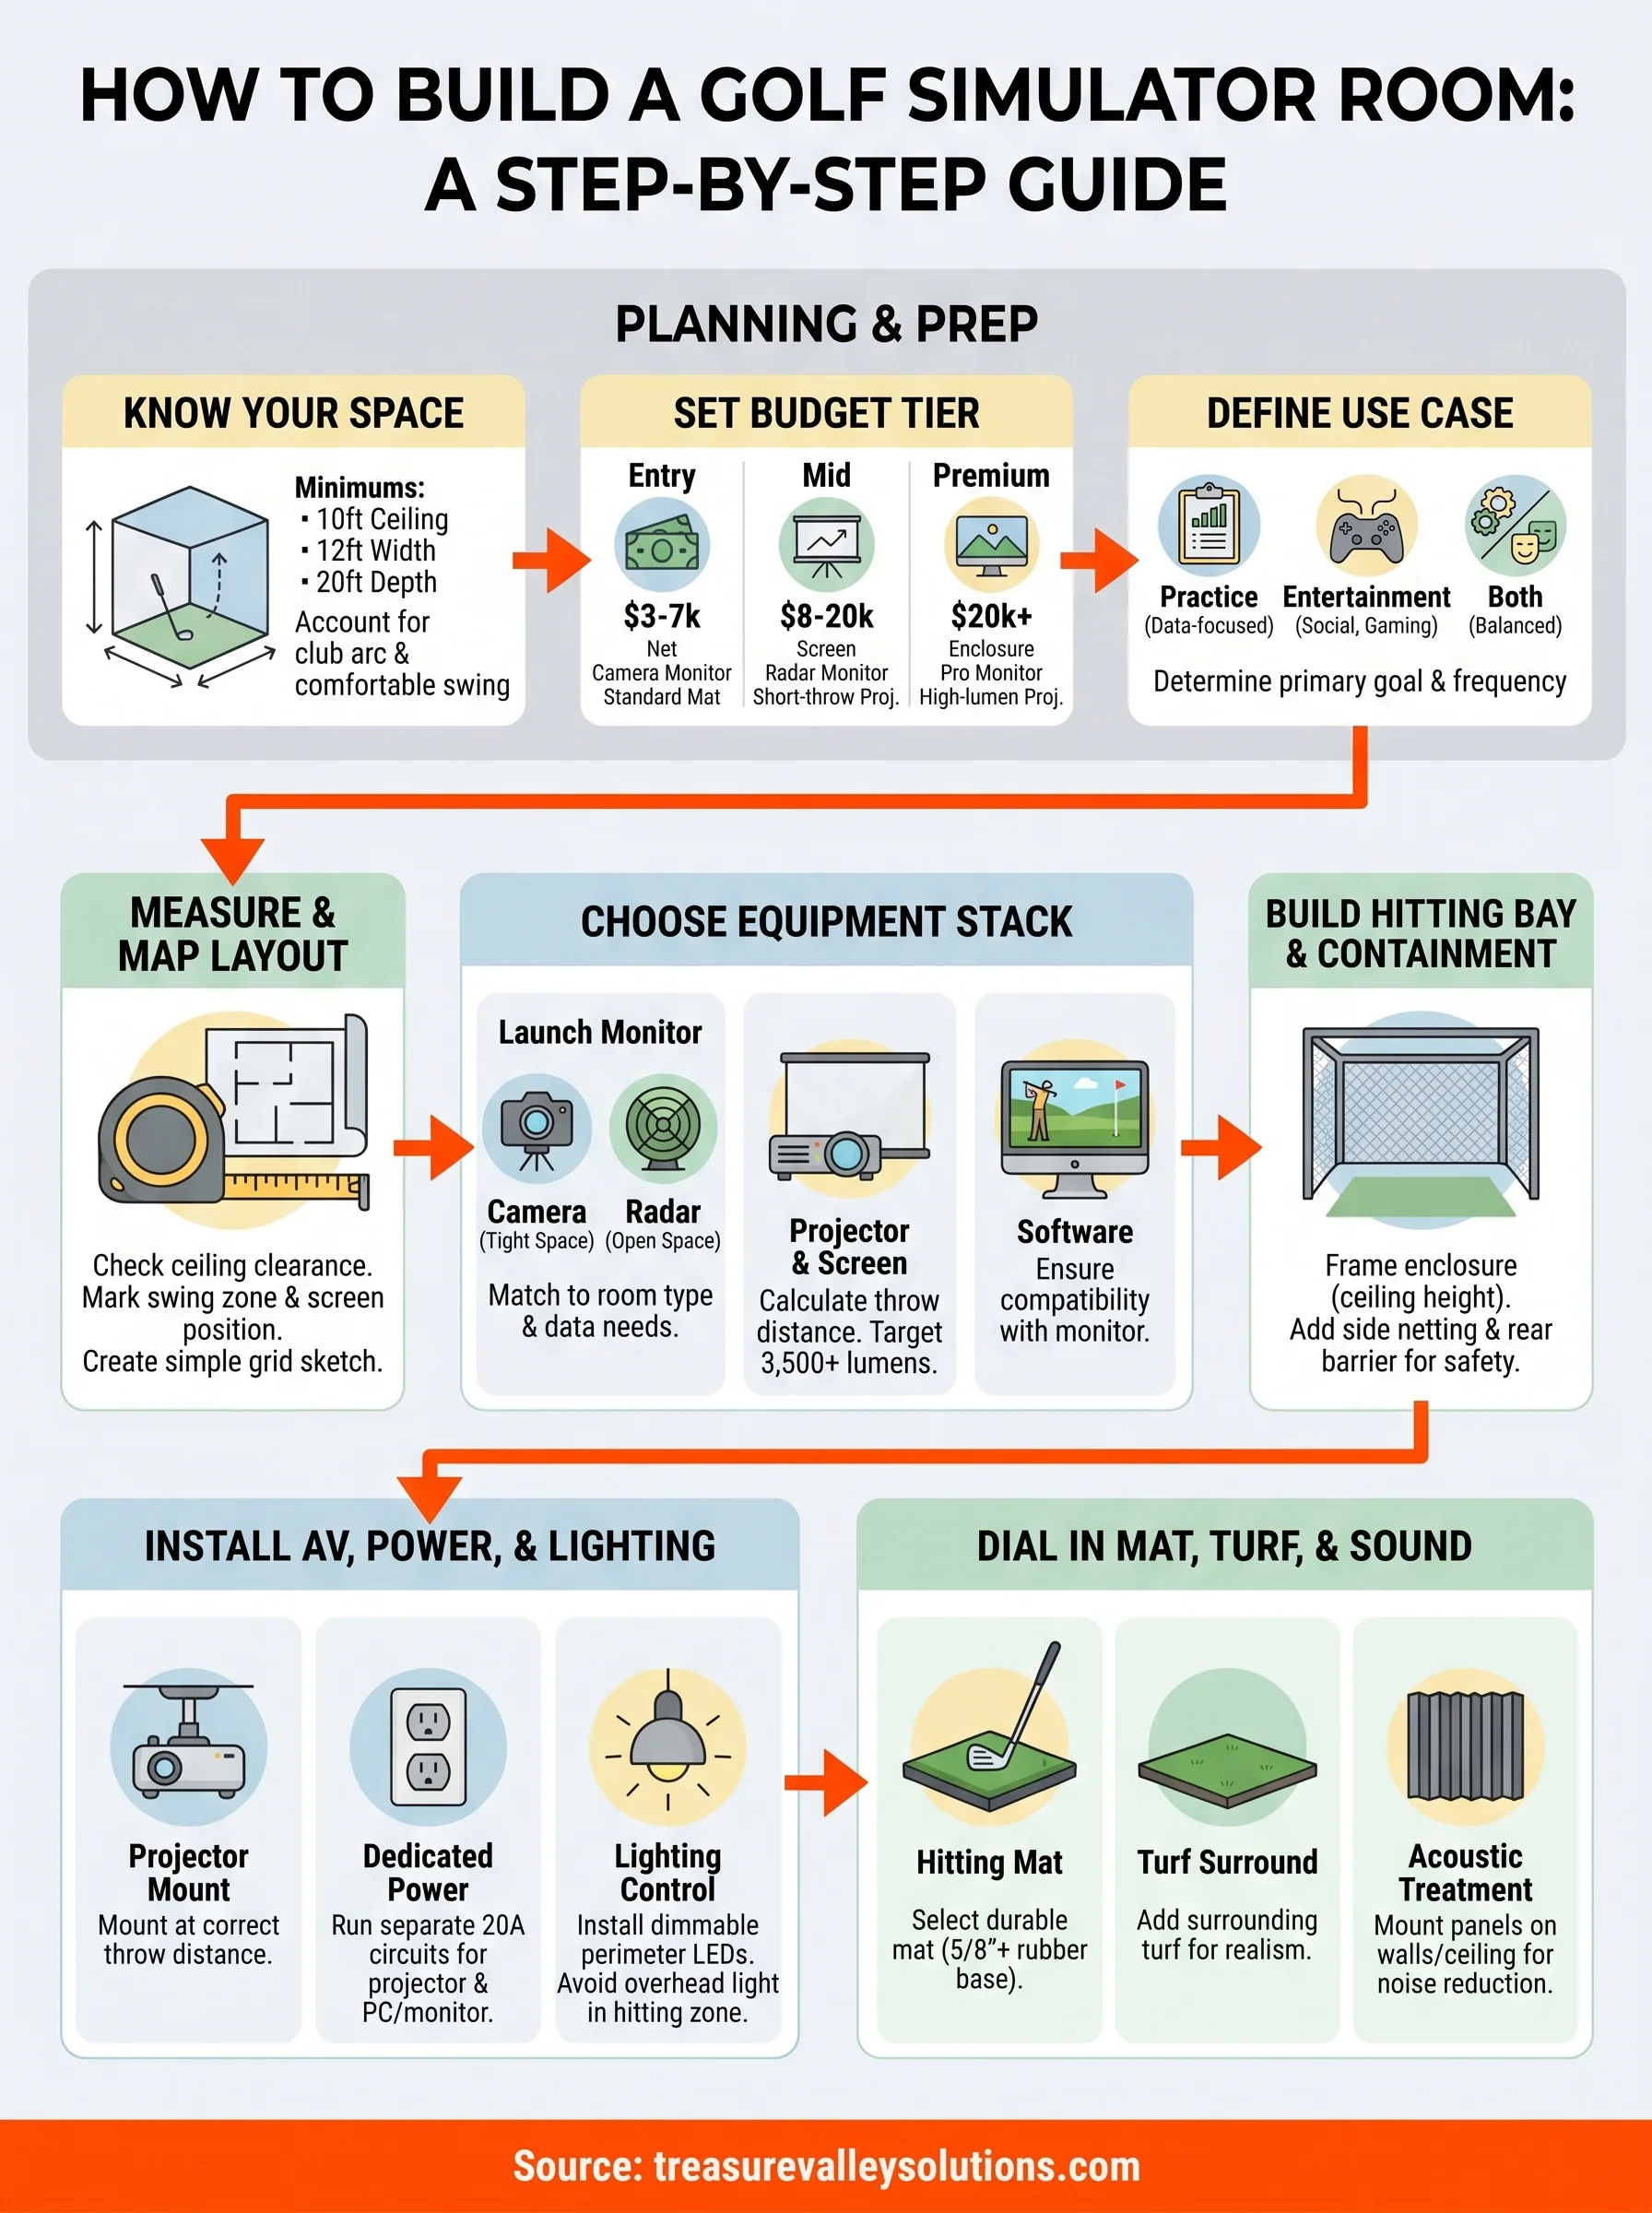
How To Build A Golf Simulator Room: A Step-By-Step Guide
Idaho winters are long, and summer tee times fill up fast, so it's no surprise that more Treasure Valley homeowners are figuring out how to build a golf simulator room right at home. A dedicated simulator space lets you practice your swing year-round, entertain friends, and even improve your game with real-time shot data, all without leaving your house.
But pulling it off takes more than buying a launch monitor and hanging a screen in the garage. You need the right room dimensions, proper ceiling height, a well-matched projector and impact screen, and clean wiring that keeps the whole setup reliable and clutter-free. The technology side, calibrating sensors, routing HDMI and power, integrating sound, is where most DIY builds either come together or fall apart.
At Treasure Valley Solutions, we design and install custom AV and smart technology systems across the Boise and Meridian area, and golf simulator rooms are one of the most rewarding projects we work on. We've seen what works, what doesn't, and where homeowners commonly run into trouble. This guide walks you through the full process step by step, from choosing your space and equipment to wiring, installation, and final calibration, so you can build a simulator room that actually performs the way you want it to.
What you need to plan before you buy anything
Rushing into equipment purchases is the single fastest way to waste money on a golf simulator build. Before you order a launch monitor, impact screen, or projector, you need a clear picture of your available space, your realistic budget, and the type of experience you actually want. Skipping this planning stage leads to mismatched components, rooms that can't support a full swing, and expensive returns that set your project back by weeks.
Know your minimum space requirements
Room dimensions and ceiling height determine every other purchase decision you make. A functional golf simulator room needs at minimum 10 feet of ceiling height, 12 feet of width, and 20 feet of depth measured from the player's stance to the impact screen. Those are floor numbers, not comfortable numbers. If you plan to swing a driver and take a full follow-through, you want at least 12 feet of ceiling clearance to account for club arc.
Most homeowners underestimate depth. A 15-foot room feels workable until you add a mat, a screen frame, and a projector mount, and suddenly you're standing 6 feet from the screen with no room to set up properly.
Width matters too, especially for left-handed golfers or anyone who wants seating alongside the bay. 18 feet of total width gives you a solid hitting bay plus room for a couch and a small side table. Anything under 12 feet wide starts to feel cramped and can affect sensor accuracy on certain launch monitor systems that rely on side-angle camera tracking.
Set a realistic budget tier before you browse
You can build a solid simulator room across a wide price range, but you need to pick which tier you're targeting before you compare products. Mixing components from different budget levels, say a premium launch monitor paired with a bargain projector and cheap screen, produces disappointing results and wastes money on both ends. The three practical tiers look like this:
| Tier | Total Budget | What You Get |
|---|---|---|
| Entry | $3,000 - $7,000 | Basic net or screen, camera-based launch monitor, standard turf mat |
| Mid | $8,000 - $20,000 | Quality impact screen, radar launch monitor, short-throw projector, framed bay |
| Premium | $20,000+ | Full enclosure, professional-grade launch monitor, high-lumen projector, acoustic panels |
Your budget tier drives every decision downstream, from which launch monitor you can realistically afford to whether you can add acoustic treatment or a custom flooring upgrade. Decide your ceiling number first, then allocate roughly 40% to the launch monitor, 25% to the screen and projector, and the remaining 35% to construction, wiring, turf, and finishing work.
Identify your primary use case
How you plan to use the simulator shapes which features actually matter for your build. A golfer focused on improving their game needs a high-accuracy radar-based launch monitor with detailed spin and path data. Someone who wants to host friends for casual rounds cares more about screen size, sound quality, and software game variety than launch angle precision down to a tenth of a degree.
Answer these three questions before you research any products:
- Who plays? One serious golfer, a family with kids, or rotating groups of friends with mixed skill levels?
- What is the primary goal? Swing practice with detailed data, entertainment and casual gaming, or both equally?
- How often will it get used? Daily practice sessions demand more durable components than a room used once a week.
Your answers filter out a significant portion of the products on the market immediately and stop you from either overbuilding a space or cutting corners on the components that matter most to you. Knowing how to build a golf simulator room that fits your specific situation becomes straightforward once you understand exactly what you are building it for.
Step 1. Measure the room and map the layout
Grab a tape measure before anything else. Accurate dimensions are the foundation of every good simulator build, and a five-minute measuring session can save you from ordering a screen that won't fit or discovering your ceiling is six inches too low after the projector mount is already installed. Write every measurement down in a simple grid so you have a reference document throughout the entire build process.
Take ceiling height first
Ceiling height is your most critical constraint, and it's the measurement that eliminates rooms the fastest. Stand at the center of your planned hitting position and measure straight up. You need at minimum 10 feet of clearance to swing a driver without restriction, but 11 to 12 feet is where the swing feels natural and you get a full follow-through without anxiety. Check for any obstructions like ductwork, beams, or light fixtures that drop below the structural ceiling line, because those cut into your usable height just as much as a low ceiling does.
A room that measures 10.5 feet to the drywall but has an HVAC duct running across the hitting zone at 9.5 feet is effectively a 9.5-foot room for your purposes.
Map the swing zone and screen position
Once you confirm your ceiling clears, measure the full depth and width of the room. Mark out a hitting position on the floor, at least 5 feet back from where the screen will hang, and verify you have a minimum of 10 feet behind that point for your stance, backswing, and follow-through. The screen itself needs a clear 12-foot-wide hanging surface with no doors, windows, or trim interrupting the frame. Use painter's tape to mark the screen footprint and hitting zone directly on the floor so you can walk the layout at full scale before committing to anything.
| Measurement | Minimum | Comfortable |
|---|---|---|
| Ceiling height | 10 ft | 11-12 ft |
| Room depth | 20 ft | 25 ft |
| Room width | 12 ft | 16-18 ft |
| Player to screen distance | 10 ft | 12-14 ft |
Create a simple floor plan sketch
Understanding how to build a golf simulator room gets much easier once you have a clear floor plan showing every key element before installation begins. A basic grid on graph paper with one square equal to one foot works perfectly, and you don't need any design software. Mark these elements on your sketch before you move to equipment selection:
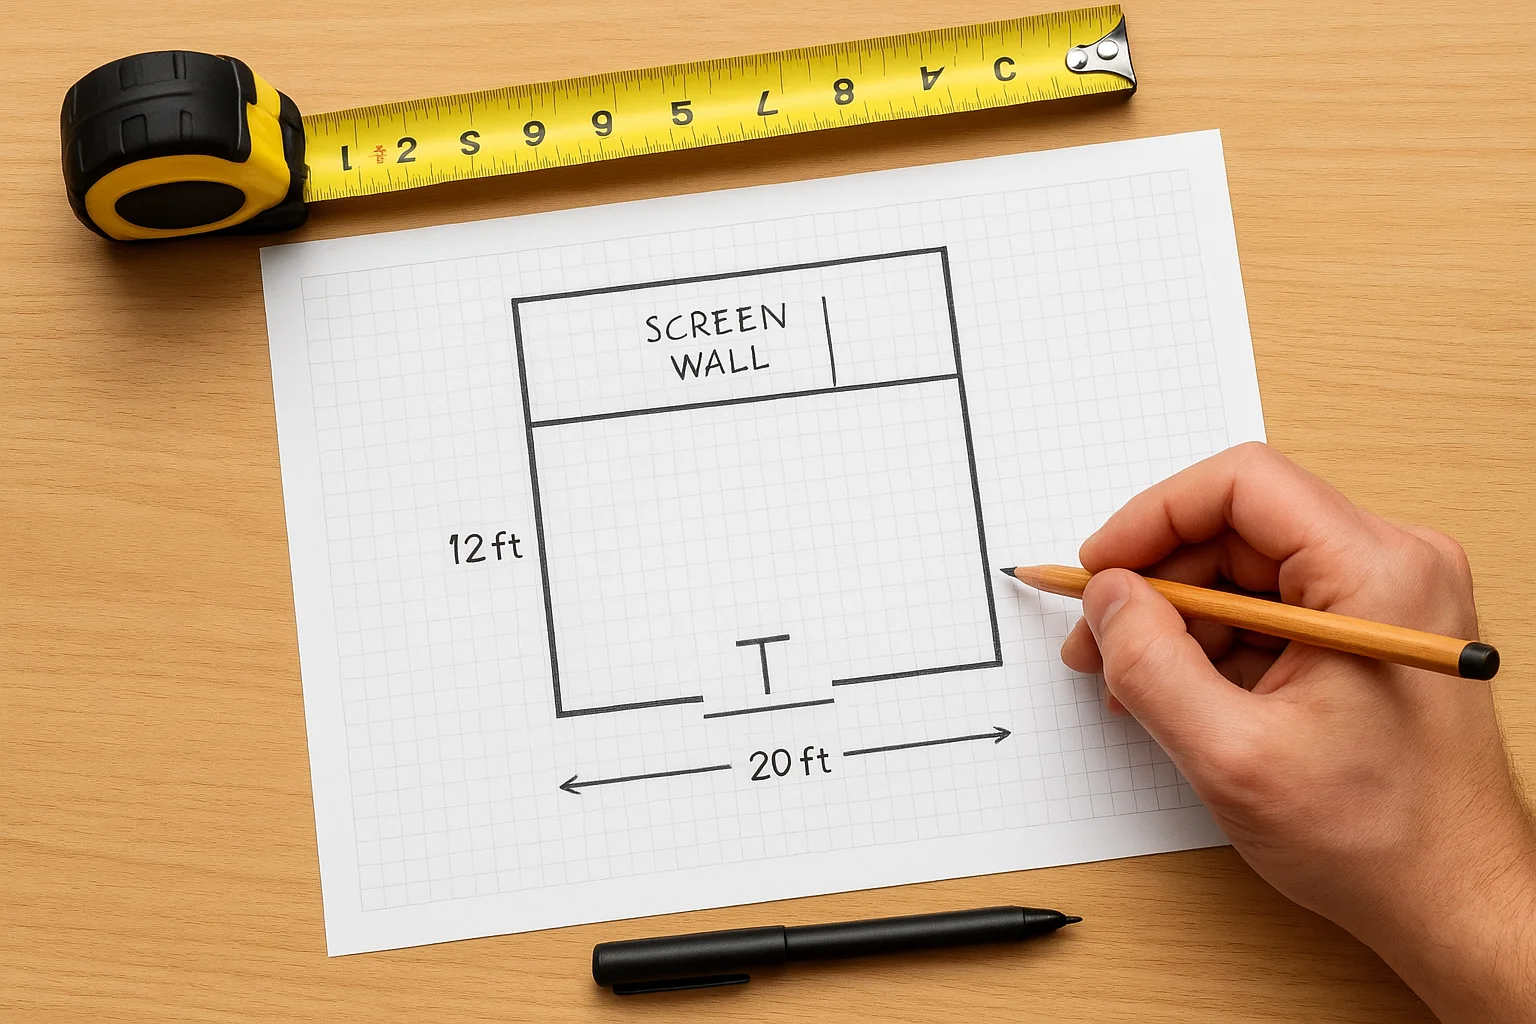
- Hitting position marked as a T-shape for stance width
- Screen wall with full frame footprint dimensions
- Projector mount location and estimated throw distance
- Every existing electrical outlet and its position on the wall
- Door swing direction and any fixed structural elements
Step 2. Choose your simulator equipment stack
Your room measurements are locked in, so now you can buy equipment with confidence. The biggest mistake golfers make at this stage is shopping for individual components without considering compatibility. Every piece of your simulator stack needs to work together, and a great launch monitor paired with a mismatched projector or undersized screen will underperform no matter how much you spent on each individual item.
Start with the launch monitor
The launch monitor is the brain of your entire setup, and it deserves the largest share of your budget. Two main technologies exist: camera-based systems like the Garmin Approach R10 or Uneekor QED sit above or beside the hitting zone and perform well in rooms with lower ceilings, while radar-based systems like the Foresight Sports GC3 or Trackman mount behind the golfer and need at least 8 to 10 feet of clear space behind the ball. Camera systems handle ceiling height restrictions better; radar systems deliver more accurate club-head data for serious practice.
Your launch monitor choice locks in your software options, your mounting requirements, and often your room layout, so make this decision before you touch anything else.
Use this table to match launch monitor type to your specific room conditions:
| Launch Monitor Type | Best For | Ceiling Friendly | Data Depth |
|---|---|---|---|
| Camera-based (overhead) | Tight rooms, entry to mid budget | Yes | Good |
| Camera-based (side) | Low ceilings, casual use | Yes | Moderate |
| Radar (rear-mounted) | Serious practice, open rooms | No | Excellent |
Match your projector to your screen size
Once you confirm your screen dimensions, calculate the throw distance your projector needs before you order anything. A standard 16:9 screen at 12 feet wide requires a projector with a throw ratio matched to your player-to-screen distance, and short-throw models work best in rooms under 20 feet deep because they eliminate the problem of your body blocking the beam mid-swing. Target a minimum of 3,500 lumens for a room you can dim but not fully blackout, and 5,000 lumens or higher if you have any ambient light you cannot fully control.
Select your simulator software last
Software selection depends entirely on which launch monitor you purchased, since most platforms only support specific hardware. GSPro and E6 Connect are two widely used options with strong course libraries and realistic ball physics. Check the official compatibility list on your launch monitor manufacturer's website before you commit, because figuring out how to build a golf simulator room only to discover your software does not recognize your hardware is a completely avoidable problem that delays your build and costs you real money.
Step 3. Build the hitting bay and ball containment
Your launch monitor is chosen and your room layout is mapped, so now the physical construction begins. Building a proper hitting bay does two things at once: it contains errant shots before they damage walls or equipment, and it gives the space a finished, intentional look that makes the room feel purpose-built rather than improvised. This is also the stage where understanding how to build a golf simulator room stops being theoretical and becomes hands-on work.
Frame the hitting bay enclosure
The hitting bay is the structural frame that holds your impact screen and side barriers in place. A basic bay frame uses 2x4 lumber or steel box tubing cut to your ceiling height, anchored to the floor and ceiling with lag screws, and connected at the top and sides with horizontal crossmembers. Your frame needs to span the full width of your screen plus at least 12 inches on each side to allow safe ball containment and avoid shots catching the edge of the structure.
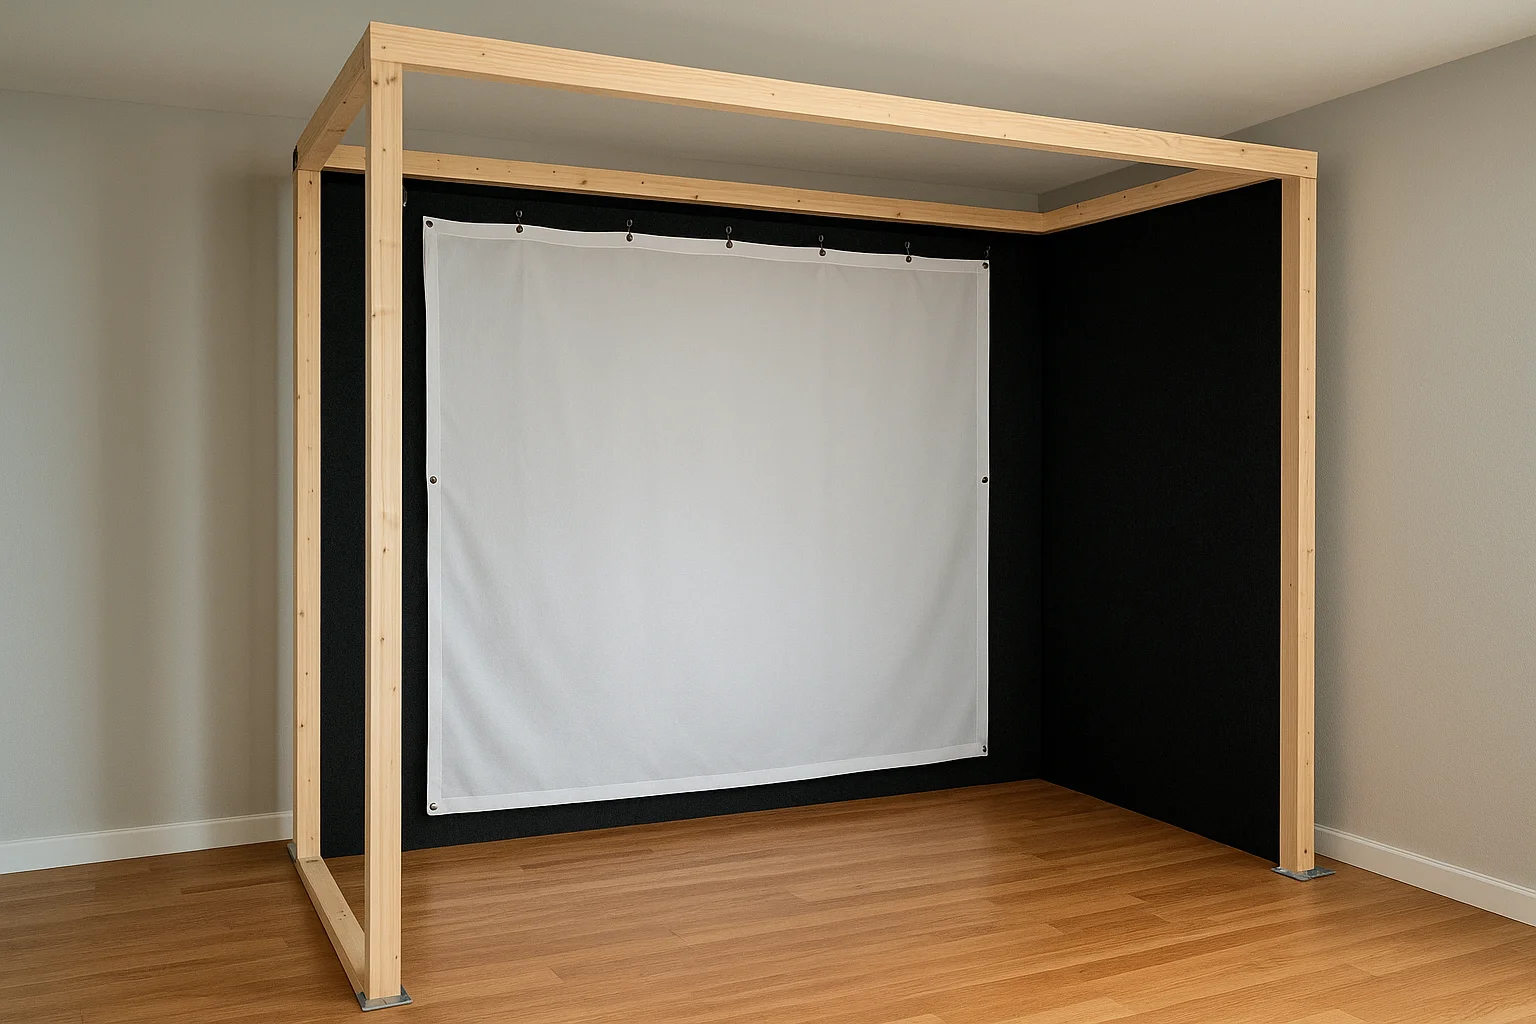
Build your frame following this sequence:
- Cut two vertical posts to your ceiling height measurement and anchor them to the floor using floor flanges screwed into concrete or subfloor
- Attach a top horizontal crossmember connecting both posts at the ceiling line
- Add side panels of rigid foam board or plywood covered in black felt to absorb lateral shots
- Hang your impact screen from the top crossmember using the grommets or bungee attachment system included with the screen
A wobbly frame transfers vibration directly into your impact screen on every shot, which shortens the screen's lifespan and degrades image quality from the projector.
Add ball containment barriers
Side netting and a rear barrier protect your projector, launch monitor, and the walls behind you from stray shots. Attach golf netting rated for at least 5,000 impacts per square foot to the side posts of your frame, running it from the front crossmember back to approximately 8 feet behind the hitting position. The rear barrier only needs to be 4 to 5 feet tall since most mishits that escape the sides travel low rather than high.
Use this quick reference to size your containment materials:
| Component | Recommended Spec |
|---|---|
| Side netting height | Full ceiling height |
| Side netting depth | 8 ft behind hitting position |
| Rear barrier height | 4-5 ft |
| Netting impact rating | 5,000+ hits per sq ft |
Step 4. Install projection, power, and lighting
Clean wiring and proper mounting separate a professional simulator build from a tangle of extension cords and a screen you cannot see clearly. This step covers three systems that work together: projector placement, electrical circuits, and lighting control. Get all three right and your room becomes genuinely usable day or night; rush any one of them and you create problems that are painful to fix once the room is finished.
Mount your projector at the right throw distance
Position your projector using the throw ratio calculation from your projector's spec sheet. Multiply the throw ratio by your screen width to get the required distance from the lens to the screen surface. For example, a projector with a 0.8:1 throw ratio and a 12-foot-wide screen needs to sit 9.6 feet back from the screen. Ceiling mount the unit directly above the hitting position using a drop-mount arm that lets you adjust tilt and lens shift after installation without remounting the bracket.
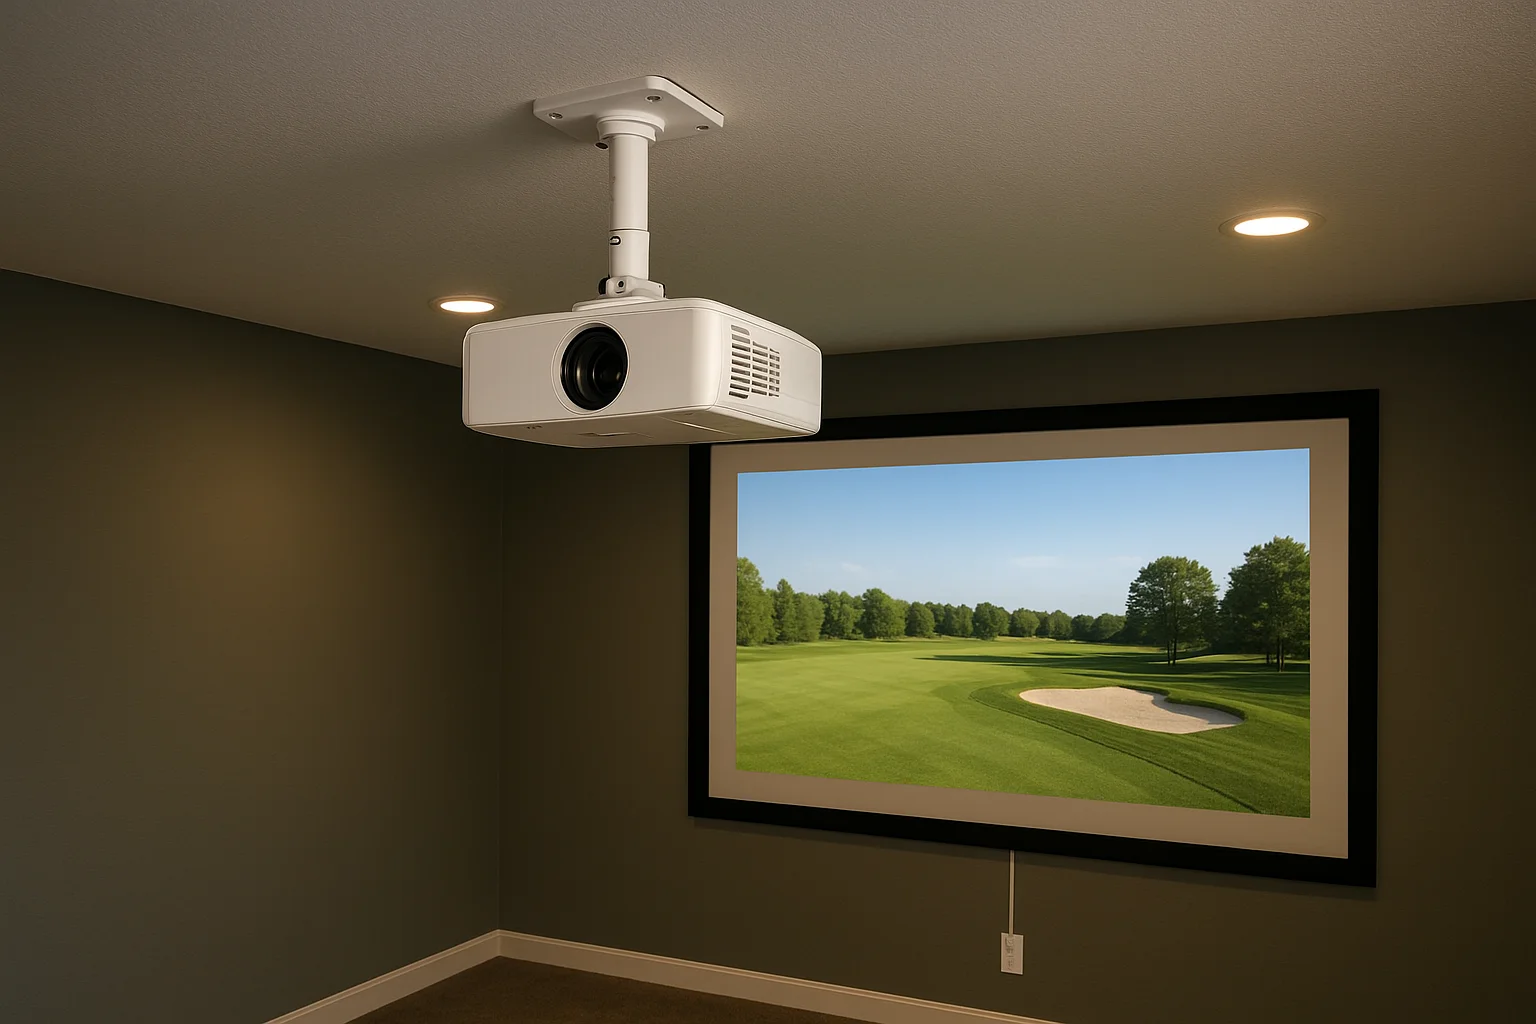
Most short-throw projectors allow a small amount of lens shift, so mount the unit two inches higher than the calculated center point and shift downward rather than fighting a unit that is already too low to correct.
Run dedicated power and manage cables
A projector, launch monitor, gaming PC, and sound system running on a single household circuit creates voltage fluctuations that cause crashes and display artifacts at the worst possible moments. Run a dedicated 20-amp circuit from your breaker panel to an outlet positioned within 6 feet of your projector mount and a second dedicated circuit to your equipment rack. Cable management channels mounted along the ceiling perimeter and down the back wall keep HDMI, USB, and power lines out of the hitting zone entirely. Use this template to plan outlet placement before your electrician arrives:
| Location | Circuit Type | Purpose |
|---|---|---|
| Ceiling mount area | Dedicated 20A | Projector |
| Equipment rack wall | Dedicated 20A | PC, launch monitor, receiver |
| Side wall | Standard 15A | Lamp, phone charging |
Control your ambient lighting
Dimmable LED lighting on a separate switch from your main room circuit gives you independent control during play versus setup and calibration. Install recessed lights on a dimmer rated specifically for LED loads along the room perimeter rather than directly above the hitting zone, where overhead light washes out the projected image on impact. Knowing how to build a golf simulator room that performs in any light condition comes down to controlling your sources rather than simply trying to eliminate them.
Step 5. Dial in turf, mat feel, and noise control
The last step is where your simulator room stops feeling like a construction project and starts feeling like a place you actually want to spend time. Turf selection, mat thickness, and acoustic treatment all affect how realistic the experience feels and how tolerable the room is for anyone in the house who is not playing. Knowing how to build a golf simulator room that runs quietly and feels natural underfoot takes a few deliberate choices that most builds skip entirely.
Pick the right hitting mat
Your hitting mat takes more punishment than any other surface in the room, so material quality and thickness matter far more than surface area. A mat with at least a 5/8-inch rubber base absorbs club impact without transmitting the full shock into your wrists and the subfloor below. Avoid thin foam-backed mats sold for putting greens; they break down quickly under full iron and driver swings and give you inaccurate feedback about strike quality.
Use this reference table to match mat type to your swing frequency:
| Mat Type | Base Thickness | Best For | Expected Lifespan |
|---|---|---|---|
| Commercial rubber base | 5/8 in or more | Daily use, irons and driver | 5+ years |
| Foam-backed turf | Under 1/2 in | Casual weekly use | 1-2 years |
| Dual-layer fairway mat | 3/4 in rubber + turf | Mixed practice and chipping | 3-5 years |
Surround the hitting mat with broader artificial turf panels cut to fit your bay floor. This extends the realistic look of the space and protects the hard subfloor when players step off the mat between shots.
Treat the room for sound and impact noise
Every full swing transfers significant impact vibration into your floor and walls, and without treatment, that noise travels through your entire home. Acoustic foam panels mounted on the side and rear walls absorb mid and high-frequency sound, while a rubber underlayment layer beneath your turf handles low-frequency floor impact. A 1/4-inch closed-cell rubber mat placed directly under your hitting mat adds meaningful shock absorption for very little cost.
Sound treatment is often the last thing golfers budget for and the first thing their family asks about after the first round.
Place acoustic panels at these five locations for the most effective coverage:
- Both side walls at standing head height
- The rear wall behind the hitting position
- The ceiling directly above the hitting zone
- The back corners where sound reflects most strongly
Ready to take your first swing
You now have everything you need to move from an empty room to a fully functional simulator setup. Planning your space first, then matching your equipment stack to your actual dimensions and budget, is what separates a build that performs from one that frustrates you every time you step onto the mat. Knowing how to build a golf simulator room is only half the equation; executing each step in the right order is what makes it stick.
Professional installation makes a real difference when it comes to projector calibration, dedicated power circuits, and cable management that stays clean over years of use. If you want a simulator room that looks sharp, runs reliably, and sounds great without a weekend of troubleshooting, our team at Treasure Valley Solutions can handle the full build. See examples of our completed projects and reach out when you are ready to get started.