 (208) 991-3502
 Meridian, ID



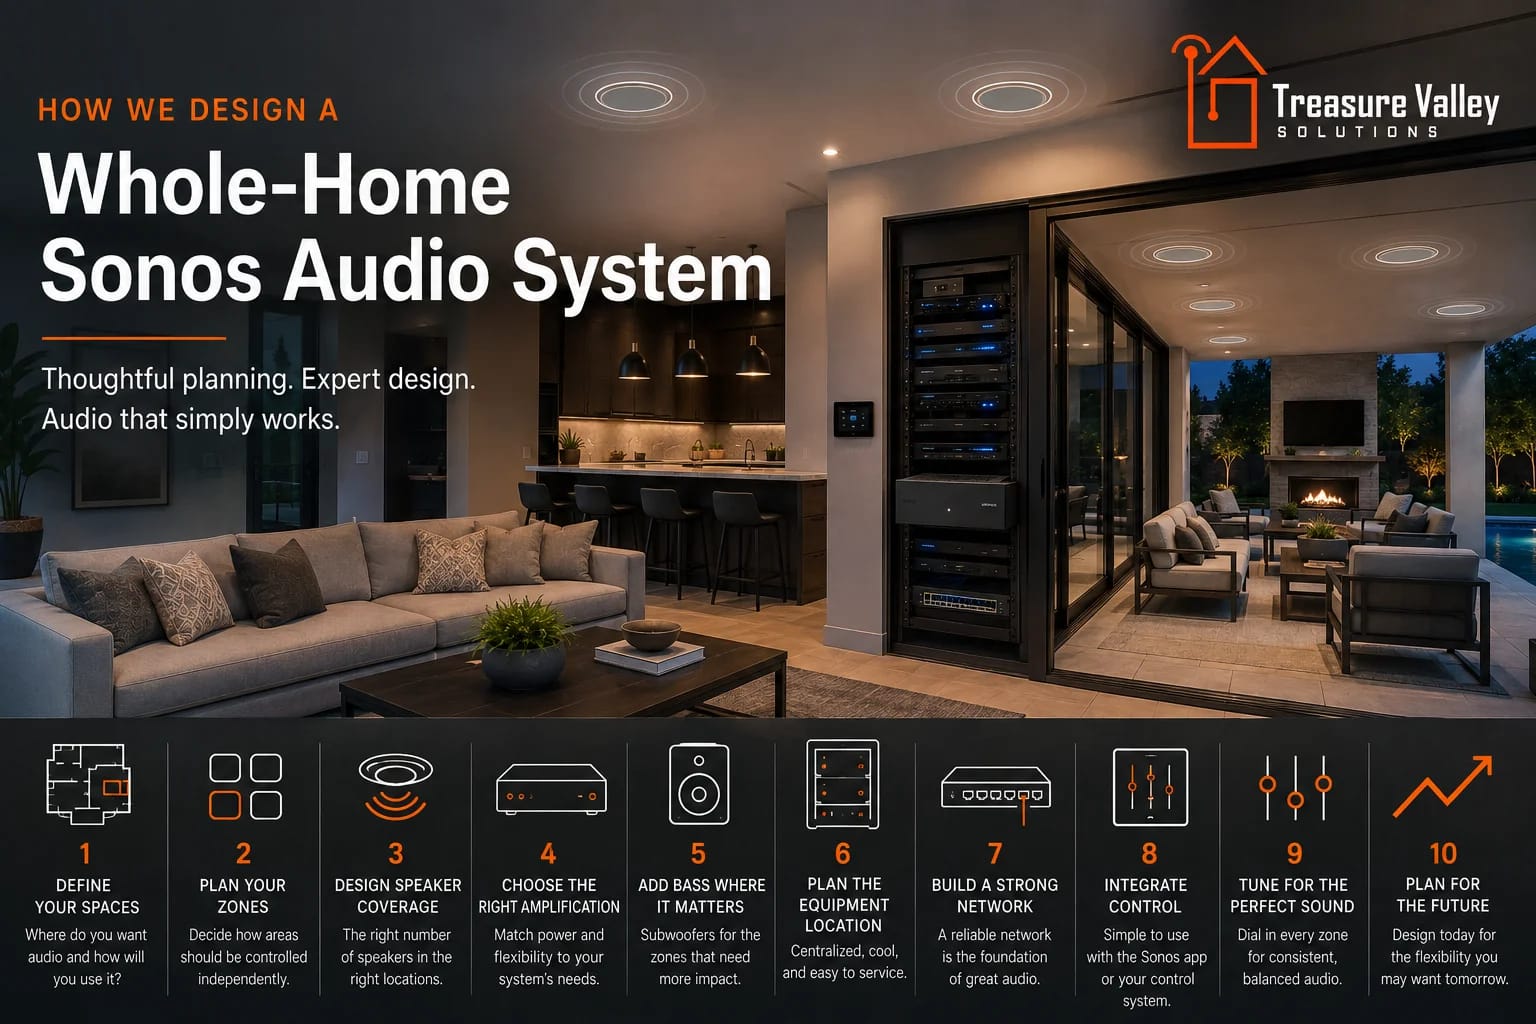

A great whole-home Sonos system should be simple to use, but getting there requires thoughtful planning behind the scenes. From audio zones and speaker placement to amplification, networking, equipment racks, and system control, every piece plays a role in the finished experience. See how we approach whole-home audio design to create consistent sound throughout your home while keeping the technology easy to use.
A great whole-home audio system should be almost invisible.
You shouldn't have to think about amplifiers, speaker impedance, network connections, audio zones, equipment racks, or how everything is wired together.
You should be able to walk into the kitchen, put on some music, extend it to the patio when friends come over, turn it down in one area, turn it up in another, and have everything simply work.
Getting to that point, however, requires quite a bit of planning behind the scenes.
When we're designing a whole-home Sonos system, we don't start by asking how many Sonos products we can put in the house.
We start with a much more important question:
How do you want to use audio throughout your home?
The answer determines almost everything that comes next.
Step 1: Decide Where You Actually Want Audio
Before we think about amplifiers or speakers, we identify the areas where audio makes sense.
For a typical whole-home system, that might include:
Kitchen
Great room
Dining room
Primary bedroom
Primary bathroom
Office
Bonus room
Covered patio
Pool area
Garage
But that doesn't mean every room automatically needs speakers.
We want to understand how you actually live in the house.
Where do you spend time?
Where do you entertain?
Do you listen to music while cooking?
Do you want audio outside?
Do you want music in the primary bathroom in the morning?
Do you regularly entertain with the doors open between the great room and patio?
Those questions are more useful than simply counting rooms on a floor plan.
We're designing around how the home will be used, not around how many spaces we can put on a proposal.
Step 2: Determine What Should Be a Separate Audio Zone
Once we know where you want audio, the next question is how those spaces should be controlled.
In Sonos, we generally think of independently controlled areas as zones.
For example, you may want:
Kitchen / Great Room
Dining Room
Primary Suite
Covered Patio
Pool Area
Each zone can have independent control.
You could have music playing outside while the indoor zones are off.
Someone could listen to something different in the primary suite.
Or you could group the kitchen, great room, patio, and pool together when you're entertaining.
This is why deciding on zones is different from deciding how many speakers you need.
A large zone may contain six speakers.
A small zone may contain two.
And sometimes two physical rooms make more sense as a single audio zone because they're almost always used together.
The goal isn't to create the maximum number of zones.
The goal is to create the right amount of control without making the system unnecessarily complicated.
Step 3: Figure Out How Many Speakers Each Space Needs
This is where we start thinking about actual audio coverage.
One of the biggest misconceptions about distributed audio is that adding more speakers is primarily about making the system louder.
Usually, we're trying to accomplish something different:
More consistent sound throughout the space.
Imagine a large kitchen and great room with only two ceiling speakers.
Someone directly underneath those speakers may hear them clearly, while someone 25 feet away may not.
The natural reaction is to turn the volume up.
Now the person underneath the speakers thinks they're too loud.
A better solution may be four or six properly positioned speakers operating at a lower level.
Instead of two obvious sources of sound, the audio becomes distributed across the room.
That's what we're after.
Speaker Placement Matters Just as Much as Speaker Count
You can buy excellent speakers and still end up with mediocre results if they're installed in the wrong locations.
When we're laying out architectural speakers, we consider things such as:
Room dimensions
Ceiling height
Furniture layout
Primary listening areas
Speaker dispersion
Lighting locations
HVAC registers
Ceiling fans
Beams
Cabinetry
Openings into adjacent rooms
There is also an aesthetic component.
Nobody wants a ceiling that looks like someone randomly scattered speakers, lights, smoke detectors, HVAC registers, and other devices across it.
On new construction projects especially, coordinating the technology plan with the lighting and reflected ceiling plan can make a substantial difference in how clean the finished home looks.
The best speaker location acoustically still has to make sense architecturally.
Outdoor Audio Requires a Different Approach
Outdoor audio deserves special attention because the design principles change once we leave the house.
Inside, walls and ceilings help contain and reflect sound.
Outside, the sound simply keeps traveling.
That's why mounting two speakers on the back of the house and turning them up isn't necessarily a good outdoor audio system.
You often end up with:
Too much volume near the house.
Not enough volume farther away.
And potentially:
A lot of music reaching the neighbors.
For larger outdoor areas, we generally prefer to distribute the audio.
That may mean speakers around a patio, landscaping, pool area, or other entertaining spaces rather than relying on one extremely loud pair of speakers.
Again, the goal is coverage.
When it's designed properly, you should be able to walk around the outdoor area without dramatic changes in volume.
Step 4: Choose the Right Amplification
Once we know the zones, speaker quantities, and speaker locations, we can determine how to power everything.
This is where the new Sonos Amp Multi gives us some very interesting options.
Amp Multi provides eight amplified outputs at 125 watts per channel, and those outputs can be assigned across as many as four independent Sonos zones.
More importantly, we're not forced to assign the same number of outputs to every zone. Sonos allows any combination of the eight outputs to be assigned across those zones.
That gives us the ability to design the amplification around the rooms rather than designing the rooms around the amplifier.
A large great room can receive more amplifier outputs.
A smaller room can receive fewer.
And when we're using compatible Sonos Architectural speakers with Optimize Sonos Speakers enabled, Amp Multi can support up to three speakers per amplified output—potentially as many as 24 speakers from one unit.
That gives us a lot of flexibility in larger homes.
We Don't Automatically Use Amp Multi Everywhere
This is important.
Just because Amp Multi is the newest Sonos amplifier doesn't mean it belongs in every room.
The regular Sonos Amp still makes sense in plenty of applications.
A single standalone audio zone may be better served by a standard Amp.
A room where we're using passive speakers for television audio may also be a good candidate because Sonos Amp includes HDMI ARC.
For larger centralized systems, Amp Multi may make more sense.
And sometimes the right answer is a combination.
That's why we determine the system requirements first and select the equipment second.
Step 5: Think About Bass
Ceiling and in-wall speakers can sound excellent, but there's a physical limit to the amount of low-frequency energy smaller architectural speakers can reproduce.
That's where subwoofers come into the conversation.
Not every zone needs one.
For background music in a bathroom, for example, a subwoofer probably isn't high on the priority list.
But in a great room, entertainment area, or outdoor space where music is important, adding a subwoofer can completely change the experience.
Amp Multi gives us both wired and wireless options.
It includes a dedicated line-level subwoofer output that can be assigned to one of its zones, and supported Sonos wireless Subs can be incorporated into the other zones.
This gives us flexibility to decide where additional low-frequency performance is actually worthwhile.
Step 6: Plan Where All of the Equipment Will Live
One of the best things about architectural audio is that most of the equipment can disappear.
The speakers are built into the home.
The amplifiers, network equipment, control hardware, and other components can be centralized somewhere else.
But where that equipment goes matters.
For larger projects, we typically want a dedicated location where everything can be installed cleanly and serviced properly.
That might be:
A mechanical room
A dedicated equipment room
A structured wiring space
A utility room
Another appropriately conditioned location
What we don't want is a pile of electronics stuffed into a cabinet with inadequate ventilation and a tangled mess of cables behind it.
A properly designed equipment rack gives us a much better foundation.
Why We Care So Much About the Equipment Rack
Most people will never show off their equipment rack to guests.
We still care a lot about it.
A properly built rack allows us to organize:
Amplifiers
Network switches
Routers
Control processors
Audio/video equipment
Power management
Patch panels
Wiring
It also gives us proper cable management and makes equipment much easier to access when something needs to be changed or serviced.
Amp Multi was clearly designed with this type of installation in mind.
Sonos offers a dedicated 2U rack mount that creates airflow around the amplifier without requiring additional vent panels. Amp Multi itself is fanless and convection cooled.
Consolidating multiple audio zones into fewer physical components can also make the rack significantly cleaner.
You may never interact with the rack.
But the quality of what happens there can have a big impact on the reliability and serviceability of everything you do interact with.
Step 7: Don't Forget the Network
This is a big one.
Sonos is a networked audio system.
That means the quality of the network matters.
A large Sonos installation shouldn't be designed independently from the home's network infrastructure.
We're thinking about:
Wired Ethernet
Network switches
Wi-Fi coverage
Access point locations
Network capacity
Equipment rack connectivity
Reliability
Future expansion
Amp Multi includes both Ethernet and Wi-Fi 6, giving us options for connecting it to the network.
For centrally located equipment, wired Ethernet is often an obvious choice because the network infrastructure is already right there in the rack.
But the larger point is this:
Whole-home audio and the home network are part of the same technology ecosystem.
Designing one while ignoring the other doesn't make much sense.
Step 8: Decide How You Want to Control Everything
One reason Sonos remains such an attractive platform is that it's easy to use.
Once we've done all the work behind the scenes, you can open the Sonos app, choose what you want to listen to, and decide where you want it to play.
Amp Multi supports up to four independent Sonos streams per unit along with Apple AirPlay 2 and Spotify Connect.
But Sonos doesn't necessarily have to operate by itself.
Amp Multi also integrates with major smart-home platforms including:
Control4
Crestron
URC
RTI
Nice
That means on a larger smart-home project, audio can become part of the broader control experience.
We can design the system so that the technology works together rather than creating a collection of unrelated apps.
Step 9: Tune the System
Installation isn't necessarily finished when the speakers start making sound.
The room itself affects what you hear.
Hard floors, large windows, high ceilings, open spaces, furniture, speaker placement, and room geometry all influence the finished result.
Amp Multi's ProTune feature gives us considerably more control here.
Each output provides a 10-band parametric EQ along with gain and delay adjustment.
That means we can make adjustments based on the actual environment instead of assuming every room behaves the same way.
When we're using Sonos Architectural speakers, Amp Multi can also automatically detect them and apply appropriate EQ profiles, limiter settings, and DSP tuning through Optimize Sonos Speakers.
Those are tools that help us take the system from "it works" to "it sounds right."
Step 10: Plan for What Comes Next
This is particularly important during new construction.
It's much easier to install wire before the drywall goes up than after the house is finished.
So even if you don't want audio in every possible location today, there are situations where it makes sense to prepare for tomorrow.
Maybe you aren't building the pool for another two years.
Maybe the bonus room won't be finished immediately.
Maybe you aren't sure whether you'll eventually want speakers in the garage.
Running the appropriate infrastructure during construction can give us options later without requiring invasive work.
We also think about capacity in the equipment rack, network infrastructure, amplifier expansion, and available power.
Amp Multi itself is designed to scale. Sonos supports systems with up to 32 total audio zones, and multiple Amp Multi units can be used together as the system grows.
We don't need to install everything on day one.
But it's smart to avoid unnecessarily limiting what can happen on day two.
What Does a Well-Designed System Look Like?
The answer is probably less exciting than you'd expect.
It looks simple.
You walk into the kitchen and play music.
You have friends over and extend that music outside.
Someone wants something different in another room, so they play it there.
The volume feels consistent as you move through the areas we've designed to work together.
The speakers blend into the architecture.
The equipment is organized somewhere you don't have to look at it.
And the system responds when you ask it to.
You don't think about amplifier channels.
You don't think about speaker loads.
You don't think about network topology.
You don't think about DSP settings.
You just use it.
That's the point.
The Technology Can Be Complicated. Using It Shouldn't Be.
Sonos Amp Multi gives us a powerful new tool for building larger whole-home audio systems.
Eight amplified outputs, flexible zone assignments, support for high speaker counts, professional tuning controls, rack-friendly hardware, and integration with the broader Sonos ecosystem give us more options than we've had with traditional Sonos Amp-based systems.
But the amplifier is still only one piece of the design.
A great whole-home audio system comes from getting all of the pieces right:
The right number of zones.
The right number of speakers.
The right speaker locations.
The right amplification.
The right network.
The right equipment infrastructure.
And controls that make sense for the people actually using the system.
That's how we approach whole-home audio at Treasure Valley Solutions.
We handle the complicated part behind the scenes so that when the system is finished, the experience is exactly what it should be:
Simple.
Planning Whole-Home Audio for Your Home?
If you're building a new home, remodeling, or looking to add whole-home audio to an existing property, the earlier we can be involved in the design, the more options we have.
We can help plan the audio zones, speaker locations, wiring, network infrastructure, equipment rack, amplification, and control system as one complete solution rather than treating each piece independently.
Because the best time to think about whole-home audio isn't after the drywall is finished.
It's while we still have the freedom to design it correctly.
Need Expert Help?
Ready to implement these solutions in your own home or business?
Our Services

Home theater design and installation planned around your room, viewing goals, and equipment scope.
Expert TV Mounting Treasure Valley Homeowners & Businesses Trust

Explore whole-home audio, commercial sound, Sonos setup, and surround sound installation in the Treasure Valley.

Complete home automation and control.
Serving the Treasure Valley
Local installation in your city