You've decided to bring the course home. A golf simulator sounds great in theory, step into a room, grab a club, and play Pebble Beach without leaving Idaho. But before you start shopping for launch m...
Golf Simulator Room Requirements: Minimum Size & Layout
You've decided to bring the course home. A golf simulator sounds great in theory, step into a room, grab a club, and play Pebble Beach without leaving Idaho. But before you start shopping for launch monitors and impact screens, there's a more fundamental question to answer: does your space actually meet the golf simulator room requirements for a safe, functional setup?
Get the room dimensions wrong, and you're looking at cracked ceilings, restricted swings, and a system that never feels right to use. Ceiling height, room width, depth behind the hitting area, flooring, and even lighting all play a role in whether your simulator performs as intended, or becomes an expensive frustration.
At Treasure Valley Solutions, we design and build dedicated entertainment spaces across the Boise and Meridian area, from home theaters to fully integrated game and recreation rooms. Golf simulator installations fall squarely into that work. We handle the AV integration, projection setup, lighting control, and acoustic considerations that turn a bare room into a space you'll actually want to spend time in. We've seen firsthand what happens when the room planning gets skipped, and it's always easier (and cheaper) to get the dimensions right from the start.
This guide breaks down the exact measurements you need, minimum and ideal, for ceiling height, width, and depth. We'll also cover layout considerations, flooring, ventilation, and the details most people overlook until it's too late.
Why golf simulator room requirements matter
Most people shopping for a golf simulator focus on the hardware: the launch monitor, the projector, the impact screen, and the software. Those are the exciting parts. But the room itself is the foundation, and every piece of equipment you install depends on it being the right size and shape. If your ceiling is too low or your room is too narrow, no amount of premium gear will fix the experience.
Understanding golf simulator room requirements before you build or convert a space saves you from costly mistakes. We work with clients who have already purchased equipment before measuring their space. Some get lucky. Others realize after delivery that their 8-foot ceiling won't allow a full driver swing, or that their 12-foot-wide bonus room is too tight for comfortable use. By that point, the options are limited and usually expensive.
What's at risk when the space is too small
When your room falls short on any critical dimension, safety becomes the first concern. A driver swing generates significant clubhead speed, and if you catch a ceiling joist, a light fixture, or a wall on your backswing, you can damage the room, the club, or yourself. This isn't a rare edge case. It happens regularly in rooms that seem "close enough" on paper but fail in practice the moment someone picks up a driver.
Swinging a driver in a room with less than 10 feet of ceiling clearance is genuinely dangerous, not just uncomfortable.
Equipment performance is the second casualty. Launch monitors need a minimum distance from the ball to accurately track clubhead data and ball flight. Projectors need enough throw distance to fill the screen properly. Compress any of these dimensions, and you get inaccurate shot data, a distorted image, or both. You end up with a setup that doesn't perform the way the product reviews suggested it would.
How room dimensions affect shot data accuracy
Your launch monitor measures dozens of data points in the fraction of a second after impact: ball speed, launch angle, spin rate, carry distance, and more. These sensors, whether radar-based or camera-based, need space to work correctly. A radar unit placed too close to the screen may struggle to capture full ball flight data. A camera-based system positioned incorrectly relative to the hitting mat and tee line will produce readings that don't reflect your actual swing mechanics.
Screen placement and hitting depth also affect the realism of the visual experience. If you're hitting from 5 feet away from the screen because the room is shallow, the simulated perspective breaks down. Most simulators are designed with 8 to 12 feet of hitting depth in mind. Squeezing below that range means accepting compromises you may not have anticipated when you made your purchase.
The financial cost of poor planning
Poor room planning is expensive in ways that compound quickly. Returning or reselling a projector that doesn't fit your room's throw distance is manageable. But if you've already had an impact screen framed and mounted, or run cabling through finished walls, changing course becomes a genuine renovation project, not just a simple equipment swap. Rework costs on a finished basement or spare room can run into thousands of dollars.
Professional installation helps you avoid many of these problems, but only if the room dimensions are correct from the start. No installer can make a 7-foot ceiling taller or add 3 feet of width to a finished space. The planning stage is where you have full control over the outcome. Once walls are closed and equipment is permanently mounted, your options narrow fast. Taking the time to understand what your space actually needs before you spend a dollar on hardware is the most practical and cost-effective decision you can make.
Minimum room size by height, width, and depth
When you're evaluating a space for a golf simulator, three dimensions determine whether the setup will work: ceiling height, room width, and room depth. Each one has a hard floor below which the simulator becomes either unsafe or non-functional. Understanding these minimum thresholds helps you quickly rule out spaces that won't work and confirm the ones that will.
Ceiling height: the most critical dimension
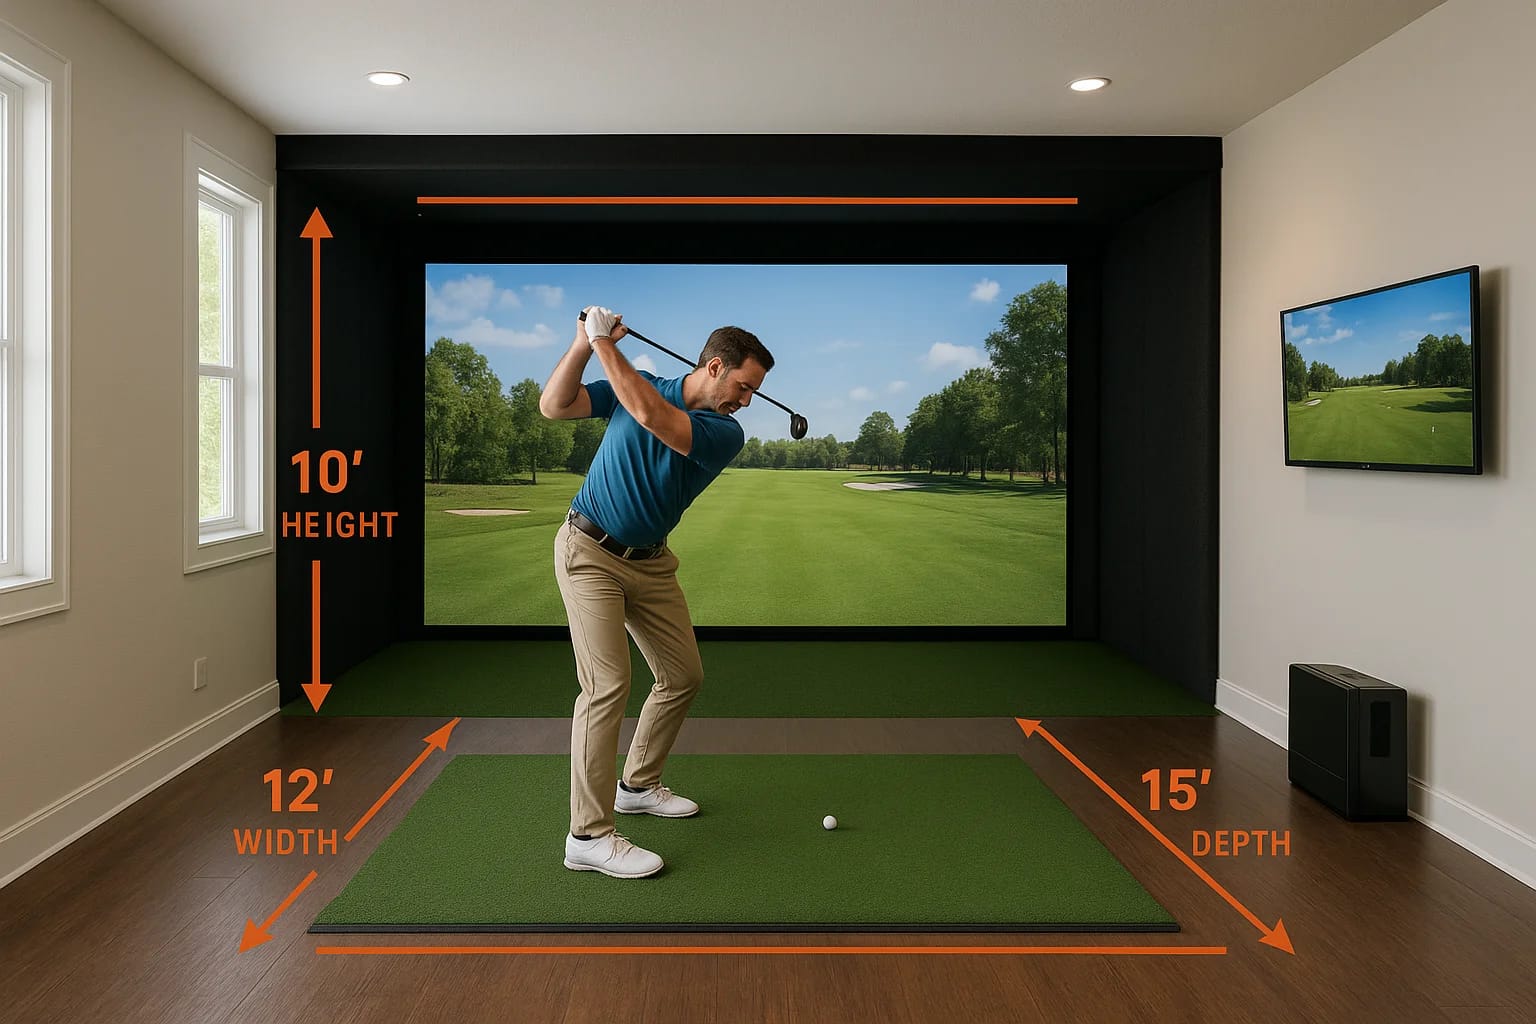
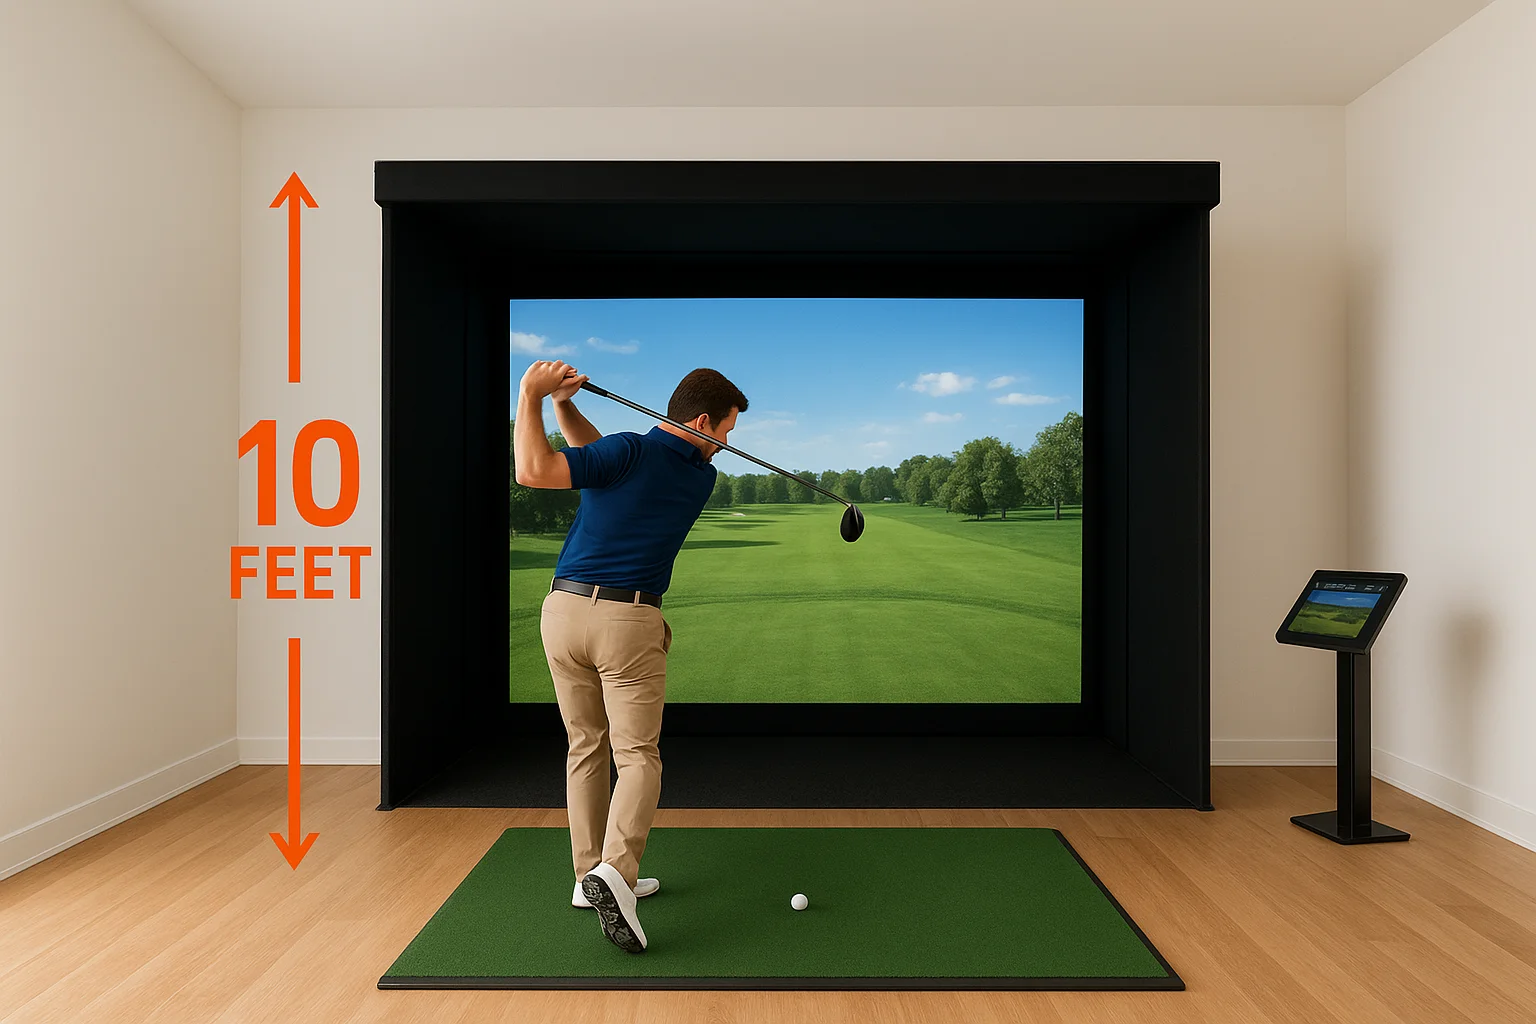
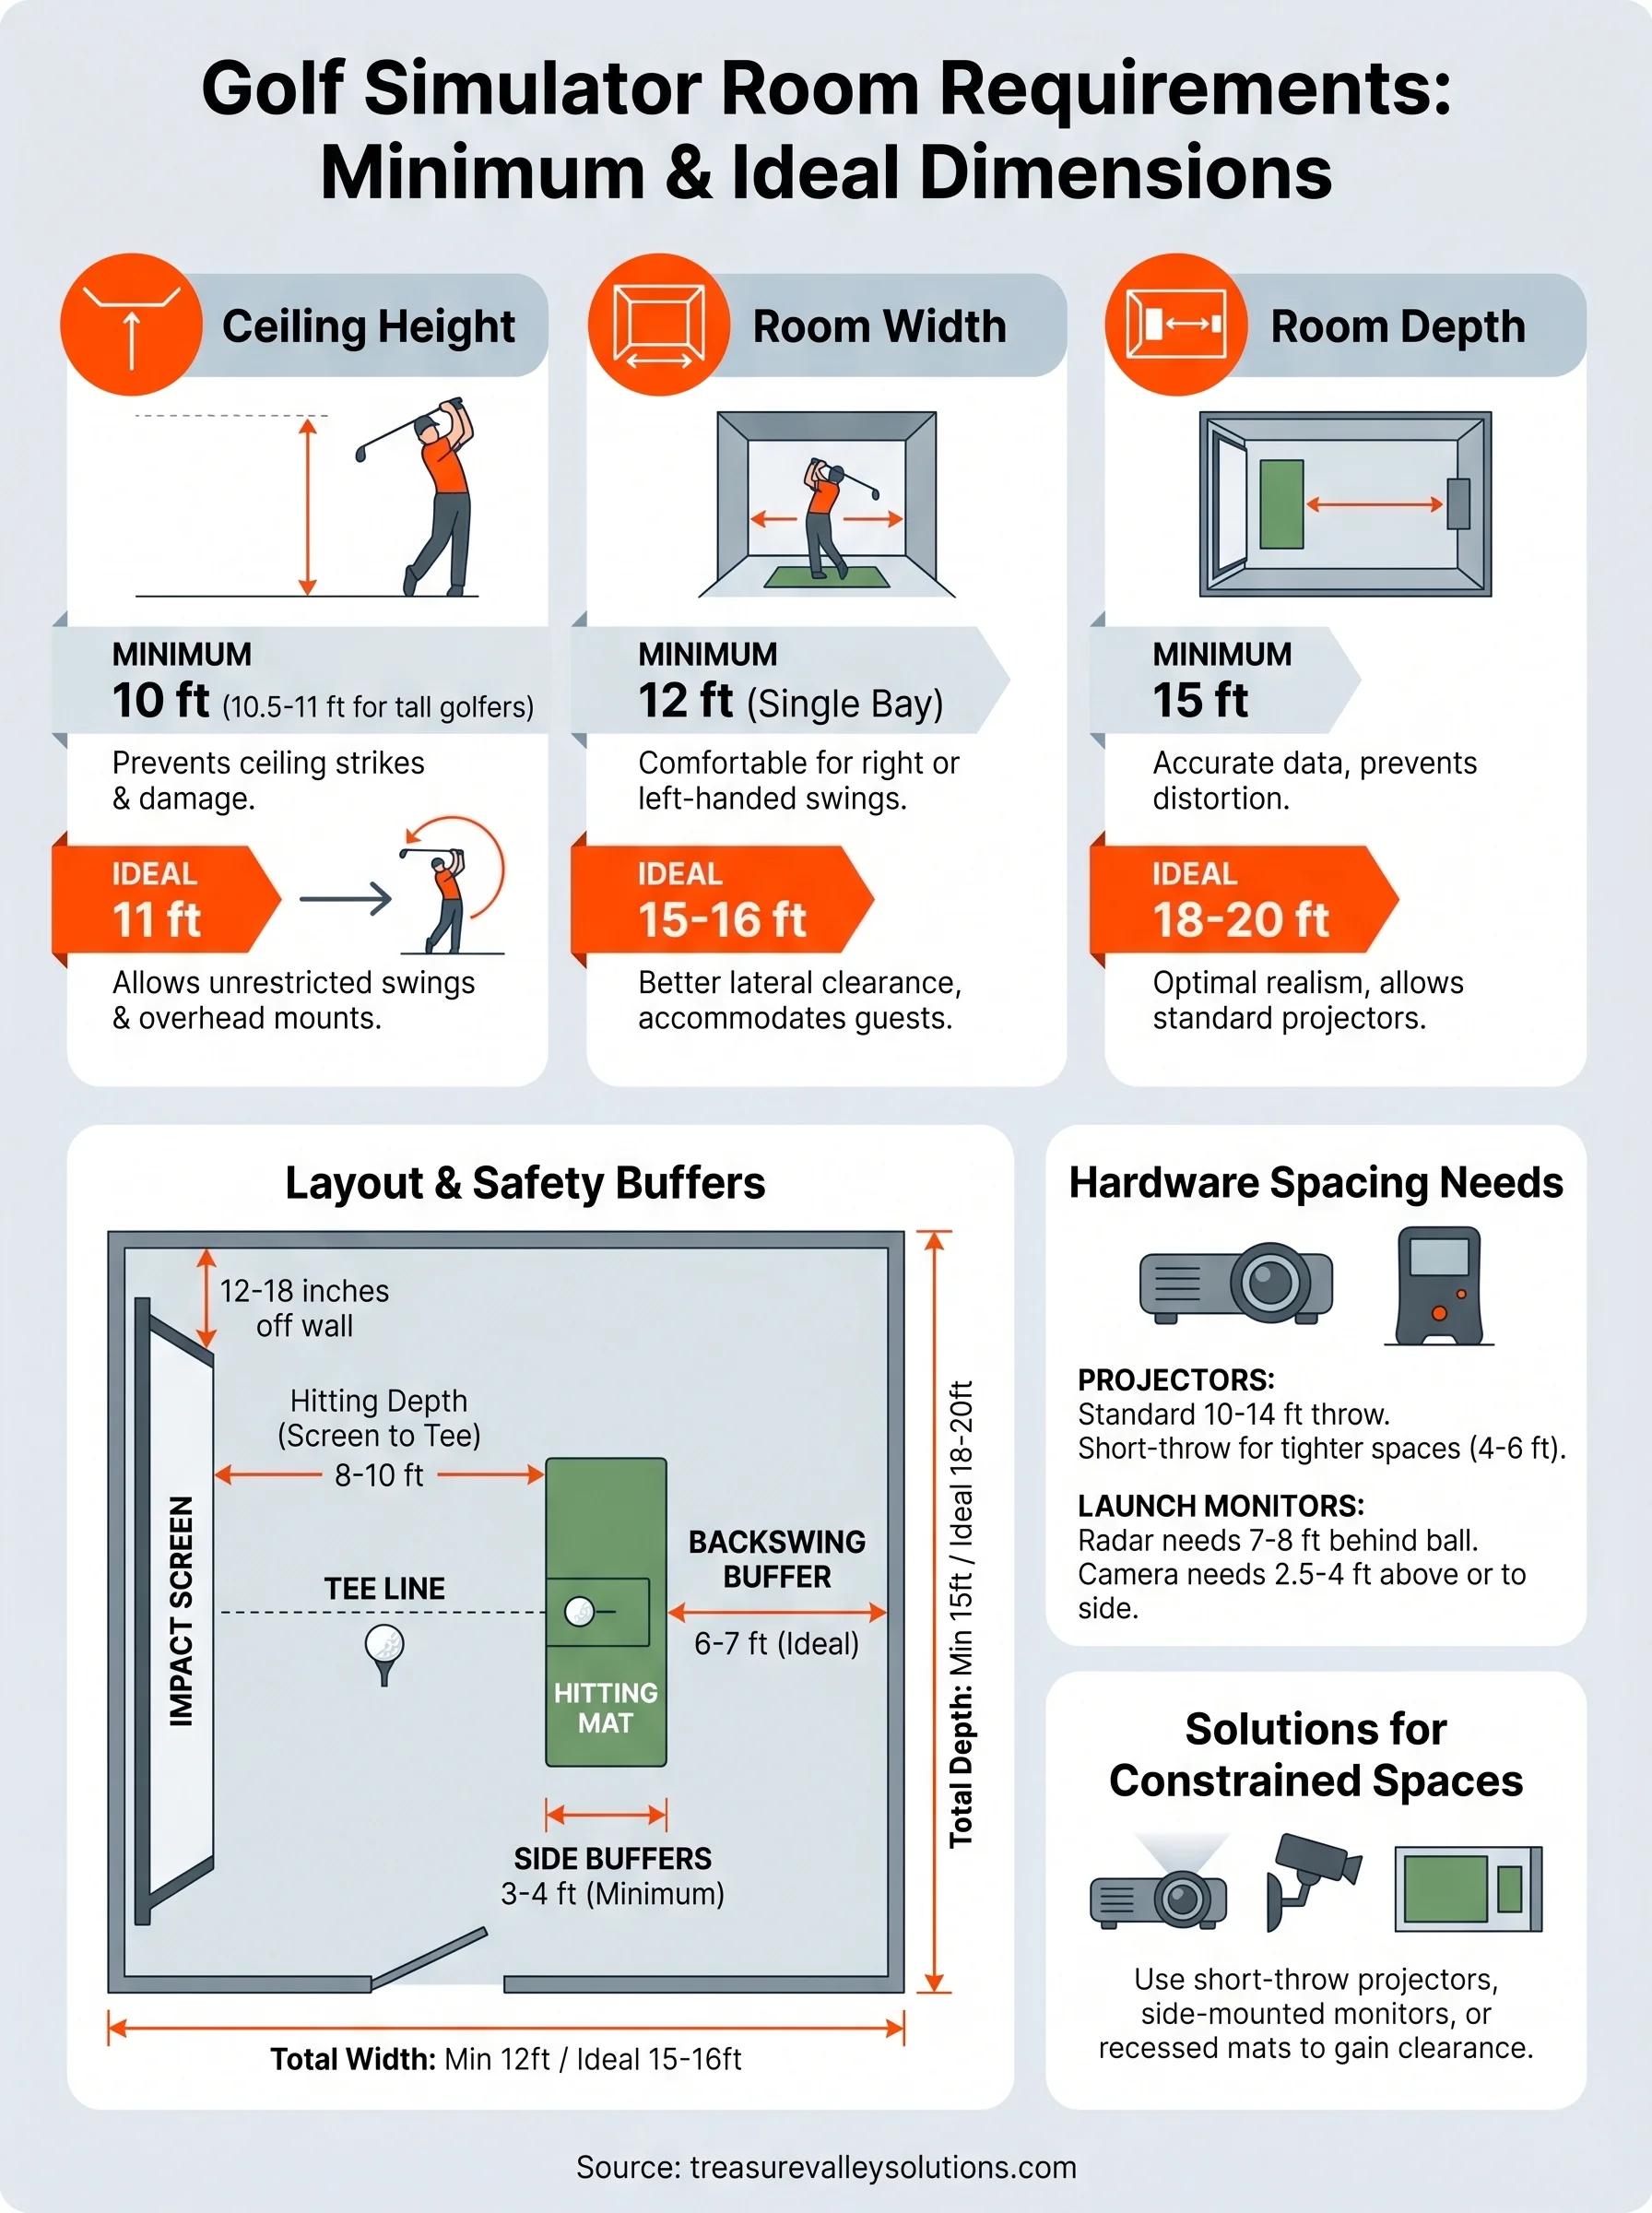
Ceiling height is where most rooms fail first. The absolute minimum ceiling height for a golf simulator is 9 feet, and that only works if you're a shorter golfer who swings shorter clubs. Most golfers need at least 10 feet of clear vertical space to swing a driver without the risk of hitting the ceiling on the backswing or follow-through. This measurement needs to account for any beams, light fixtures, HVAC ducts, or ceiling-mounted equipment, not just the raw ceiling height from the floor.
If your ceiling measures 9 feet but has an exposed beam running through the hitting zone, your usable clearance is whatever falls below that beam.
Taller golfers, those over 6 feet, should plan for 10.5 to 11 feet of clear height as a realistic minimum. The swing arc on a driver at full extension reaches higher than most people expect, and the risk of a ceiling strike is not worth the saved headroom.
Width and depth minimums
Room width sets the boundaries of your swing from side to side. The minimum width for a single-bay golf simulator is 12 feet, measured wall to wall. This gives a right-handed golfer enough lateral space to take a full swing without the club approaching the side wall. Left-handed golfers need the same clearance mirrored in the opposite direction, so 12 feet remains the minimum regardless of which hand you swing with.
Room depth controls two things simultaneously: how far you stand from the impact screen and how much space sits behind you during the backswing. The minimum depth for a functional simulator is 15 feet, measured from the screen to the back wall. Within that 15 feet, the hitting mat typically sits around 8 to 10 feet back from the screen, leaving 5 to 7 feet of clearance behind the golfer. These are the baseline golf simulator room requirements that most manufacturers build their products around, so falling below any of these numbers means you'll need to look at specialized short-throw or side-mounted equipment configurations instead.
Ideal room size for comfort and full swings
Meeting the minimums keeps your setup functional, but ideal dimensions let you swing freely, move around the hitting area naturally, and bring guests in without anyone feeling crowded. If you're building a dedicated space or finishing a basement specifically for a simulator, planning for ideal measurements rather than bare minimums produces a noticeably better experience and avoids the ceiling-watching anxiety that comes with a room that's just barely big enough.
Ceiling height that gives you room to breathe
The ideal ceiling height for a golf simulator is 10 to 11 feet of clear, unobstructed vertical space. At that height, nearly any golfer swinging any club can complete a full arc without adjusting their natural motion. You stop thinking about the ceiling entirely, which means your focus stays on the shot in front of you rather than on managing your swing to fit the room.
A ceiling at 10 feet or above also gives you flexibility when mounting projectors, lighting systems, or overhead speakers without losing usable swing clearance below those fixtures.
Taller golfers, or those who want a completely unrestricted practice environment, should target 11 feet as the benchmark. This adds a meaningful buffer above the highest point of the swing arc and leaves room for ceiling-mounted equipment that might otherwise reduce your usable clearance by 6 to 12 inches once installed.
Ideal width and depth for a full experience
The ideal room width for a single-bay simulator is 15 to 16 feet. This provides comfortable lateral clearance on both sides of the hitting position, which matters when guests watch from the side or when you rotate between right-handed and left-handed golfers. A 12-foot-wide room clears the minimum, but active use in that space feels noticeably tighter than most people expect.
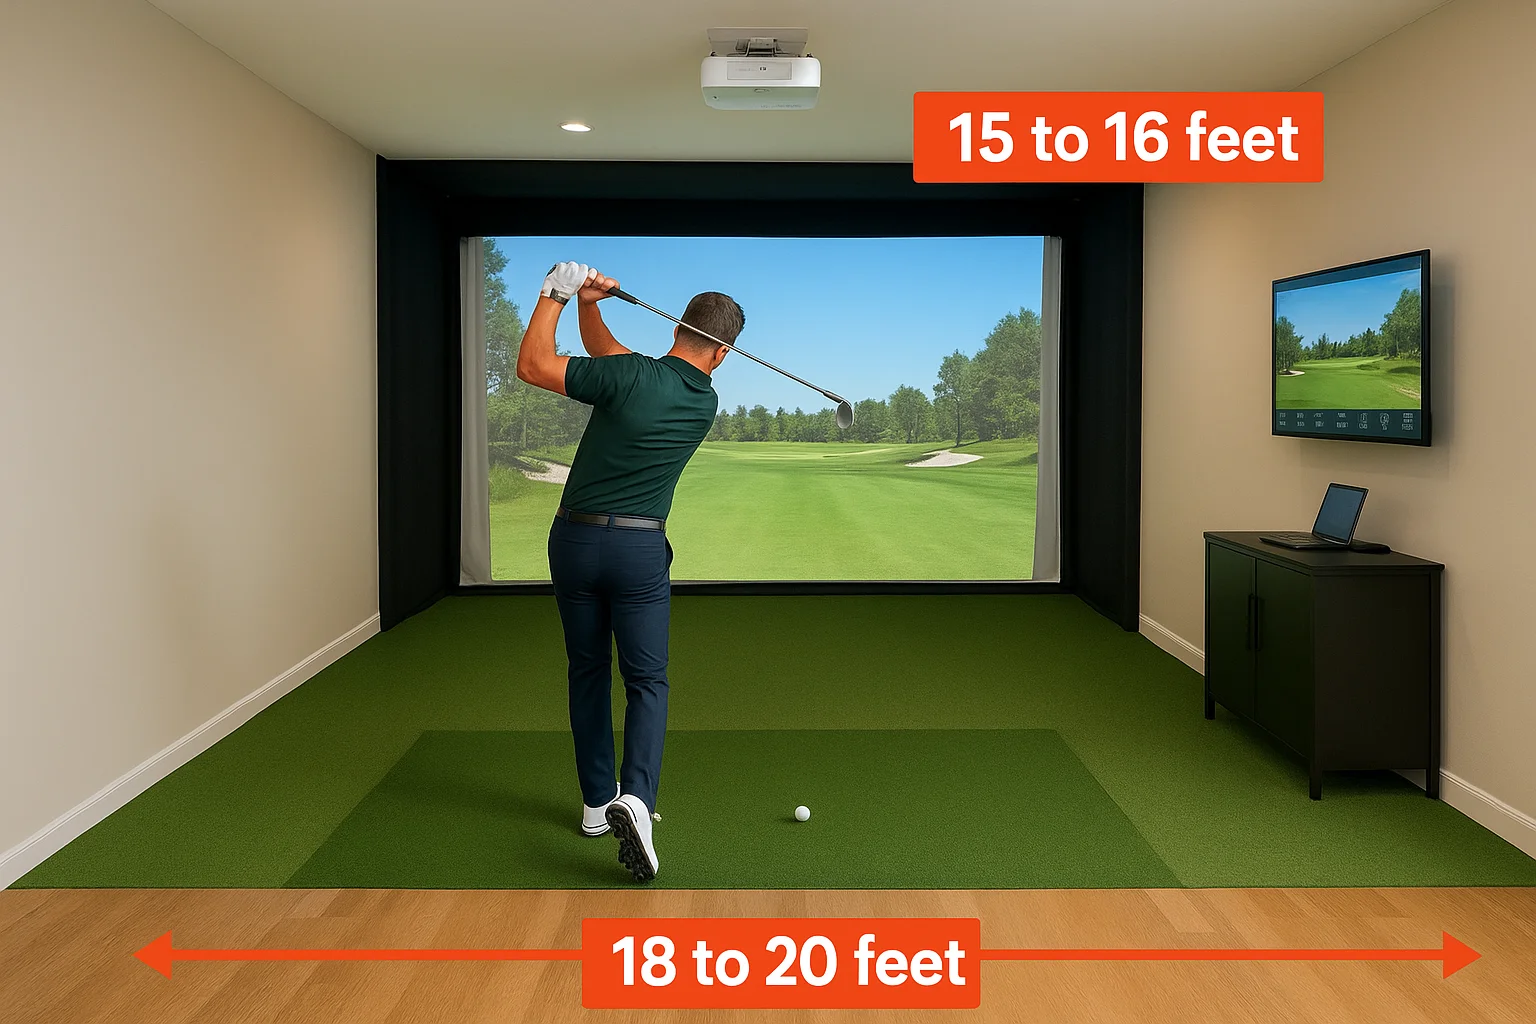
Room depth is where ideal dimensions make the biggest difference in shot realism and data accuracy. A depth of 18 to 20 feet lets you position the hitting mat 10 to 12 feet from the impact screen while keeping 6 to 8 feet of open space behind the golfer. This distance also gives projectors enough throw to fill a standard screen without image distortion. When you're working through your golf simulator room requirements, pushing room depth from 15 to 18 feet is often the single change that produces the most noticeable improvement in everyday use and equipment performance.
Layout basics: screen, tee line, and safety buffers
Room dimensions give you the outer boundaries, but where you place each element inside that space determines how well the setup actually works. The screen, the hitting mat, and the safety buffers all interact with each other, and getting one wrong shifts the others out of position. Before you mount anything or pour a concrete pad, map out the layout on paper so you know exactly where each component lands.
Where the screen goes and how far back to set the tee line
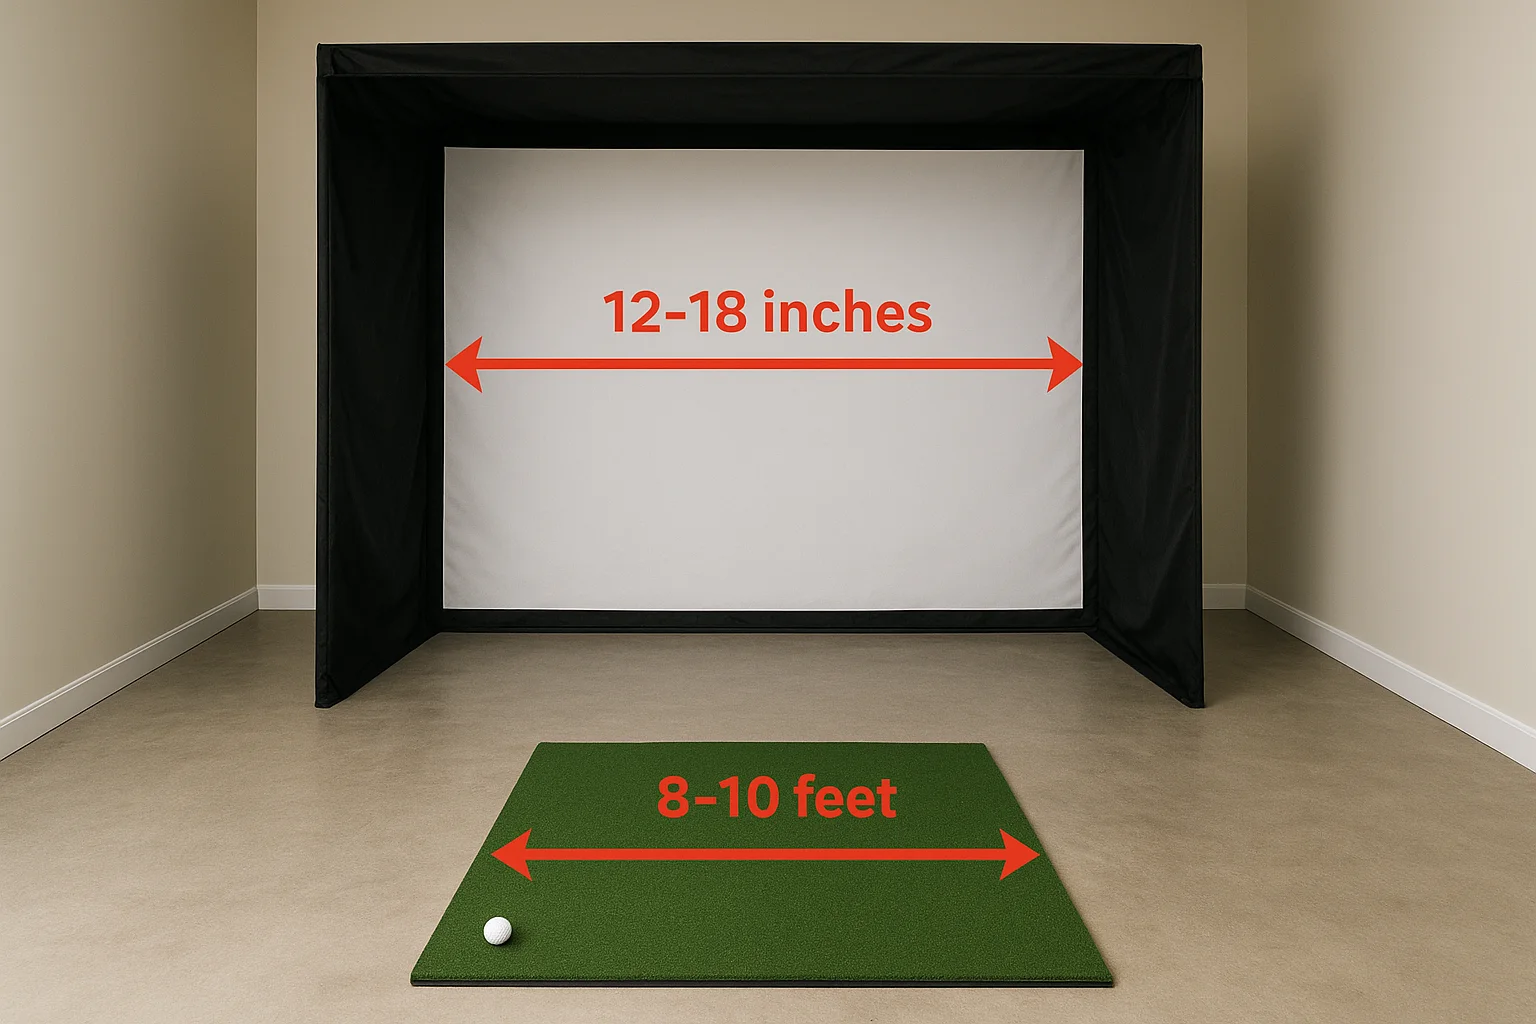
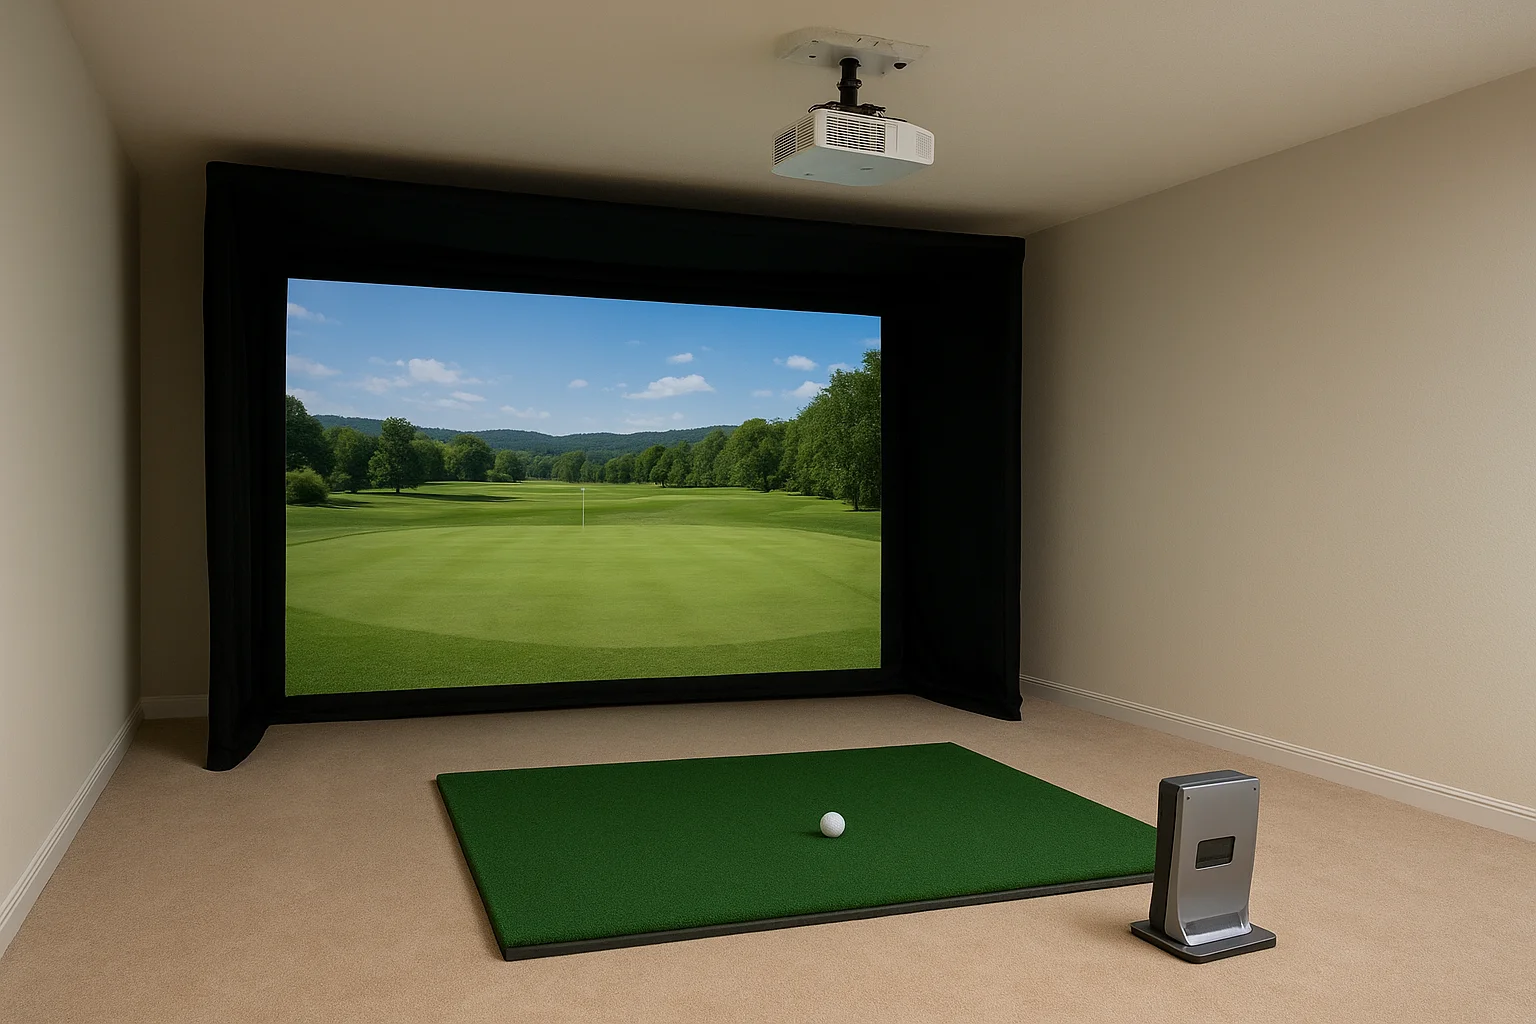
Your impact screen anchors the entire layout. It should sit 12 to 18 inches off the front wall, not flush against it, to allow the screen material to flex on impact and absorb the ball's energy without transferring force directly into the framing. From that screen face, you measure backward to establish your tee line, the point where the hitting mat sits and where you address the ball.
The distance between the screen face and the center of your hitting mat is called the hitting depth, and it drives nearly every other layout decision in the room.
Most simulator systems are calibrated for 8 to 10 feet of hitting depth as a standard range. Staying within this window keeps the visual scale accurate and helps your launch monitor capture clean data. If your room depth is tight, you can push toward the 8-foot end, but dropping below that mark starts to affect both data accuracy and the sense that you're actually hitting toward a real target.
Safety buffers behind and beside the hitting area
The space behind the tee line is your backswing buffer, and it gets underestimated more than any other golf simulator room requirement. You need a minimum of 5 feet from the center of your hitting mat to the back wall, and 6 to 7 feet is more practical for a full driver swing. This isn't just about comfort; it's about preventing club contact with the wall on a full backswing arc.
Lateral buffers on each side of the hitting position should be at least 3 to 4 feet from the center of the mat to the nearest side wall. A right-handed golfer's club extends well to the right on the follow-through, and a left-handed golfer mirrors that in the opposite direction. Running a taped outline of your swing arc on the floor before you finalize your layout lets you see where the club actually travels, so you can confirm the buffers are sufficient before anything gets permanently installed.
Launch monitor and projector space needs
Your launch monitor and projector are the two most space-sensitive pieces of equipment in your simulator setup. Both require specific distances to function correctly, and both interact directly with your room's depth and ceiling height. When you're working through your golf simulator room requirements, mapping out where these two components sit in the room before you buy either one prevents a lot of backtracking later.
Launch monitor placement and distance requirements
Launch monitors fall into two main categories: radar-based units and camera-based systems. Each one has different spatial needs, and knowing which type you're working with shapes how you position it in the room. Radar units, like the Garmin Approach R10 or the Bushnell Launch Pro, work by tracking ball flight across a measured distance, so they need enough room behind the ball to capture the full launch data window before the ball hits the screen.
Most radar-based launch monitors require at least 7 to 8 feet of hitting depth from the ball position to the screen to return accurate spin rate and carry data.
Camera-based systems, such as the Foresight Sports GC3 or the Uneekor QED, mount above the hitting zone on the ceiling or on a dedicated frame. These units need 2.5 to 4 feet of clearance above the ball position depending on the model, which means a 9-foot ceiling can work with some systems but eliminates others entirely. Check the manufacturer's mounting height specifications for your exact unit before you finalize your ceiling height.
Projector throw distance and mounting position
Projector placement depends on the size of your impact screen and the projector's throw ratio, which is the relationship between the projector's distance from the screen and the width of the image it produces. A standard throw projector typically needs 10 to 14 feet of distance from the screen to fill a 10-foot-wide impact screen at full resolution without any keystone distortion.
If your room depth is shorter, a short-throw projector closes that gap significantly, projecting a full-size image from as little as 4 to 6 feet away. These units usually mount from the ceiling above the hitting area rather than behind the golfer, which keeps them out of the swing path entirely. Ceiling mounting height for a projector typically lands between 8 and 10 feet, so confirm that your projector's mounting position doesn't reduce your usable swing clearance once the unit and its housing are installed.
How to measure your room and test your swing
Knowing your room dimensions on paper is different from understanding how they actually feel in practice. Before you finalize any purchase decisions, grab a tape measure and spend 30 minutes in the space with the actual golf clubs you plan to use. This hands-on step catches problems that floor plans and rough estimates consistently miss.
Taking accurate measurements
Start by measuring ceiling height at multiple points across the hitting zone, not just in one corner. Basements and converted garages often have beams, HVAC ducts, or soffit overhangs that reduce clearance in specific spots. Measure from the finished floor to the lowest fixed obstruction in the path of your swing arc. Write down the smallest number you find, because that is your actual usable ceiling height for purposes of meeting your golf simulator room requirements.
Then measure room width and depth with a laser measure or a long tape. Pull the measurement from finished wall to finished wall, not from stud to stud or from an unfinished surface. Mark the center of your planned hitting position on the floor with tape, then measure from that point to each side wall, to the front wall where your screen will go, and to the back wall. These four numbers tell you exactly how much clearance you have in every direction.
Recording all six measurements (height, two lateral distances, hitting depth, and backswing clearance) in one place before you shop saves you from needing to revisit the room repeatedly as you compare equipment.
Testing your swing before installation
With your measurements confirmed, grab a driver and stand at the marked hitting position. Take a slow-motion full swing and watch where the club travels at its highest point on the backswing and follow-through. Have someone spot from the side to confirm clearance, or record a video from behind so you can review the swing arc relative to the ceiling and walls. This is the most direct way to verify that your numbers translate into a swing that actually feels natural.
Pay special attention to the follow-through, which most golfers underestimate in both length and height. If the club comes within 12 inches of the ceiling or a side wall at any point during the motion, you need more room before you proceed with installation. Catching this during the measurement phase costs you nothing. Finding it after a permanent screen frame is built costs significantly more.
Making a simulator work in small or odd rooms
Not every available space meets the standard golf simulator room requirements, and that doesn't automatically rule it out. Basements with structural posts, garages with sloped ceilings, and bonus rooms with odd proportions all present real challenges, but many are workable with the right equipment choices and layout adjustments. The key is identifying exactly which dimension is the limiting factor before you start shopping, because different constraints call for different solutions.
Short-throw projectors and side-mounted launch monitors
When room depth is your primary limitation, short-throw projectors are the most direct fix available. These units produce a full-size image from much shorter distances than standard projectors, often as little as 4 to 6 feet from the screen, which lets you maintain a functional hitting depth without needing a long room behind it.
Side-mounted launch monitors offer a similar workaround for rooms where ceiling height makes overhead camera placement impossible.
Some launch monitors, like the Foresight Sports GC3, mount to the side of the hitting mat rather than overhead or directly behind the ball. Side-mounted configurations reduce your ceiling height dependency significantly and open up more placement flexibility in rooms where the ceiling drops below 9.5 feet.
Adjusting your setup for low ceilings
A low ceiling forces you to think carefully about which clubs you swing and how you position the hitting mat. Many golfers in constrained spaces keep drivers out of the rotation and focus on irons, wedges, and fairway woods, which have shorter shaft lengths and lower swing arcs. This isn't a perfect solution, but it keeps the space functional.
Recessing the hitting mat into a shallow floor cutout is another approach some installers use to gain 4 to 6 inches of effective ceiling clearance without modifying the ceiling itself. This works best in spaces where you control the flooring and can plan the recess during a renovation. Combined with a ceiling-mounted short-throw projector and a low-profile enclosure frame, a room that initially looked too tight can still come together into a usable setup.
Working around pillars, beams, and uneven layouts
Structural posts and exposed beams are the most common obstacles in basement simulator builds. Before you rule out a space because of a pillar, mark your hitting position and check whether the obstruction falls outside your swing arc. Many posts sit close enough to a side wall that they clear the 3-to-4-foot lateral buffer you need, making them a non-issue for the actual swing path.
Uneven ceiling heights, common in finished basements with dropped sections or soffits, require the same precision. Measure your clearance at multiple points along the planned swing arc, not just at the peak. A soffit that drops 18 inches in one corner may have no effect on your swing at all, or it may sit exactly where your club reaches its highest point. Knowing the difference before installation starts saves you from relocating equipment after the fact.
Planning for commercial bays and multi-user spaces
Commercial simulator installations operate under a different set of priorities than home setups. You're no longer designing for one golfer and one layout, you're designing for throughput, safety between adjacent users, and a consistent experience across multiple bays. The core golf simulator room requirements for ceiling height, width, and depth still apply, but everything gets scaled up and then layered with considerations that a residential installation doesn't face.
Sizing individual bays in a commercial facility
Each bay in a commercial facility should meet or exceed the ideal residential dimensions rather than the minimums. A standard commercial bay runs 15 to 16 feet wide, 18 to 20 feet deep, and at least 10 feet tall, because you're serving golfers of all heights and skill levels without knowing in advance who will walk in. Tighter bays that work for a dedicated home user become a liability in a commercial context where you can't control who uses the space or how they swing.
Building your commercial bays to ideal dimensions from the start costs less than retrofitting walls or lowering ceilings after you've opened.
Flooring material also matters more at commercial scale, since hitting mats take heavier use and the subfloor beneath them needs to absorb repeated impact without degrading. Rubber underlayment or reinforced concrete with a mat system holds up significantly better than wood subfloor under daily commercial traffic.
Separating bays safely and managing shared traffic areas
Dividing walls between bays need to be solid enough to stop a ball on a missed shot, not just a visual separator. Most commercial installations use framed walls with plywood backing covered by impact-absorbing material from the floor up to at least 8 feet. This protects adjacent golfers from a ball that gets away from the screen and also reduces the sound transfer between active bays.
Plan your common area and walkway widths separately from the bay dimensions. A corridor of at least 4 feet between the entrance to each bay and the main walkway gives users enough room to move in and out without disrupting an active session next door. If your layout includes a seating or waiting area facing the bays, set it back a minimum of 6 feet from any active hitting zone and use a physical barrier rather than relying on an open sightline alone. These layout decisions affect your liability exposure as much as they affect user experience, so they deserve the same careful attention you give to the technical dimensions.
Key takeaways
Getting your golf simulator room requirements right before you spend a dollar on equipment is the single most important step in building a setup that actually works. Your ceiling needs at least 10 feet of clear height, your room needs a minimum of 12 feet of width, and you need at least 15 feet of depth from screen to back wall. Ideal dimensions push those numbers to 11 feet, 15 to 16 feet wide, and 18 to 20 feet deep.
Beyond raw dimensions, your launch monitor placement, projector throw distance, tee line position, and safety buffers all need deliberate planning before installation begins. Small or awkward rooms can often work with short-throw projectors and side-mounted launch monitors, but only if you identify the constraints early. Commercial bays need to exceed residential minimums to serve a wide range of golfers safely.
Ready to plan your space the right way? Contact Treasure Valley Solutions to get started.