A golf simulator is only as good as the space around it. You can drop thousands on a premium launch monitor and projector, but if your enclosure doesn't contain the ball, block ambient light, or fit t...
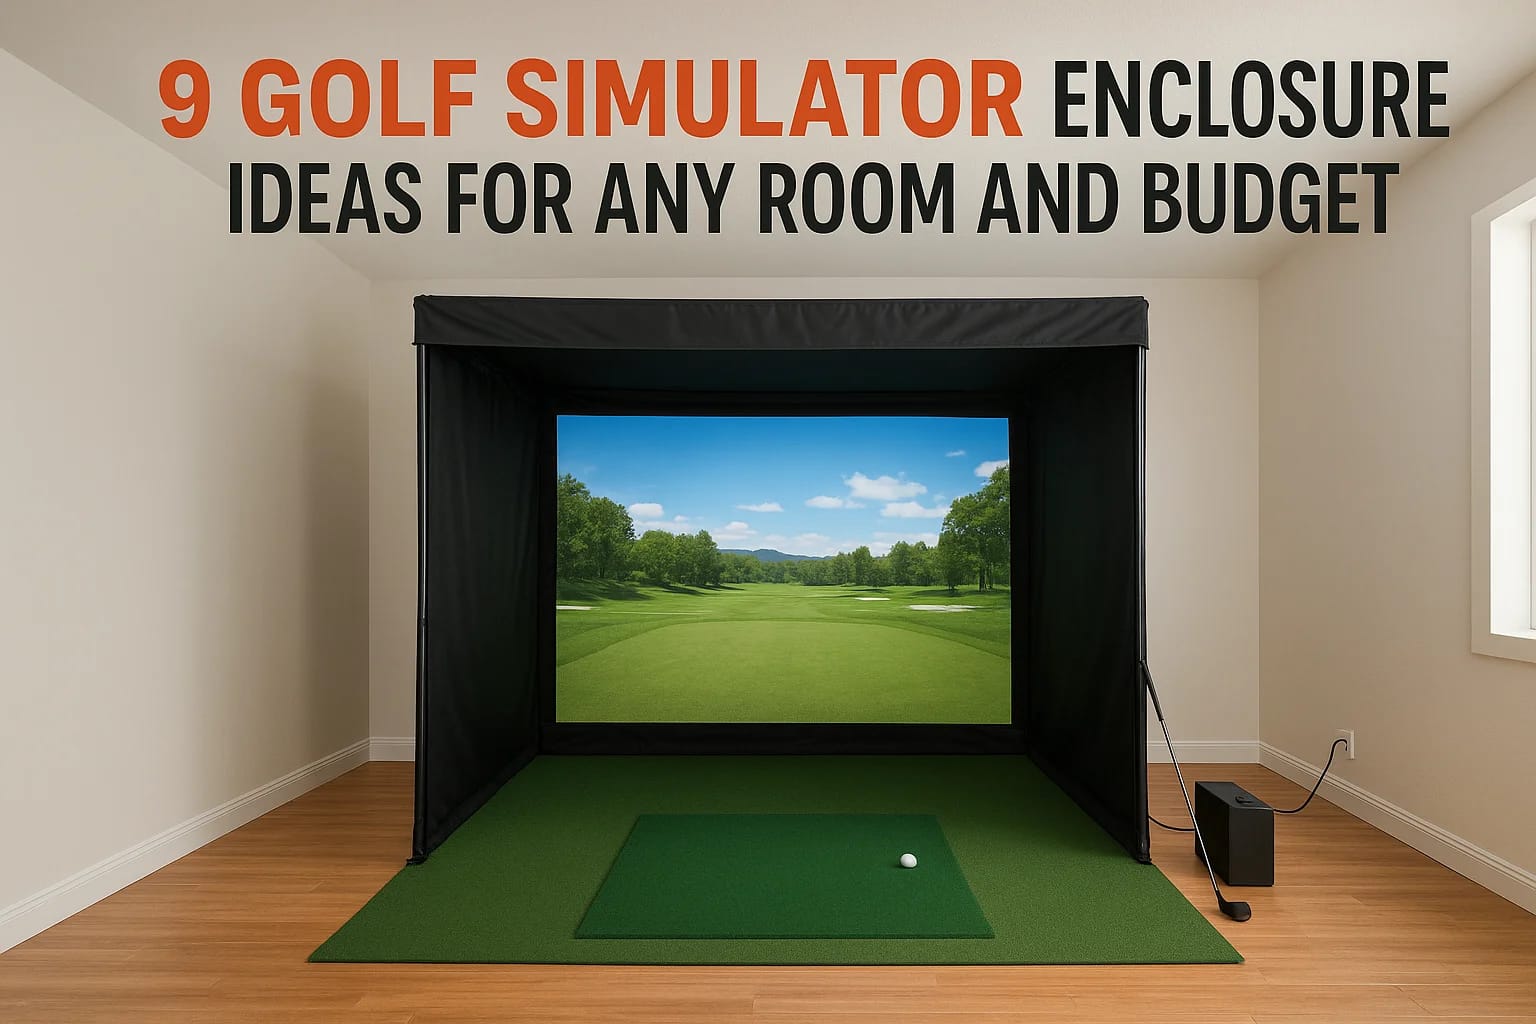
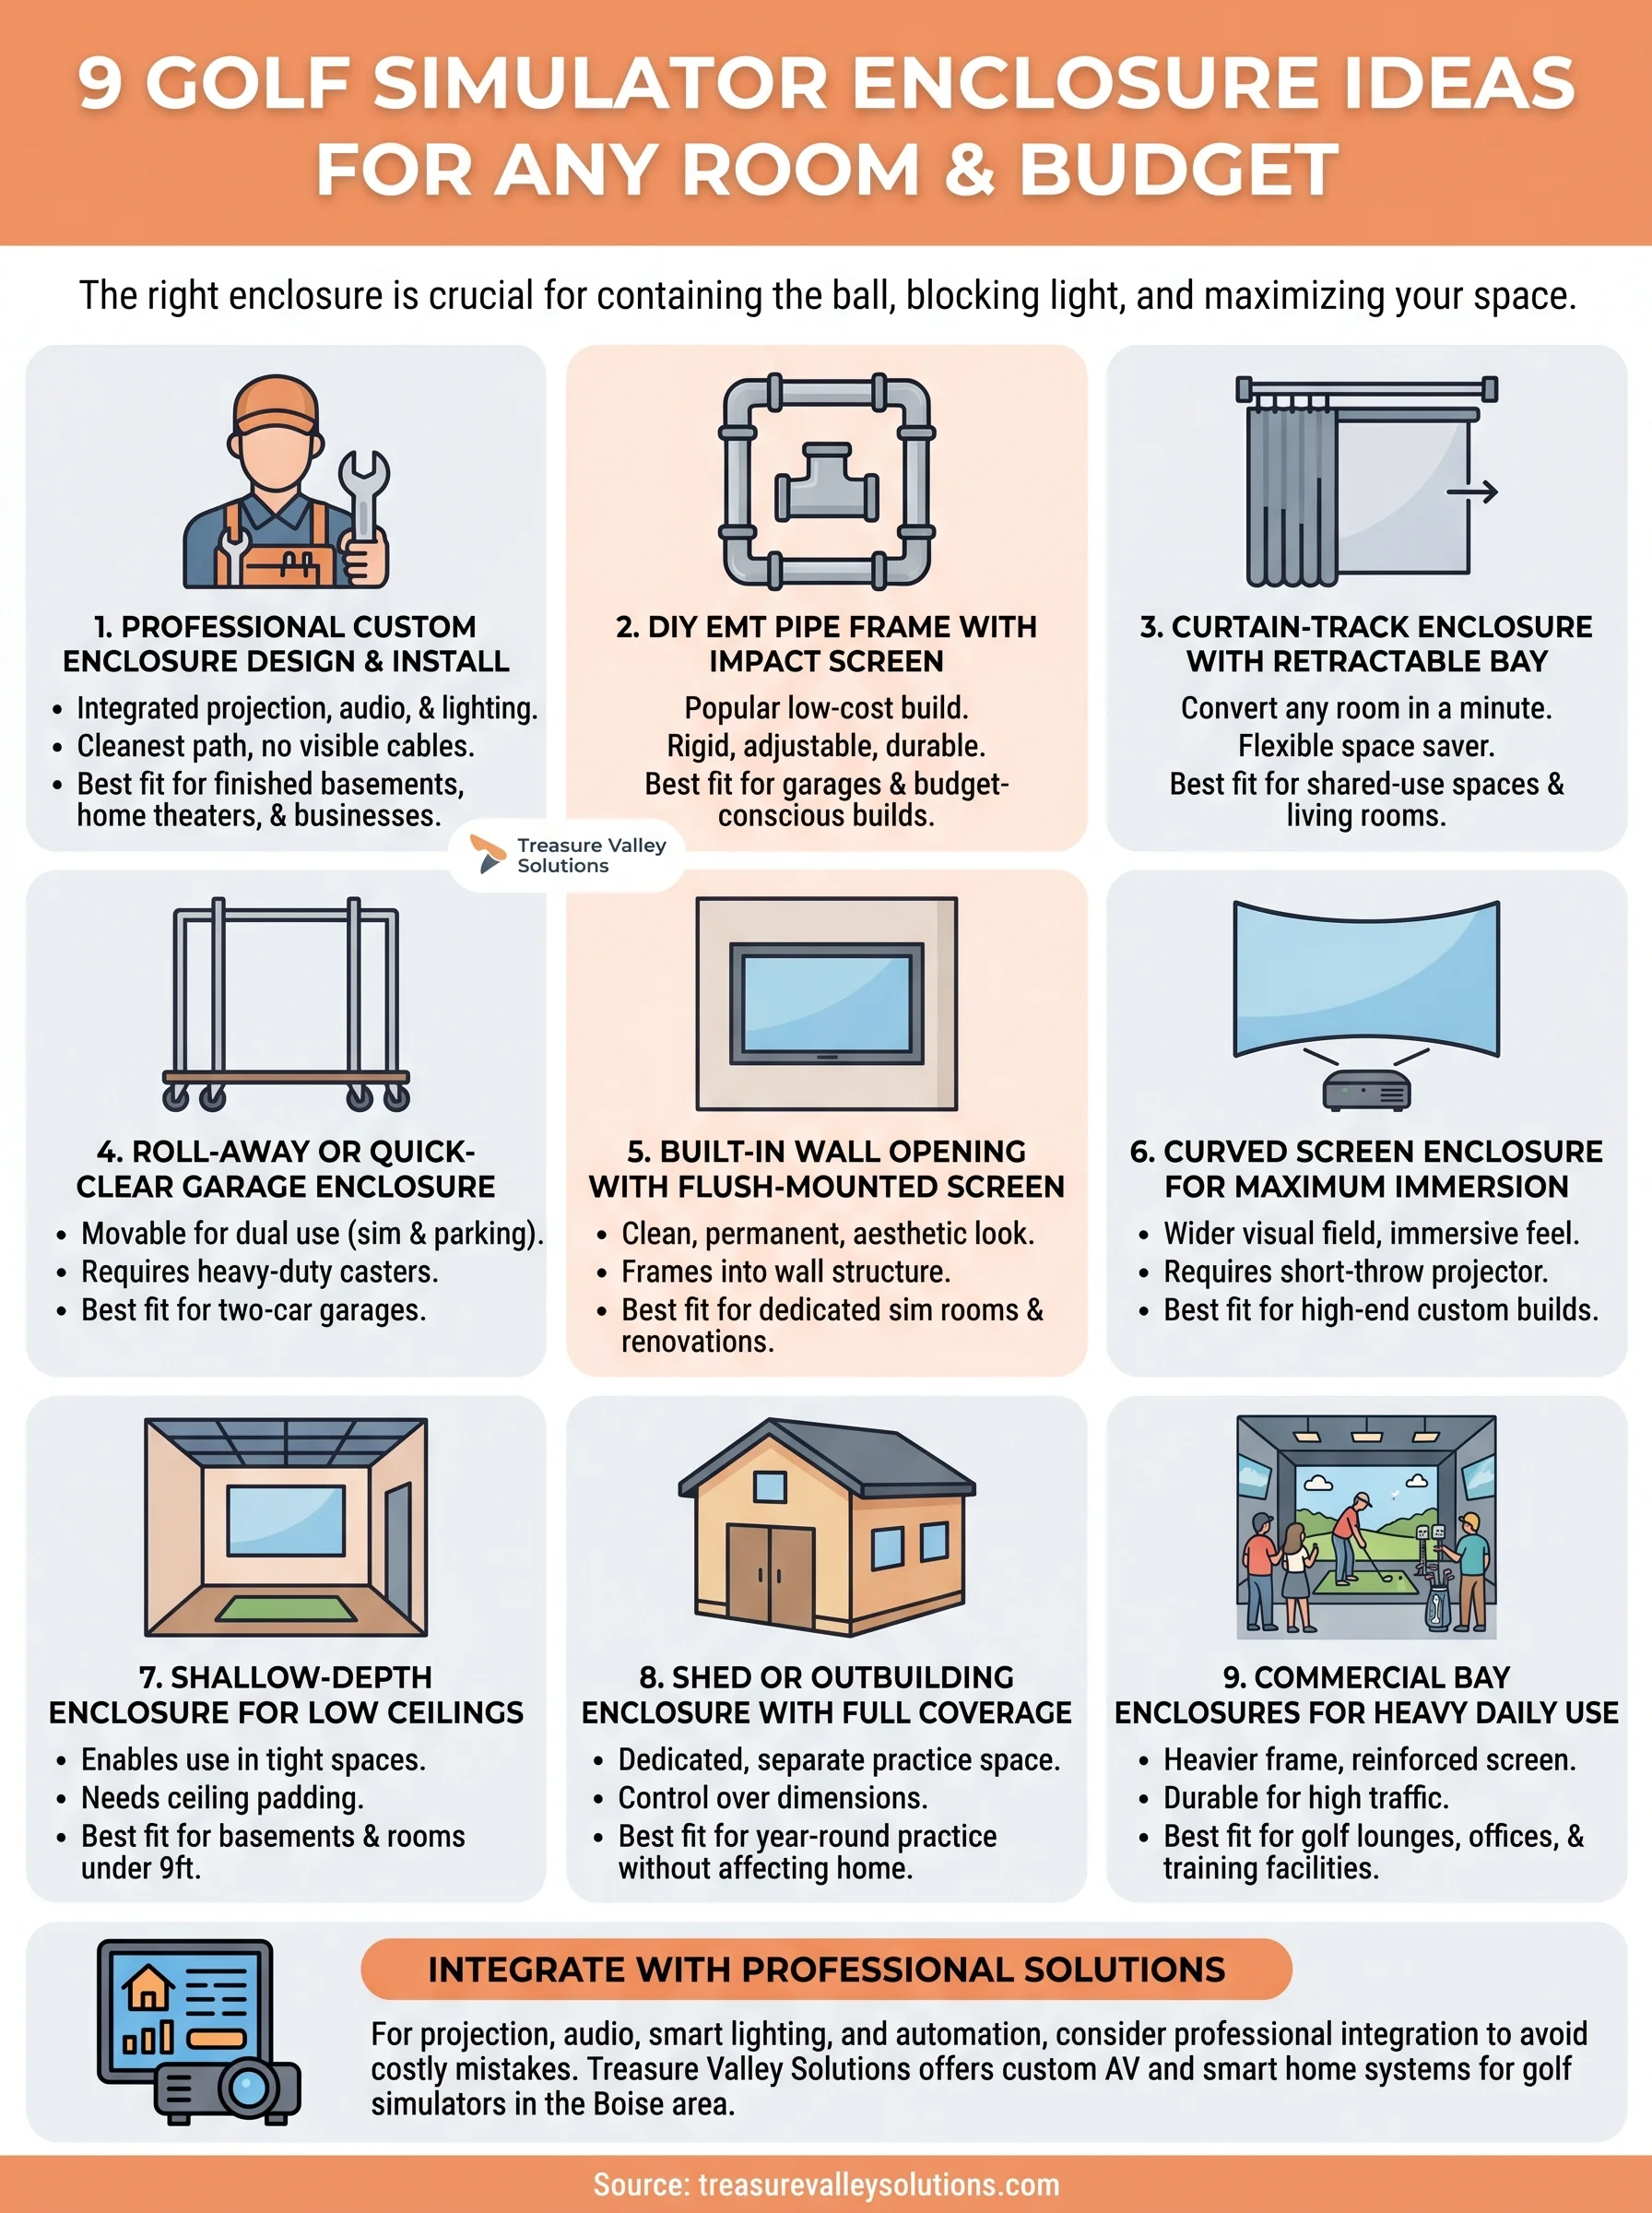
9 Golf Simulator Enclosure Ideas for Any Room and Budget
A golf simulator is only as good as the space around it. You can drop thousands on a premium launch monitor and projector, but if your enclosure doesn't contain the ball, block ambient light, or fit the room properly, the whole setup falls short. That's why exploring golf simulator enclosure ideas before you buy a single piece of hardware can save you real money, and a lot of frustration. The right enclosure turns a spare bedroom, garage, or basement into a year-round practice space that actually works.
The challenge is that no two rooms are the same. Ceiling height, available square footage, flooring, and budget all shape what's possible. Some golfers need a compact setup that tucks into a corner; others want a dedicated sim room that rivals a commercial bay. Whether you're planning a DIY frame from PVC pipe or a professionally integrated enclosure with projection, surround sound, and smart lighting, there's an approach that fits.
At Treasure Valley Solutions, we design and install custom AV and smart home systems across the Boise area, including the projection, audio, lighting, and automation that bring golf simulator rooms to life. Below, we break down nine enclosure ideas spanning different room sizes, styles, and budgets to help you find the right fit for your space.
1. Professional custom enclosure design and install
A professionally designed enclosure takes the guesswork out of every decision. Instead of adapting your room around off-the-shelf dimensions, a custom installation adapts to your ceiling height, wall layout, and technology stack from the start. This is the cleanest path through the available golf simulator enclosure ideas if you want projection, audio, and lighting all working together without visible cable runs or compromised sightlines.
What you get with a pro-built enclosure
Pro installers handle far more than a frame and screen. They work through structural framing, impact screen tensioning, side-net coverage, and padding so every component functions as a system. You also get integration options that DIY builds rarely include, such as automated lighting scenes, acoustic treatment, and smart controls that let you switch between simulator mode and living room mode with a single tap.
A well-designed enclosure isn't just safer for your walls, it makes the simulator noticeably easier to use every single day.
Best fit for homes and businesses in Treasure Valley
Custom installs make the most sense when the space has to serve more than one purpose or when the finished look matters. Finished basements, bonus rooms, and home theaters in the Treasure Valley area are common candidates. Commercial settings like indoor golf lounges, office break rooms, and hospitality venues in Boise or Meridian also benefit, since those spaces carry heavier daily use and a higher standard for aesthetic consistency and equipment durability.
Planning checklist to bring to a walkthrough
Walking into a site visit with room data and a clear use case saves time on both sides. Before you meet with an installer, gather these details so the conversation stays focused on solutions rather than basics:
- Room dimensions: width, depth, and ceiling height
- Existing electrical: outlet locations and circuit capacity
- Flooring type: concrete, subfloor, or finished hardwood
- Light sources: windows, recessed lights, and their positions
- Primary use: solo practice, entertainment, or commercial play
Typical cost range and what drives price
Professional custom enclosures typically run $3,000 to $15,000 or more, depending on screen size, frame material, integration complexity, and finish level. The biggest cost drivers are structural modifications and AV integration rather than the enclosure hardware itself. Adding projection mapping, surround sound, or smart home automation will push the number higher, but those additions also deliver a noticeably better experience.
2. DIY EMT pipe frame with an impact screen
An EMT conduit frame is the most popular low-cost build path for golfers who want a functional enclosure without professional installation. You source electrical metallic tubing from any hardware store, connect it with standard fittings, and hang an impact screen across the front. The result is a rigid, adjustable frame that holds up to repeated ball strikes better than PVC alternatives.
How the EMT pipe enclosure works
You build a rectangular frame using 1-inch or 1.5-inch EMT conduit and bolt-together pipe clamps. The impact screen attaches with bungee cords or grommets along the top and sides, creating controlled tension that absorbs each shot and returns the ball to a predictable spot. Side netting completes the containment zone so stray shots never reach the walls.
A well-tensioned impact screen does most of the safety work, so don't cut corners on how you attach it to the frame.
Best fit for budget builds and garages
This setup works well in unfinished garages and open basement areas where function outweighs aesthetics. Among all the golf simulator enclosure ideas on a tight budget, an EMT frame gives you a solid foundation you can improve over time.
Key measurements for width, height, and depth
Your enclosure needs at minimum these dimensions for a safe full swing:
- Width: 10 feet minimum, 12 feet preferred
- Height: 9 feet minimum
- Depth: 5 feet from mat to screen
Typical cost range and where DIY budgets go wrong
Frame materials run $100 to $300, and a quality impact screen adds another $200 to $600. Most DIY builders underestimate side netting, wall padding, and mounting hardware, which can quietly add $150 or more to the final number.
3. Curtain-track enclosure with a retractable bay
A curtain-track enclosure lets you convert any open room into a simulator bay in under a minute and convert it right back when you need the space for something else. You mount a ceiling-mounted track system, hang a heavy-duty impact screen from the track, and add side curtains for containment. When you're done playing, the whole bay retracts to the wall.
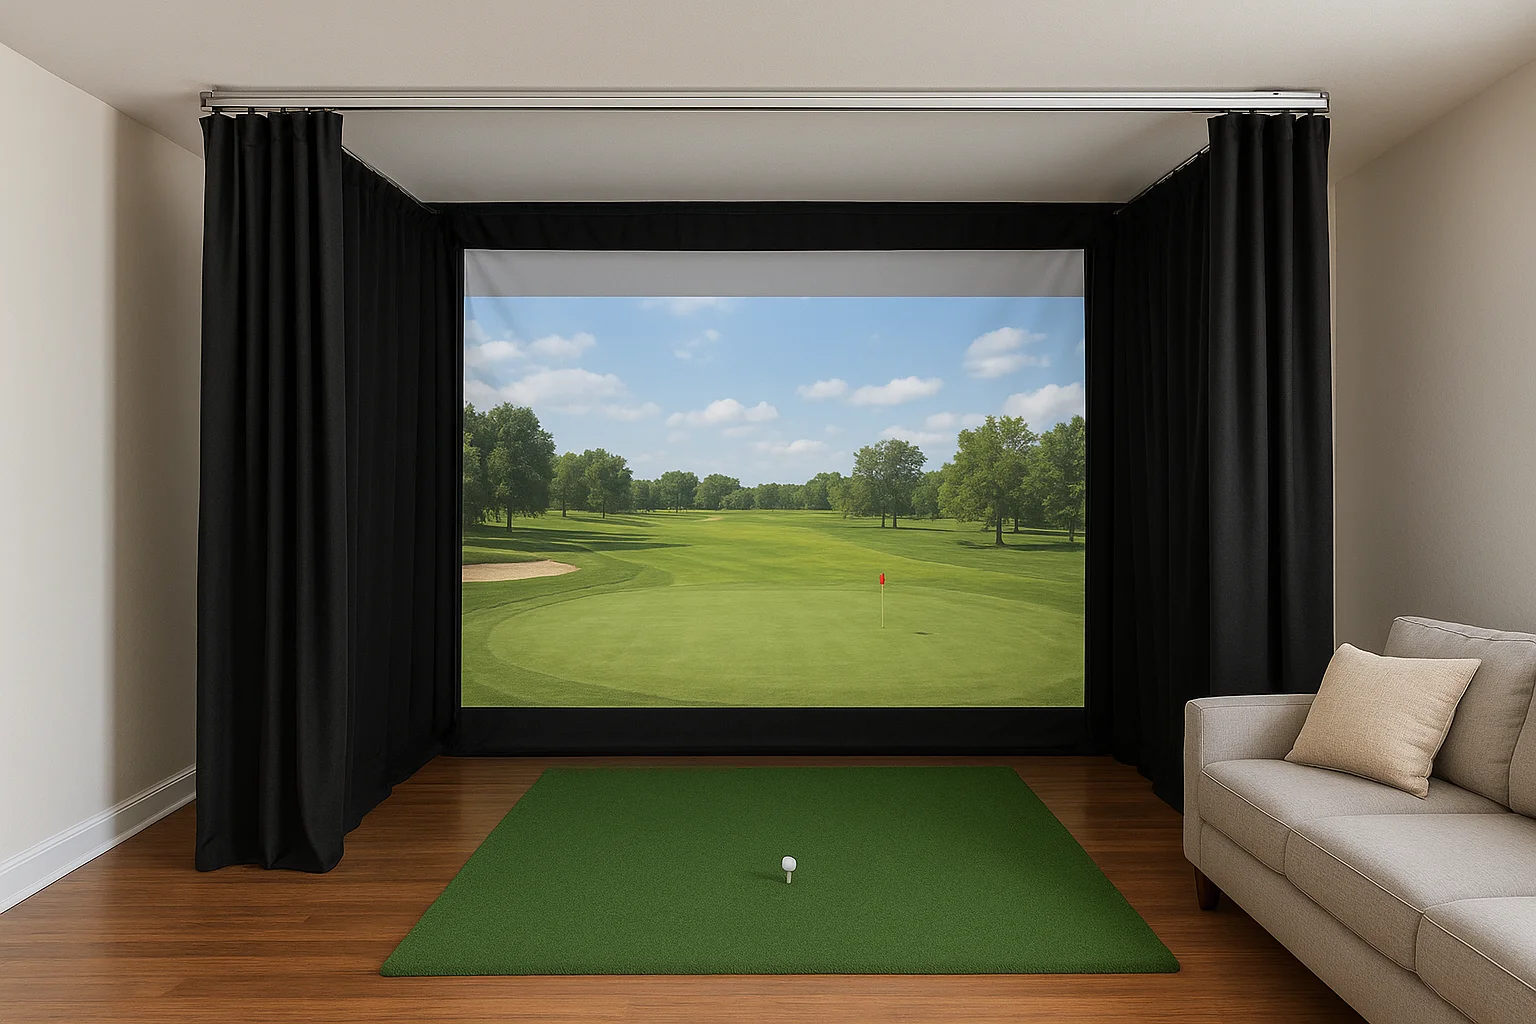
How a retractable enclosure layout works
The system relies on a ceiling-mounted aluminum or steel track that spans the full width of the enclosure. You slide the impact screen along the track to deploy it and retract it the same way after each session. Side curtains run on separate tracks or fixed rods to close off the bay during play. Among all the golf simulator enclosure ideas that prioritize flexibility, this one gives you the most usable square footage between sessions.
Best fit for shared-use spaces and multi-purpose rooms
This layout works well in living rooms, finished basements, and home gyms where the space has to function as more than one room. You get a full-swing bay when you want it and your floor back when you don't.
If your room serves multiple purposes, a retractable setup is almost always the smarter long-term choice over a fixed frame.
Curtain and side protection considerations
Your side curtains need to be heavy enough to absorb off-center shots without shifting off the track. Add foam wall padding behind both side curtains to protect drywall from direct contact strikes.
Typical cost range and maintenance needs
Track hardware, screen, and curtains typically run $400 to $1,200 depending on width and material quality. Inspect the track mounting points and screen grommets every few months since repeated retraction puts steady wear on both.
4. Roll-away or quick-clear garage enclosure
A roll-away enclosure solves the most common garage problem: you want a simulator bay and a functional parking space at the same time. These setups use a lightweight frame on locking casters that you push against one wall when the cars come in and roll back to the hitting position when you're ready to play.
How a movable enclosure keeps parking possible
The frame sits on heavy-duty swivel casters rated for the combined weight of the frame, screen, and netting. You mark the floor with tape or floor plates so it lands in the exact same spot every session. Among all the golf simulator enclosure ideas that stretch a two-car garage, this layout consistently delivers the most flexibility without a permanent footprint.
The casters matter more than the frame material here, so don't cheap out on load ratings.
Best fit for two-car garages and tight footprints
This approach works best in garages with at least 20 feet of depth so the enclosure can sit fully clear of the parking zone when stored. Tight layouts with low overhead clearance or narrow bays benefit the most since a fixed build would eliminate parking entirely.
Stability, anchoring, and rebound control
Lock every caster before your first swing. Add rubber floor pads under the front feet to prevent micro-movement during ball impact, and keep side netting tensioned tight enough to absorb off-axis shots without letting the frame rock.
Typical cost range and durability tradeoffs
Expect to spend $600 to $1,800 for a roll-away setup with decent casters, a quality impact screen, and proper netting. Welded steel frames outlast bolt-together aluminum over time, especially with daily use on concrete floors.
5. Built-in wall opening with a flush-mounted screen
A built-in enclosure frames the impact screen directly into your wall structure, creating a clean, permanent bay that looks like it belongs in the room rather than sitting in front of it. Among all the golf simulator enclosure ideas that prioritize aesthetics, this approach delivers the most finished result without visible hardware or frame legs cutting through your floor space.
How a built-in enclosure changes the room
Framing the screen into the wall eliminates the visual bulk of a freestanding structure and keeps your floor fully open. The screen mounts flush, so your simulator becomes a dedicated room feature rather than equipment you step around every day.
Best fit for finished basements and dedicated sim rooms
This layout suits finished basements and purpose-built sim rooms where construction work is already planned or underway. You get the cleanest result when you build it in during a renovation rather than retrofitting into an existing finished drywall surface.
A built-in enclosure integrates with your room in a way that raises the overall value of the space long after the build is done.
Framing, padding, and edge protection details
Your framing needs solid blocking around the entire screen perimeter to anchor the impact screen under consistent tension. Protect the swing zone with these additions:
- Foam edge padding on all hard framing surfaces within reach
- Corner guards on any exposed structural corners
- Rubber base trim along the floor line to handle club bounce
Typical cost range and the hidden construction costs
Construction and materials typically run $1,500 to $5,000 before any AV integration. The hidden costs come from drywall repair, painting, and electrical rough-in that fall outside a standard enclosure quote and frequently surprise first-time builders.
6. Curved screen enclosure for maximum immersion
A curved screen enclosure wraps the impact screen around a gentle arc, which pulls the visual field wider and makes the simulated course feel closer to an actual range. Among all the golf simulator enclosure ideas that prioritize how the game feels over how much floor space you save, curved builds consistently deliver the most convincing experience.
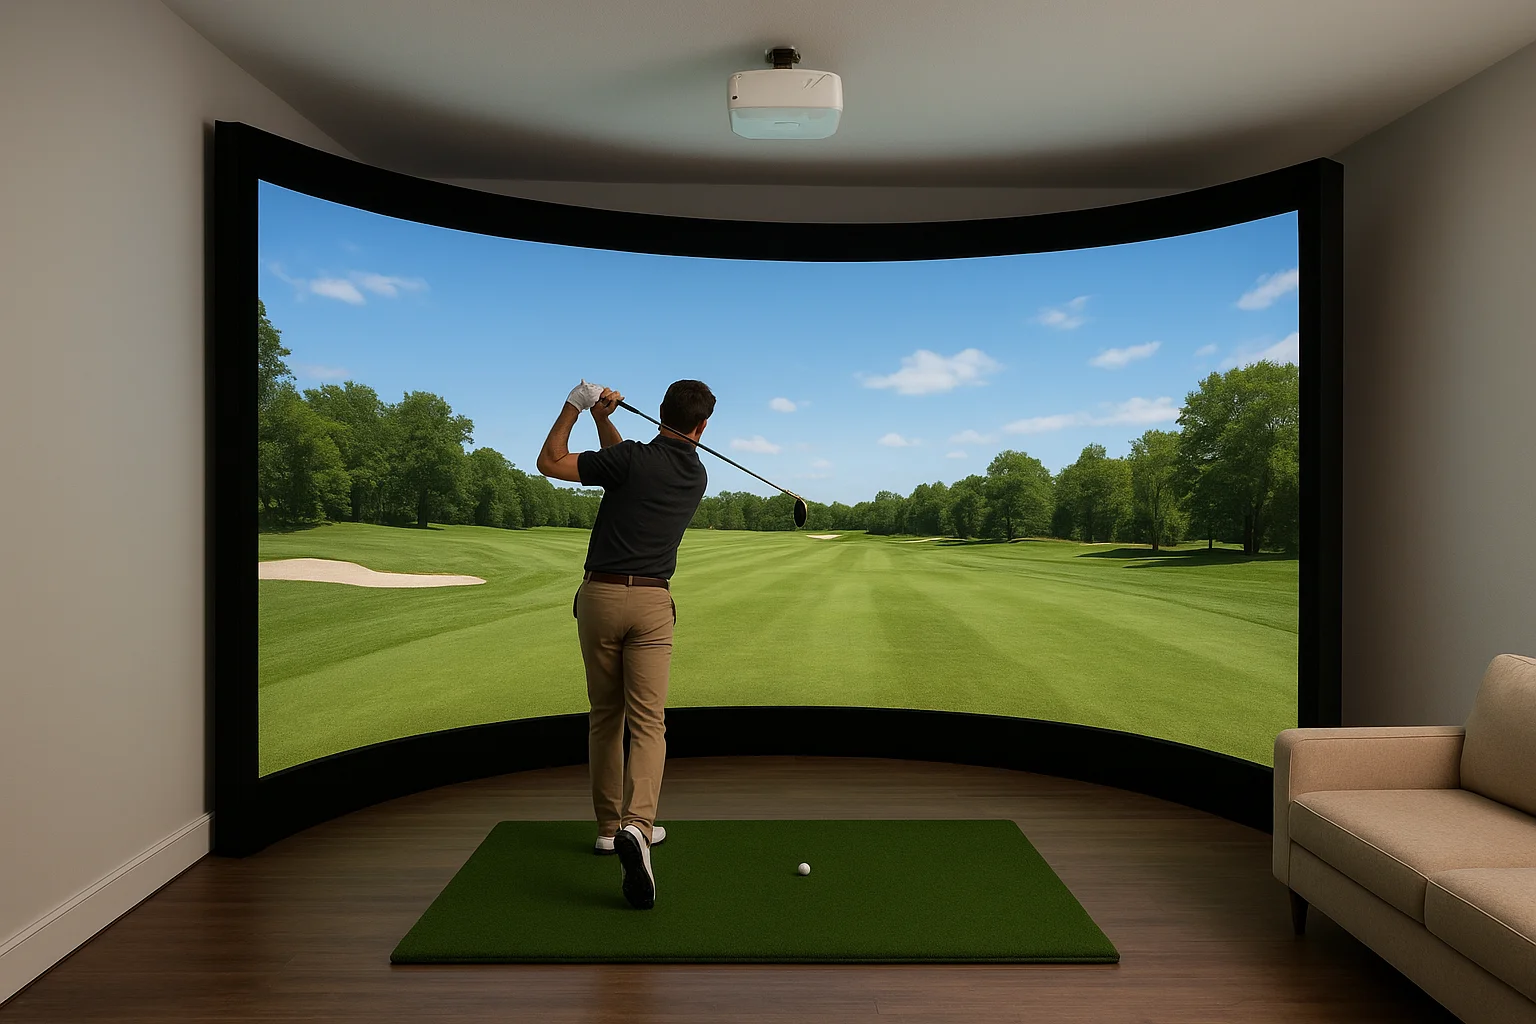
How curved enclosures affect sightlines and projection
The curve shifts your peripheral vision into the field of play instead of showing you a flat edge where the screen ends. This matters most for course play where the fairway and sky fill the frame. Your projector needs to account for the arc, so a short-throw lens with keystone correction is the standard solution.
A curved screen reduces the eye fatigue that comes from staring at a flat edge during long sessions, not just how the image looks at first glance.
Best fit for dedicated rooms and higher-end builds
This setup suits purpose-built sim rooms and high-end residential installs where the budget supports custom fabrication. It rarely makes sense in a shared-use space since the fixed arc limits how the room functions outside of simulator sessions.
Space requirements that actually matter
You need at least 14 feet of width to accommodate the curve without cutting the screen short at the edges. Depth from mat to screen requires at least six feet to give the projection enough throw distance for a sharp, full image across the arc.
Typical cost range and projector considerations
Curved screens and custom frames typically run $2,000 to $6,000 for the enclosure alone. Your projector must be a short-throw model with lens shift capability to handle the arc without visible distortion or banding across the image surface.
7. Shallow-depth enclosure for low ceilings
A shallow-depth enclosure compresses the hitting zone depth and positions the screen closer to the mat, which lets you swing in rooms that top out under nine feet. Among all the golf simulator enclosure ideas suited for tight vertical clearance, this approach trades some depth for the ability to actually use a space that would otherwise sit empty.
How to keep swings safe in height-limited rooms
Your club comes closest to the ceiling at the top of your backswing, not at impact. Padding the ceiling directly above the mat with foam tiles or impact-absorbing panels protects both surfaces if contact happens. Keep your mat positioned at least 18 inches from any ceiling obstruction to give your swing arc a reliable buffer zone before you take a single shot.
A few inches of ceiling clearance make a bigger difference than most builders expect, so measure at the highest point of your actual swing before committing to a mat position.
Best fit for basements, bonus rooms, and sheds
This layout works well in finished basements with drop ceilings, bonus rooms over garages, and converted sheds where ceiling height runs between seven and nine feet. These spaces sit unused because standard enclosure specs call for more height than they offer, and a shallow build solves that problem directly.
Ceiling and wall protection strategies
Add foam padding to any ceiling surface within your swing arc and line the side walls with impact-absorbing rubber panels to handle mishits without damaging drywall over time.
Typical cost range and the top safety mistakes
Shallow enclosures run $300 to $1,500 depending on screen quality and padding coverage. The most common safety mistake is skipping overhead padding entirely, which leads to ceiling damage and broken club heads within the first few sessions.
8. Shed or outbuilding enclosure with full coverage
A detached shed or outbuilding gives you a fully dedicated simulator space that keeps the rest of your home untouched. Among all the golf simulator enclosure ideas that separate practice from living space, this one offers the most freedom to build without compromise.
How a detached sim space changes the build
When you build outside the main structure, you control ceiling height, wall depth, and floor treatment from scratch rather than adapting to existing constraints. That freedom means you can frame the enclosure to exact swing dimensions and install full side coverage, ceiling padding, and rear containment without negotiating with finished walls or low joists.
Best fit for year-round practice without taking over the house
This setup works best for golfers who want daily access without occupying a bedroom, basement, or garage. A shed build keeps noise, lighting, and traffic out of your main living areas entirely.
A detached space also makes it easier to dial in acoustics and temperature without affecting the rest of the house.
Power, HVAC, lighting, and sound control basics
Your outbuilding needs a dedicated electrical circuit of at least 20 amps to handle the projector, launch monitor, and heating or cooling load. Plan for insulated walls and a mini-split HVAC unit to keep the space usable year-round in Treasure Valley winters and summers.
Typical cost range and the infrastructure line items
Total costs typically run $5,000 to $20,000 depending on structure size and finish level. The biggest line items are electrical service, HVAC, and insulation, not the enclosure hardware itself.
9. Commercial bay enclosures for heavy daily use
Commercial bay enclosures carry far more stress than any residential setup. When you're running an indoor golf lounge, training facility, or office entertainment space, your enclosure takes hundreds of swings per day from different players with different swing speeds and tendencies. Among all the golf simulator enclosure ideas covered here, this one requires the most attention to materials and build quality from the start.
How commercial enclosures handle traffic and wear
Commercial enclosures use heavier frame steel, reinforced screen attachment points, and thicker impact screen material rated for high-cycle use. Standard residential screens wear out quickly under commercial traffic, so you need a screen with a higher denier rating and double-stitched grommets that hold tension through thousands of repeated strikes without sagging or tearing at the edges.
Skimping on screen material in a commercial setting costs you more in replacements over 12 months than upgrading once at the start.
Best fit for indoor golf lounges, offices, and training spaces
This setup works for any commercial venue where multiple players rotate through daily bays. Office recreation rooms and hospitality venues also benefit since the build quality keeps maintenance calls low.
Bay layout, walkways, and equipment mounting
Plan for at least 4 feet of walkway clearance on each side of the bay so players move safely between sessions. Mount your launch monitor and projector on reinforced ceiling brackets rated for commercial vibration loads.
Typical cost range and the operating costs to plan for
Commercial builds typically run $8,000 to $25,000 per bay depending on screen size, frame spec, and AV integration. Budget separately for annual screen inspection, mounting hardware checks, and projector bulb replacement as recurring operating costs.
Quick next steps
These nine golf simulator enclosure ideas cover a wide range of room types, budgets, and use cases, but the right choice always comes down to your specific space. Measure your ceiling height, room width, and available depth before you commit to any frame style or screen size. Those three numbers eliminate most of the wrong options immediately and narrow your focus to builds that will actually fit.
If your room needs projection, audio, smart lighting, or automation integrated with the enclosure, working with a professional saves you time and avoids the costly mistakes that come from retrofitting AV into a finished build. Treasure Valley Solutions designs and installs custom simulator rooms for homeowners and commercial clients across the Boise area, handling everything from screen framing to smart controls in one coordinated project.
Ready to move from planning to building? Contact our team to schedule a walkthrough and get a design scoped to your space.