
You've decided a golf simulator belongs in your home, great choice. But before you start shopping for launch monitors and impact screens, there's a critical first step most people rush past: figuring...
Golf Simulator Dimensions: Minimum Room Size For Home Setup
You've decided a golf simulator belongs in your home, great choice. But before you start shopping for launch monitors and impact screens, there's a critical first step most people rush past: figuring out golf simulator dimensions for the room you plan to use. Get this wrong, and you'll end up with a setup where you can't take a full swing, your club catches the ceiling, or the ball ricochets off a wall two feet from the screen.
The space you need depends on several factors, your height, your swing style, the club you're using, and the type of simulator hardware you choose. There's a real difference between the absolute minimum room size that technically works and the dimensions that actually make the experience enjoyable. A cramped setup doesn't just feel bad; it changes your swing mechanics and can cause real damage to your room, your equipment, or yourself.
At Treasure Valley Solutions, we design and install integrated technology spaces for homeowners across the Boise and Meridian area, including dedicated golf simulator rooms with projection systems, surround sound, smart lighting, and proper AV integration. We've seen firsthand what happens when the room planning gets skipped. This guide breaks down the exact ceiling height, width, and depth you need, covers minimum versus ideal measurements, and helps you figure out whether your space can actually support the setup you want.
Why golf simulator dimensions matter
Most people think about the simulator hardware first and the room second. That's backward. Golf simulator dimensions determine what equipment you can use, how safe the setup is, and whether your swing mechanics stay intact or get distorted by the constraints of the space. Getting those measurements right before you buy anything saves you from expensive mistakes and a lot of frustration down the road.
Your swing needs more room than you think
A standard driver swing from a 6-foot-tall golfer can reach over 100 inches of arc radius from backswing to follow-through. Add the length of the club itself, and you're talking about a wide horizontal footprint plus significant vertical clearance at the top of the backswing. Most people underestimate both measurements when they look at a room and try to eyeball whether it will work.
The problem compounds when you account for your natural swing path. Right-handed golfers with an outside-in swing plane use more lateral space on the left side of the hitting position. Left-handed golfers do the opposite. Even if the room looks wide enough from the door, the actual usable hitting zone can shrink significantly once you place the mat, the screen, and any side walls or columns into the equation. Your swing path, not just your stance width, is what sets the real boundary.
What happens when the room is too small
When the room is too short or too narrow, you don't just feel uncomfortable. You change your swing. You shorten your backswing, drop your elbow, or cut off your follow-through to avoid hitting a wall or the ceiling. Those adjustments become muscle memory over time, and a simulator is supposed to improve your game, not introduce new mechanical problems that carry over to the course.
A space that forces you to alter your swing defeats the purpose of owning a simulator in the first place.
Beyond swing mechanics, there are real physical safety risks when the room dimensions are wrong. A club that strikes a low ceiling doesn't just leave a dent. It can snap the shaft, send the clubhead flying, and injure anyone nearby. A ball that hits the screen at too close a range can ricochet back at dangerous speed. These aren't rare edge cases; they're documented outcomes from setups where the room was measured poorly or not at all.
The difference between "it fits" and "it works"
There's a meaningful gap between a room where the simulator technically fits and a room where it performs the way it's supposed to. A screen can physically mount in a 9-foot ceiling space, but if your driver swing requires 10 feet of clearance at impact, that room doesn't actually work for you. "It fits" is about the hardware footprint. "It works" is about the full experience, which includes swing freedom, safe screen distance, projection quality, and enough lateral clearance to swing naturally.
Your height plays a direct role here, and so does the specific clubs you plan to hit. A short iron swing and a driver swing operate at very different arc heights and widths. A room that comfortably fits a 5-foot-8 golfer hitting mid-irons may still be completely wrong for a 6-foot-3 golfer taking full drives. The sections that follow break down each dimension, ceiling height, room width, and depth, so you can evaluate your space with real numbers instead of guesswork before anything gets ordered or installed.
Quick minimum vs ideal room size chart
Before you dig into the details of each individual dimension, it helps to see the full picture in one place. The table below gives you clear minimum and ideal measurements across the three dimensions that matter most for any home golf simulator setup: ceiling height, room width, and room depth. Use these numbers as your starting reference point while you evaluate your space, keeping in mind that your height and swing style can shift these figures in either direction.
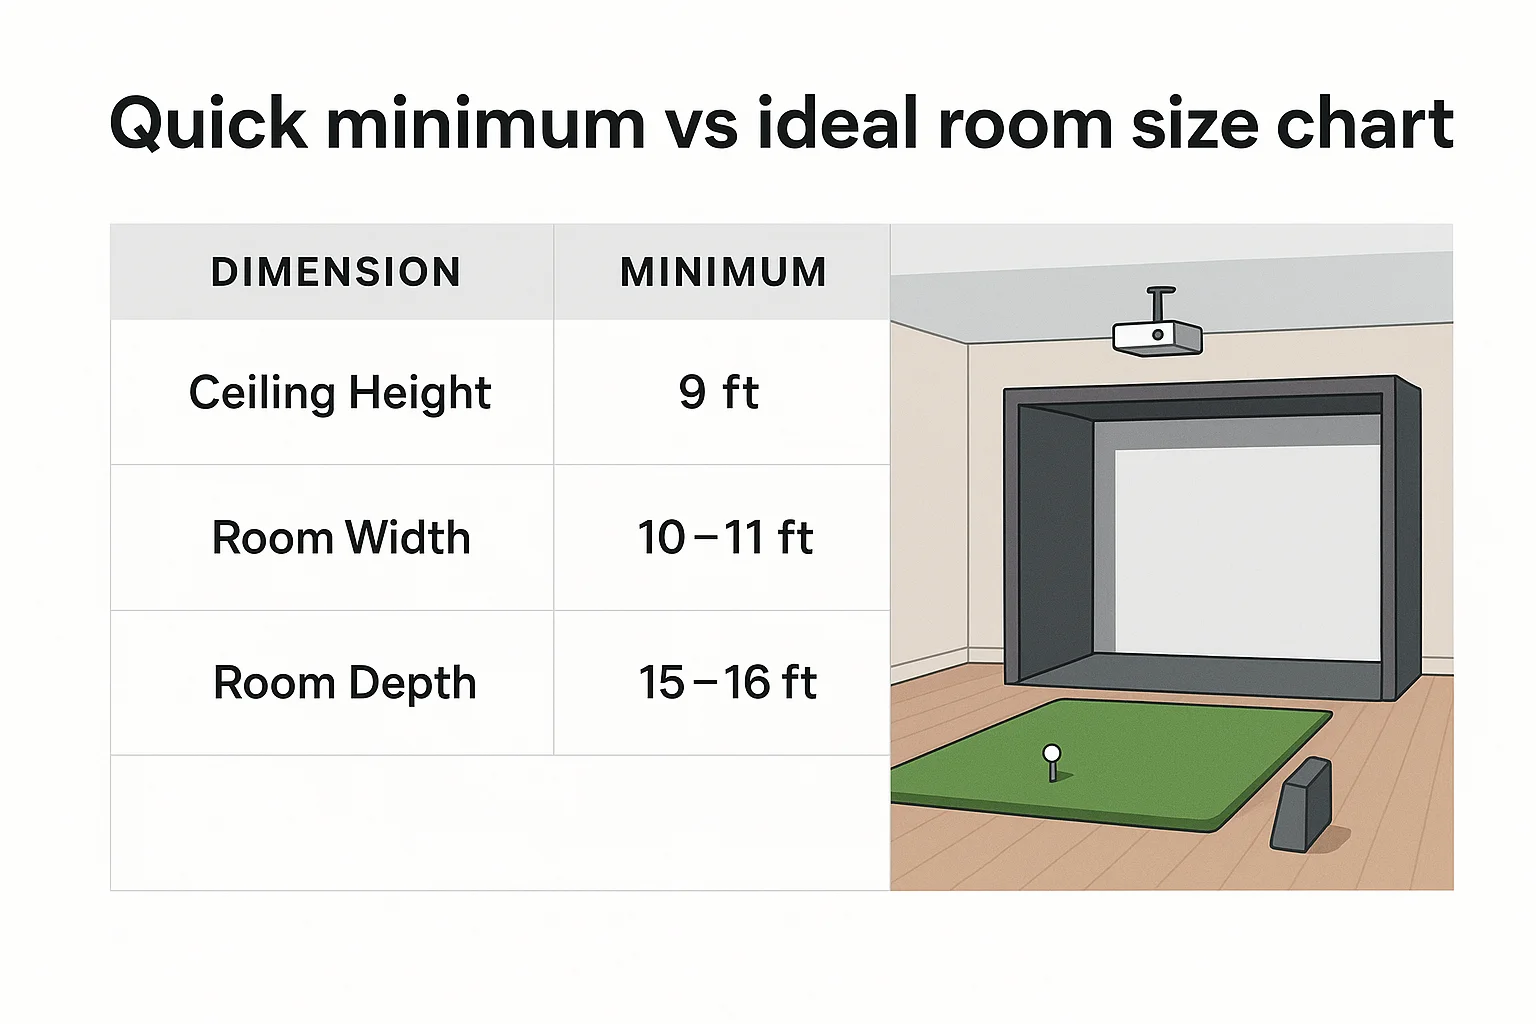
| Dimension | Minimum | Ideal |
|---|---|---|
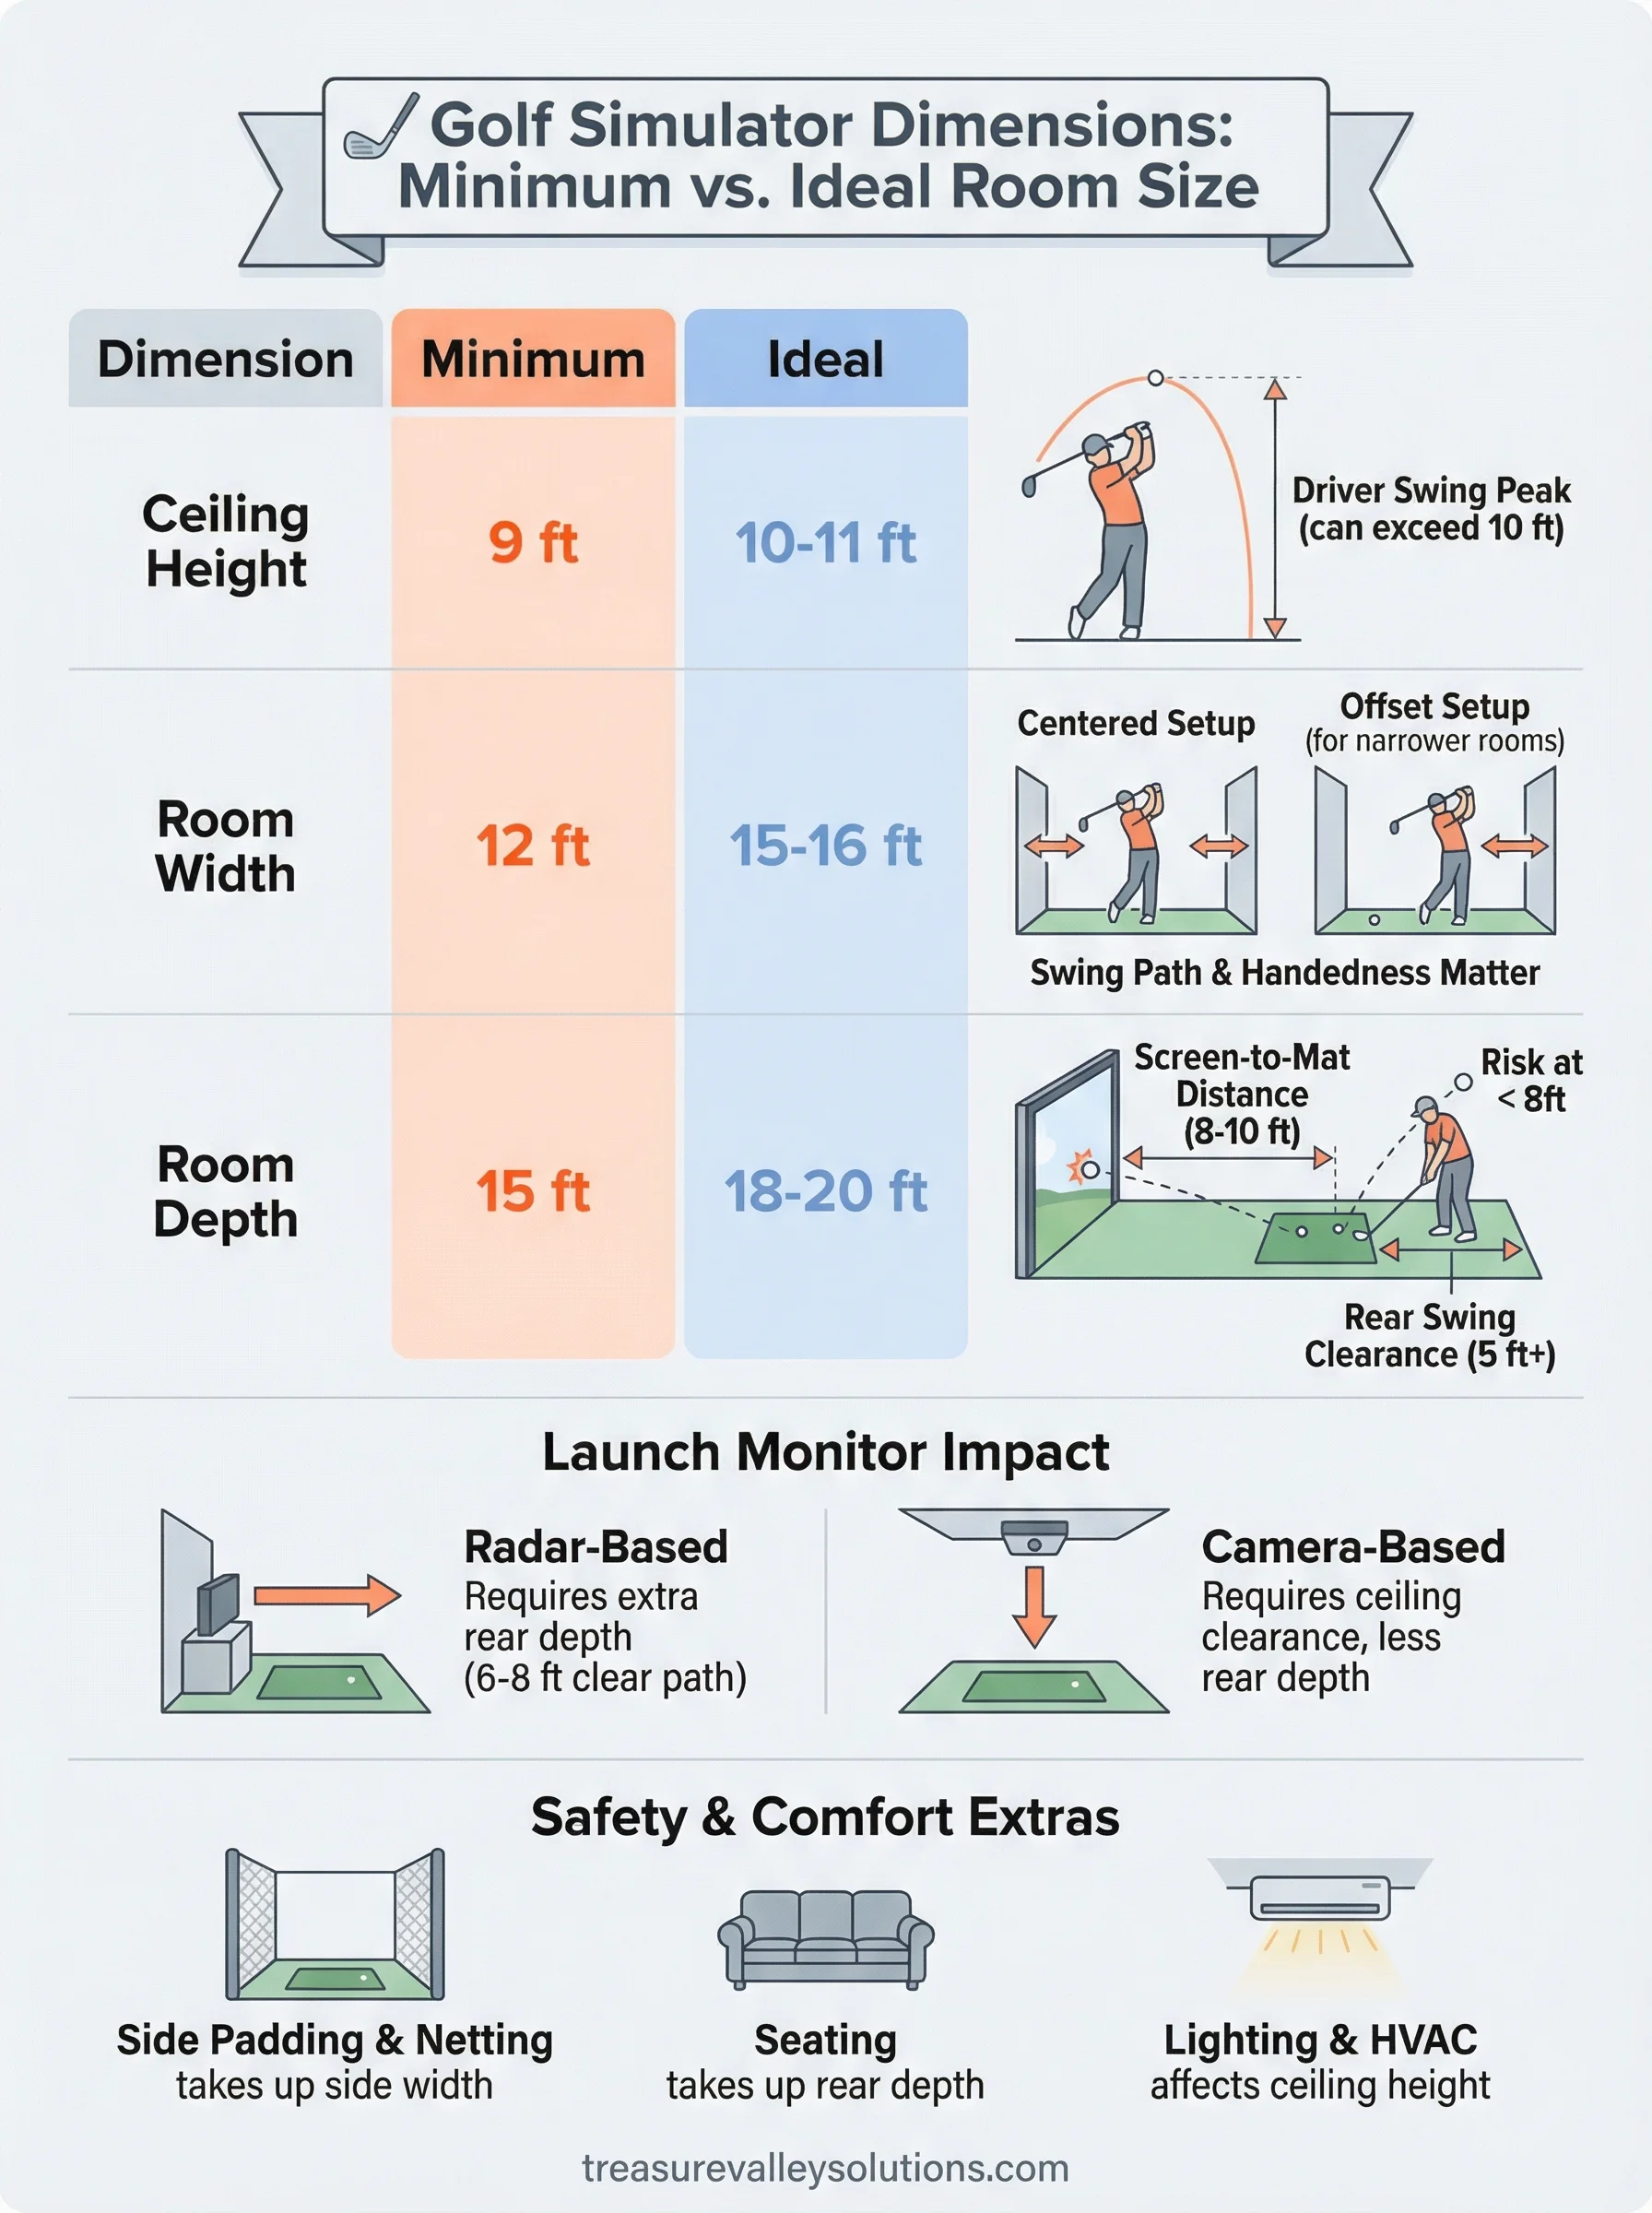
| Ceiling Height | 9 ft | 10-11 ft |
| Room Width | 12 ft | 15-16 ft |
| Room Depth | 15 ft | 18-20 ft |
What these numbers assume
These figures assume a right- or left-handed golfer of average height, between 5-foot-8 and 6-foot-2, taking full swings with a driver. If you stand taller than 6-foot-2, you should add at least 6 inches to the minimum ceiling height and widen your side clearance estimates by several inches on each side. The minimums in the chart represent conditions where a golfer of typical stature can complete a full swing without clipping walls or the ceiling, but there is very little room for error in those tighter spaces.
Treat the minimum figures as the absolute floor, not a comfortable target, especially if you plan to hit drivers regularly.
The depth figures also assume a standard impact screen and projector setup, not an open bay or net-only configuration. Screen distance requirements shift based on your projector's throw ratio and how much clearance you need behind the hitting mat. Both of those variables get covered in detail later in this guide.
When minimum isn't enough
Minimum golf simulator dimensions technically allow a full swing, but they leave no buffer for equipment placement, side lighting, or furniture along the walls. If you want to add a seating area, a launch monitor console, or any AV cabinetry, a minimum-sized room won't fit those additions without crowding the hitting zone. Tight rooms also complicate installation, which limits how cleanly wiring, projector mounts, and speaker hardware can be routed through the space.
Ideal dimensions give you comfortable swing clearance, room for integrated components like projectors, speakers, and control systems, and enough open space that the setup actually functions as a dedicated room rather than a constrained corner you made work on paper.
How to measure your space the right way
A tape measure gives you raw square footage, but that number alone won't tell you whether your room can support a full simulator setup. Before you start shopping for screens, projectors, or launch monitors, you need a clear picture of the actual usable space, which often differs significantly from what the walls suggest on paper.
Measure usable space, not total room size
Every room has fixed features that eat into your functional area without showing up in a basic length-by-width measurement. HVAC ducts, low beams, recessed lighting fixtures, and support columns all reduce how much space you can actually use for a simulator. Pull out a tape measure and record ceiling height at the center of the hitting zone specifically, not at the edges of the room where fixtures or framing may hang lower than the rest of the ceiling.
Measure the ceiling height directly above where your club will be at the top of your backswing, not just at the center of the room.
Walk the full perimeter and note any protrusions, built-in shelving, or door swings that limit how close you can get to a side wall. These details matter more than the room's advertised dimensions when you're deciding whether the space will actually work.
Mark your hitting position before anything else
The single most useful thing you can do is physically stand in the space and simulate your swing. Use a spare club or even a broom handle, stand where you'd naturally place your mat, and take a slow, full backswing and follow-through. Note where you need the most clearance on each side and mark that spot on the floor with tape.
From that marked position, measure in every direction: forward to where your screen will mount, backward to the wall behind you, and laterally to both side walls. These four measurements give you the real-world numbers that determine your golf simulator dimensions for that specific space, with your height and swing style already factored in.
Record everything in writing before buying anything
Writing down every measurement before you contact a dealer or installer prevents a common and expensive mistake. Bring those numbers along with notes about ceiling obstructions, electrical panel locations, and existing lighting and HVAC positions to every planning conversation. A complete, written picture of the room eliminates back-and-forth once equipment selection begins and keeps the project moving without surprises.
Ceiling height requirements and workarounds
Ceiling height is the single most restrictive golf simulator dimension for most homes, and it's also the one you can't change without major construction. Width and depth can sometimes be compensated for with offset hitting positions or screen placement adjustments, but when the ceiling is too low, your only real options are workarounds that limit what you can swing, or finding a different room entirely.
Why ceiling height is the hardest constraint to fix
The minimum ceiling height for a golf simulator is 9 feet, and that number only works for golfers under 6-foot-2 who are careful about club selection. A driver swing at full speed from a taller golfer routinely requires 10 feet or more of clearance at the highest point of the arc. That peak doesn't happen directly over your head either. It typically occurs slightly behind your shoulder line during the backswing, which is why measuring ceiling height only at the room's center can give you a false sense of security.
Measure ceiling clearance directly above your backswing peak, not at the center of the room, because those two points are rarely the same.
Your club length also factors into the clearance equation. A standard driver runs 45 to 48 inches long, and when you add that to the height of your hands at the top of your backswing, the total arc can easily push past 9 feet in a room that otherwise looks fine. Short irons and wedges create far less risk, but most golfers who invest in a simulator want to hit every club in the bag.
Workarounds when your ceiling falls short
If your ceiling height sits below the ideal mark but you still want to make the space work, a few practical adjustments can reduce the risk without requiring structural changes. Recessing the projector mount into a ceiling cavity, using a short-throw projector on a lower shelf, or dropping the impact screen slightly can all help recover vertical space. The most effective ceiling-height workarounds include:
- Limiting club selection to irons and wedges only, eliminating the tallest swing arcs
- Lowering the hitting mat position by a few inches using a sunken floor pad
- Choosing a launch monitor that doesn't require overhead sensors, removing ceiling-mounted hardware from the equation
- Flattening your swing plane slightly, though this should only be done intentionally with an instructor's guidance
No workaround fully replaces proper ceiling height for a complete simulator experience, but these adjustments help you use the golf simulator dimensions you have instead of waiting for the perfect room.
Room width: centered vs offset hitting setup
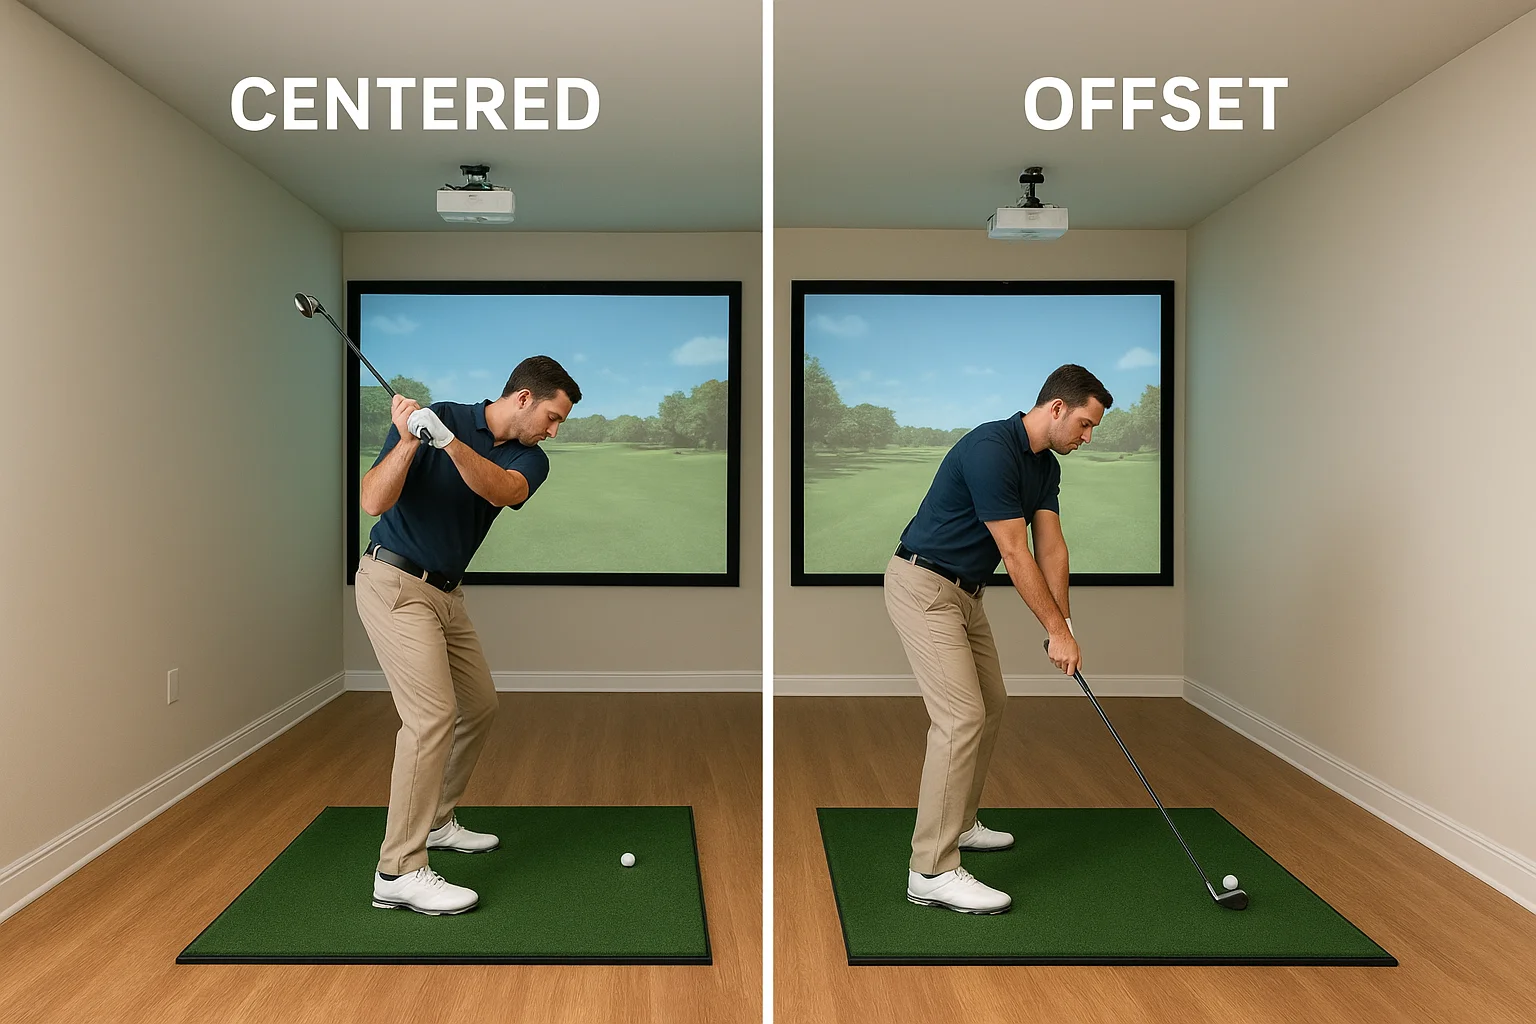
Room width controls how much lateral freedom you have during your swing and where your hitting position sits relative to the screen. Most people assume they'll stand dead center in the room, but that's not always the right call, and in narrower spaces, it's often not possible. Knowing the difference between a centered and an offset hitting setup helps you evaluate a room that might look too tight at first glance and still make it work.
What a centered setup requires
A centered hitting setup splits the room evenly, with the golfer standing at the midpoint of the total width. For a right-handed golfer, that means roughly 5 feet of clearance from your body to the right wall and 7 feet to the left wall, since the follow-through extends further left than the backswing extends right. That's how you arrive at the 12-foot minimum width figure. Centered setups are the cleanest option when both sides of the room are fully open and free of columns, doors, or built-in storage that shrinks the usable hitting lane.
Measure your actual hitting lane after accounting for the mat, any side launch monitor equipment, and wall obstructions, not just the room's total width measurement.
What an offset setup allows
An offset hitting setup shifts your position toward one side of the room to gain more clearance on your dominant swing side. A right-handed golfer who moves closer to the right wall gets more open space on the follow-through side, which is where the most lateral room gets used. This approach lets you work with golf simulator dimensions as narrow as 10 feet in some cases, without compromising the part of your swing that demands the most clearance.
The tradeoff is a screen image that reads slightly off-center from your hitting position. Adjusting the projector angle or upgrading to a wider screen helps close that visual gap, but you should test the sightlines in person before finalizing the layout.
Matching your room layout to your handedness
Sketch your room from above before you commit to either setup. Mark every obstruction, including doors, windows, and any structural elements, then draw your hitting position with real clearance measurements in every direction. That overhead view gives you a fast, clear answer about which setup your space supports and keeps the decision grounded in actual numbers rather than guesswork.
Room depth: screen distance and swing clearance
Room depth controls two things that have nothing to do with each other mechanically but everything to do with each other spatially: how far your screen sits from the hitting mat and how much room you have behind your body to complete a full swing. Both measurements pull from the same fixed pool of room depth, which means understanding how they compete against each other is essential before you lock in your golf simulator dimensions.

Screen distance from the hitting mat
The screen needs to be far enough from your hitting position that a ball strike doesn't ricochet back at dangerous speed but close enough that your projector can fill the image area without requiring an unusually long throw distance. For most standard screen setups, 8 to 10 feet from the mat to the screen is the working range that balances both concerns. Shorter distances increase ricochet risk and demand a very short-throw projector. Longer distances reduce the ricochet risk but require more total depth, which compresses the space behind you.
Place your screen at a minimum of 8 feet from your hitting mat, and treat anything under that distance as a safety risk rather than a space-saving solution.
Swing clearance behind the hitting position
The space behind you during a golf swing is easy to underestimate because you're focused on the screen side of the room. A full backswing with a driver can extend 2 to 3 feet behind your rear shoulder, which means you need real clearance between your back and the rear wall. Combined with the mat itself and any equipment positioned behind the hitting zone, a minimum of 5 feet from your body to the back wall is the standard safety buffer most installers recommend.
That's how you get to the 15-foot minimum room depth. Roughly 9 to 10 feet goes toward the hitting area and screen, and the remaining 5 to 6 feet covers your backswing clearance and mat footprint. A depth of 18 to 20 feet moves you into the ideal range because it gives you more screen distance, better projector positioning, and enough rear clearance that you're never adjusting your backswing to protect a wall. Both numbers matter, and splitting your depth measurement between the two zones before finalizing anything keeps the layout from favoring one side at the expense of the other.
How launch monitor type changes space needs
The hardware you choose to measure your ball flight directly affects your golf simulator dimensions requirements, and not always in ways that are obvious from the product specs. Launch monitors fall into two main technology categories: radar-based and camera-based systems, and each one imposes different placement rules that change how much of your room depth and width gets consumed before you even set up the mat and screen.
Radar-based launch monitors
Radar-based units like the Bushnell Launch Pro and Garmin Approach R10 sit on the floor behind the ball, angled slightly upward to track the shot after impact. These systems need a clear, unobstructed line of sight from the unit to the ball flight path, which means they require extra room depth behind the hitting position. Most radar units need at least 6 to 8 feet of clear space behind the ball to capture accurate spin and launch data, which pushes your total depth requirements higher than camera-based alternatives.
If you choose a radar-based monitor, add at least 1 to 2 feet to your minimum rear clearance estimate to account for unit placement and tracking accuracy.
Radar systems also perform better when the hitting area is wide and open on both sides, since any object crossing the radar cone during a swing can introduce data errors. Narrow rooms with walls close to the hitting zone create more interference risk with radar-based setups than with camera alternatives.
Camera-based launch monitors
Camera-based systems like the Uneekor QED and Foresight Sports GCQuad use overhead or side-mounted cameras to capture ball and clubhead data at the moment of impact. These units attach to the ceiling or a side rail above the hitting mat, which shifts the space challenge from room depth to ceiling height and mounting position. A ceiling-mounted camera system requires clean overhead clearance of at least 9 to 10 feet directly above the mat, and the camera position must stay within a narrow range to read data accurately.
The advantage of camera-based systems in tight spaces is that they don't consume any floor depth behind the hitting position, leaving that rear zone entirely for swing clearance. If your room runs short on depth but has adequate ceiling height, a camera-based launch monitor often fits better than a radar unit without forcing any compromises on your swing.
Safety and comfort extras that affect dimensions
When you finalize your golf simulator dimensions, the raw swing clearance numbers are only part of the equation. Protective gear, seating, climate control, and lighting all take up physical space inside the room, and each one deserves a place in your measurements before you commit to a layout. Skipping these additions during the planning phase means you end up retrofitting them into a space that wasn't designed to handle them.
Protective netting and side padding
Side netting and wall padding protect your room from errant shots, and both require dedicated inches along your walls that your original clearance measurements didn't account for. Wall padding typically runs 1 to 2 inches thick, and side netting panels on fixed frames can extend 4 to 6 inches from the wall surface into the hitting zone. Multiply that across both side walls, and you lose nearly a foot of usable width before anyone swings a club.
Add side padding and netting thickness to your wall clearance numbers before you finalize your hitting position, not after installation has already started.
These additions also affect how your floor mat lines up with the screen, since padding often forces the mat slightly forward or to one side. Factor that shift into your depth and width math from the start to avoid realigning everything after the room is built out.
Seating, lighting, and HVAC clearance
A dedicated simulator room without comfortable seating and reliable climate control feels like a utility space instead of a room you actually want to spend time in. A couch or two chairs along the rear wall can consume 3 to 4 feet of depth behind the hitting zone, which directly affects how much rear swing clearance remains. Place seating in your floor plan sketch first, then confirm that your backswing still clears the back wall with those pieces in position.
Lighting placement affects both the room's visual comfort and the projector's image quality. Overhead lighting that hits the screen directly washes out the projected image, so recessed or angled fixtures need to stay outside the screen zone. HVAC vents positioned above the hitting area can also create ceiling obstructions that reduce your effective clearance. Routing both systems around the hitting zone requires planning ahead, and that routing path needs space in the walls and ceiling that won't be available after framing is complete.
A simple plan to move forward
You now have the full picture on golf simulator dimensions, from minimum ceiling height to screen distance to how your launch monitor choice changes every number. The next step is simple: grab a tape measure, walk your intended space, and record every measurement using the methods this guide laid out. Mark your hitting position, measure in all four directions from that point, and compare what you find against the minimum and ideal figures covered here. That one hour of preparation prevents months of frustration after equipment arrives.
Once you have your measurements, the right professionals can help you turn that data into a room that actually works. Treasure Valley Solutions designs and installs complete simulator rooms across the Boise and Meridian area, including projection systems, acoustic treatment, smart lighting, and clean AV integration built around your specific space. When you're ready to move from measurements to a finished room, contact our team to start the conversation.