
You've decided a golf simulator belongs in your home, now comes the part most people underestimate. Golf simulator space planning isn't just about picking a room and hoping your driver doesn't punch t...
Golf Simulator Space Planning: Room Size, Layout, Checklist
You've decided a golf simulator belongs in your home, now comes the part most people underestimate. Golf simulator space planning isn't just about picking a room and hoping your driver doesn't punch through the ceiling. It requires specific dimensions, proper clearances, and careful equipment placement to build a setup that's actually safe, functional, and fun to use.
We see this firsthand at Treasure Valley Solutions. As a technology integration company based in Meridian, Idaho, we design and install custom AV and entertainment systems, including the projection, display, and audio components that bring golf simulators to life. The most common issue we run into? Homeowners who bought all the gear before confirming their space could handle it. A few inches of missing ceiling height or a room that's too narrow can turn a great investment into a frustrating compromise.
This guide walks you through everything you need to measure, plan, and verify before you commit. We'll cover minimum and ideal room dimensions, equipment layout considerations, electrical and lighting requirements, and a printable checklist to keep your project on track. Whether you're converting a garage, finishing a basement, or building new, this is the planning step you don't want to skip.
What golf simulator space planning covers
Golf simulator space planning is a multi-layered process, and each layer affects the ones that follow. Room dimensions, equipment placement, and electrical infrastructure all need to align before you spend a dollar on hardware. Think of it as a system design problem: your screen position drives your projector placement, your projector placement depends on your throw distance, and your throw distance is constrained by your room depth. Getting one element wrong cascades through the rest of the setup, which is exactly why working through these decisions in a specific order matters. The steps in this guide are sequenced to help you catch conflicts early rather than after equipment has already arrived.
The physical space requirements
The first layer of planning is purely physical. Ceiling height, room width, and room depth are the three numbers that determine whether a given space can work at all. Ceiling height is the most common dealbreaker: a standard 8-foot ceiling is marginal, and most comfortable setups need at least 9 feet, with 10 feet being the clear target for taller golfers or anyone who swings a driver regularly.
Width matters just as much. A minimum of 10 feet wide is the functional baseline, but 12 to 15 feet gives you proper clearance for a full swing without worrying about clipping a side wall on your backswing or follow-through. Depth controls how far back you can position a launch monitor or projector, which directly determines the equipment options available to you.
Your room's three dimensions are not just background information - they are the foundation that every other planning decision builds on.
Room depth also needs to account for the screen itself (which typically adds 12 to 18 inches from the wall), the hitting mat position, and the buffer distance behind the golfer. A total depth of 16 to 20 feet covers most residential setups comfortably, though some compact systems work in less.
Equipment and layout decisions
Once you know your dimensions, the next layer focuses on equipment selection and placement. Your launch monitor type determines how much depth you need behind the ball, and that single decision shapes the entire room layout. Radar-based systems typically require 6 to 8 feet behind the hitting position to track ball and club data accurately. Camera-based systems can work with as little as 2 to 4 feet of rear clearance, which makes them a better fit for tighter rooms.
Screen placement and projector throw ratio are closely connected. Short-throw projectors can sit 3 to 5 feet from the screen, while standard throw projectors need 8 to 12 feet. Your available room depth determines which type you can use, and both come with different trade-offs in image brightness, resolution, and cost that you need to weigh against your space constraints.
Electrical, lighting, and sound requirements
The third layer covers the infrastructure that makes the room functional and safe to use long-term. Dedicated circuits for the projector, simulator PC, and audio equipment are standard for a clean installation. Running all of that off a shared residential circuit creates power fluctuation risks and can introduce noise into your audio signal.
Lighting control matters more than most people expect: overhead lights that point toward the screen wash out the image significantly, even during daytime use. Recessed dimmable LEDs positioned away from the screen face are the standard fix. Sound control rounds out this layer. Impact noise from ball strikes and foot movement travels through floors and walls, which becomes a real concern in multi-story homes or finished basements next to living areas. Acoustic panels and rubber underlayment under your hitting mat address both problems without requiring major construction work.
Step 1. Measure your room and note obstacles
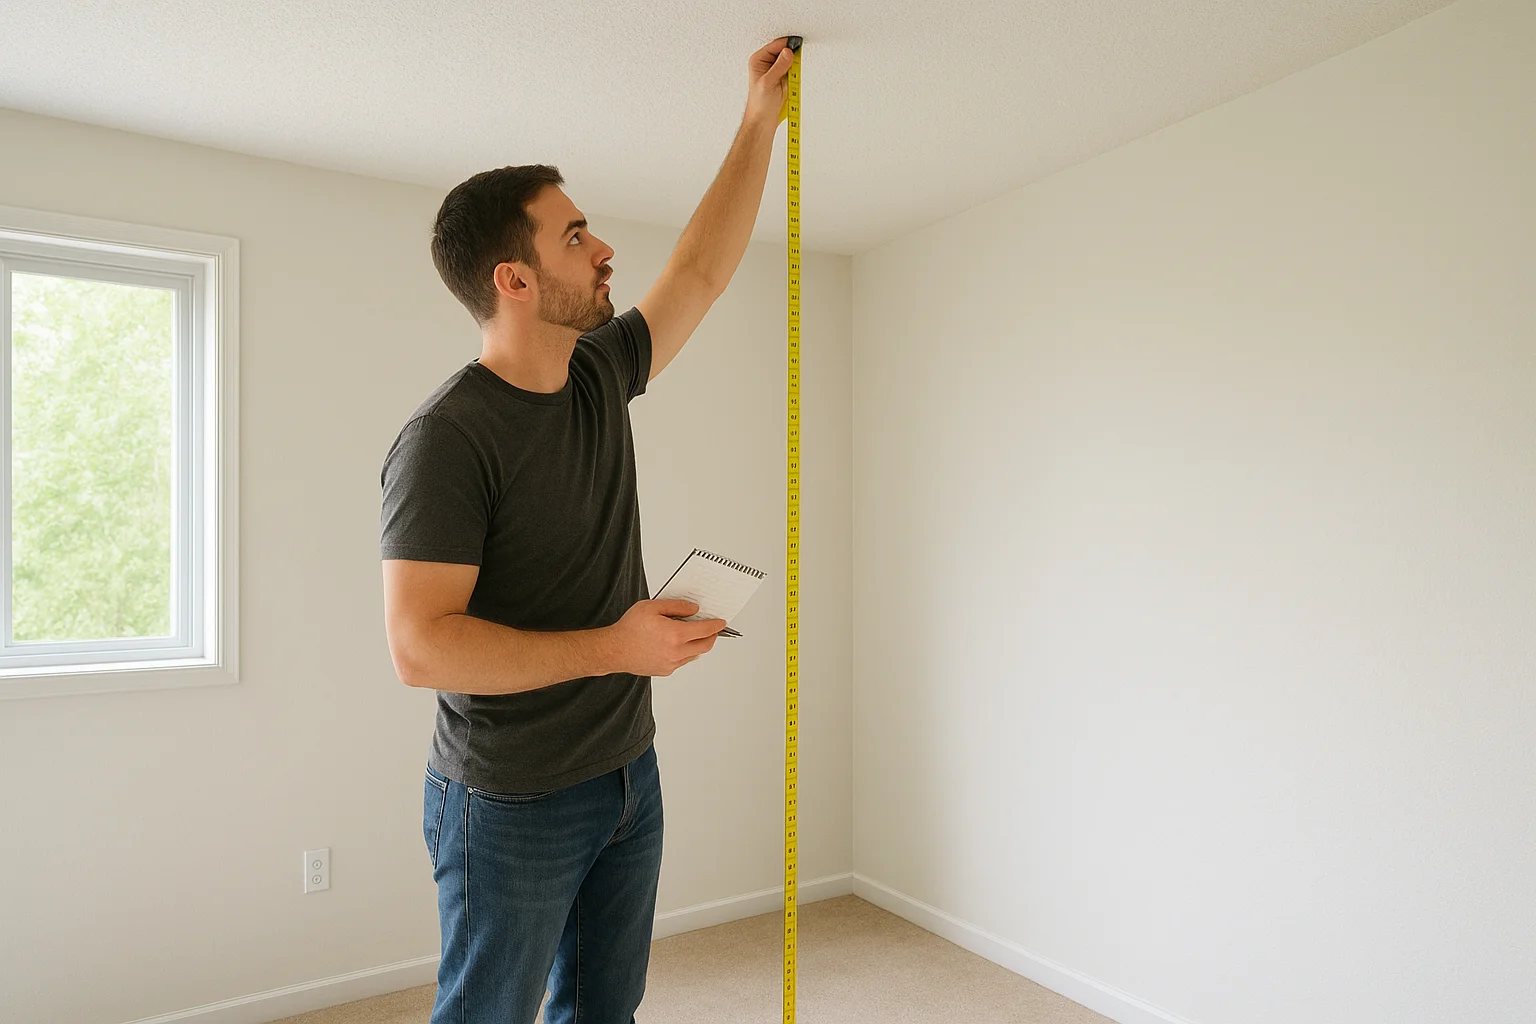
Before any golf simulator space planning decisions lock in, you need raw numbers from your actual room. Grab a tape measure, a notepad, and your phone for photos, then commit 20 to 30 minutes to a full room survey. Guessing or relying on memory costs you later, especially when you discover a support beam or a low-hanging HVAC duct sits exactly where your screen was supposed to go.
The three measurements that matter most
Ceiling height, room width, and room depth are the three numbers that define every other decision in your plan. Measure ceiling height at multiple points, not just the center. Basements and garages often have drop sections, beams, or ductwork that lower the usable clearance by 6 to 12 inches in key areas. Mark the lowest point in the hitting zone specifically, because that number controls your setup, not the highest point in the room.
| Measurement | Where to take it | What to record |
|---|---|---|
| Ceiling height | Center, front wall, rear wall | Lowest point in hitting area |
| Room width | At hitting position, at screen wall | Narrowest usable span |
| Room depth | Wall to wall along centerline | Total depth minus screen thickness |
Measure room width at the hitting position and at the screen wall separately, because walls are not always perfectly parallel. A difference of even 2 inches between those two widths can affect screen sizing and side netting placement, so both numbers belong in your notes.
What to record about obstacles
Every fixed obstacle in the room needs its own note. Structural columns, ceiling beams, electrical panels, windows, doors, and HVAC registers all affect where you can safely position equipment. Take photos with a tape measure held in frame so the dimensions are visible, which gives you a reference you can check without returning to the room repeatedly.
The details you skip during measurement are almost always the ones that force a redesign later.
Write down door swing direction and the location of any existing outlets or circuit breakers, since your electrician needs that information to plan dedicated circuits for your projector and simulator PC. A simple hand-drawn sketch with labeled dimensions works well at this stage and takes less than five minutes to produce.
Step 2. Set minimum, comfy, and ideal dimensions
Once you have your room measurements in hand, the next step in golf simulator space planning is matching those numbers to three realistic tiers of performance: minimum, comfortable, and ideal. Each tier represents a different tradeoff between what you can technically get away with and what actually makes the experience worth using every day. Knowing which tier your room falls into helps you set expectations, choose compatible equipment, and avoid buying gear that physically cannot work in your space.
The three tiers explained
Think of the minimum tier as the floor, not the target. A minimum setup works, but it leaves no margin for error, taller players, or future equipment upgrades. The comfortable tier adds usable clearance on all sides and supports a wider range of launch monitor and projector options. The ideal tier removes most constraints entirely and gives you room to swing freely, mount a short-throw projector cleanly, and add acoustic panels without crowding the space.
| Tier | Ceiling Height | Room Width | Room Depth |
|---|---|---|---|
| Minimum | 8.5 ft | 10 ft | 15 ft |
| Comfortable | 9.5 ft | 12 ft | 18 ft |
| Ideal | 10+ ft | 15 ft | 20+ ft |
Where ceiling height draws the line
Ceiling height is the single number that most directly determines which tier applies to your room. A driver swing at full extension for a six-foot golfer reaches roughly 10 feet at the highest point of the arc, which means an 8.5-foot ceiling puts you in contact-risk territory without careful swing adjustment. That is fine for a dedicated putting or short-game setup, but it limits full-swing use significantly.
If your ceiling measures under 9 feet in the hitting zone, confirm that limitation with every player who will regularly use the room before committing to a full-swing build.
Comfortable and ideal ceiling heights allow natural swing mechanics without the mental overhead of worrying about clearance, which is the whole point of building a simulator at home rather than adjusting to a cramped box.
Width and depth by tier
Width requirements scale with how many players you plan to accommodate and whether left-handed and right-handed golfers will both use the setup. A 10-foot-wide room fits a single right-handed golfer with minimal side clearance; a 12-foot room handles both swing orientations without forcing anyone to stand uncomfortably close to a side wall. For depth, add at least 3 feet behind the hitting position to any screen-to-ball distance requirement your launch monitor specifies, and that combined number is your actual room depth minimum for that specific piece of equipment.
Step 3. Match launch monitor type to your depth
Your room depth is not just a background number in golf simulator space planning; it directly controls which launch monitor types will actually work in your space. Radar-based systems and camera-based systems have fundamentally different depth requirements, and buying the wrong one for your room is a costly mistake that no amount of creative furniture rearrangement will fix. Before you look at price or feature comparisons, confirm the depth your room can deliver and use that number as your first filter.
Radar-based vs. camera-based systems
Radar-based launch monitors, like the Bushnell Launch Pro or Garmin Approach R10, track the ball and club using radar waves emitted from a unit positioned behind the golfer. These systems need 6 to 8 feet of clear space behind the hitting position to capture an accurate flight path before the ball reaches the screen. Camera-based systems, such as the Foresight GC3 or Uneekor QED, use high-speed cameras mounted overhead or in front of the golfer to capture club and ball data at impact. Camera-based systems can function with as little as 2 to 4 feet of rear clearance, which makes them the practical choice for rooms where depth is the primary constraint.
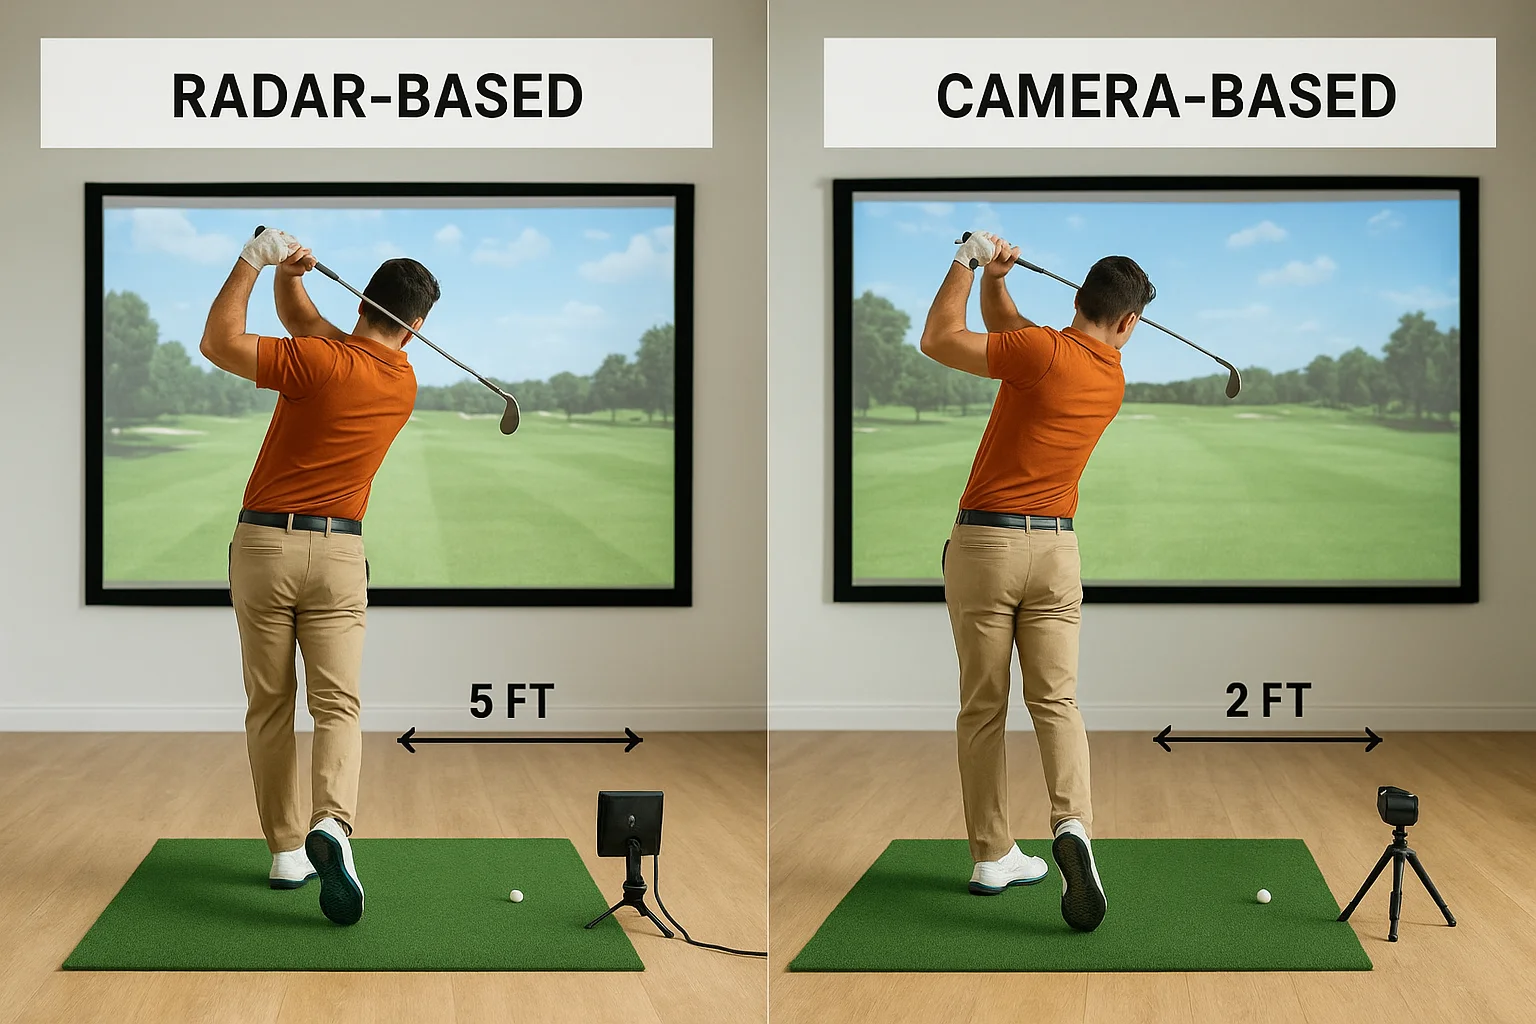
If your usable depth from the screen to the back wall is under 18 feet total, a camera-based system almost always gives you more flexibility without sacrificing data accuracy.
| Launch Monitor Type | Rear Clearance Needed | Minimum Total Room Depth |
|---|---|---|
| Radar (behind golfer) | 6 to 8 ft | 18 to 20 ft |
| Camera (overhead/front) | 2 to 4 ft | 14 to 16 ft |
| Doppler (side-mounted) | 3 to 5 ft | 16 to 18 ft |
How to apply this to your specific numbers
Take the total room depth you recorded in Step 1 and subtract 12 to 18 inches for your screen and impact panel. The remaining number is your usable hitting depth, and it tells you exactly where the hitting position lands relative to the back wall. From that hitting position, measure back toward the rear wall. If that number is under 5 feet, cross radar-based systems off your list and focus entirely on camera-based or overhead-mounted options.
Write your usable hitting depth on your planning sketch and label it clearly. That single number eliminates a significant portion of the launch monitor market from consideration and saves you from wasting hours comparing specs on products that your room cannot support.
Step 4. Map the hitting line and screen position
With your launch monitor type confirmed, the next task in golf simulator space planning is defining the center hitting line and your screen's exact position on the front wall. These two elements lock in where every other piece of equipment lives in the room, so establishing them on paper before you drill a single anchor or roll out a hitting mat saves you from rework that is both time-consuming and expensive.
Establish the center hitting line
Your center hitting line runs straight down the middle of the room from the back wall to the screen. Mark this line on your planning sketch first, then position your hitting mat so the ball sits directly on that centerline. For right-handed golfers, the golfer's body will stand to the right of center, and for left-handed golfers, to the left. This offset is typically 18 to 24 inches from the centerline to the inside foot, which means your room needs enough width on each side of the centerline to keep both elbows clear of side walls during a full swing.
A simple way to confirm your hitting position works is to stand in the actual room, hold a club at address, and take a slow-motion practice swing. Note where your hands and club travel at the widest point of your backswing and follow-through. If either path comes within 12 inches of a wall, your hitting position needs to shift toward the center of the room.
Set the screen distance from the ball
Screen placement controls both safety and image quality. Most impact screens work best when the ball position sits 8 to 12 feet from the screen face, which gives the ball enough distance to decelerate into the screen safely while keeping the image sharp at normal projector settings. Measure that distance from your confirmed ball position toward the front wall and mark it with tape on the floor.
Your screen position is not adjustable after installation, so verify the ball-to-screen distance against your launch monitor's minimum specification before you mount anything permanently.
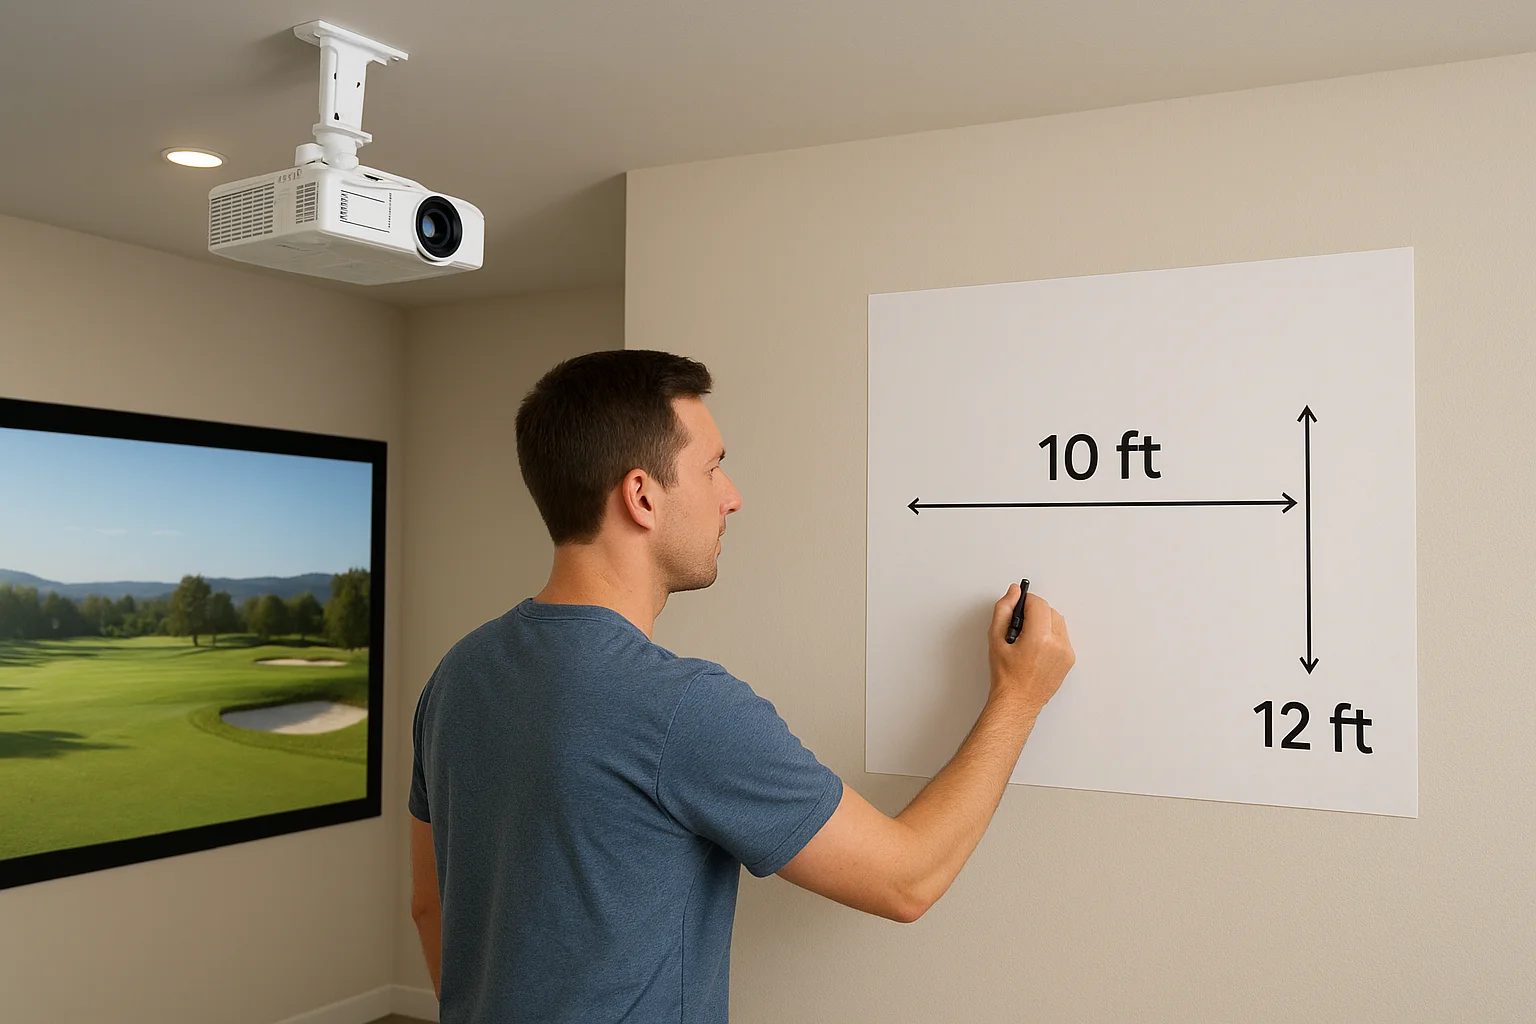
Record the screen width and height on your sketch next, centering it horizontally on the hitting line. A standard residential impact screen runs 10 to 12 feet wide and 8 to 9 feet tall, which fits comfortably in a 12-foot-wide room with 12 inches of clearance on each side for frame mounting and side netting attachment points.
Step 5. Dial in projector throw, lighting, and power
Once your screen position is marked on paper, projector placement, lighting layout, and electrical planning can all lock in together. These three elements depend on each other, and adjusting one after installation typically forces you to revisit the others. Resolving them during golf simulator space planning keeps you from dealing with a washed-out image, a misaligned projector mount, or an overloaded circuit after your room is already finished.
Calculate your projector throw distance
Throw distance is the gap between your projector lens and the screen surface. Every projector has a throw ratio, expressed as a number like 1.2:1, which means the lens needs 1.2 feet of distance for every 1 foot of image width. A 10-foot-wide screen with a 1.2:1 throw ratio requires at least 12 feet between the lens and the screen. Short-throw projectors with ratios below 0.8:1 can sit 6 to 8 feet from a 10-foot screen, making them the practical choice in rooms where ceiling-mounted placement behind the golfer would eat into your rear clearance.
If your room depth is under 18 feet, price out a short-throw projector before committing to a standard-throw model, because moving the mount even 2 feet can shift your image size outside usable range.
Use this quick reference to match throw ratio to your available distance:
| Screen Width | Throw Ratio | Minimum Throw Distance |
|---|---|---|
| 10 ft | 0.6:1 (ultra-short) | 6 ft |
| 10 ft | 1.2:1 (standard) | 12 ft |
| 12 ft | 0.6:1 (ultra-short) | 7.2 ft |
| 12 ft | 1.2:1 (standard) | 14.4 ft |
Control lighting to protect your image
Overhead lights pointing toward the screen face are the single biggest image quality killer in a simulator room. Recessed dimmable LEDs positioned along the side walls or behind the golfer, angled away from the screen, solve this without requiring a full electrical overhaul. Install a dimmer switch so you can dial down the room during play and bring it back up between shots.
Dedicate circuits for your equipment
A simulator PC, projector, and audio components running on the same residential circuit create power fluctuation risks that affect both equipment performance and image stability. Plan for at least two [dedicated 20-amp circuits](https://treasurevalleysolutions.com/blog/golf-simulator-projector): one for the projector and one for the simulator PC and peripherals. Have a licensed electrician confirm your panel has capacity and run those circuits before you mount anything permanently, because adding circuits after drywall is closed adds both cost and disruption.
Step 6. Add safety buffers, nets, and sound control
The final layer of golf simulator space planning focuses on protecting both people and surfaces from errant shots and managing the noise your setup generates. Safety buffers, side netting, and acoustic treatment are not optional upgrades you add after the room is finished; they belong in your plan from the beginning because retrofitting them into a completed room costs significantly more time and money.
Build side and rear safety buffers
Your hitting position needs clear buffer zones on three sides: left, right, and behind the golfer. A minimum of 18 inches between the golfer's maximum swing arc and any hard wall surface is the practical starting point, but 24 to 36 inches is the target. Measure your actual swing arc by holding a club at your widest backswing and follow-through positions, then add 6 inches to each side as a safety margin.
If your room width forces the hitting position within 18 inches of a side wall, padding that wall surface with impact foam rated for golf applications is a non-negotiable step before the room sees any play.
For the rear buffer, 3 feet of open space behind the golfer is the minimum you want between the player and the back wall, regardless of your launch monitor type. That distance keeps players from stepping backward into a hard surface during a swing and gives enough room for a spotter or second player to stand safely.
Install impact netting where it counts
Side netting catches shanks and hooks before they hit walls, windows, or anyone standing nearby. Use golf-rated barrier netting with a minimum thread weight of 4mm along both side walls from the screen frame back to roughly 10 feet behind the hitting position. Attach it to wall-mounted stanchions or ceiling tracks rated for impact loads, not standard curtain hardware.
| Netting Zone | Coverage Area | Minimum Spec |
|---|---|---|
| Side walls | Screen to 10 ft behind ball | 4mm braided golf netting |
| Rear wall | Full wall width | 2mm containment net |
| Screen surround | 12 in beyond screen frame | Impact panel or foam border |
Reduce impact and airborne sound
Ball strike noise and foot movement vibration both travel through floors and walls, which creates real friction in multi-story homes. Place a rubber underlayment pad rated at minimum 8mm thickness under your hitting mat to absorb impact shock before it reaches the subfloor. Acoustic foam panels mounted on side walls and the ceiling above the hitting area reduce the sharp crack of ball strikes bouncing around a hard-surface room without requiring permanent construction changes.

A simple way to finish your plan
You now have the full framework for golf simulator space planning: room measurements, dimension tiers, launch monitor selection, screen placement, projector throw, and safety buffers. Each step builds on the previous one, which means a complete plan only works when all six layers are resolved before equipment arrives. Go back through your notes from each step and confirm you have a recorded number or decision for every element covered. A single unresolved gap, like an unknown ceiling height in the hitting zone or an unlabeled circuit, is enough to stall an install.
If any part of your plan raises questions about AV setup, projector mounting, screen installation, or room wiring, that is exactly where professional help pays for itself. Treasure Valley Solutions designs and installs custom home entertainment systems across the Treasure Valley, and we can review your layout before anything is purchased. Start your golf simulator project with us and avoid the costly surprises that come from skipping this step.