A golf simulator projector can make or break your indoor golf experience. Pick the right one, and every drive, chip, and putt looks crisp and true to life on your impact screen. Pick the wrong one, an...
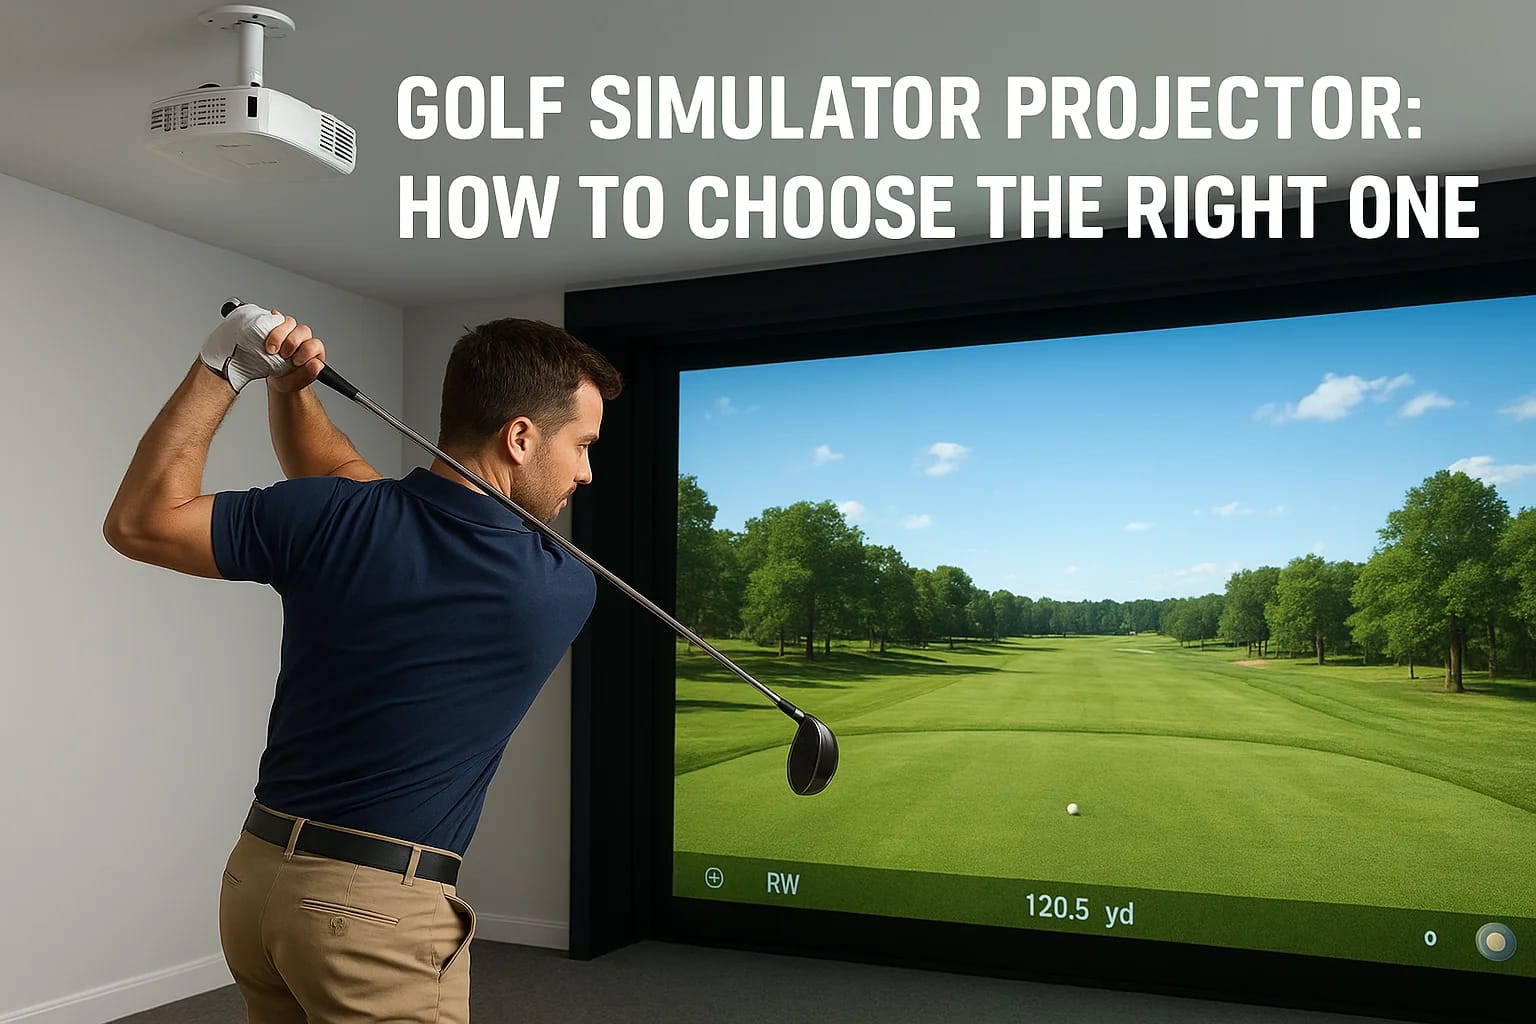
Golf Simulator Projector: How To Choose The Right One
A golf simulator projector can make or break your indoor golf experience. Pick the right one, and every drive, chip, and putt looks crisp and true to life on your impact screen. Pick the wrong one, and you're squinting at a washed-out image that kills the immersion, and the investment. With so many specs to sort through, resolution, throw ratio, brightness, input lag, choosing a projector that actually fits your space and budget takes more than a quick scroll through Amazon reviews.
At Treasure Valley Solutions, we design and install custom entertainment spaces for homeowners across the Boise and Meridian area, including dedicated golf simulator rooms. We've spec'd projectors for tight basement builds and spacious bonus rooms alike, so we know firsthand which features matter and which ones are just marketing fluff. Our experience with AV integration means we look at projector selection the same way we approach any project: it has to work perfectly within your specific setup, not just look good on a spec sheet. That hands-on perspective is what shaped this guide.
Below, we'll walk you through every factor that goes into choosing the right projector for your golf simulator, from resolution and brightness to throw distance and connectivity. You'll learn how to match a projector to your room dimensions, understand which specs actually affect gameplay, and avoid the common mistakes that lead to buyer's remorse. By the end, you'll have a clear framework for making a confident, informed purchase.
What a golf simulator projector needs to do
A golf simulator projector operates under conditions that a standard home theater projector never faces. You're projecting onto an impact screen that absorbs ball strikes, flexes slightly when hit, and has a textured surface, not a smooth painted wall. That texture scatters light differently, which means you need a projector with enough brightness and contrast to produce a sharp, readable image through that surface variation. If you use a projector that works fine in a living room but lacks the output for an impact screen, the result is a dull, flat picture that makes reading ball flight data and course details much harder.
Beyond image quality, your projector has to keep up with the simulation software in real time. Programs like FSX 2020 or E6 Connect update the on-screen image the instant your launch monitor captures ball data, and a projector with high input lag will create a noticeable delay between when the software renders the frame and when you see it. That delay disrupts the feel of the simulation. For most setups, you want input lag below 30 milliseconds, and many low-latency projectors targeting the gaming and simulator market hit 16ms or less.
Image performance on impact screens
Impact screens are typically made from polyester or nylon blends that diffuse projected light across their surface. This diffusion reduces perceived contrast and sharpness compared to a rigid projection surface, which is why brightness measured in lumens matters more here than it does in a home theater. A projector that delivers 3,000 to 4,000 lumens is a reasonable starting point for most simulator rooms, while rooms with significant ambient light may need 4,500 lumens or more.
For impact screens, prioritize lumens and contrast ratio over raw resolution; a bright 1080p image consistently outperforms a dim 4K image in real-world use.
Contrast ratio determines how well the projector separates dark and light areas in the image. A high native contrast ratio keeps the fairway, rough, and sky looking distinct rather than blending into a flat, muddy picture. Look for a native contrast ratio above 10,000:1 for the best results when projecting onto an impact screen.
Input lag, refresh rate, and connectivity
Your simulator software sends frames to the projector through an HDMI connection, so the projector's HDMI input version and refresh rate directly affect how smooth the image looks during play. Most simulator setups run at 60Hz, and a projector that supports 60Hz at your chosen resolution keeps everything fluid. Higher-end builds sometimes push to 120Hz, which produces smoother motion when the virtual camera pans across the course during replay.
Connectivity goes beyond just counting HDMI ports. Check whether the projector supports HDMI 2.0, because HDMI 1.4 ports cannot carry 4K at 60Hz and will either drop the resolution or reduce the frame rate. If you plan to run a gaming PC alongside your simulator software, two HDMI inputs let you switch between sources without unplugging cables each time, which is a practical detail that becomes obvious the first time you need it.
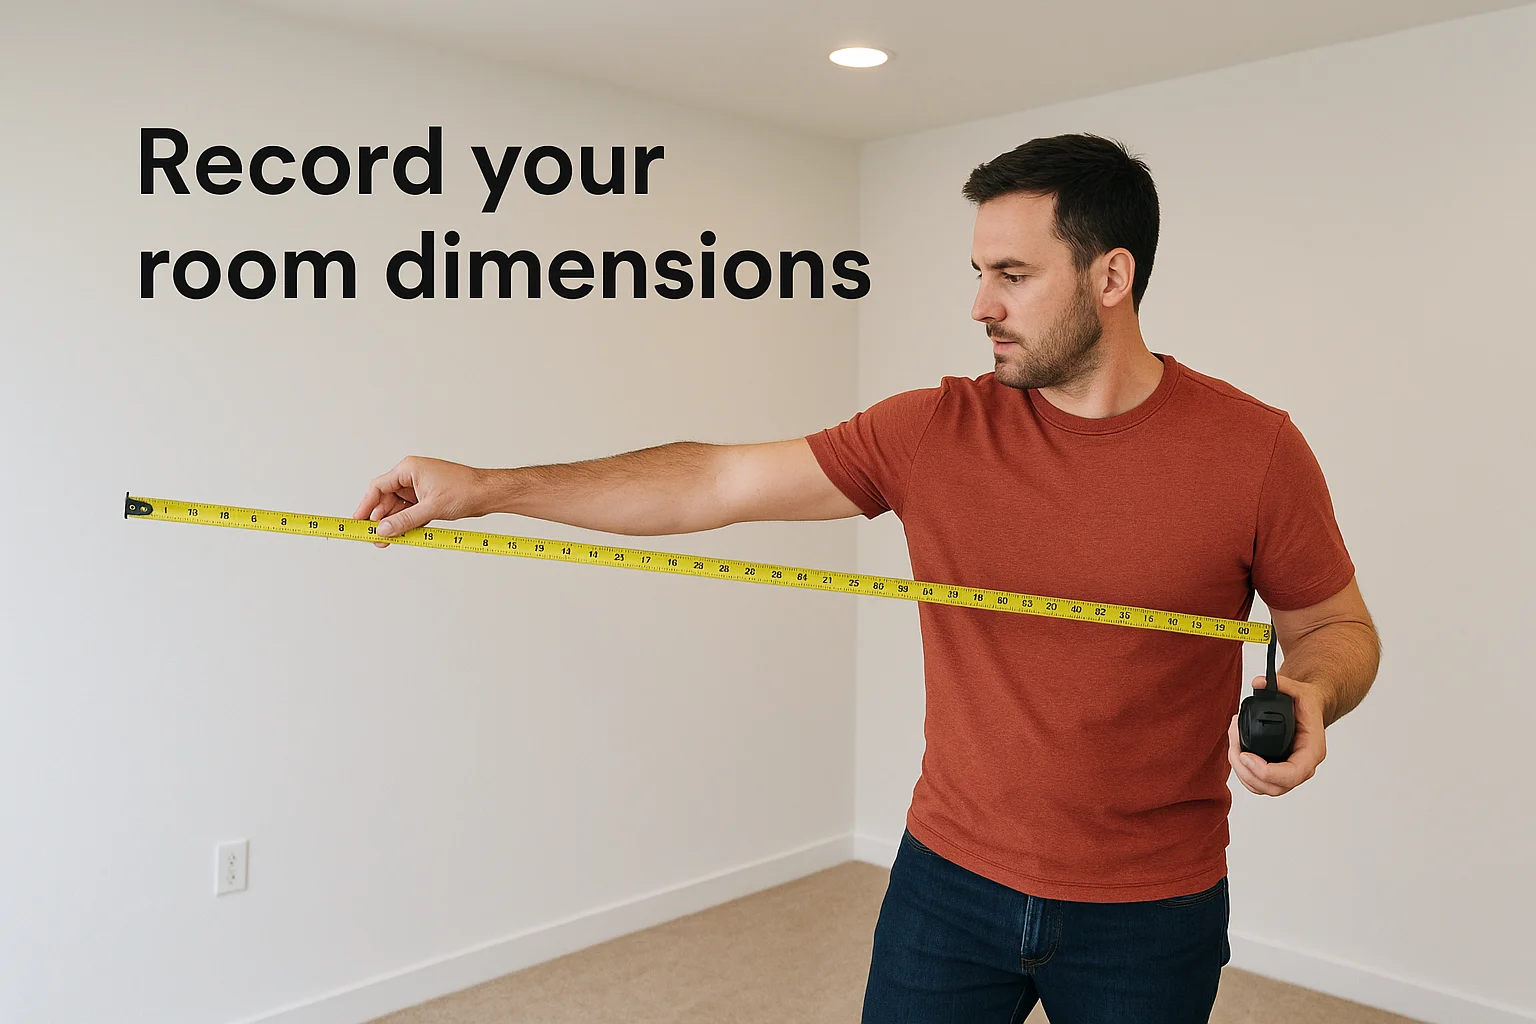
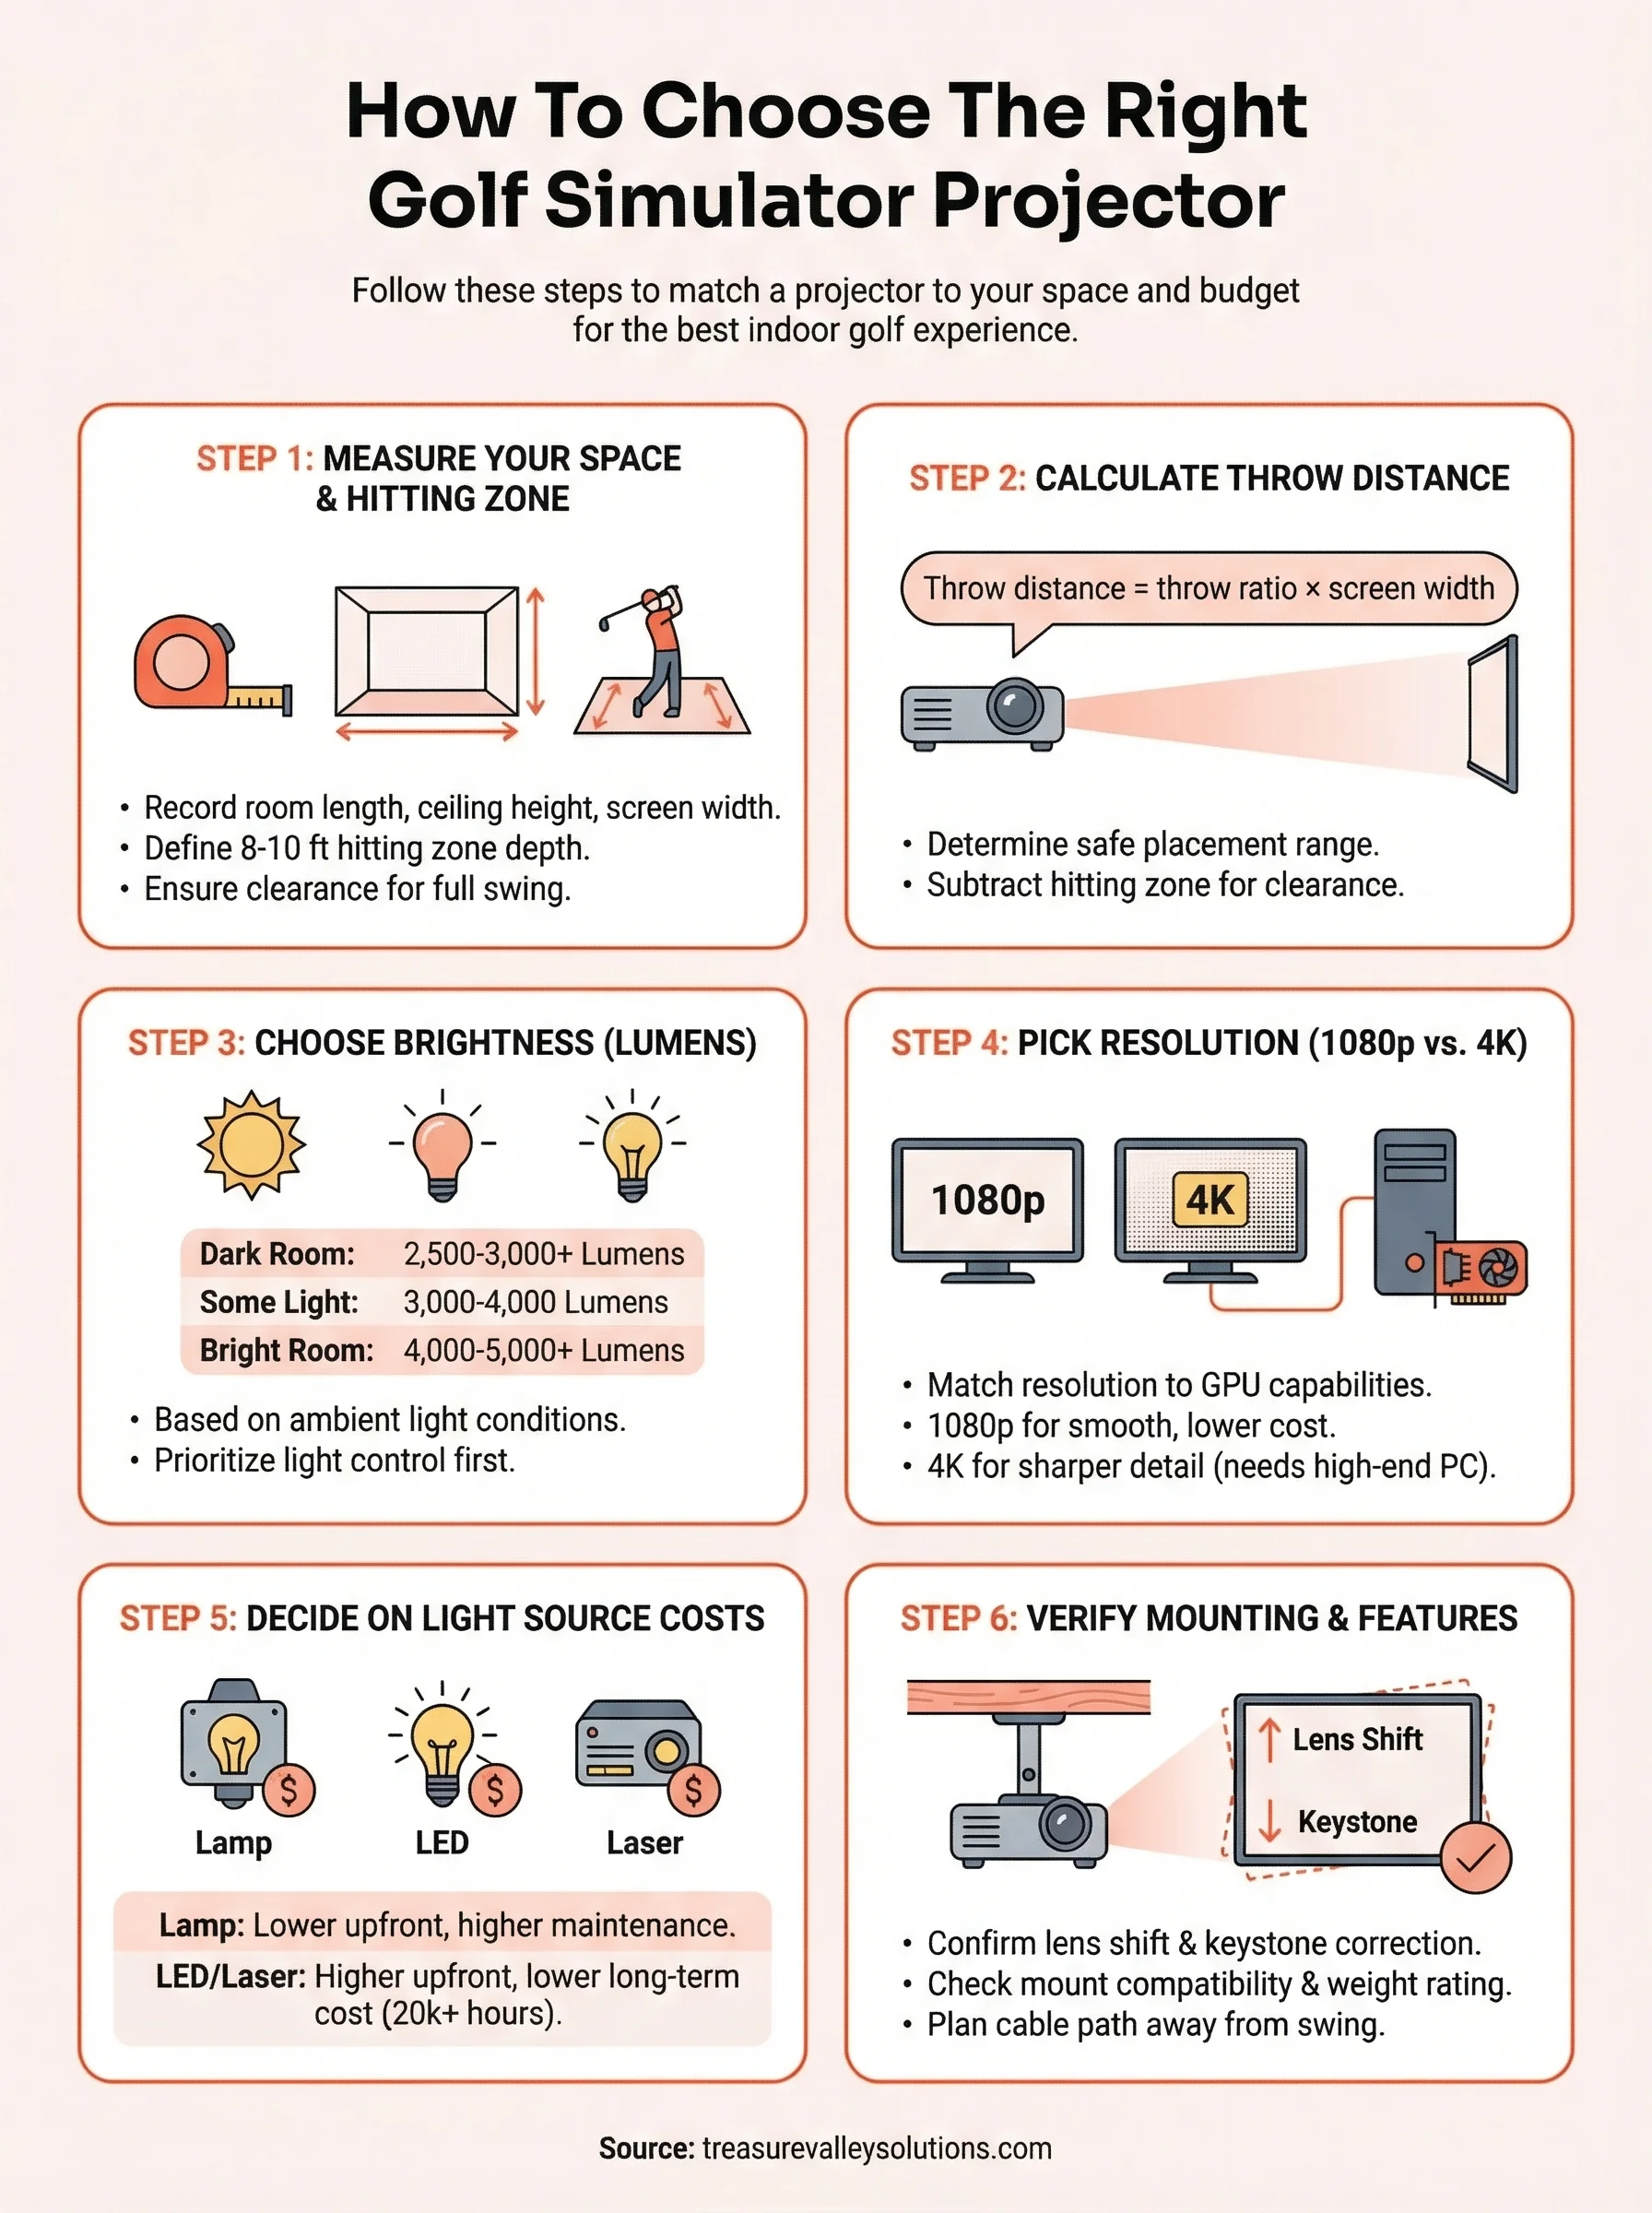
Measure your room, hitting zone, and screen
Before you compare any projector specs, pull out a tape measure and record three numbers: room length, ceiling height, and screen width. These measurements drive every other decision in the buying process. Your throw distance, projector brightness requirements, and mounting position all follow directly from what your room can physically accommodate. Skipping this step and guessing leads to projectors that either can't fill the screen or sit dangerously close to your swing path.
Record your room dimensions
Start at the back wall and measure to where your impact screen will hang. That distance is your maximum throw distance, and it caps which projectors are even viable for your setup. Next, measure ceiling height from the floor to the point where you plan to mount the projector. Most simulator rooms need at least 9 feet of ceiling clearance to give a golfer enough overhead room on a full driver swing without clipping the unit or its mounting hardware.
Use this template to record your numbers before you shop:
| Measurement | Your Value |
|---|---|
| Room length (back wall to screen) | |
| Ceiling height (floor to mount point) | |
| Screen width | |
| Screen height | |
| Hitting zone depth (tee to screen) |
Define your hitting zone and screen size
Your hitting zone is the space between where you tee up and the front face of your impact screen. Most golfers need 8 to 10 feet of hitting zone depth for a natural swing with a driver, and that zone must stay completely clear of any projector, mount, or cable. If you plan to mount the projector from the ceiling, confirm that it sits behind your maximum backswing arc, not above or in front of it.
Measure your hitting zone with a club in hand, not just on paper; take a full driver swing and mark the furthest point the club head reaches overhead and behind you.
Screen width typically runs between 100 and 120 inches for home simulator builds, and your screen size directly determines how much light output your golf simulator projector needs to produce a bright, even image across the full surface.
Step 1. Use throw ratio to set safe placement
Throw ratio tells you how far a projector must sit from your screen to produce an image of a specific width. The number is expressed as distance-to-width, so a projector with a 1.5:1 throw ratio needs 1.5 feet of distance for every 1 foot of screen width. Understanding this single spec keeps you from mounting a projector inside your swing path or discovering after installation that it can't fill your screen from where it sits.
If you only check one spec before buying a golf simulator projector, check throw ratio first; it determines whether the unit physically fits your room.
Calculate your minimum and maximum throw distance
Use this formula to find the throw distance for any projector you're considering:
Throw distance = throw ratio × screen width
Most projectors list a throw ratio range rather than a fixed number, which gives you a zone of valid placement rather than a single point. Calculate both ends of that range to know exactly where the unit can mount within your room without clipping your image or crowding your swing space.
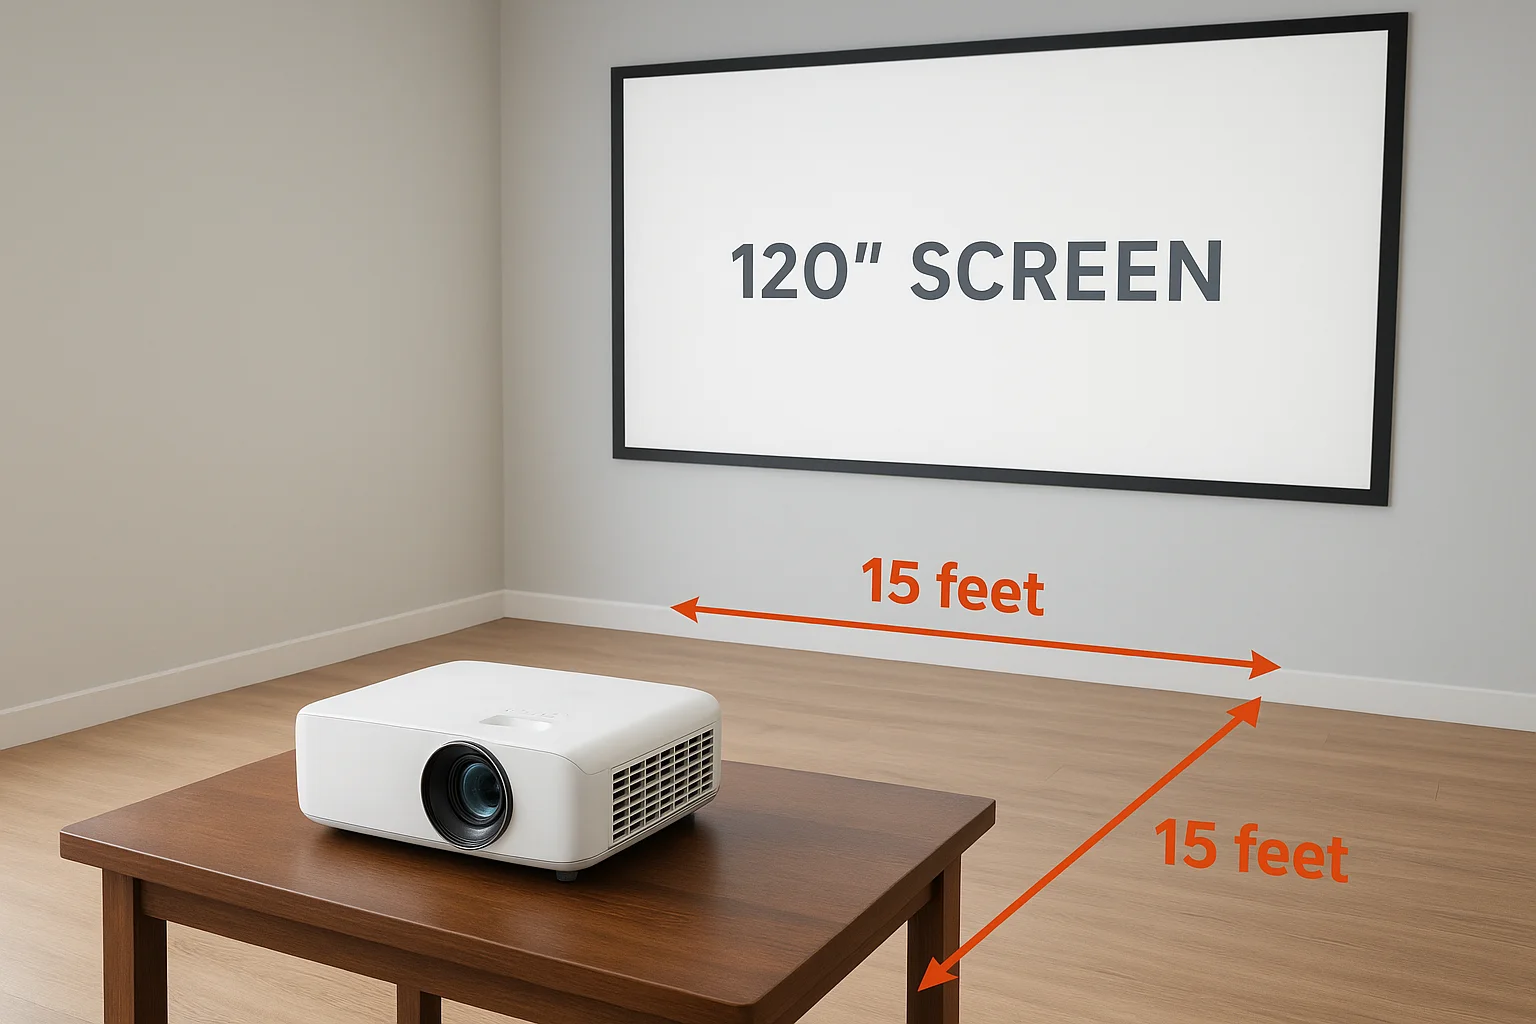
Here's an example using a 10-foot (120-inch) wide screen:
| Throw Ratio | Throw Distance (120" screen) |
|---|---|
| 0.5:1 (ultra-short throw) | 5 feet |
| 1.0:1 | 10 feet |
| 1.5:1 | 15 feet |
| 2.0:1 | 20 feet |
Most simulator rooms work best with throw ratios between 1.1:1 and 1.5:1, which keeps the projector well behind the hitter without requiring an unusually deep room.
Match throw ratio to your hitting zone clearance
Once you know your throw distance, subtract your hitting zone depth from it. That remainder is how much space sits between your swing arc and the projector. If that number is less than 2 feet of clearance, the projector is too close and poses a genuine safety risk during play.
For a room with a 15-foot throw distance and an 8-foot hitting zone, you get 7 feet between the back of your hitting zone and the projector, which is a safe and workable margin for most setups. Rooms shorter than 12 feet total typically need a short-throw projector to maintain both adequate image size and enough clearance for a full swing.
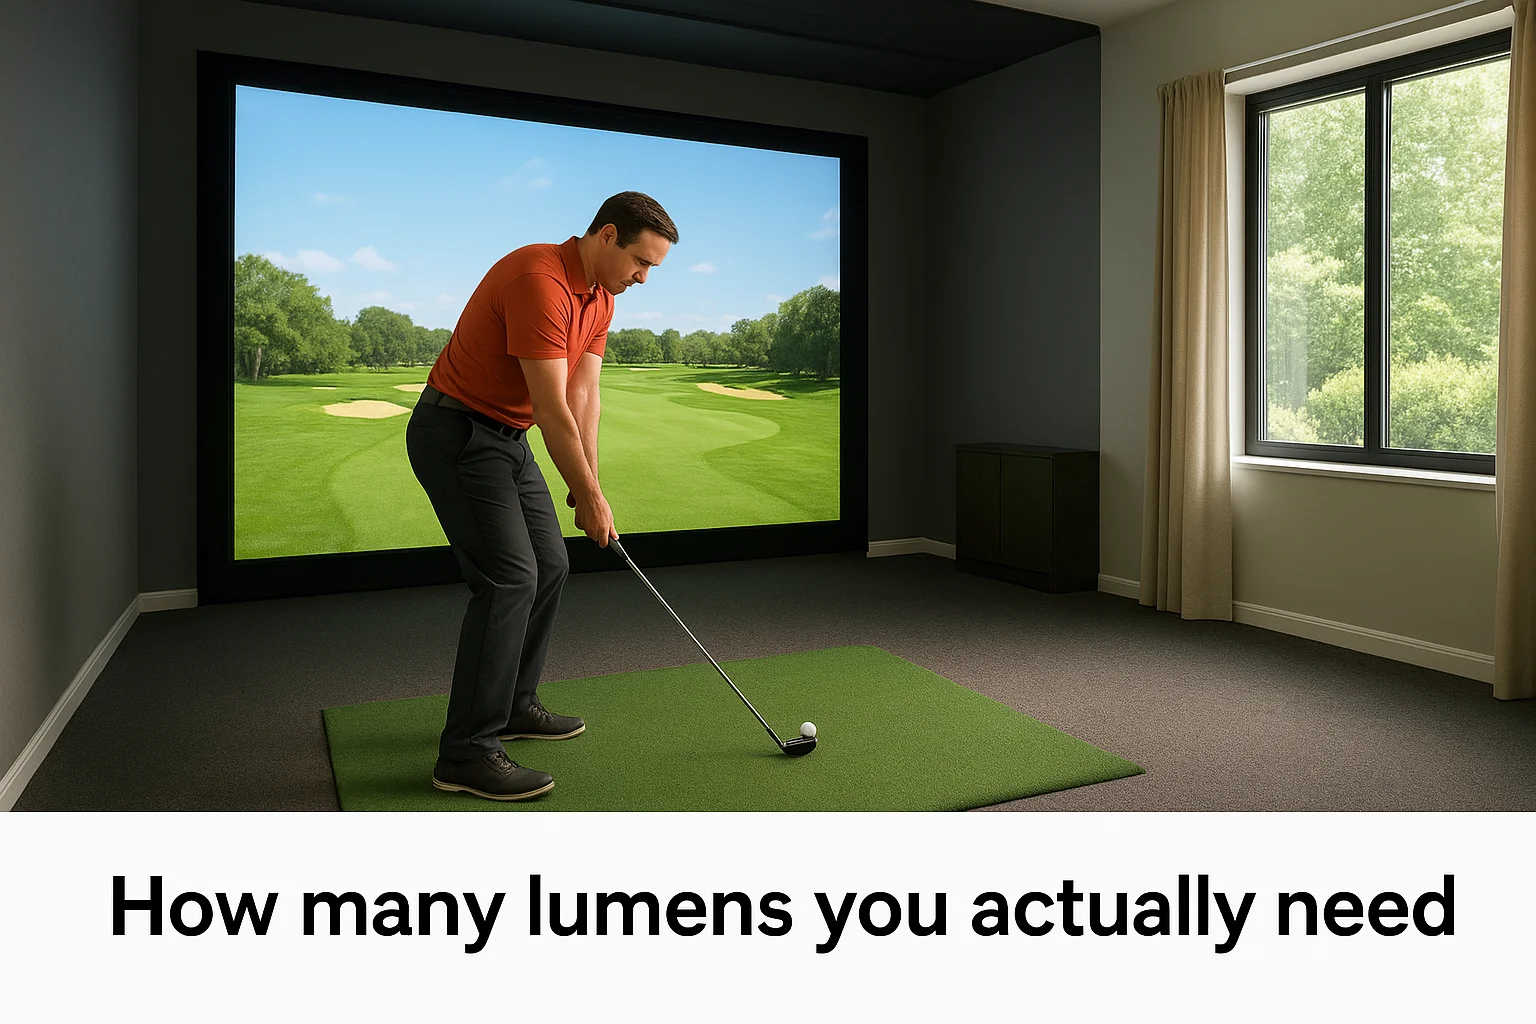
Step 2. Choose brightness and manage ambient light
Brightness is the spec that most buyers underestimate when shopping for a golf simulator projector. Impact screens absorb and scatter light rather than reflecting it cleanly, so you need more raw output than a typical home theater setup would require. Lumens determine how visible your image stays when ambient light competes with the projected picture, and in a simulator room, that competition is constant.
How many lumens you actually need
Your room's light conditions set the baseline for how much brightness you need. A light-controlled space with no windows can work well with 3,000 lumens, but most simulator rooms sit somewhere between fully dark and partially lit. Use this table to find your realistic starting point:
| Room Condition | Recommended Brightness |
|---|---|
| Fully dark, no windows | 2,500 to 3,000 lumens |
| Minimal ambient light (one small window) | 3,000 to 4,000 lumens |
| Moderate ambient light (multiple windows) | 4,000 to 5,000 lumens |
| High ambient light (uncontrolled lighting) | 5,000+ lumens |
Projectors above 4,000 lumens generate more heat and draw more power, so factor that into your room's ventilation and electrical planning before you commit to a high-output unit.
Always measure your room's brightness requirements at the time of day you'll use the simulator most; morning and afternoon light levels differ significantly.
Control ambient light to reduce your lumen requirement
Reducing your room's ambient light level is often cheaper and more effective than buying a brighter projector, and it delivers a better overall image at the same time. Before you move up to a higher-lumen unit, work through these options first:
- Blackout curtains or blinds on any windows in the room
- Dimmer switches for overhead lighting so you can fine-tune brightness during play
- Dark wall paint on side and back walls to cut down on light bounce
- Recessed lighting positioned behind the hitter, not above or in front of the screen
Each of these changes reduces the ambient light your projector has to overcome. A 3,500-lumen unit in a well-controlled room consistently outperforms a 5,000-lumen unit in a space with unchecked ambient light, so invest in light control before you invest in more lumens.
Step 3. Pick 1080p or 4K that your PC can run
Resolution determines how sharp the course, ball flight data, and UI elements look on your impact screen, but the resolution your projector outputs means nothing if your PC can't render frames at that resolution smoothly. Before you spend more on a 4K golf simulator projector, confirm your graphics card can actually push 4K at a stable frame rate through your simulator software. A 4K projector fed a 1080p signal from an underpowered GPU will upscale the image, which produces a softer result than native 1080p from a capable machine.
What 1080p and 4K actually deliver in a simulator
Both resolutions produce strong results in a simulator room, but they serve different use cases. 1080p at 60Hz delivers sharp text in the simulator UI, clear ball flight arcs, and readable course details without demanding heavy GPU resources. Most mid-range PCs handle 1080p with headroom to spare, which keeps frame rates consistent and input lag low. 4K adds finer detail to grass textures, course backgrounds, and on-screen data, which is most noticeable on screens wider than 110 inches where individual pixels start to become visible at 1080p.
The gap between 1080p and 4K matters more on large screens viewed from short distances; on a standard 100-inch impact screen from 10 feet away, the difference is real but not dramatic.
Match resolution to your GPU
Your GPU sets the hard ceiling on which resolution makes sense for your build. Use this table to match your hardware to a realistic resolution target:
| GPU Tier | Recommended Resolution | Notes |
|---|---|---|
| Entry-level (e.g., GTX 1660) | 1080p | Stable frame rates, low input lag |
| Mid-range (e.g., RTX 3060) | 1080p or 1440p | 4K possible at reduced settings |
| High-end (e.g., RTX 4070+) | 4K | Full settings, 60Hz output |
Check your GPU's HDMI output version before you buy, because many older cards top out at HDMI 1.4, which cannot carry 4K at 60Hz. If your card only has DisplayPort 4K output, confirm your projector has a compatible input or plan for an active adapter. Matching your projector's resolution to what your PC actually outputs keeps the image sharp and the frame rate consistent throughout your round.
Step 4. Decide on lamp, LED, or laser ownership costs
The purchase price of a golf simulator projector is only part of what you'll spend over time. Light source technology determines how long your projector stays bright, how often you pay to maintain it, and what your total ownership cost looks like after two or three years of regular use. Choosing the wrong light source for your usage habits costs you more in the long run, even if it looks cheaper upfront.
Lamp projectors and replacement costs
Traditional lamp projectors carry the lowest upfront cost, which makes them attractive for budget builds. The tradeoff is that bulbs dim significantly after 3,000 to 5,000 hours of use and need replacement at roughly $50 to $200 per bulb depending on the model. If you play two hours per day, you'll replace the bulb every four to seven years, but heavy users hit that limit much sooner. Factor replacement bulb cost and downtime into your total budget before you commit to a lamp unit.
Lamp projectors work well for occasional use, but for daily simulator sessions they often cost more over five years than an LED or laser unit purchased at a higher upfront price.
LED and laser long-term value
LED and laser projectors carry higher upfront prices but hold their brightness far longer, which reduces your total ownership cost for regular players. LED units typically last 20,000 hours, and laser units stretch to 30,000 hours or more, which means most users never replace the light source during the life of the projector. Use this comparison to weigh your options based on how often you plan to play:
| Light Source | Rated Hours | Replacement Cost | Best For |
|---|---|---|---|
| Lamp | 3,000 to 5,000 | $50 to $200 per bulb | Occasional use |
| LED | 20,000 | None (sealed unit) | Regular use |
| Laser | 30,000+ | None (sealed unit) | Daily or heavy use |
Laser projectors also maintain consistent brightness over their lifespan rather than gradually dimming the way lamp units do, which keeps your image quality stable session after session. If you plan to use your simulator three or more times per week, the higher upfront cost of a laser unit pays for itself well before the light source reaches its end of life.
Step 5. Verify image fit, mounting, and key features
Once you confirm throw ratio, brightness, resolution, and light source, three final checks keep your build from running into problems after delivery: image geometry, mounting compatibility, and the short feature list that makes a real difference session after session. Skipping these verifications leads to crooked images, incompatible hardware, or a unit that works on paper but frustrates you every time you use it.
Confirm keystone correction and lens shift
Your projector almost never sits at perfect center height relative to your screen, which means the image arrives at an angle and produces a trapezoid shape instead of a rectangle. Keystone correction fixes this digitally by adjusting the image geometry to compensate for the angle. Most projectors include vertical keystone correction, but look for horizontal keystone correction as well, because ceiling mounts rarely land at perfect horizontal center either.
Optical lens shift corrects image geometry without degrading pixel quality; digital keystone correction works but softens the image slightly, so use lens shift first when your projector supports it.
Lens shift moves the lens mechanically rather than warping the image digitally, which preserves full resolution at the corrected angle. If your chosen golf simulator projector offers lens shift, use it as your primary alignment tool and save keystone correction as a backup for fine-tuning only.
Choose the right mount and confirm key features
Ceiling mounting is the standard choice for simulator rooms because it keeps the projector well out of your swing arc and positions it centrally behind the hitting zone. Before you order a mount, verify that your ceiling joists align with where the projector needs to sit based on your throw distance calculation from Step 1.
Use this checklist to confirm your mount and feature setup before installation:
- Joist location confirmed with a stud finder at your planned mount point
- Mount weight rating exceeds your projector's weight by at least 50 percent
- Cable management path planned from projector to PC without crossing the hitting zone
- Clearance from swing arc measured with a club in hand at full extension
- Lens shift range sufficient to align the image without relying entirely on keystone correction
Check that the projector's mounting hole pattern matches your selected ceiling mount before you order both separately, since mismatched patterns require adapter plates that add cost and delay your installation.
Wrap up and get help when you need it
Choosing the right golf simulator projector comes down to working through each spec in a logical order rather than grabbing the highest-reviewed unit on a retail site. Throw ratio and room dimensions come first, then brightness, resolution, and light source. Image geometry and mounting round out the process. Each step filters your options until you have a short list of projectors that actually fit your space, your PC, and your usage habits without compromise.
Building a simulator room in the Treasure Valley area and not sure where to start? Our team at Treasure Valley Solutions handles everything from projector selection and ceiling mounting to cable management and full software calibration. You don't have to sort through spec sheets alone or guess at throw distances with a tape measure. Reach out to us today to talk through your room dimensions and get a custom recommendation for your specific build.