
A home golf simulator sounds amazing until you start Googling prices and realize the range runs from $500 to $70,000+. That spread is huge, and without a clear golf simulator cost breakdown, it's easy...
Golf Simulator Cost Breakdown: 10 Costs From DIY to Pro
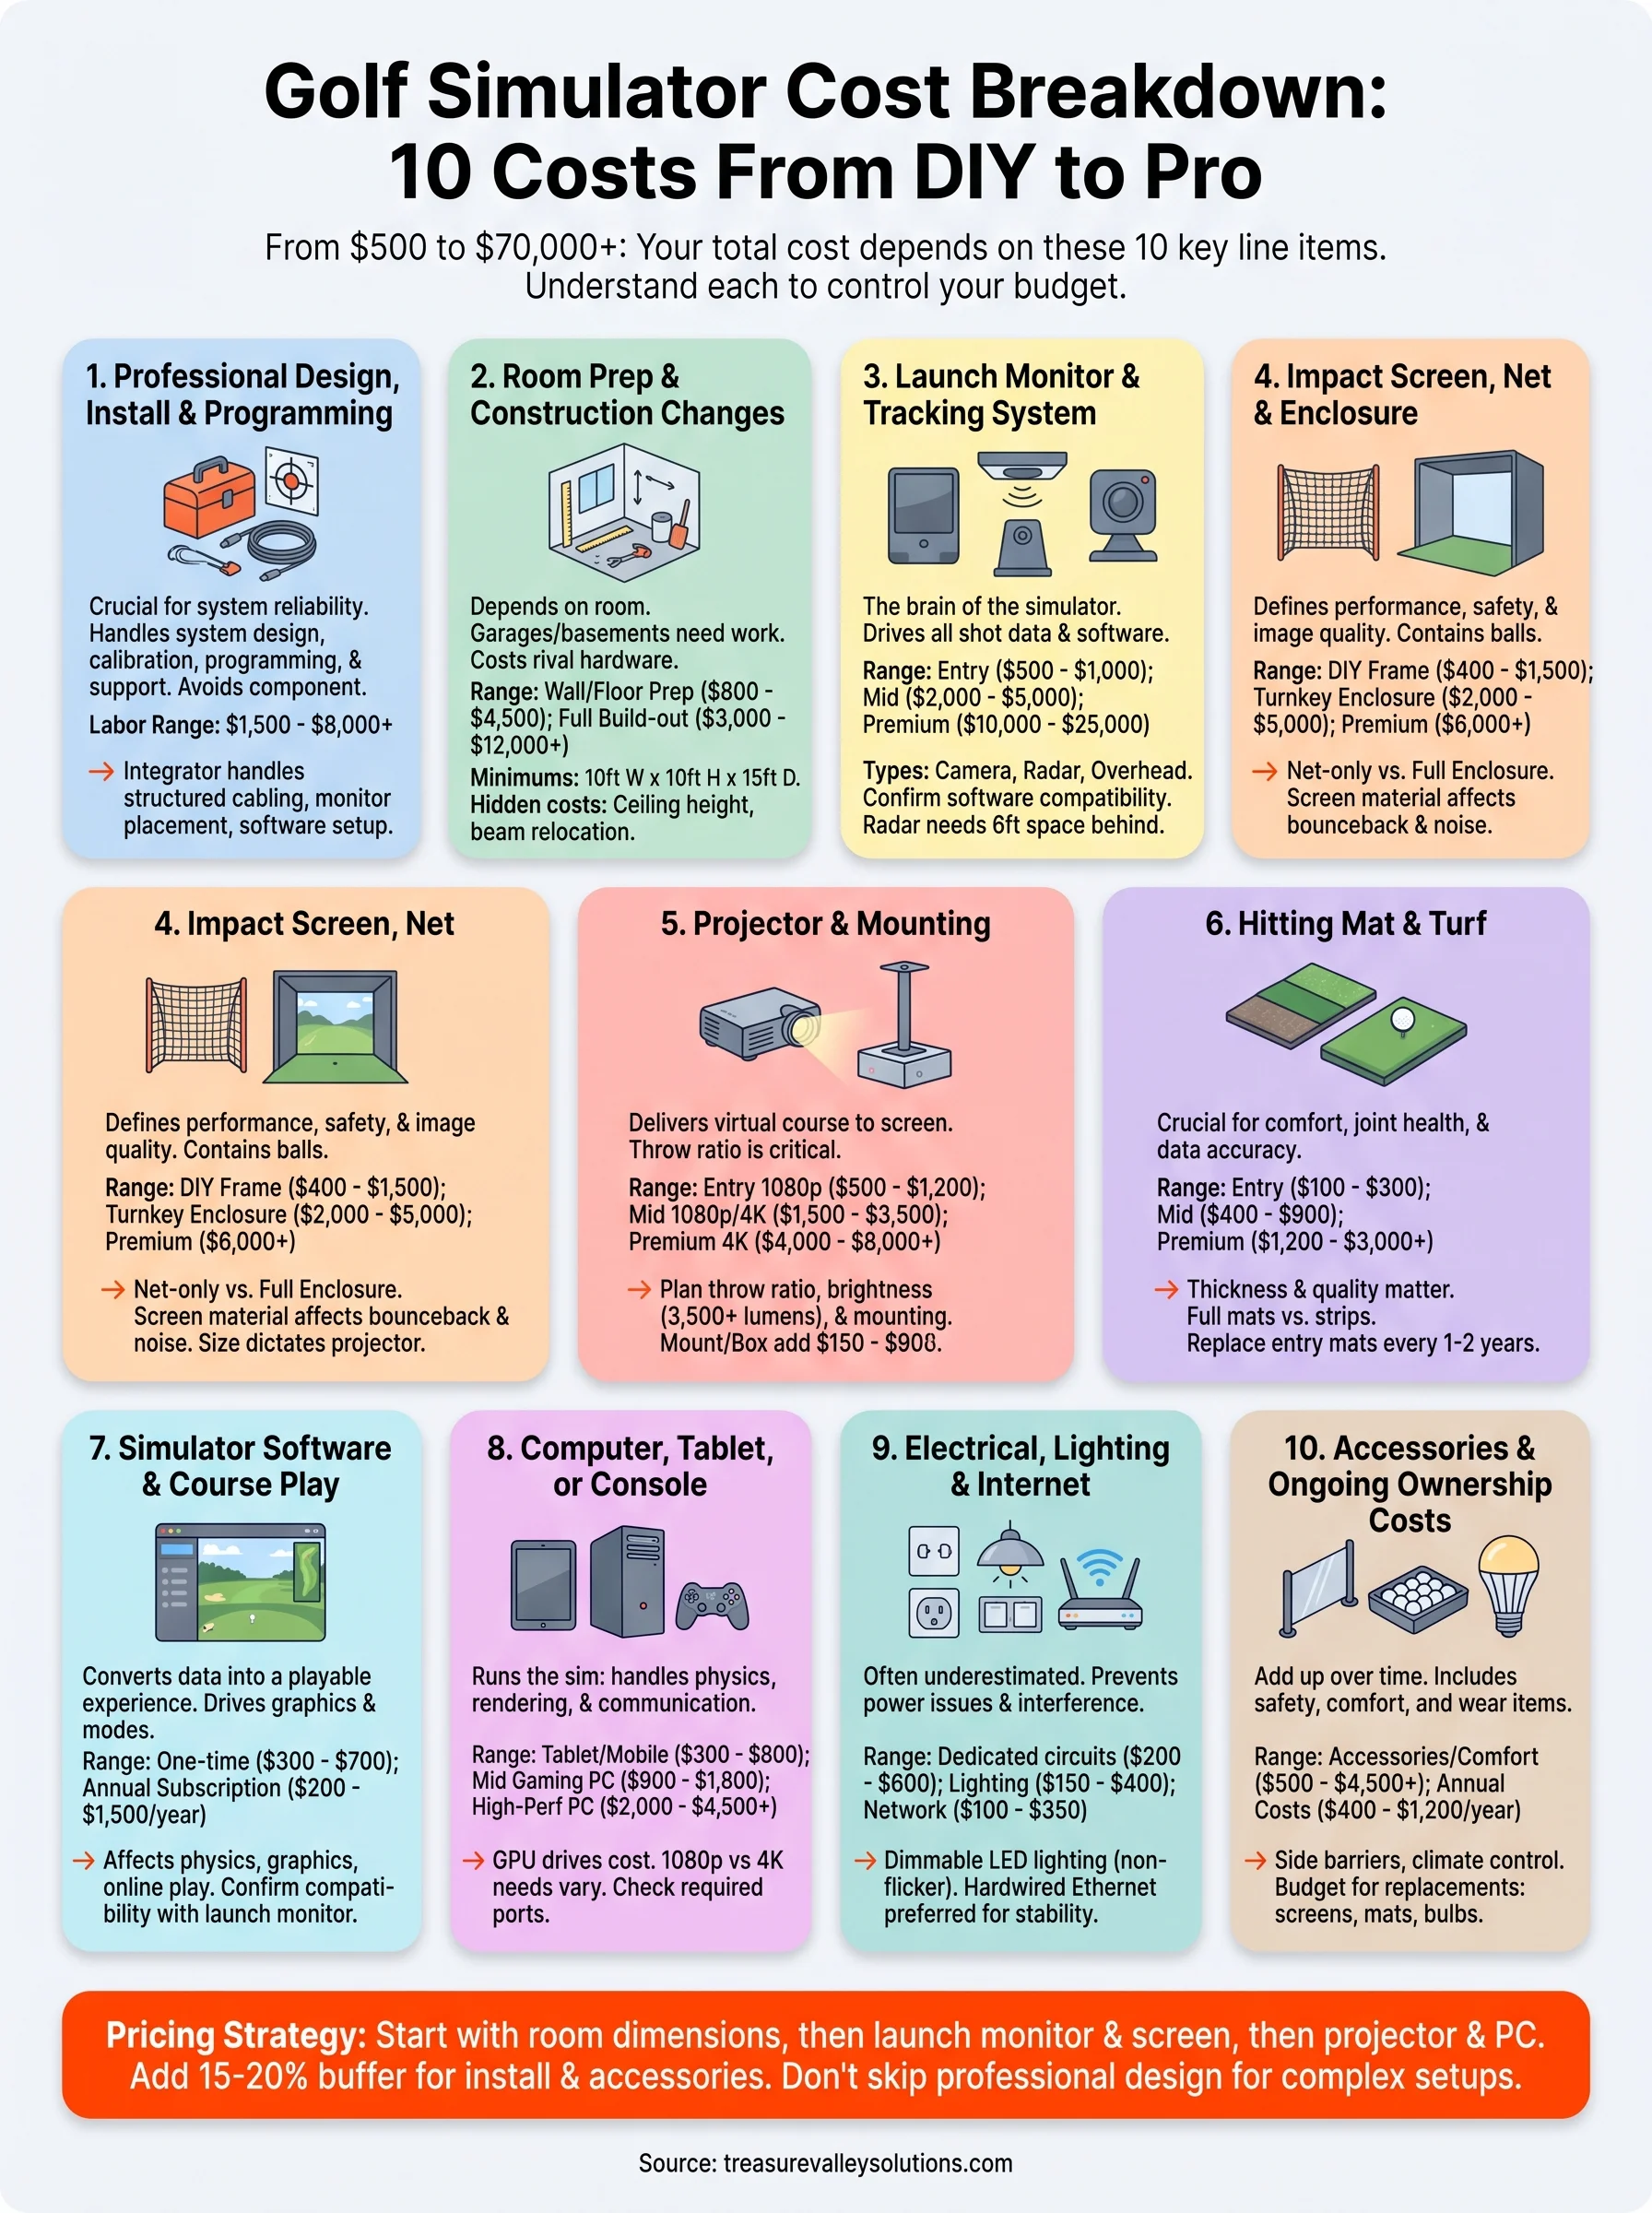
A home golf simulator sounds amazing until you start Googling prices and realize the range runs from $500 to $70,000+. That spread is huge, and without a clear golf simulator cost breakdown, it's easy to either overspend on features you don't need or cheap out on components that ruin the experience. The truth is, your total cost depends on 10 specific line items, and understanding each one puts you in control of your budget.
At Treasure Valley Solutions, we design and install custom entertainment spaces across the Boise and Meridian area, including dedicated golf simulator rooms with integrated projection, audio, and lighting. We've helped homeowners navigate these exact decisions, choosing the right launch monitor, screen size, enclosure setup, and software, so the finished space actually performs the way they imagined. That hands-on experience is what shaped this guide.
Below, we break down every cost involved in building a golf simulator, organized from budget-friendly DIY setups to fully professional installations. Each component includes realistic price ranges for entry-level, mid-range, and premium options so you can mix and match based on your priorities and your space.
1. Professional design, install, and programming
Professional installation is often the first line item people skip when building a golf simulator, and it's usually the decision they regret most. When you hire a technology integrator, you're not just paying someone to hang a projector. You're paying for system design, calibration, programming, and ongoing support that makes every component work together as a single reliable system.
What an integrator handles that DIY misses
A professional integrator starts with your actual room, measuring ceiling height, wall placement, and available depth before specifying a single component. They handle projector throw calculations, screen positioning, launch monitor placement, cable routing, and software configuration as a coordinated system. DIY builders frequently discover incompatibilities after purchasing equipment, like a projector that's too bright for the throw distance or a launch monitor that won't calibrate due to uncontrolled ambient light.
Integrators also manage the details that don't show up in YouTube tutorials:
- Structured cable routing that avoids signal interference between systems
- Launch monitor positioning within manufacturer-specified tolerances
- Software licensing, firmware updates, and device communication setup
- Post-install calibration to confirm shot data accuracy before you play
Getting component compatibility right before you buy anything saves more money than any discount you'll find on individual parts.
Typical labor and programming cost ranges
Labor and programming for a golf simulator installation typically runs $1,500 to $4,000 for a straightforward single-room setup. Projects with integrated lighting control, dedicated audio, and full AV programming can reach $5,000 to $8,000 or higher. These figures are separate from equipment and construction costs, which you'll see throughout the rest of this golf simulator cost breakdown.
Your specific cost depends on room complexity, the number of integrated systems, and how much custom programming your setup requires.
When pro install pays for itself
The strongest case for hiring a professional comes when multiple systems need to work together: projection, lighting, audio, and launch monitor software all responding correctly in the same space. A misconfigured setup wastes expensive equipment. If your launch monitor placement is off or your projector input lag runs too high, shot data becomes unreliable and the whole experience suffers. Fixing these issues after the fact often costs more than the original install.
What to ask for in a quote so pricing stays firm
Before signing anything, request a line-item quote that separates equipment from labor, programming, and post-install support. Ask specifically whether calibration and software setup are included or billed separately. Confirm whether return visits for adjustments are covered. A detailed scope of work protects you from cost creep and signals how organized the company operates before they enter your home.
2. Room prep and construction changes
Your room determines what components are even viable before you spend a dollar on equipment. This part of the golf simulator cost breakdown surprises most buyers because the construction numbers can rival the cost of the simulator hardware itself.
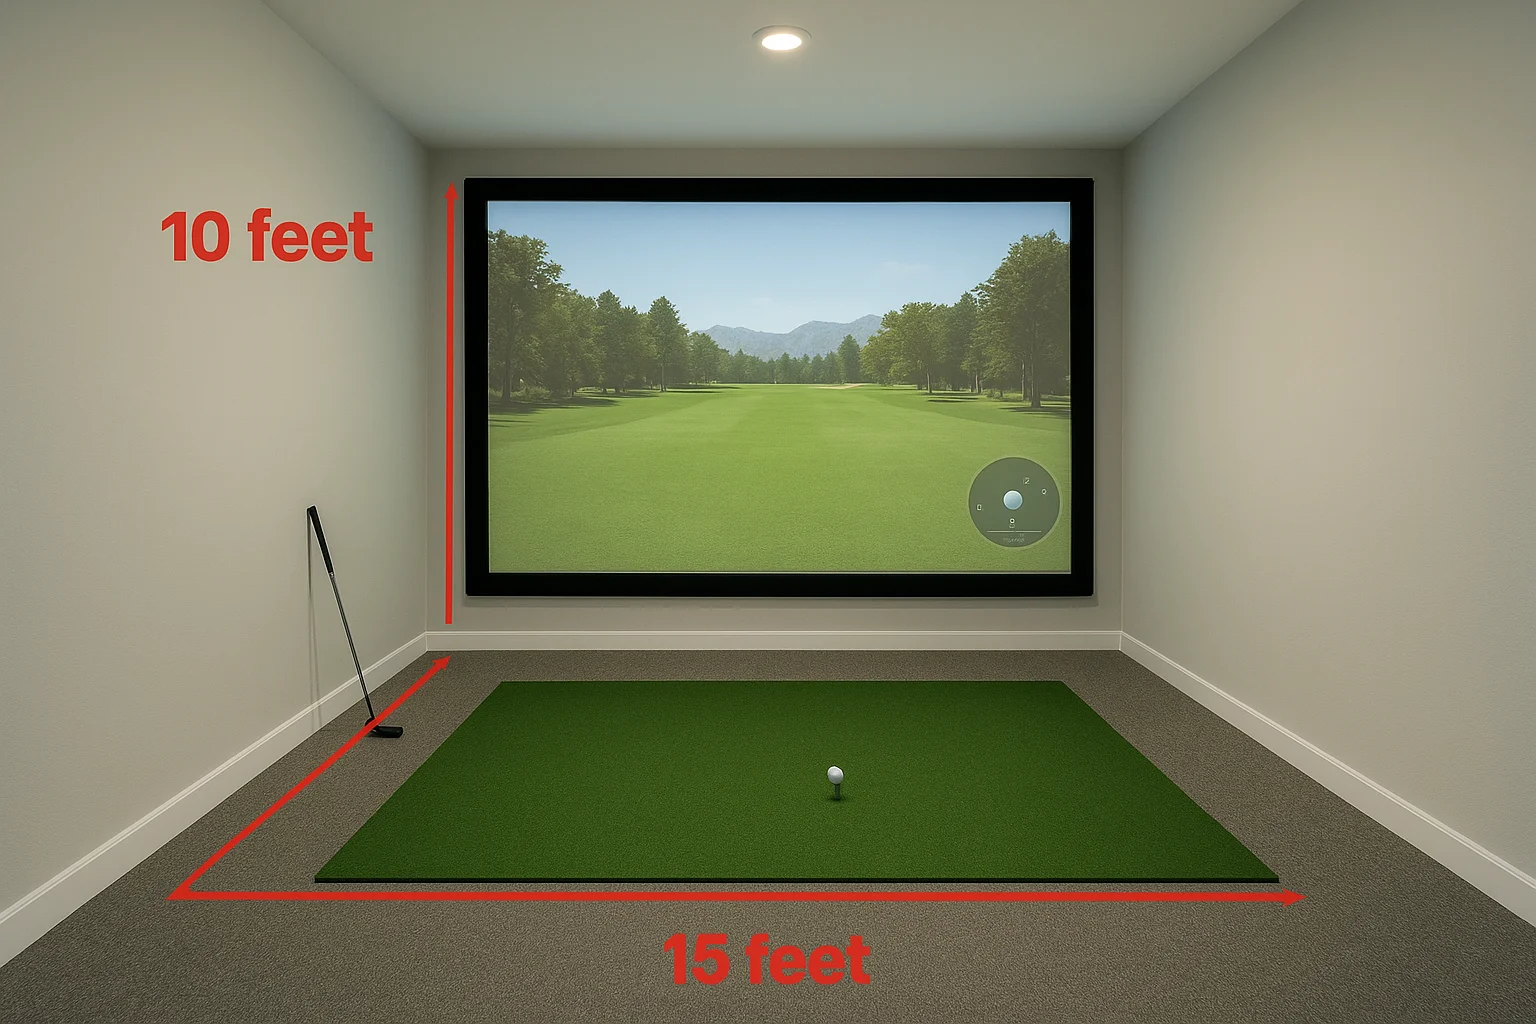
Minimum room dimensions and swing clearance basics
Most full-swing simulators require at least 10 feet wide, 10 feet of ceiling height, and 15 feet of depth from the hitting position to the screen. Narrower or shorter rooms limit your screen size, restrict launch monitor placement, and create real safety risks during a full driver swing.
Garage, basement, and spare room tradeoffs that change cost
Garages are popular choices but often need insulation, drywall, and dedicated HVAC work before they're usable year-round, adding $2,000 to $8,000 before any simulator hardware goes in. Basements typically offer better natural depth but may require moisture barriers or flooring upgrades. Spare rooms need the least prep but frequently have the tightest dimensions.
Typical build-out costs for walls, flooring, and protection
Wall padding and side impact protection typically run $300 to $1,500 depending on surface area. Flooring work like rubber underlayment, turf runners, or sealed concrete costs $500 to $3,000. Full drywall, framing, and finish work in a raw garage or unfinished basement adds another $3,000 to $12,000.
Room construction is frequently the largest surprise in any simulator project, especially once you open a wall and find uninsulated framing or an undersized electrical panel.
Hidden "gotchas" that force expensive redesigns
Ceilings under 9 feet typically require an overhead launch monitor rather than a floor-level radar unit, which significantly changes your hardware budget. Existing structural beams, HVAC ducts, or plumbing that cut into swing clearance can force costly relocation work that doubles or triples your original construction estimate.
3. Launch monitor and tracking system
The launch monitor is the brain of your simulator. It captures ball speed, launch angle, spin rate, and carry distance to drive everything you see on screen. Choosing the wrong one at the wrong price point affects every shot you take in that room.
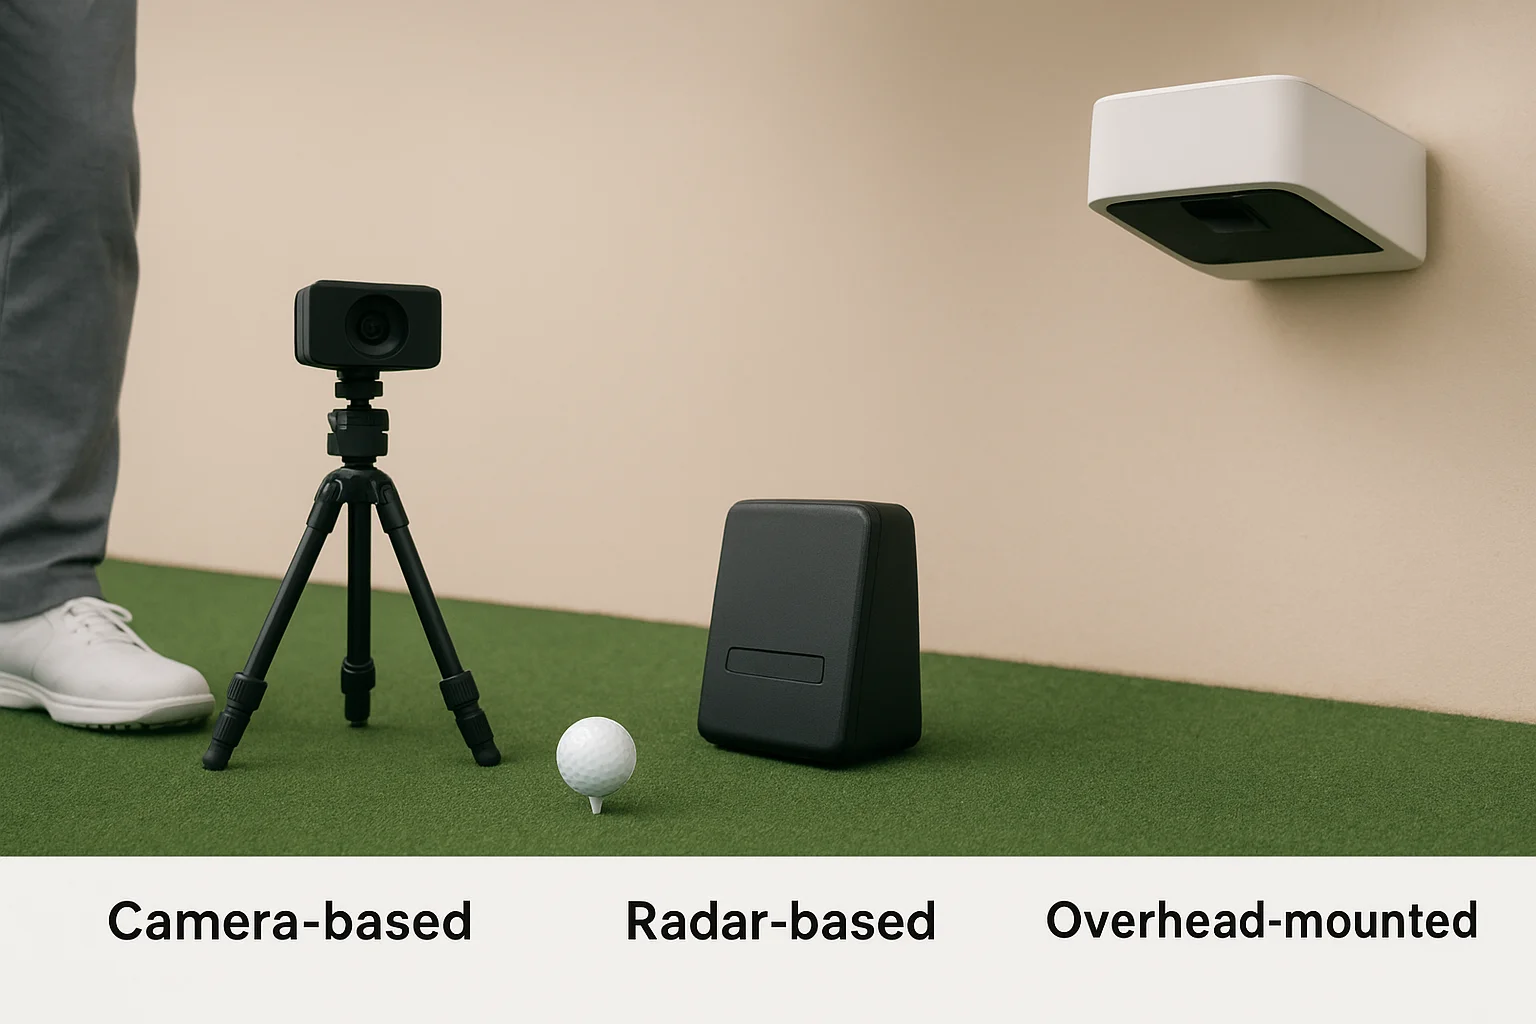
Camera vs radar vs overhead systems and what they affect
Launch monitors use one of three tracking methods: camera-based, radar-based, or overhead-mounted optical systems. Camera-based units sit above and behind the ball, capturing high-speed images at impact. Radar-based monitors track ball flight using Doppler technology and typically sit on the floor behind the hitting position. Overhead systems mount to the ceiling and work well in rooms with lower clearance or where floor clutter is a concern.
Price tiers and what accuracy you actually get at each tier
Entry-level radar units run $500 to $1,000 and suit casual play and basic practice. Mid-range monitors in the $2,000 to $5,000 range deliver better spin accuracy and broader software compatibility. Premium systems like TrackMan or the Foresight GCQuad run $10,000 to $25,000 and match what tour players use during club fitting.
The launch monitor you choose locks in your software options, so confirm compatibility with your preferred simulation platform before you buy.
Lefty-righty use, space needs, and placement constraints
Radar units handle both left and right-handed golfers without repositioning, while some camera-based units need physical adjustment between players. Overhead systems work for both without changes. Floor-mounted radar typically needs roughly 6 feet of clear space behind the hitting position, while overhead units require solid ceiling mounting and adequate clearance.
Extra costs like club stickers, calibration, and mounting
Certain camera-based systems require reflective club stickers to track club path accurately, typically $30 to $80 per set. Professional mounting and calibration for overhead units adds $200 to $600 to your golf simulator cost breakdown. Budget for these line items upfront rather than discovering them at setup time.
4. Impact screen, net, and enclosure
The screen and enclosure define how your simulator performs on every single shot. They contain balls, protect your walls, and determine image quality once the projector fires up. Getting this piece wrong creates safety risks and poor picture performance that will frustrate every session regardless of what you spent on other components.
Net-only vs full enclosure and when each makes sense
A net-only setup works when you plan to hang a separate impact screen in front of it and have enough room depth for safe ball containment. A full enclosure integrates the screen, side barriers, and frame into one coordinated system, which simplifies installation and catches more mishits. Consider which setup fits your room before buying anything:
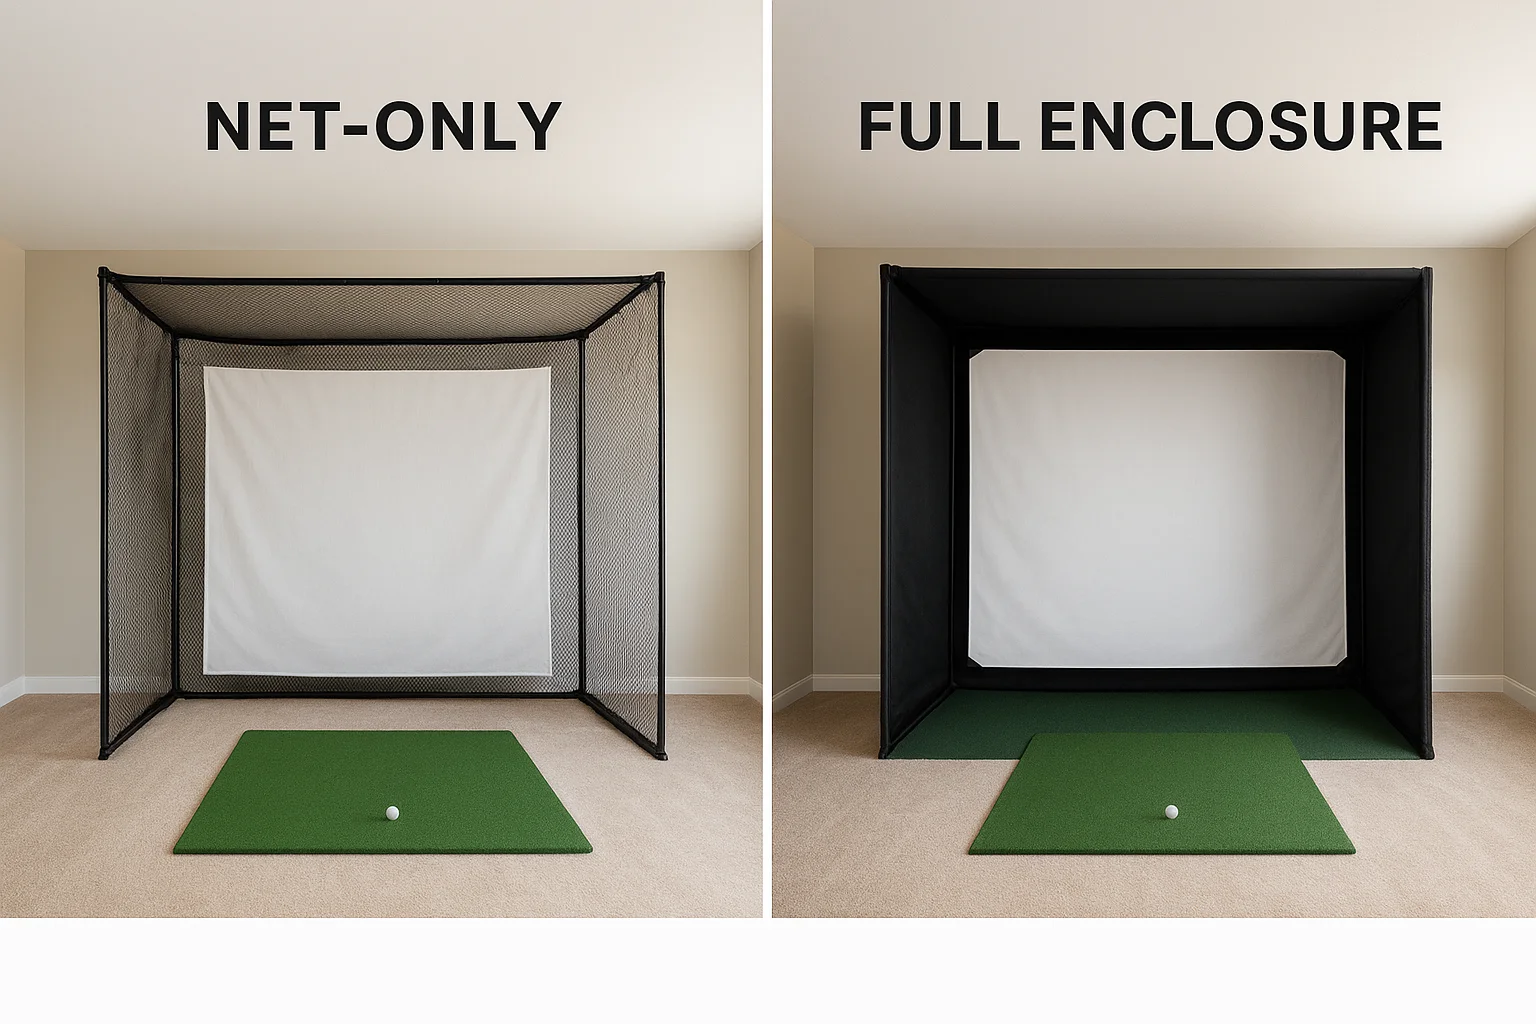
- Net-only: lower upfront cost, more flexible screen sizing
- Full enclosure: better containment, cleaner finished look, easier install
Screen materials, durability, bounceback, and noise control
Screen fabric controls impact absorption, projected image sharpness, and ambient noise in the room. Woven polyester handles repeated shots well and delivers a clean image. Thicker multi-layer materials reduce ball bounceback speed and cut down on noise, which matters significantly in tighter rooms or shared living spaces.
Size choices that drive cost and projector requirements
Your screen width directly drives projector throw distance and lens selection. Standard widths run 10 to 16 feet, and moving up even two feet can push you into a different projector throw category with a meaningfully higher price tag. Lock in your screen size and projector specs together before purchasing either component.
Confirm your screen dimensions and throw ratio as a pair, or you risk buying a projector that simply cannot fill your screen correctly.
Typical cost ranges for DIY frames vs turnkey enclosures
| Setup Type | Typical Cost Range |
|---|---|
| DIY frame with basic net and screen | $400 to $1,500 |
| Mid-range turnkey enclosure | $2,000 to $5,000 |
| Premium commercial-grade enclosure | $6,000 and above |
These numbers represent a real line item in any complete golf simulator cost breakdown, and upgrading your enclosure usually delivers more daily satisfaction than upgrading your software.
5. Projector and mounting
The projector delivers your virtual course onto the screen, and picking the wrong unit for your room dimensions is one of the most common mistakes in any golf simulator build. Your throw ratio, brightness, and mounting setup all interact with your screen size and ceiling height in ways that lock down your options before you finalize your budget.
Throw ratio planning and why it decides your options
Throw ratio describes how far back a projector must sit to fill a given screen width. A 1.0 throw ratio means the projector needs to sit 10 feet back to fill a 10-foot-wide screen. Short-throw projectors (ratios under 0.8) work well in tight rooms where ceiling or floor mounting close to the screen is the only option, but they typically cost significantly more than standard-throw units.
Confirm your throw ratio against your available room depth before buying any projector, because returning a unit that won't fit costs both time and money.
Brightness, resolution, and aspect ratio that matter for sims
For simulator use, aim for at least 3,500 lumens to maintain image visibility in a room that isn't completely dark. Resolution at 1080p handles most simulator software without issue, and 4K adds cost without a proportional improvement in playability at typical screen distances. Most impact screens use a 16:9 aspect ratio, so confirm your projector matches before purchasing.
Mounting and protection costs: ceiling, floor box, and cabling
Ceiling mounts with proper cable management and conduit typically add $150 to $400 in labor and materials. Floor-box enclosures that protect projectors from stray balls run $300 to $900 depending on build quality and materials.
Typical price ranges from budget to premium
| Tier | Typical Cost Range |
|---|---|
| Entry-level (budget 1080p) | $500 to $1,200 |
| Mid-range (bright 1080p/4K) | $1,500 to $3,500 |
| Premium (high-brightness 4K) | $4,000 to $8,000+ |
These projector costs represent a meaningful slice of your full golf simulator cost breakdown, and skimping here often means replacing the unit within two years as brightness degrades under heavy use.
6. Hitting mat and turf
The hitting mat takes every swing you make, absorbing repeated impact from iron shots, wedges, and drivers across thousands of sessions. Choosing the right mat affects your comfort during play, joint health over time, and the accuracy of your launch monitor data, since some tracking systems rely on consistent ball placement on a flat, stable surface.
Why the mat can make or break comfort and injury risk
Hard, thin mats transmit shock directly into your wrists, elbows, and knees with every iron strike. A mat that feels firm during the first few swings becomes genuinely painful during a two-hour session. Fatigue and joint stress accumulate quickly on low-quality surfaces, and many golfers replace cheap mats within six months after realizing the physical cost.
A quality hitting mat protects your body first and your floor second, so treat it as a core line item in your golf simulator cost breakdown rather than an afterthought.
Full mats vs hitting strips vs built-in turf platforms
Full mats cover your entire stance area, typically 4x6 feet or larger, and provide consistent footing and ball placement for every club. Hitting strips isolate just the strike zone and cost less upfront but leave your feet on harder flooring, which reduces comfort during longer sessions. Built-in turf platforms integrate the mat into a raised surface with defined rough and fairway sections, adding realism at a meaningfully higher price.
How thickness, stance area, and replaceable inserts change cost
Thicker mats over one inch absorb more impact and last significantly longer under heavy use. Replaceable insert systems let you swap just the strike zone rather than replacing the entire mat when it wears through, cutting your long-term costs. Larger stance areas increase upfront cost but reduce physical fatigue noticeably.
Typical price ranges and replacement expectations
| Tier | Typical Cost Range |
|---|---|
| Entry-level (thin, basic) | $100 to $300 |
| Mid-range (thick, full stance) | $400 to $900 |
| Premium (insert system or platform) | $1,200 to $3,000+ |
Expect to replace entry-level mats every one to two years under regular use. Premium mats with replaceable inserts can last five or more years before you need to address more than the insert itself.
7. Simulator software and course play
Simulator software is where your launch monitor data becomes an actual round of golf on a recognizable course. Without quality software, accurate shot tracking is meaningless because nothing converts those numbers into a playable experience you actually enjoy over months and years of use.
One-time purchase vs subscription pricing models
Software pricing splits into two clear models you need to evaluate before committing. One-time purchase options give you permanent access to a fixed course library and features with no recurring cost. Subscription-based platforms charge monthly or annually but deliver continuous course updates, new game modes, and online features that one-time licenses rarely match in depth or freshness.
What software affects: graphics, physics, practice modes, leagues
Your software choice drives the quality of every visual and physical element inside your simulator. Better platforms deliver realistic ball physics, detailed course rendering, and structured practice modes with driving range tools and shot dispersion tracking. Online leagues and multiplayer modes add long-term replay value that casual software packages simply do not include, which matters significantly once the novelty of basic play wears off.
Weak software makes an expensive launch monitor feel like a waste, so allocate real budget here rather than treating software as an afterthought.
Compatibility checks with your launch monitor before you buy
Not every software platform works with every launch monitor. Confirm compatibility directly with both the software developer and your launch monitor manufacturer before purchasing anything. Some platforms support only specific devices, and discovering an incompatibility mid-build creates expensive workarounds that inflate your overall golf simulator cost breakdown unnecessarily.
Typical annual and upfront cost ranges
| Pricing Model | Typical Cost Range |
|---|---|
| One-time purchase | $300 to $700 |
| Annual subscription | $200 to $600 per year |
| Premium subscription platform | $800 to $1,500 per year |
Entry-level software covers basic course play, while premium subscriptions unlock tour-quality courses, detailed analytics, and competitive online play that keep the simulator running strong long-term.
8. Computer, tablet, or console to run the sim
The computer running your simulator handles real-time physics calculations, course rendering, and launch monitor communication simultaneously. Underpower it and you get dropped frames, delayed shot feedback, and software crashes mid-round, which ruins the experience regardless of what you spent on everything else.
When you need a gaming PC and when you do not
Some launch monitors pair with a dedicated tablet or mobile device and bypass the need for a PC entirely. Entry-level and mid-range systems like the Garmin Approach R10 run on an iPad, keeping your hardware cost low. Once you move into premium software platforms or high-end launch monitors, a full Windows gaming PC becomes necessary to handle the processing load without compromise.
Key specs that drive cost: GPU, CPU, RAM, and ports
Your graphics card (GPU) drives the most cost in any gaming PC build for simulator use. A mid-tier GPU handles 1080p simulation smoothly, while 4K rendering demands significantly more. Aim for at least 16GB of RAM and a modern multi-core CPU to prevent stuttering during complex course rendering. Confirm your PC has the correct ports to connect your launch monitor before finalizing any purchase.
Buying a PC without checking your launch monitor's connection requirements is a fast way to add unexpected cost to your golf simulator cost breakdown.
Display choices: projector only vs TV or monitor control station
Some setups add a secondary monitor or TV at a side station for score tracking, software menus, and video review while the main projector handles the impact screen. This adds $150 to $600 but significantly improves usability during longer sessions.
Typical price ranges and common upgrade paths
| Tier | Typical Cost Range |
|---|---|
| Tablet or mobile device | $300 to $800 |
| Mid-range gaming PC | $900 to $1,800 |
| High-performance gaming PC | $2,000 to $4,500+ |
Graphics card upgrades are typically the most cost-effective path when your existing system starts struggling with newer software versions or higher-resolution course packs.
9. Electrical, lighting, and internet
Most simulator builds underestimate power, lighting, and network requirements until the room is already wired. Getting these three systems right from the start prevents flickering images, inaccurate shot data, and frustrating software disconnects during play.
Power needs: outlets, surge protection, and clean cable routing
Your simulator room needs dedicated circuits for the projector, PC, and launch monitor to avoid voltage fluctuations that cause crashes or image drops. A quality surge protector rated at least 1,500 joules protects expensive components from power spikes. Clean cable routing through conduit keeps signal cables separated from power lines and reduces interference.
Lighting that avoids glare, shadows, and camera flicker
Standard fluorescent and LED fixtures that cycle at certain frequencies interfere directly with camera-based launch monitors, causing missed shots or false reads. Use dimmable LED lighting on a separate circuit positioned behind or beside the hitting position rather than overhead, which eliminates glare on the screen and keeps the tracking zone shadow-free.
Lighting that flickers at 60Hz or 120Hz is one of the most common causes of inconsistent shot data in camera-based launch monitor setups.
Network reliability: Wi-Fi coverage, mesh, or hardwired Ethernet
Many simulator software platforms require a [stable internet connection](https://treasurevalleysolutions.com/blog/home-golf-simulator-packages) for course downloads, firmware updates, and online play. A hardwired Ethernet connection is the most reliable option. If your room sits far from your router, a mesh network node or powerline adapter prevents the dropouts that interrupt online rounds.
Typical install costs and the problems they prevent
| Work Type | Typical Cost Range |
|---|---|
| Dedicated circuit and outlet work | $200 to $600 |
| Lighting install and dimmer wiring | $150 to $400 |
| Network cabling or mesh node | $100 to $350 |
These electrical and network costs are a small but important part of your full golf simulator cost breakdown, and skipping them is a reliable way to damage equipment or create tracking problems that are difficult to diagnose later.
10. Accessories and ongoing ownership costs
The equipment costs get most of the attention, but accessories and recurring expenses add up quietly over time and can push your total golf simulator cost breakdown well past your original estimate if you ignore them at the planning stage.
Safety and realism add-ons: side barriers, padding, and ball trays
Side barriers and wall padding catch shanks and off-center strikes that your main net misses, protecting drywall, windows, and anyone standing nearby. Ball trays and return systems keep your hitting area organized during longer sessions. Budget $200 to $800 for a complete set of side protection and basic accessories, depending on room width and wall surface type.
Audio, seating, and climate control costs that improve use
In-room audio transforms passive screen watching into a more engaging experience, and a basic two-speaker setup runs $300 to $900 installed. [Comfortable seating and climate control](https://treasurevalleysolutions.com/blog/how-to-build-a-golf-simulator-room) matter significantly if your simulator sits in a garage or unfinished basement where temperature swings make extended play uncomfortable. A dedicated mini-split unit adds $1,500 to $3,500 but makes the room usable year-round.
Climate control is one of the most underbudgeted line items in garage simulator builds, and it directly determines how often you actually use the room.
Wear items: screens, mats, balls, tees, and projector lamps
Impact screens and hitting mats absorb the most physical punishment and need periodic replacement. Projector lamps in non-laser units typically last 3,000 to 5,000 hours before brightness drops noticeably, and replacement bulbs run $150 to $400 depending on the model.
A simple yearly budget so you do not get surprised later
Annual ownership costs typically run $400 to $1,200 once you account for balls, tees, software renewals, and one or two wear-item replacements. Setting aside $75 to $100 per month keeps you prepared without any single expense feeling disruptive to your finances.
A simple way to price your build
Every complete golf simulator cost breakdown starts with your room dimensions and works outward from there. Lock in your ceiling height and available depth first, then choose your launch monitor and screen size as a paired decision, and let those two choices drive your projector and PC specs. Trying to finalize your budget in the wrong order is what leads to expensive component conflicts and rebuild costs that catch most buyers off guard.
Once you know your core hardware tier, add 15 to 20 percent of your total hardware estimate to cover installation, electrical work, and accessories that most planning guides leave out. That buffer is the difference between a build that lands on budget and one that stalls halfway through. If you want help designing a simulator room that actually fits your space and goals, talk to our team about a custom installation and we will walk you through every line item before you spend anything.