
You just pulled a Yamaha AV receiver out of the box, and now you're staring at a back panel covered in ports, terminals, and acronyms. If this is your first time setting one up, the Yamaha AV receiver...
Yamaha AV Receiver Setup Guide: Step-By-Step Connections
You just pulled a Yamaha AV receiver out of the box, and now you're staring at a back panel covered in ports, terminals, and acronyms. If this is your first time setting one up, the Yamaha AV receiver setup guide that ships in the box can feel like it was written for electrical engineers. The good news: connecting everything correctly isn't nearly as complicated as it looks once you break it down into clear steps.
At Treasure Valley Solutions, we install and configure AV receivers as part of home theater and whole-home audio systems across the Boise and Meridian area. We've set up enough Yamaha units to know exactly where people get stuck, from speaker wire connections to HDMI handshake issues to the initial calibration process. This guide is built from that hands-on experience.
Below, we'll walk you through the full setup process step by step: wiring your speakers, connecting source devices and your TV, running Yamaha's AV Setup Guide app, and dialing in your audio calibration. Whether you're tackling this yourself or just want to understand the process before calling a pro, you'll have a clear path from unboxing to first listen.
Before you start: tools, cables, and placement
Taking 30 minutes to gather your materials and plan your placement before you touch a single cable will save you significant frustration later. Most Yamaha AV receiver setup guide walkthroughs skip straight to connections, but poor prep is the number one reason installs end up messy, overheated, or electrically noisy. Start here, and the rest of the process goes much faster.
What you'll need: tools and cables
You don't need a professional tool kit to get this done, but having the right items on hand before you start means you won't have to stop mid-installation to dig through a drawer. For speaker wire connections, a small flat-head screwdriver works on most Yamaha binding post terminals. For HDMI connections, plan on at least one High Speed HDMI 2.1 cable for your TV connection, plus additional cables for each source device you're connecting.
Here's a quick reference list of what to have ready before you begin:
| Item | Notes |
|---|---|
| HDMI 2.1 cables | One per device: TV, console, Blu-ray, streaming box |
| Speaker wire | 16 AWG for runs under 50 ft; 14 AWG for longer runs |
| Wire stripper | For clean terminations on bare wire ends |
| Optical or coaxial digital audio cable | Backup if HDMI ARC causes problems |
| Ethernet cable | For network features or MusicCast streaming |
| Small flat-head and Phillips screwdrivers | For terminals and rack screws |
| Cable ties or Velcro straps | Keep the back panel organized from the start |
Using 16 AWG or thicker speaker wire reduces resistance over longer runs and keeps your sound consistent across all channels.
Banana plugs aren't required, but they make connecting and swapping speakers far cleaner than bare wire ends. If you're running wire through walls or under carpet, label each run on both ends before you connect anything. You'll thank yourself when you're troubleshooting six months from now.
How to place your receiver properly
Ventilation is not optional with AV receivers. Yamaha receivers generate real heat during operation, and most models require at least 2 to 3 inches of clearance on the top and sides to keep temperatures in a safe range. Stuffing a receiver into a tight cabinet without airflow is one of the fastest ways to trigger thermal shutdowns or shorten the unit's lifespan.
Place your receiver on a solid, level shelf that can handle its weight, which typically runs between 15 and 25 pounds depending on your model. Keep it away from direct heat sources, components stacked directly on top, and anything that produces electromagnetic interference, such as unshielded power strips or Wi-Fi routers placed right beside the unit. If you're building a dedicated media cabinet, measure your unit's exact dimensions first and confirm clearance before you commit to a shelf position.
A note on power and grounding
Plug your receiver into a quality surge protector or power conditioner, not directly into a wall outlet. Voltage spikes from storms or grid fluctuations can damage internal components, and a good surge protector costs far less than a repair or replacement. If you notice a low hum after connecting everything, a ground loop is usually the cause. You can typically resolve it by making sure all components share the same power strip rather than pulling from different outlets across the room.
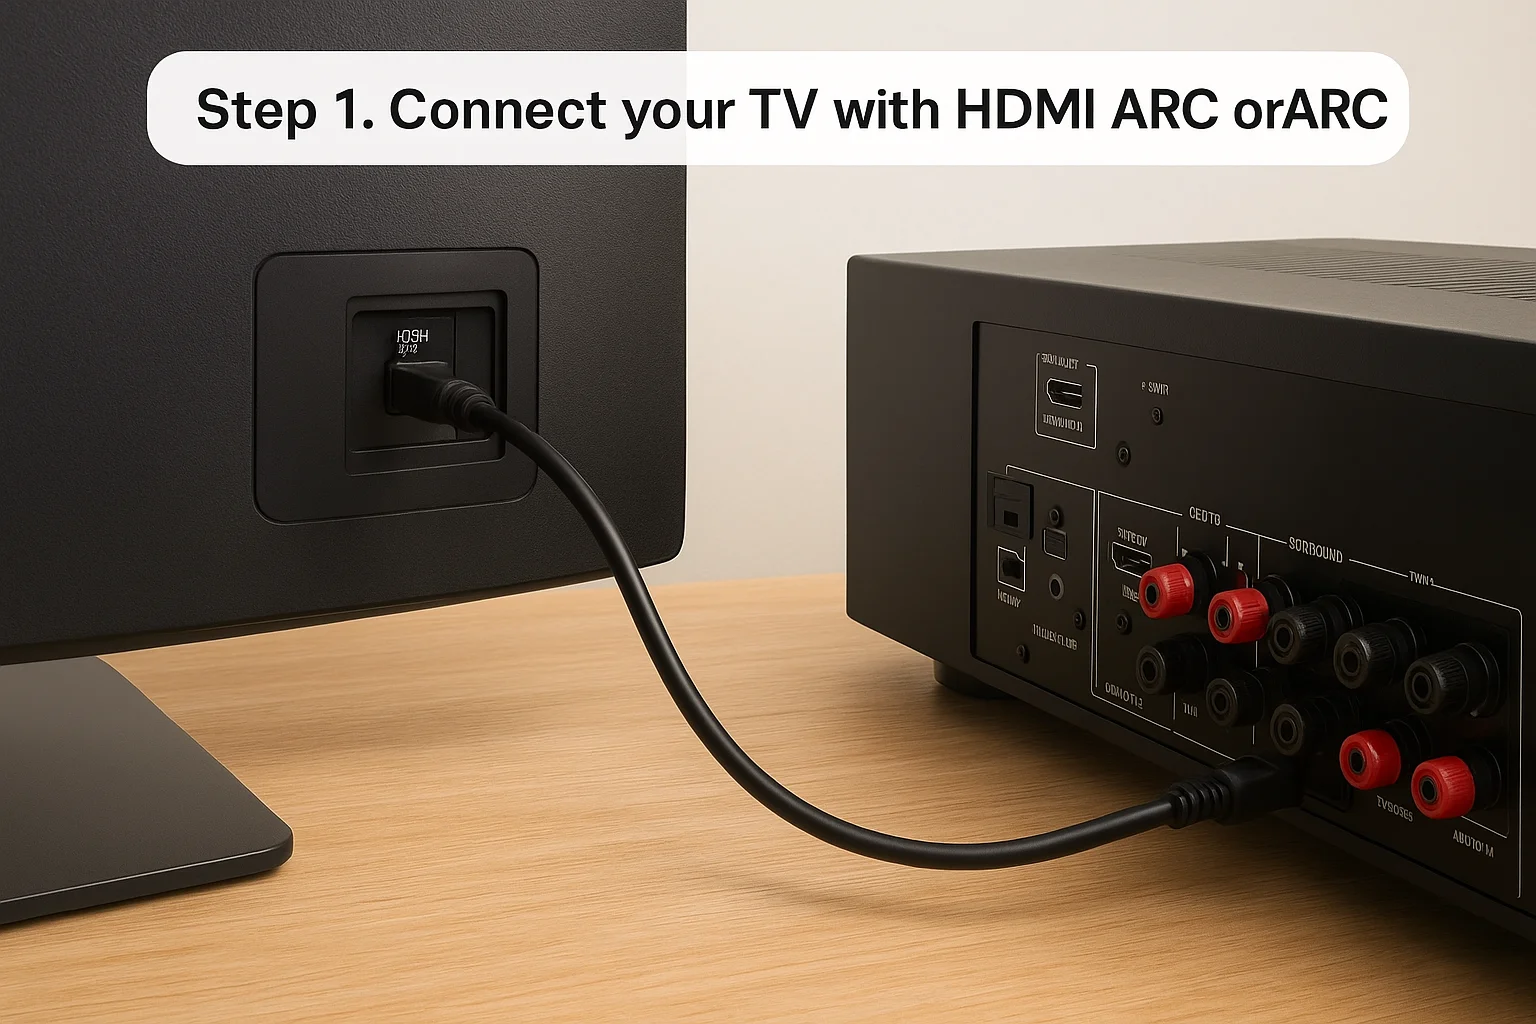
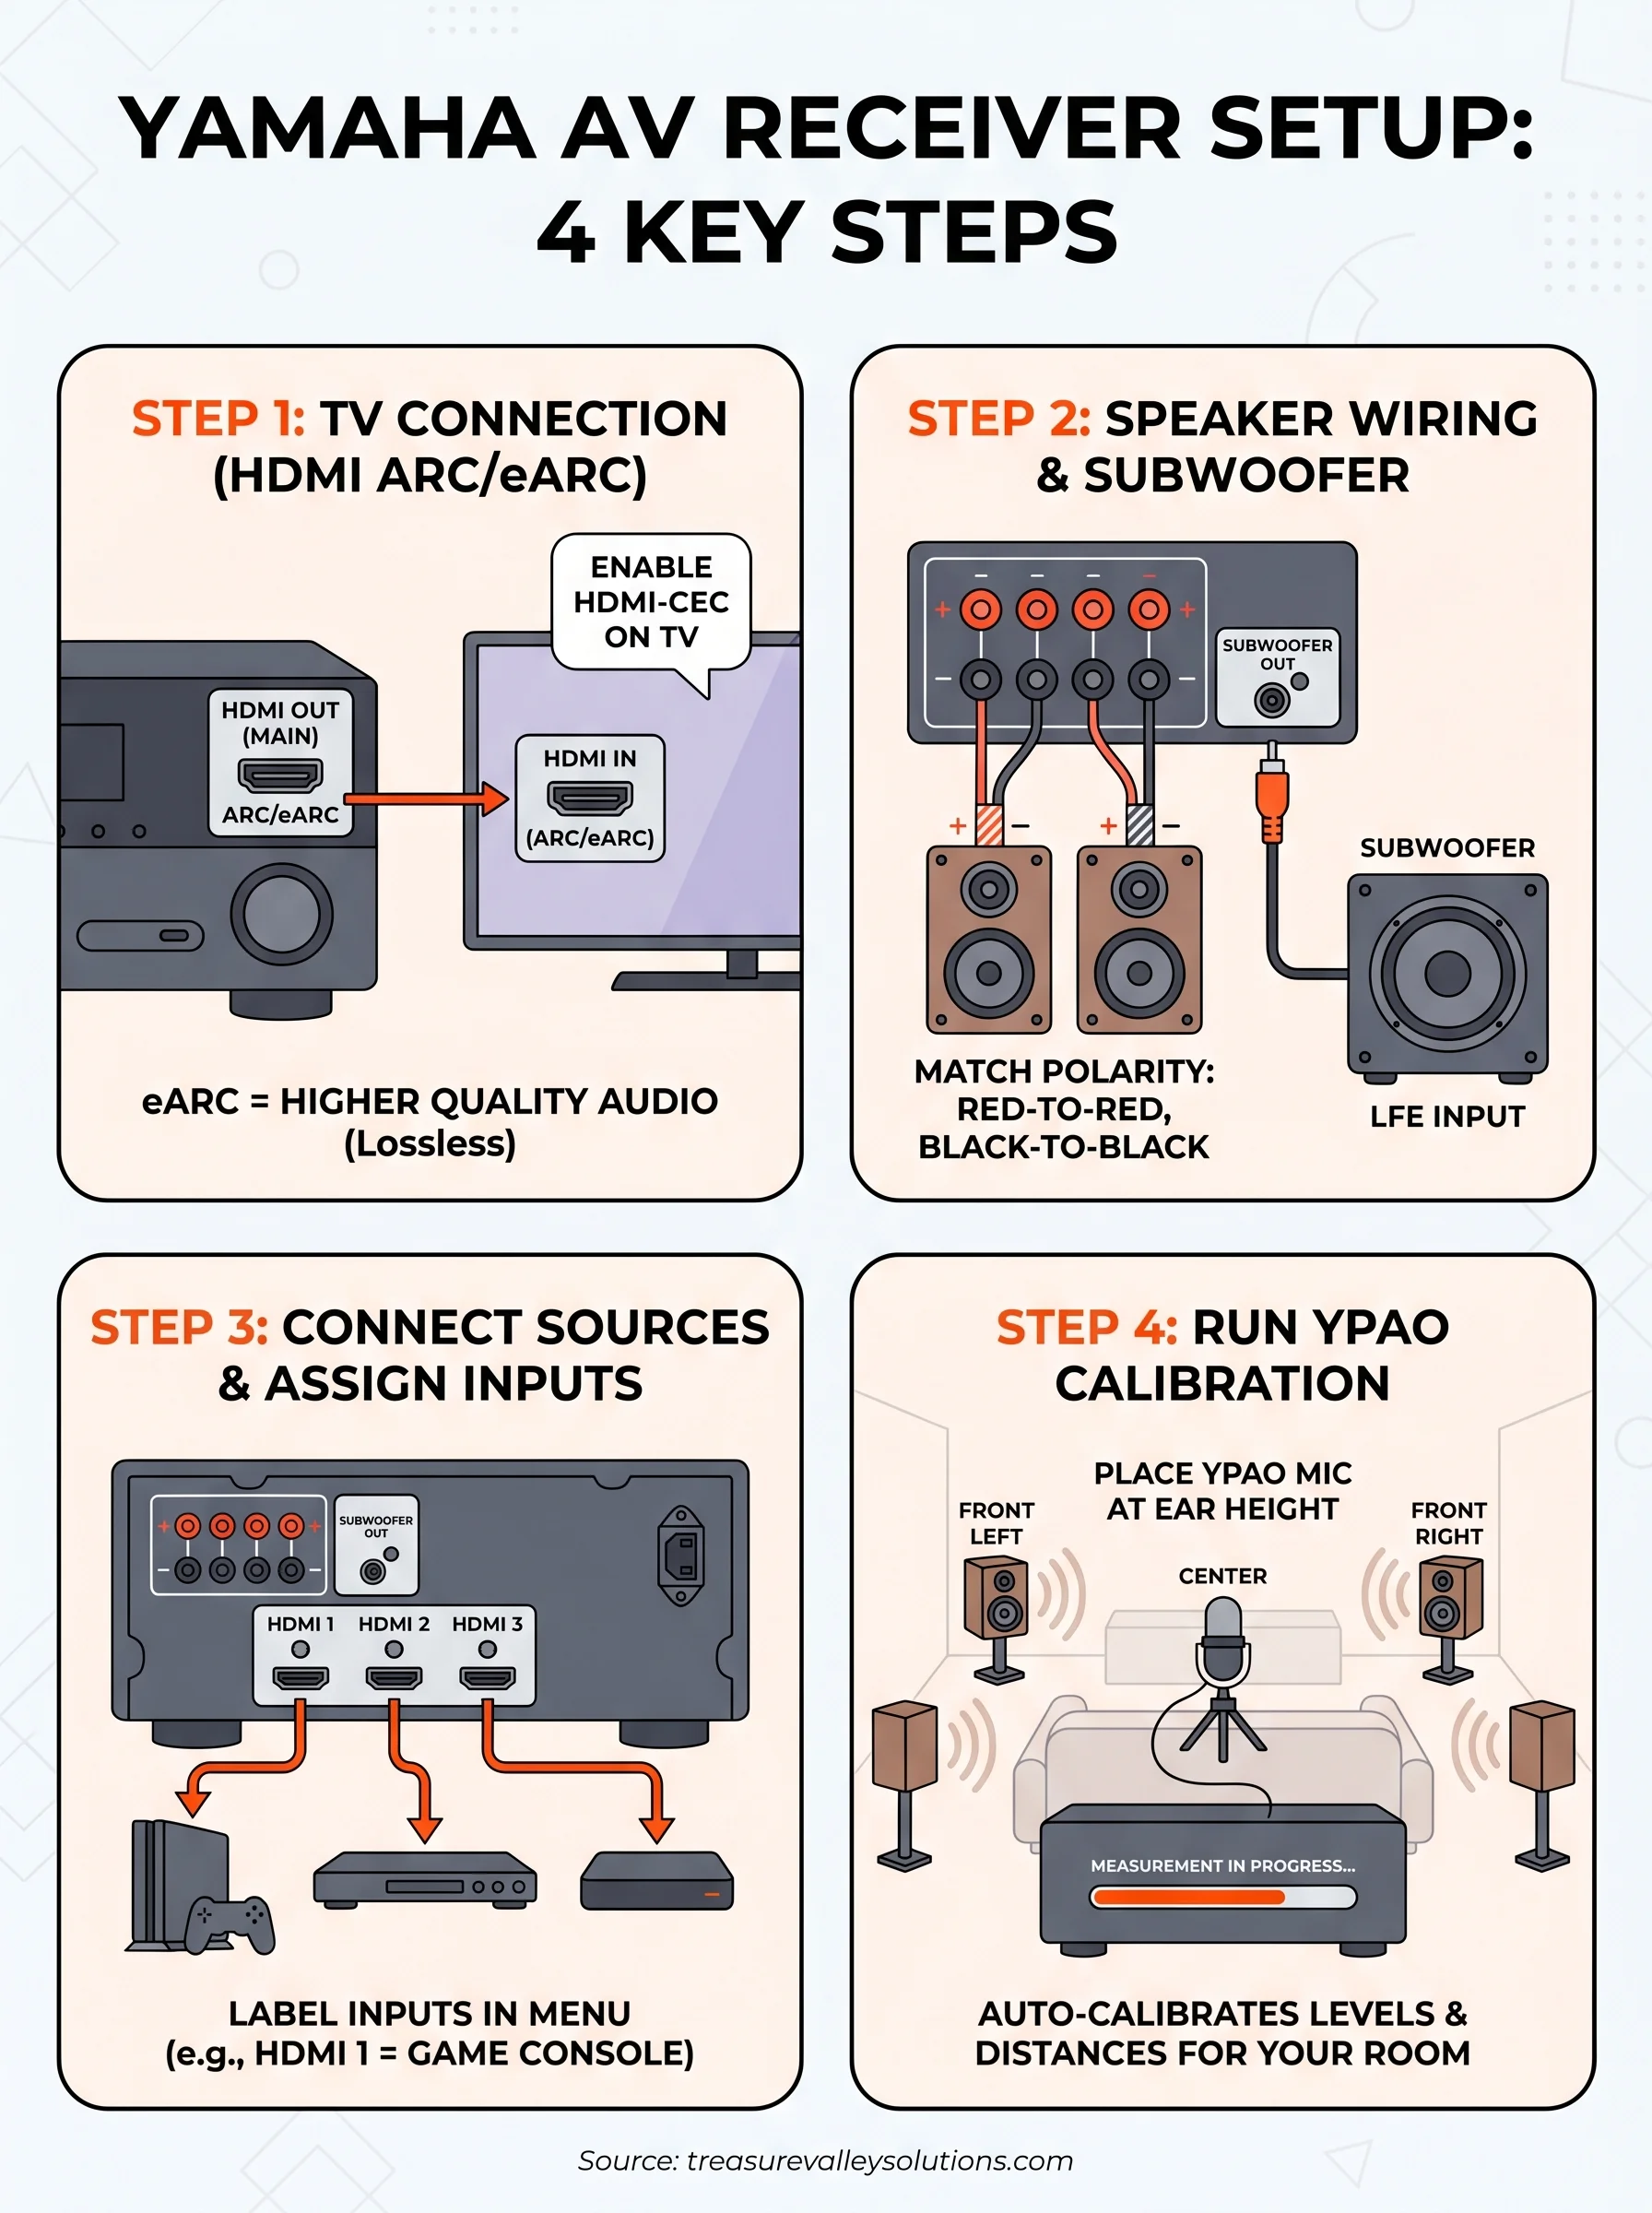
Step 1. Connect your TV with HDMI ARC or eARC
Your TV connection is the most critical cable in the entire setup, and it's the step where most yamaha av receiver setup guide walkthroughs miss important details. On your Yamaha receiver, look for the HDMI OUT (MAIN) port, which carries an ARC or eARC label depending on your model. Run a single HDMI 2.1 cable from that port to the ARC or eARC-labeled HDMI input on your TV. That one cable replaces what used to require a separate optical audio cable running back from your TV to the receiver.
ARC vs. eARC: Know the difference before you connect
ARC and eARC both send audio from your TV back to the receiver, but eARC supports significantly higher bandwidth, which means it can carry lossless audio formats like Dolby TrueHD and DTS:X. Standard ARC is limited to compressed audio, including Dolby Digital 5.1 and two-channel PCM. If your TV and receiver both have eARC ports, use them together with an HDMI 2.1 cable to get the full benefit. Using an older HDMI 2.0 cable on an eARC connection will quietly drop your audio quality back to standard ARC performance without any warning.
If your TV only has ARC and not eARC, you can still get solid surround sound. Just know that uncompressed formats like Dolby TrueHD will not pass through.
Enable CEC on your TV
The physical cable alone is not enough to make audio return work. You also need to activate HDMI-CEC in your TV's settings menu so the two devices can communicate properly. Samsung calls this feature Anynet+, LG calls it SimpLink, and Sony calls it Bravia Sync, but it's the same underlying protocol under different brand names. Navigate to your TV's settings, find the HDMI or external device section, and turn CEC on. Then confirm that the ARC function is enabled separately if your TV lists it as its own toggle.
What to do when the handshake fails
If you power everything on and get no sound from the receiver, power cycle both devices before changing any settings. Turn off the receiver and the TV completely, unplug them from the wall for 30 seconds, then power the TV on first and the receiver second. This resets the HDMI handshake and resolves the issue in the majority of cases. If the problem persists, swap the HDMI cable before assuming a settings or firmware problem, since a faulty cable is a surprisingly common cause that's easy to rule out immediately.
Step 2. Wire speakers and subwoofer the right way
Speaker wire connections look intimidating on paper, but following this yamaha av receiver setup guide approach breaks the process down to matching labels and confirming polarity. Before you connect anything, check the back panel for labeled terminals: FL (front left), FR (front right), C (center), SL (surround left), SR (surround right), and any additional surround back or height channels depending on your model. Strip about half an inch of insulation from each wire end, twist the strands tight, and verify you're connecting positive to positive and negative to negative on both the receiver and the speaker.
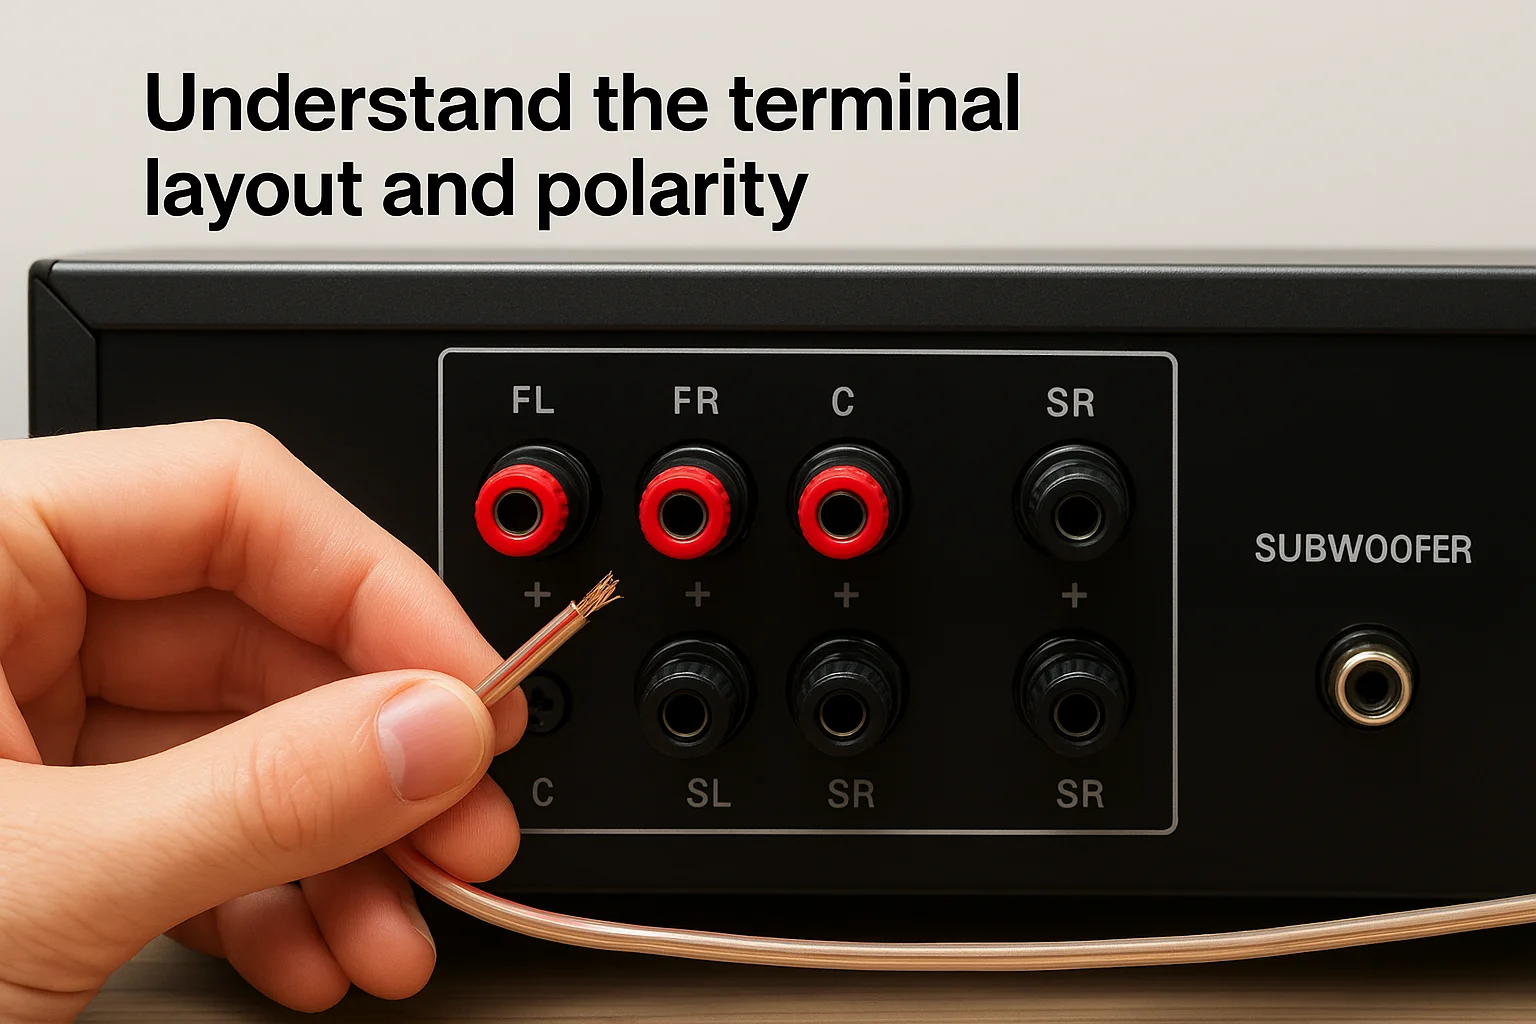
Understand the terminal layout and polarity
Getting polarity wrong across even one speaker will throw off your entire soundstage and noticeably reduce bass. On most Yamaha receivers, the positive terminal is red and the negative terminal is black, though some models use color-coded labels rather than actual colored hardware. Loosen each binding post by turning it counterclockwise, insert the wire firmly, and tighten it down so no exposed copper can contact an adjacent terminal. A short between terminals won't just cut your audio; it can damage the receiver's amplifier section permanently.
Here's a quick reference for channel labels and speaker positions:
| Channel Label | Speaker Position |
|---|---|
| FL / FR | Front left and right |
| C | Center channel (above or below TV) |
| SL / SR | Surround left and right |
| SBL / SBR | Surround back left and right (7.1 systems) |
| FHL / FHR or TFL / TFR | Front height or top front (Atmos systems) |
Double-check polarity at both ends of every speaker wire run before you power on. A reversed connection is easy to miss visually but immediately affects sound quality.
Connect your subwoofer correctly
Your subwoofer connects differently than your main speakers do. Instead of a binding post with bare wire, most powered subwoofers use a single RCA LFE (Low Frequency Effects) input, and your Yamaha receiver has a corresponding SUBWOOFER OUT port on the back panel. Run one RCA cable from that port directly to the LFE input on your sub.
Once the cable is in place, set your subwoofer's crossover knob to its highest position and leave the actual crossover frequency control to YPAO. The calibration process in Step 4 will detect your subwoofer and assign the correct frequency automatically, so manually dialing it in now would only create a conflict.
Step 3. Hook up sources and assign inputs
With your TV and speakers wired, the next step is connecting your source devices and telling the receiver what each input actually is. Yamaha receivers include multiple HDMI inputs on the back panel, typically labeled HDMI 1 through HDMI 4 or higher depending on your model. This part of the yamaha av receiver setup guide process is straightforward: plug each device into an available HDMI input, then move to the on-screen menu to label those inputs so you're not guessing which number corresponds to which device every time you want to watch something.
Connect your source devices to HDMI inputs
Every source device, whether it's a game console, Blu-ray player, streaming box, or cable receiver, connects through one of the numbered HDMI inputs on your receiver's back panel. The receiver handles the video signal and routes it to your TV through the HDMI OUT (MAIN) connection you made in Step 1, so you don't need a separate cable running directly from each source to your TV. Keep track of which device goes into which numbered input before you finalize anything, since you'll reference those numbers in the next step.
Here's a practical reference for common source connections:
| Source Device | Recommended Connection | Notes |
|---|---|---|
| Game console (PS5, Xbox) | HDMI input (4K-capable port) | Prioritize 4K-rated ports on your model |
| 4K UHD Blu-ray player | HDMI input | Use HDMI 2.1 cable for full bandwidth |
| Streaming box (Apple TV, Roku) | HDMI input | Any input works for standard streaming |
| Cable or satellite box | HDMI input | Label clearly in menu after connecting |
| Turntable with phono preamp | Analog RCA (AUDIO IN) | Built-in phono stage required without preamp |
If your Yamaha model has designated 4K-enhanced or 8K-capable HDMI ports, connect your highest-resolution sources to those ports before filling the remaining inputs with lower-priority devices.
Rename and assign inputs in the menu
After everything is physically connected, power on your receiver and navigate to Setup in the on-screen menu. Find the Input Assignment or Input Rename section, which lets you give each numbered input a recognizable label. Renaming HDMI 1 to "PS5" and HDMI 2 to "Blu-ray" takes about two minutes and makes switching sources from across the room significantly easier, especially once you hand the remote to someone else.
Some Yamaha models also let you assign specific audio processing modes to individual inputs. For example, you can configure your game console input to automatically apply Dolby Atmos processing while keeping your streaming input on a different preset. Setting these preferences during initial setup saves you from navigating sub-menus every time you change sources later.
Step 4. Run Yamaha AV Setup Guide and YPAO
With all your connections in place, this step ties everything together. Yamaha provides two tools that work in sequence: the Yamaha AV Setup Guide app, which walks you through initial configuration on your smartphone, and YPAO (Yamaha Parametric room Acoustic Optimizer), which uses a measurement microphone to automatically calibrate speaker levels, distances, and EQ settings. Running both correctly is what separates a technically connected system from one that actually sounds right in your specific room.
Download and use the Yamaha AV Setup Guide app
The Yamaha AV Setup Guide app is available for both iOS and Android and guides you through network settings, input configuration, and initial speaker assignments using a question-and-answer format. Download the app, open it, and select your receiver model from the list. The app confirms your speaker configuration (5.1, 7.1, Atmos, etc.) and checks that each connection is recognized before you move to calibration.
Here's what the app covers during initial setup:
- Network connection and firmware update check
- Speaker layout confirmation (number of channels, subwoofer presence)
- Input labeling and source assignment review
- YPAO measurement launch prompt
Place the YPAO microphone correctly
Your Yamaha receiver ships with a small YPAO measurement microphone that plugs into the front panel. Place it at seated ear height in your primary listening position, typically the center of your couch or main chair. A microphone stand or a stable stack of books works fine to hold it level. Keep the room as quiet as possible and close any windows or doors that might introduce ambient noise during the measurement sequence, since the test tones are sensitive enough to register HVAC hum or nearby appliances.
Running YPAO with significant background noise present produces inaccurate distance and level readings, which directly affects how balanced your system sounds during playback.
Run the measurement and review the results
Once the microphone is in position, navigate to YPAO in the Setup menu on your receiver's on-screen display and start the measurement. The receiver plays test tones through each speaker and subwoofer channel, then calculates crossover frequencies, trim levels, and distances automatically. When it finishes, review the results on screen before saving. If YPAO flags a speaker as "None" when it should be detected, recheck that terminal connection before accepting the configuration, since saving incorrect results will degrade your audio output immediately.
You're ready to enjoy your system
You've followed every step in this yamaha av receiver setup guide: your TV is connected via HDMI ARC or eARC, your speakers are wired with correct polarity, your sources are labeled and assigned, and YPAO has calibrated the system to your room. Press play on something you know well, whether a favorite film or a familiar album, and listen for how the audio fills the space compared to what you had before.
If something still sounds off after YPAO, recheck your speaker polarity and confirm your subwoofer LFE cable is seated firmly before adjusting any settings manually. Most issues trace back to a physical connection rather than a configuration problem.
Rather than troubleshoot alone, you can have a professional handle the full installation from the start. Contact the Treasure Valley Solutions team to schedule a custom home theater setup in the Boise and Meridian area.