
You spent good money on quality speakers. But if they're sitting in the wrong spots, you're hearing a fraction of what they're capable of. Speaker placement is the single biggest factor separating a &...
Home Theater Speaker Placement Guide: 5.1, 7.1 & Atmos Setup
You spent good money on quality speakers. But if they're sitting in the wrong spots, you're hearing a fraction of what they're capable of. Speaker placement is the single biggest factor separating a "nice TV setup" from a room that actually puts you inside the movie. This home theater speaker placement guide covers the angles, heights, and distances you need to get 5.1, 7.1, and Dolby Atmos configurations dialed in correctly.
At Treasure Valley Solutions, we've been designing and installing home theaters across the Boise and Meridian area since 2014. We've seen firsthand how a few inches of adjustment can transform a room's sound. That hands-on experience is what shaped this guide, real placement principles we use on actual projects, not recycled spec-sheet theory. Whether you're planning a dedicated theater room or upgrading your living room setup, you'll walk away knowing exactly where every speaker should go and why.
Below, we'll break down each speaker position by configuration, starting with the fundamentals and working up through immersive overhead layouts.
Before you start: room and gear checklist
Before you move a single speaker, you need a clear picture of two things: your room's physical characteristics and the capabilities of your gear. Skipping this step leads to placement choices that fight your environment instead of working with it. The measurements and specs you gather now will anchor every decision you make throughout this home theater speaker placement guide.
Know your room dimensions
Your room's shape, size, and surface materials directly affect how sound travels. A rectangular room with standard ceiling height is your best starting point because parallel walls create predictable reflection patterns you can account for. Irregular shapes, angled ceilings, and open floor plans all complicate things, but understanding your space lets you compensate.
Grab a tape measure and record these before you place anything:
- Room length and width (measure at floor level)
- Ceiling height (critical for height channel placement in Atmos setups)
- Primary seating distance from the front wall (this becomes your reference point for every speaker angle)
- Location of doorways, windows, and openings (these break up reflections and affect surround coverage)
- Floor and wall materials (hardwood floors and bare walls reflect more sound; carpet and upholstered furniture absorb it)
Hard, reflective surfaces like tile or glass can cause harsh high-frequency buildup that no amount of speaker repositioning will fully fix. Rugs, curtains, and acoustic panels are worth considering before you finalize your layout.
Knowing whether your room is acoustically live (lots of hard surfaces) or acoustically dead (heavy absorption) tells you how aggressively you may need to angle speakers away from direct reflection points.
Check your gear before you place anything
Your receiver or processor sets the hard boundaries for what configurations are even possible. A 5.1-channel receiver cannot power a 7.1 or Atmos layout, no matter how you position the speakers. Pull up your receiver's manual or the manufacturer's spec page and confirm the following before deciding on a configuration.
Use this checklist before finalizing your speaker layout:
| Item | What to confirm |
|---|---|
| Receiver channel count | How many amplified channels does it support? |
| Atmos/DTS:X decoding | Does it support object-based audio formats? |
| Speaker impedance matching | Are your speakers 4-ohm, 6-ohm, or 8-ohm compatible with your receiver? |
| In-ceiling or upward-firing support | Does your receiver have dedicated height channel outputs? |
| Subwoofer outputs | How many LFE outputs does it provide? |
Your speaker wire runs also matter at this stage. If you're working in an existing room without in-wall wiring, confirm whether you can route cables to your intended surround and height positions before committing to a layout you can't cleanly wire. Nothing is worse than settling on a 7.1 configuration and realizing you have no practical way to get wire to the rear speakers without running it across the floor.
Finally, check whether your receiver includes room correction software such as Audyssey, YPAO, or MCACC. These tools use a calibration microphone to measure your speaker positions and adjust levels and timing automatically. They don't replace correct placement, but they do help compensate for small positioning compromises once everything is set up.
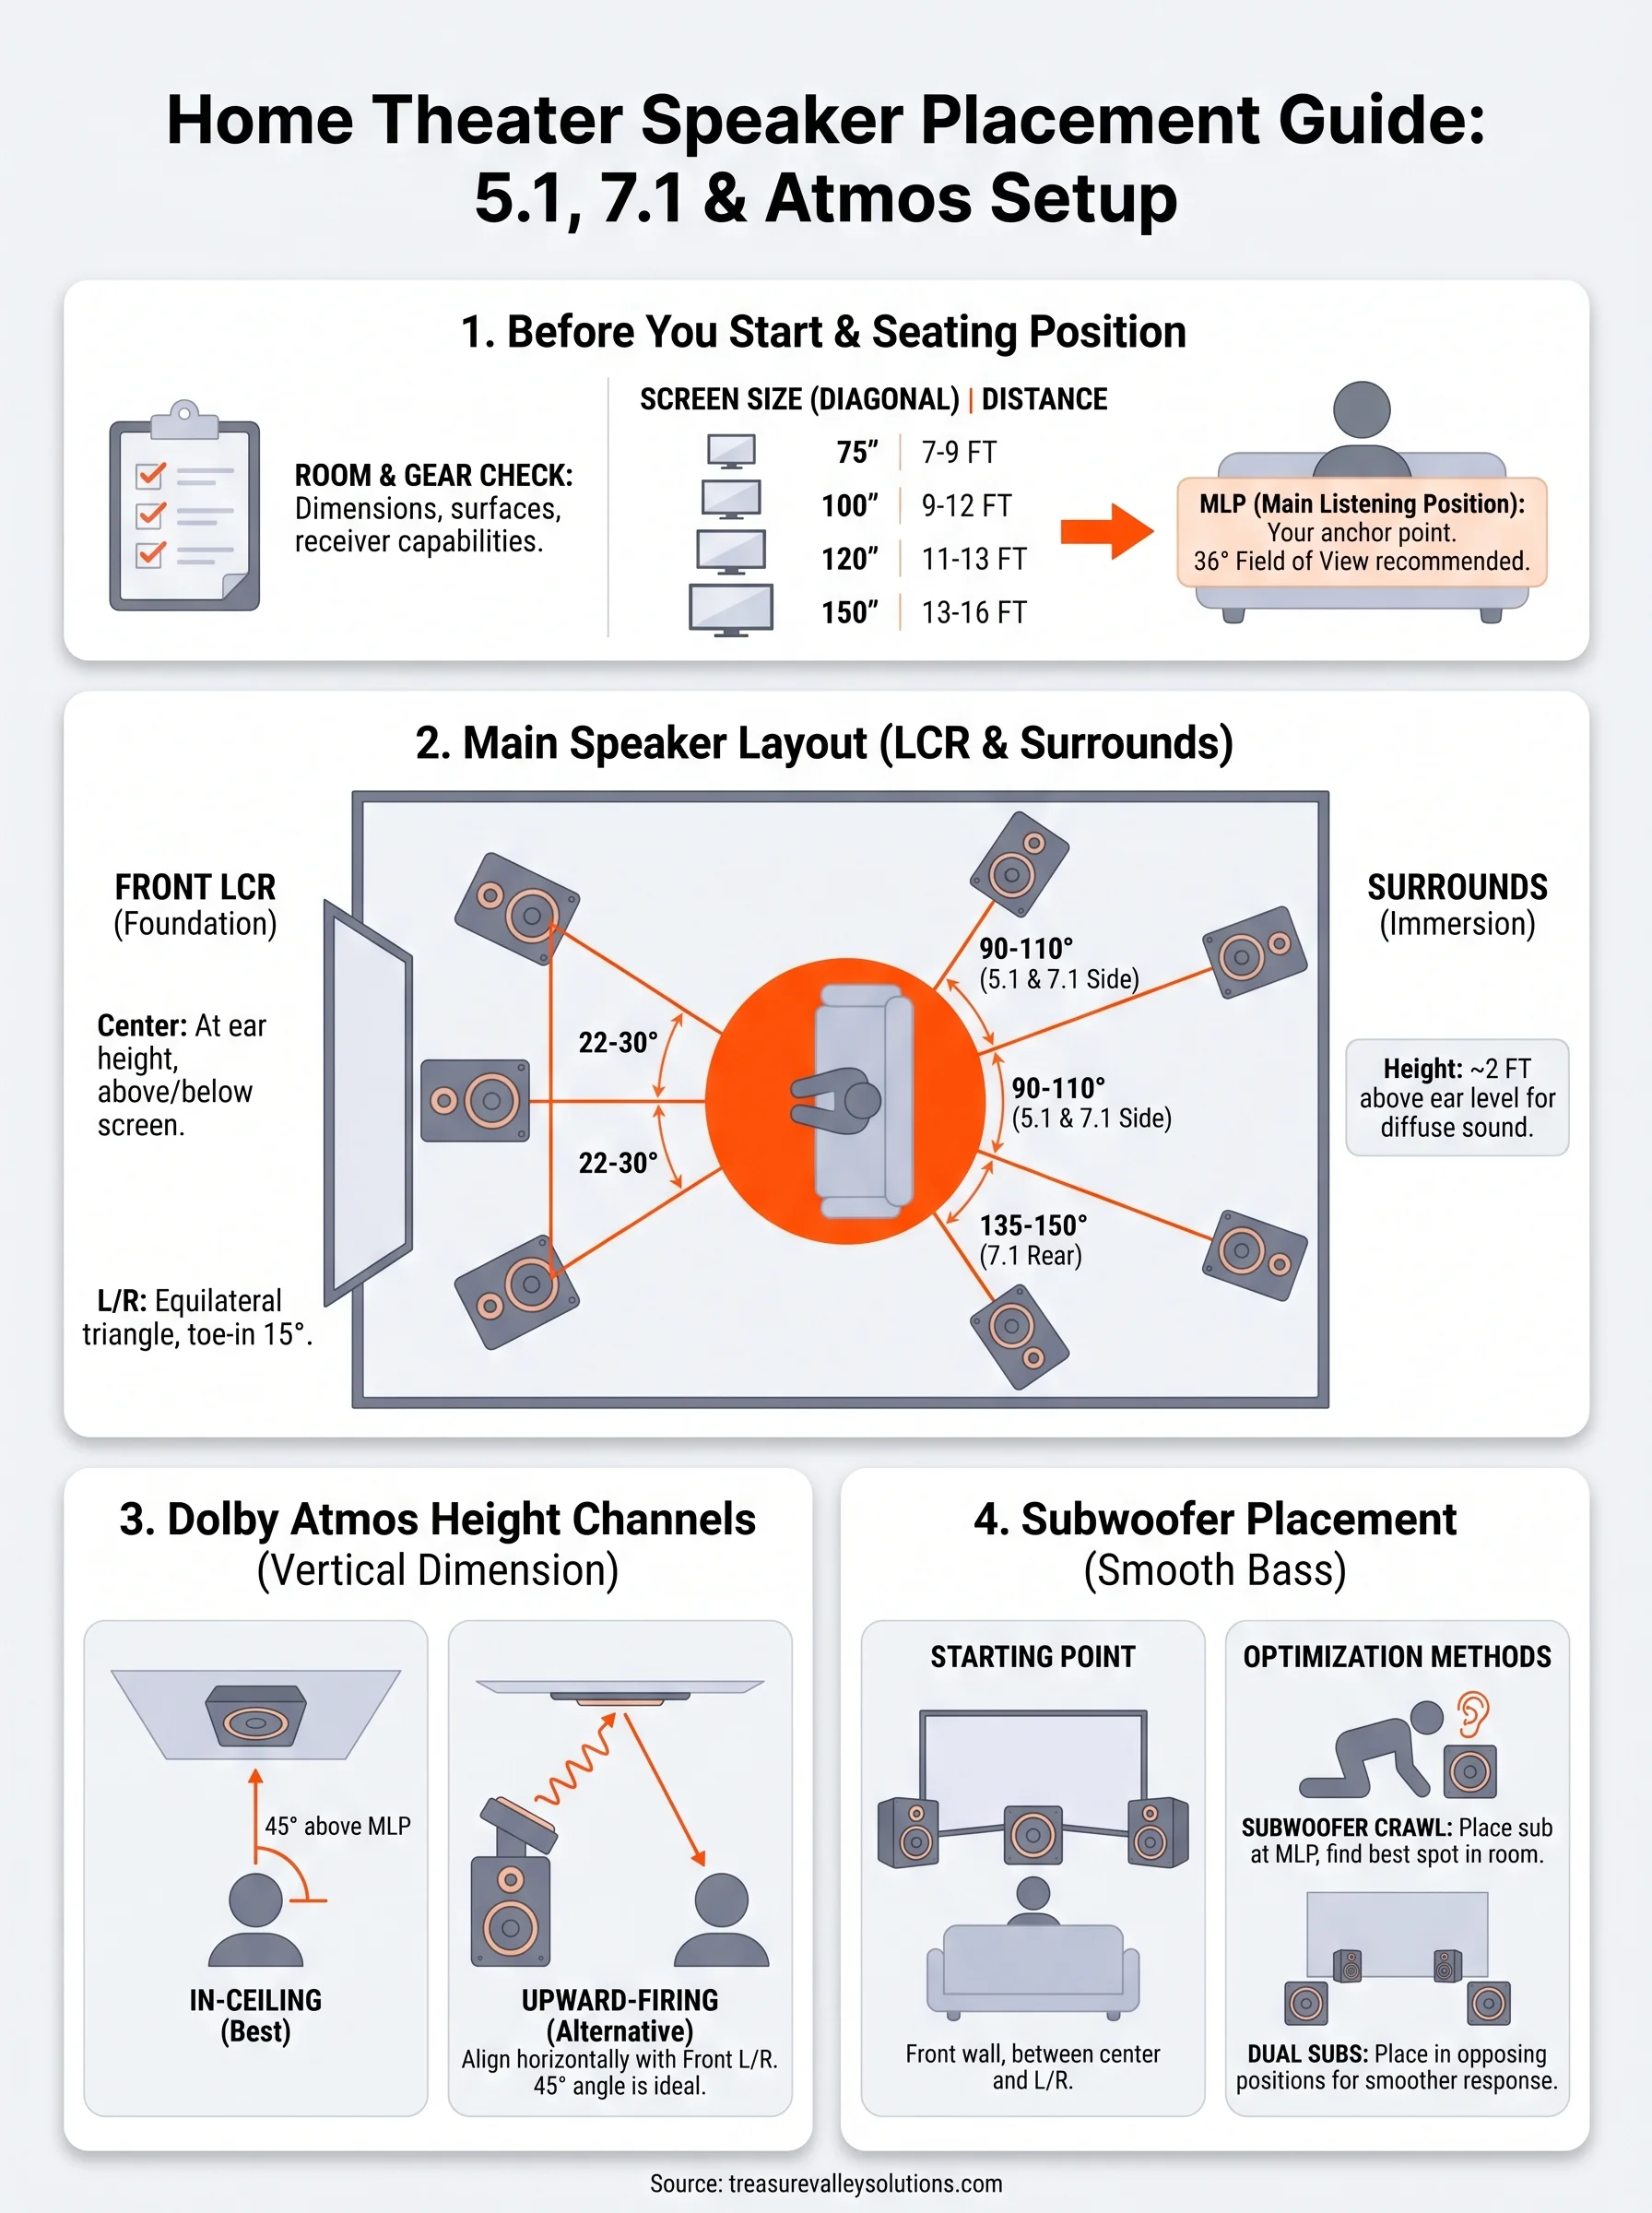
Step 1. Choose your main listening position
Every placement decision in this home theater speaker placement guide starts from one fixed point: where you sit. Your primary listening position (MLP) acts as the center of a virtual circle, and every speaker location you choose gets measured as an angle and distance from that single seat. Get this point wrong and your entire layout shifts off-axis, meaning your front soundstage, surround angles, and height channels all land at the wrong positions relative to your ears.
Lock down your listening position before moving a single speaker. Shifting your seat even two feet later means recalculating every angle and distance you've already set.
Find the right distance from the screen
Screen size drives your starting distance. The SMPTE standard for a cinematic field of view recommends sitting at a distance where the screen fills roughly 36 degrees of your horizontal field of view. For a 120-inch diagonal screen, that puts your primary seat approximately 11 to 13 feet back from the screen surface. Closer than that and you'll strain to track the full picture; further back and the immersive effect weakens.
Use this table as your baseline seating distance reference before finalizing your room layout:
| Screen size (diagonal) | Recommended seating distance |
|---|---|
| 75 inches | 7 to 9 feet |
| 100 inches | 9 to 12 feet |
| 120 inches | 11 to 13 feet |
| 150 inches | 13 to 16 feet |
Mark your seat and measure outward from it
Once you settle on a distance, mark the exact center point of your primary seat with a piece of tape on the floor. This mark becomes your anchor for every speaker measurement in the room. All horizontal angles in a 5.1 or 7.1 layout originate from this point, and Dolby Atmos height channels require you to calculate vertical angles from your ear level at this specific location.
From your marked seat, measure and record these four values:
- Distance to the front wall (where your left, center, and right speakers will go)
- Distance to the rear wall (for rear surrounds in 7.1)
- Distance to each side wall (for side surrounds in 5.1 and 7.1)
- Your ear height when seated (typically 36 to 44 inches for standard home theater seating)
These numbers feed directly into every placement step that follows.
Step 2. Place front left, center, and right
The front three speakers, your left, center, and right (LCR), form the foundation of everything you hear. The center channel anchors dialogue to the screen, while the left and right handle music, sound effects, and the width of the sound field. Get these three wrong and the entire mix sounds disconnected regardless of how well your surrounds are positioned.
Center channel placement
The center channel carries roughly 60 to 70 percent of a film's audio, which includes nearly all on-screen dialogue. Place it either directly above or below your display, with the tweeter aimed at your seated ear height. If your screen sits on a TV stand, set the center speaker on the stand below the display and tilt it slightly upward toward your ears. For projector setups using acoustically transparent screens, you can place the center directly behind the screen surface so dialogue originates exactly where the actors appear.
Never place the center speaker more than 12 inches above or below the screen's vertical midpoint, or dialogue will seem to come from a different location than the on-screen actors.
Front left and right speaker angles
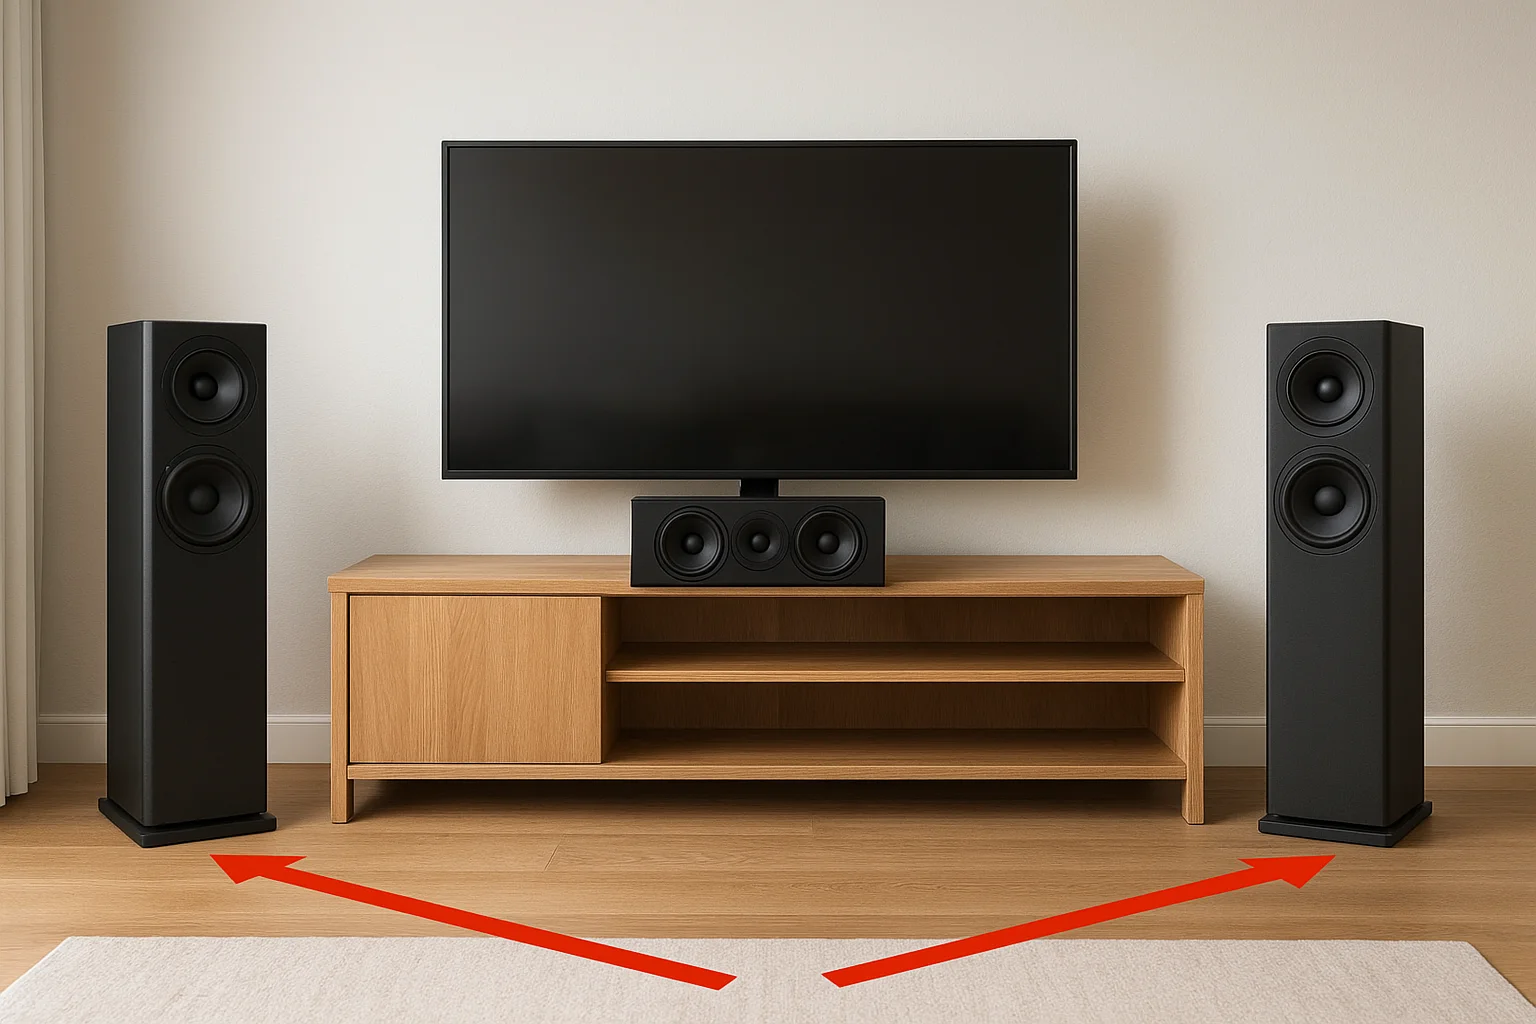
Your left and right speakers should form an equilateral triangle with your primary listening position. Each speaker should sit at 22 to 30 degrees off your center axis, which is the imaginary line running straight from your seat to the center channel. At a typical 12-foot seating distance, that puts each speaker roughly 5 to 6 feet to either side of center.
Use this table to find your target spread based on your seating distance:
| Seating distance | L/R angle | Approximate spread (each side from center) |
|---|---|---|
| 8 feet | 22 to 30 degrees | 3 to 4 feet |
| 10 feet | 22 to 30 degrees | 4 to 5 feet |
| 12 feet | 22 to 30 degrees | 5 to 6 feet |
| 14 feet | 22 to 30 degrees | 6 to 7 feet |
Your left and right speakers should also match the tweeter height of your center channel as closely as possible. This keeps the soundstage consistent as audio pans across all three front speakers. If your left and right are floorstanding models, toe them inward about 15 degrees so the tweeters point directly at your listening position. Locking in this front stage is the most critical step in any home theater speaker placement guide before you move on to surrounds.
Step 3. Place surrounds for 5.1 and 7.1
Surround speakers create the side and rear sound field that makes explosions feel like they're passing through the room and footsteps sound like they're happening right behind you. In a 5.1 system, you have two surround speakers to position. In a 7.1 system, you add a second pair behind your seat. Each pair has a specific angle and height target relative to your listening position, and hitting those targets is what separates convincing surround sound from audio that just seems to leak out of the walls.
5.1 surround speaker angles
Your two surround speakers in a 5.1 configuration should land at 90 to 110 degrees from your center axis, measured horizontally from your primary listening position. That puts them to your direct sides or slightly behind your ears, not in front. Mounting them at approximately 2 feet above ear level, which is roughly 5 to 6 feet off the floor, keeps the sound diffuse rather than pinpoint, which is exactly what surround channels are designed to deliver.

Placing surrounds too far forward, at 60 to 70 degrees, collapses the soundstage and makes the transition from front to surround channels feel abrupt instead of seamless.
Use this table to set your 5.1 surrounds correctly:
| Measurement | Target value |
|---|---|
| Horizontal angle from center axis | 90 to 110 degrees |
| Speaker height from floor | 5 to 6 feet |
| Distance from listening position | Equal to front L/R distance if possible |
| Toe-in angle toward listening position | 0 to 10 degrees |
7.1 surround speaker angles
A 7.1 layout splits the surround work across two pairs: side surrounds at 90 to 110 degrees and rear surrounds at 135 to 150 degrees. Your side surrounds hold the same position as in a 5.1 system. The rear pair moves behind your seat and fans outward toward the back corners of the room. Keep your rear surrounds at the same 5 to 6 foot height as your sides so the back of the sound field stays consistent.
Rear surrounds in a 7.1 system should also maintain roughly the same distance from your seat as the side surrounds. This keeps your receiver's distance and level calibration accurate when you run room correction. Mismatched distances force the processor to apply heavy timing delays, which this home theater speaker placement guide recommends avoiding through correct physical positioning first.
Step 4. Add Dolby Atmos height channels
Dolby Atmos adds a vertical dimension to your sound field by placing audio objects above your listening position. Unlike traditional surround channels that work in a flat horizontal plane, height channels let the processor move sound over your head, which is what makes rain, helicopters, and overhead action feel three-dimensional instead of flat. To use them, your receiver needs dedicated height channel outputs and support for object-based audio decoding, which you confirmed in the checklist before starting this guide.
If your receiver supports Atmos but you skip height channels, you'll still hear the mix, but the processor will fold height information down into your surround speakers and lose most of the overhead effect.
In-ceiling vs. upward-firing speakers
Your two main options for height channels are in-ceiling speakers mounted directly overhead and upward-firing modules that sit on top of your existing front left and right speakers and bounce sound off the ceiling. In-ceiling speakers give you more precise placement control and a cleaner listening experience when your ceiling height is between 8 and 12 feet. Upward-firing modules are a practical alternative for rooms where cutting ceiling holes is not an option, but they require a flat, reflective ceiling to work correctly. Heavily textured, vaulted, or coffered ceilings scatter the reflected sound and reduce the effect significantly.
Height channel angles and placement
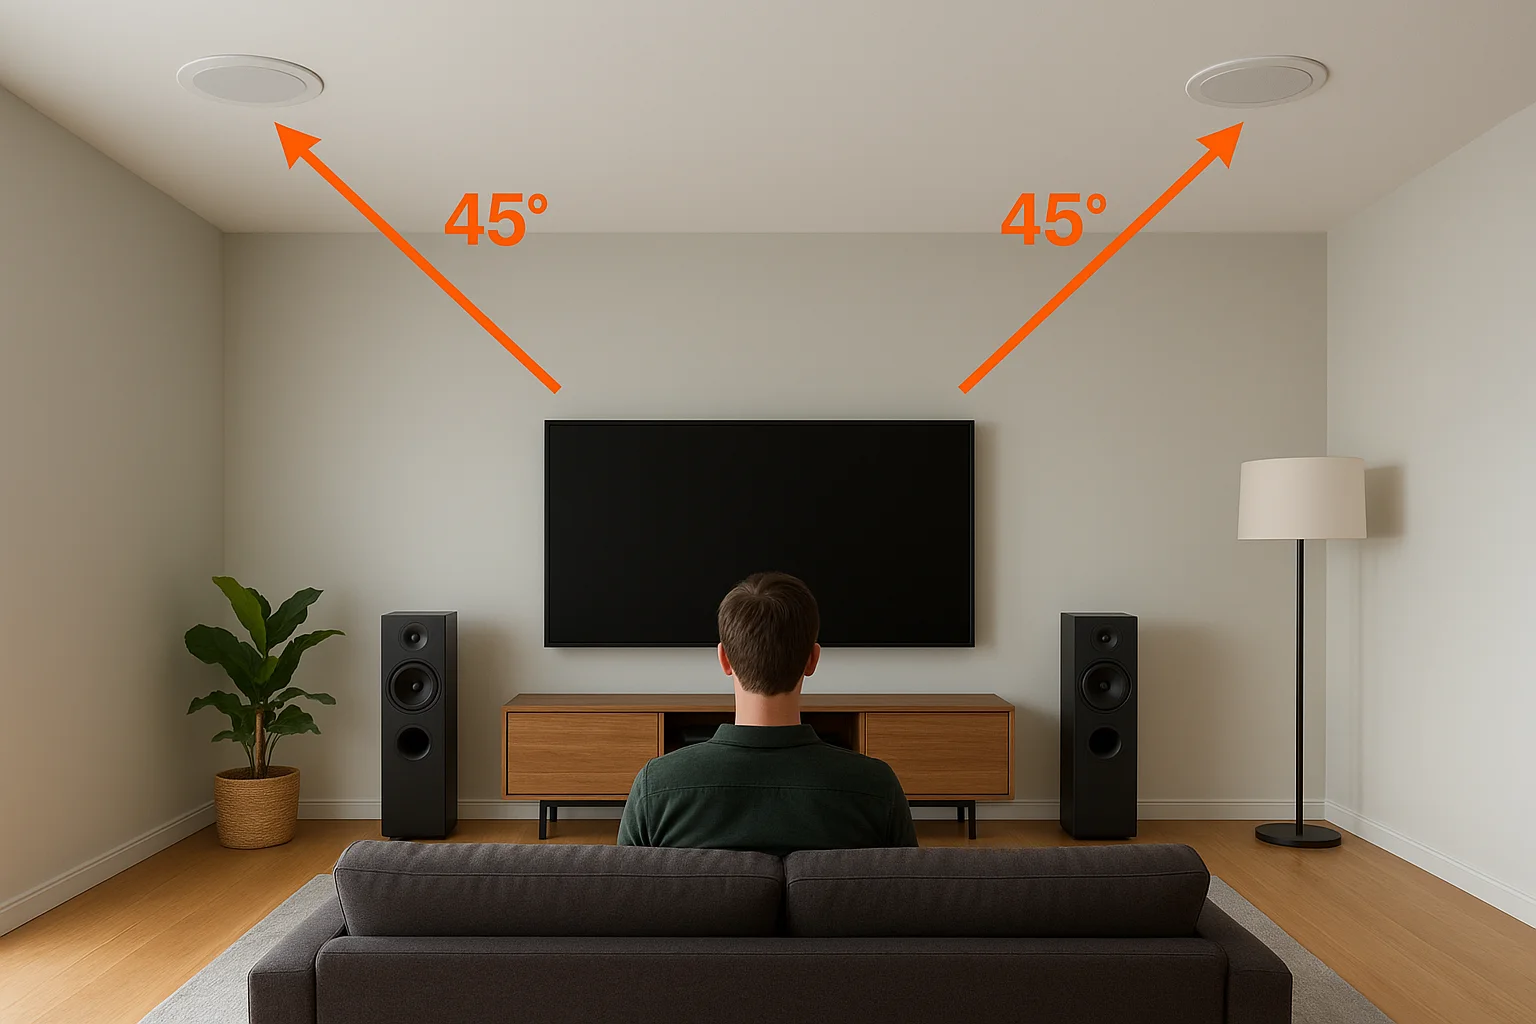
This home theater speaker placement guide recommends a Dolby-specified placement for the most common two-height-channel (5.1.2 or 7.1.2) setup. Your height speakers should land at 45 degrees above your listening position, measured from your ear level at the primary seat. Horizontally, they should align with your front left and right speakers, not your surrounds. That puts them roughly over the first third of your seating area, between the screen wall and your seat.
Use this table to position your height channels accurately:
| Measurement | Target value |
|---|---|
| Vertical angle from ear level | 45 degrees (30 to 55 degrees acceptable) |
| Horizontal position | Aligned with front L/R speakers |
| Distance apart (center to center) | Matches front L/R spread |
| Ceiling height for in-ceiling install | 8 to 12 feet ideal |
For a four-height-channel layout (5.1.4 or 7.1.4), add a second rear pair at the same 45-degree vertical angle but aligned over your surround speaker positions rather than your front speakers.
Step 5. Place subwoofers for smooth bass
Bass frequencies travel differently than mid and high frequencies. A subwoofer produces long sound waves that interact with your room's walls, floor, and ceiling in ways that create peaks and nulls at specific locations. Move the sub two feet in any direction and the bass response at your seat can change dramatically. This step in the home theater speaker placement guide focuses on finding the position where bass output stays consistent and even across your listening area rather than booming in one spot and disappearing in another.
Avoid placing your subwoofer directly in a corner by default. Corner placement boosts output but often produces one-note, bloated bass that your receiver's room correction software cannot fully fix.
Start with the front wall
Your best first position is along the front wall, placed between your center channel and one of your front speakers. This keeps the subwoofer close to your main speakers so bass and mid frequencies blend at similar distances. If your room is smaller than 15 feet wide, start with the sub roughly one-quarter of the room's length away from the front wall, which typically puts it 3 to 4 feet out from the wall surface.
Most receivers let you set a subwoofer distance and trim level independently during calibration, so small asymmetries in placement don't ruin the result. The physical starting position still matters because room correction works best when the raw placement is already close to correct before it begins adjusting.
Use the subwoofer crawl method
The subwoofer crawl is the most reliable DIY method for finding your room's smoothest bass position. Follow these steps:
- Place the subwoofer at your primary listening position, in the exact spot where your seat normally sits.
- Play a bass-heavy test track or a 40 to 80 Hz sine wave tone.
- Slowly walk along the front wall and then the side walls while listening for the spot where bass sounds fullest and most even.
- Mark that spot and move the subwoofer there permanently.
If you're running two subwoofers, place the second one on the opposite side of the room from the first to cancel out room modes more effectively. Two subs at opposing positions, such as front-left and rear-right, produce dramatically smoother bass than one sub at any single location.
Ready to fine-tune your system
Following this home theater speaker placement guide gives you a solid physical foundation, but the final layer of tuning happens after everything is mounted and wired. Run your receiver's room correction software with the calibration microphone placed at your primary listening position, then let it measure distances, levels, and timing for every speaker. Once it finishes, play a scene you know well and listen for any channel that sounds too loud, too quiet, or out of sync with the others. Small manual trim adjustments after auto-calibration are normal and expected.
Building a dedicated theater room or working with an unusual space means the process gets more complex. Treasure Valley Solutions has been designing and installing custom home theater systems across the Boise and Meridian area since 2014, and every project starts with a conversation about your room, your gear, and your goals. Contact us today to get expert guidance from your initial layout through final calibration.