You bought the speakers. You unboxed everything. Now you're staring at a pile of cables, stands, and an instruction manual that reads like it was written for engineers. Learning how to set up surround...
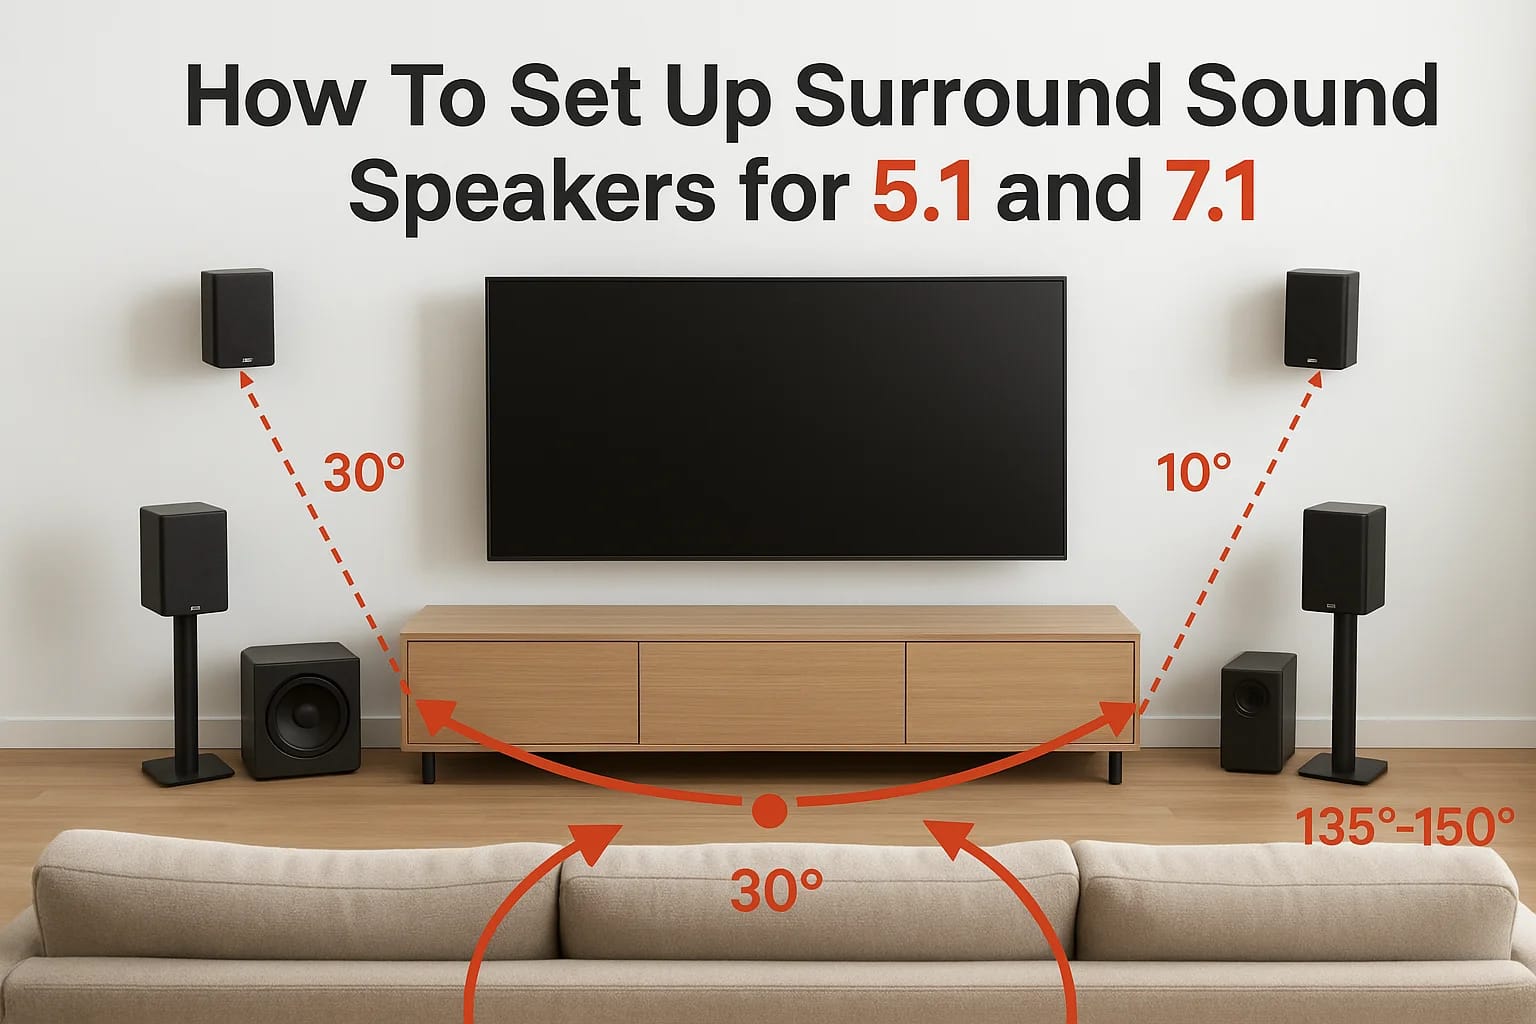
How To Set Up Surround Sound Speakers for 5.1 and 7.1
You bought the speakers. You unboxed everything. Now you're staring at a pile of cables, stands, and an instruction manual that reads like it was written for engineers. Learning how to set up surround sound speakers correctly makes the difference between an immersive home theater experience and audio that never quite sounds right.
Speaker placement isn't just about following a generic diagram. The angles, heights, and distances all affect how sound reaches your ears, and small mistakes can leave you with muffled dialogue or action scenes that fall flat. Whether you're configuring a 5.1 or 7.1 system, getting these details right from the start saves hours of frustration.
At Treasure Valley Solutions, we've installed hundreds of home theater systems across Idaho. This guide shares what we've learned, where to position each speaker, how to wire everything correctly, and the calibration steps that bring your system to life.
What you need before you start
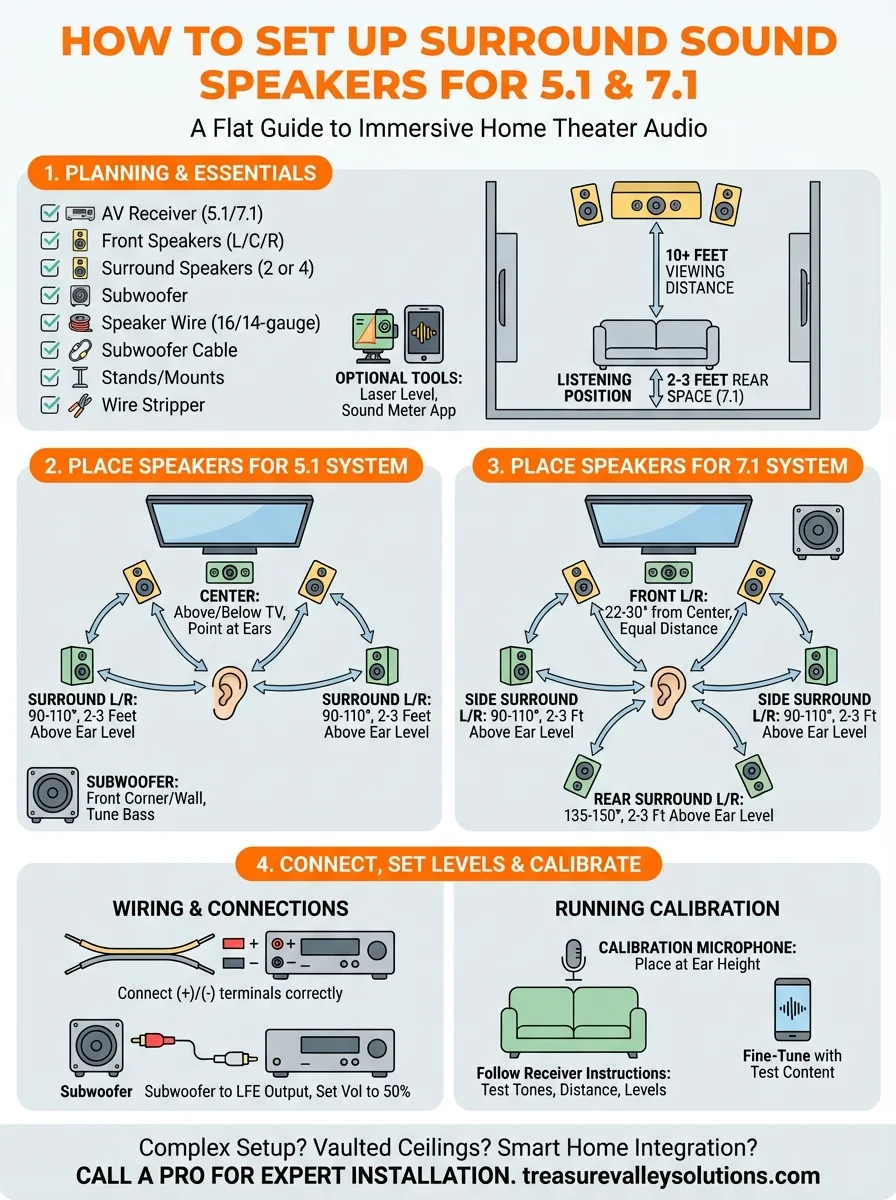
Before you position a single speaker or plug in a cable, gather everything required for the job. Missing a mounting bracket or the right speaker wire gauge halfway through setup wastes time and disrupts your workflow. Running through this checklist prevents trips to the hardware store when you're already deep into installation.
Essential equipment checklist
Your surround sound system includes more than just speakers. You need a compatible AV receiver that supports 5.1 or 7.1 channels, since this unit powers your speakers and processes audio signals. Check that your receiver has enough HDMI inputs for all your devices like game consoles, streaming boxes, and Blu-ray players.
Here's what you need to complete the setup:
- Front speakers: Left, center, and right channels
- Surround speakers: Two for 5.1, four for 7.1
- Subwoofer: One active subwoofer with built-in amplifier
- AV receiver: Dolby Digital or DTS compatible
- Speaker wire: 16-gauge or 14-gauge for runs under 50 feet
- Subwoofer cable: RCA cable rated for low-frequency audio
- Speaker stands or wall mounts: Height-adjustable stands work best
- Wire stripper: For clean connections
- Cable labels: To track which wire goes where
The right speaker wire gauge matters. Use 14-gauge wire for longer runs to prevent signal loss and maintain clean audio.
Room preparation and measurements
Walk through your space and identify where furniture sits, where outlets are located, and which walls support mounting hardware. You need at least 10 feet of viewing distance from the front speakers for most 5.1 and 7.1 configurations, though smaller rooms can work with adjustments. Mark the primary listening position on the floor with painter's tape, since this spot determines all speaker angles and distances.
Measure the room dimensions and note any acoustic challenges. Large windows, hardwood floors, and bare walls reflect sound and create echoes. You don't need acoustic panels before you start, but knowing these factors helps you anticipate calibration needs later.
Optional tools that make the job easier
Wire management clips keep cables organized along baseboards and prevent tripping hazards. A laser level ensures your wall-mounted speakers sit at identical heights, which affects how sound reaches your ears. A stud finder locates wall supports for secure mounting, especially important for heavier bookshelf speakers.
Bringing a smartphone or tablet with a sound meter app helps during calibration. These apps measure decibel levels at your listening position, making it easier to balance all channels when you reach the final setup steps in learning how to set up surround sound speakers.
Step 1. Choose the room layout and main seat
Your listening position determines every measurement that follows. When you learn how to set up surround sound speakers, this first decision shapes speaker angles, distances, and heights throughout the entire system. Skip this step or rush through it, and you'll spend hours adjusting speakers that never quite sound balanced.
Finding your primary listening position
Position your main seat at least 10 feet from the front speakers and ideally centered between the side walls. This creates equal distances to your left and right speakers, which prevents audio from favoring one side. Measure from each side wall to confirm you're truly centered, not just eyeballing it.
Your seating should sit one-third to halfway into the room's depth. Avoid pushing furniture against the back wall, since this placement traps you in bass nodes where low frequencies build up and sound muddy. Leave at least 2 to 3 feet of space behind your seat for rear speakers in a 7.1 configuration.
Center your main seat between the side walls and position it one-third to halfway into the room for balanced audio across all channels.
Room shape and speaker clearance
Rectangular rooms work better than square spaces because parallel walls create fewer standing waves. If you're working with a square room, plan to add acoustic treatment later, but don't let this stop your initial setup. Long, narrow rooms need speakers pulled away from walls to prevent bass buildup.
Keep speakers at least 12 inches from walls and corners during initial placement. Subwoofers need clearance too, though you'll fine-tune their position during calibration. Mark your listening position with tape and measure the distance to each wall, writing these numbers down for reference when you position speakers in the next steps.
Step 2. Place speakers for a 5.1 system
A 5.1 configuration includes three front speakers, two surround speakers, and one subwoofer. When you learn how to set up surround sound speakers in this layout, precision matters more than rough estimates. Each speaker needs specific angles and distances from your listening position to create a cohesive soundstage.
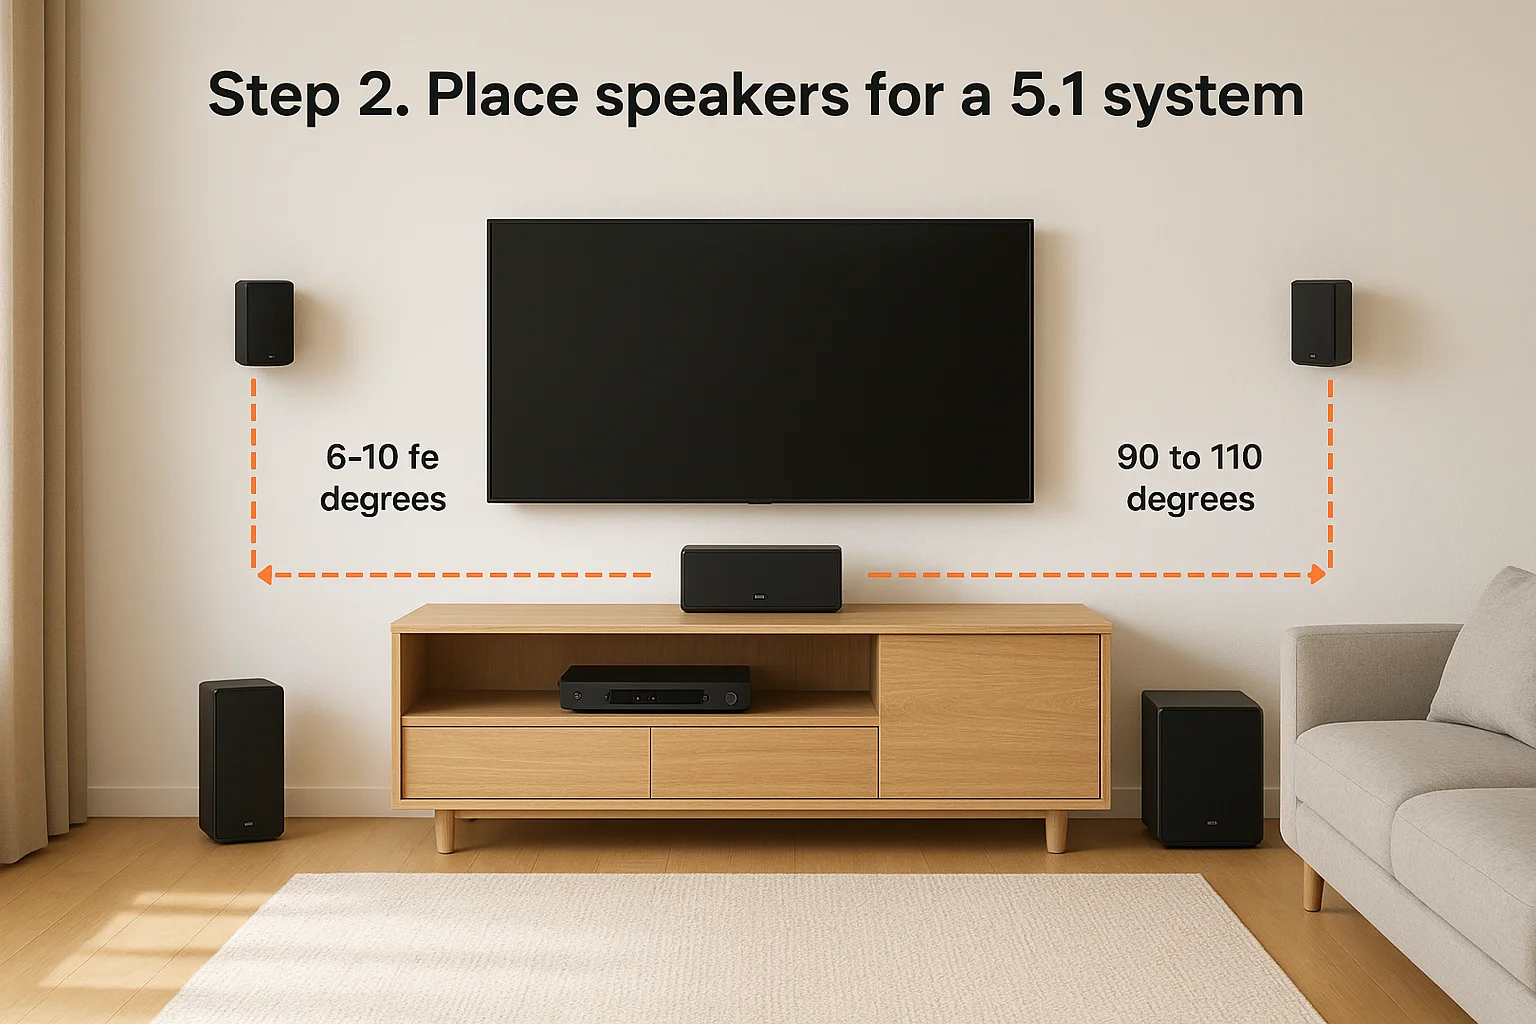
Front speaker positioning
Place your center channel directly above or below your TV, aligned with the screen's center. This speaker handles dialogue, so it should point straight at your ears when you sit in your main seat. Keep it no higher than 2 feet above or below ear level to prevent voices from sounding disconnected from the action on screen.
Position your left and right front speakers at 22 to 30 degrees from the center channel, measured from your listening position. These speakers should sit at equal distances from your seat, typically 6 to 10 feet away depending on room size. Angle them inward so they point directly at your head, creating a focused soundstage.
Surround speaker placement
Mount or place your surround speakers 90 to 110 degrees to the sides of your listening position. These speakers need height between 2 and 3 feet above ear level to create an enveloping effect without sounding like they're directly overhead. Measure from your seated ear height and add the extra clearance for proper placement.
Position surround speakers 90 to 110 degrees from center and 2 to 3 feet above ear level for proper immersion.
Subwoofer location
Start with your subwoofer in a front corner of the room or along the front wall between your left and right speakers. Low frequencies spread throughout the room, so exact placement matters less than with other speakers. Test different positions during calibration to find where bass sounds tight and balanced without overpowering dialogue.
Step 3. Place speakers for a 7.1 system
A 7.1 system adds two rear surround speakers to the 5.1 configuration, creating a more immersive audio envelope around your listening position. The front speakers follow the same placement rules from the 5.1 setup, but your surround channels now split into side and rear positions that require specific angles and heights. When you learn how to set up surround sound speakers in this layout, the extra channels deliver noticeably better spatial accuracy during action scenes and ambient effects.
Front channel placement
Your center, left, and right front speakers use identical positioning from the 5.1 configuration. Keep the center channel aligned with your screen and the left and right speakers at 22 to 30 degrees from center. These three speakers anchor dialogue and primary sound effects, so their placement doesn't change when you add rear channels.
Side and rear surround positioning
Position your side surrounds at 90 to 110 degrees from your center line, matching the 5.1 placement. These speakers sit 2 to 3 feet above ear level when measured from your seated position. Your rear surrounds go directly behind you at 135 to 150 degrees from the center channel, also mounted 2 to 3 feet above ear level.
Place rear surrounds at 135 to 150 degrees behind your listening position for proper 7.1 channel separation.
Maintain equal distances from your seat to all four surround speakers. Measure from your head position to each speaker location and adjust placement until all four measurements match within 6 inches. This balance ensures sound effects pan smoothly around the room without gaps or volume jumps between channels.
Subwoofer setup
Your subwoofer placement remains the same as in a 5.1 system. Start with a front corner position and plan to test different locations during calibration to find where bass sounds cleanest in your room.
Step 4. Connect, set levels, and calibrate
Your speakers sit in their positions, but they won't produce sound until you wire everything to your AV receiver and calibrate the system. Knowing how to set up surround sound speakers includes making clean connections and adjusting audio levels so each channel blends together. Poor connections create crackling sounds or channels that cut out, while skipping calibration leaves some speakers too loud and others barely audible.
Wiring and connections
Strip half an inch of insulation from each speaker wire end using wire strippers. Connect the positive terminal (red) on your speaker to the positive terminal on your receiver, then repeat with the negative terminal (black). Keep left and right channels separated and label each wire with tape to track connections.
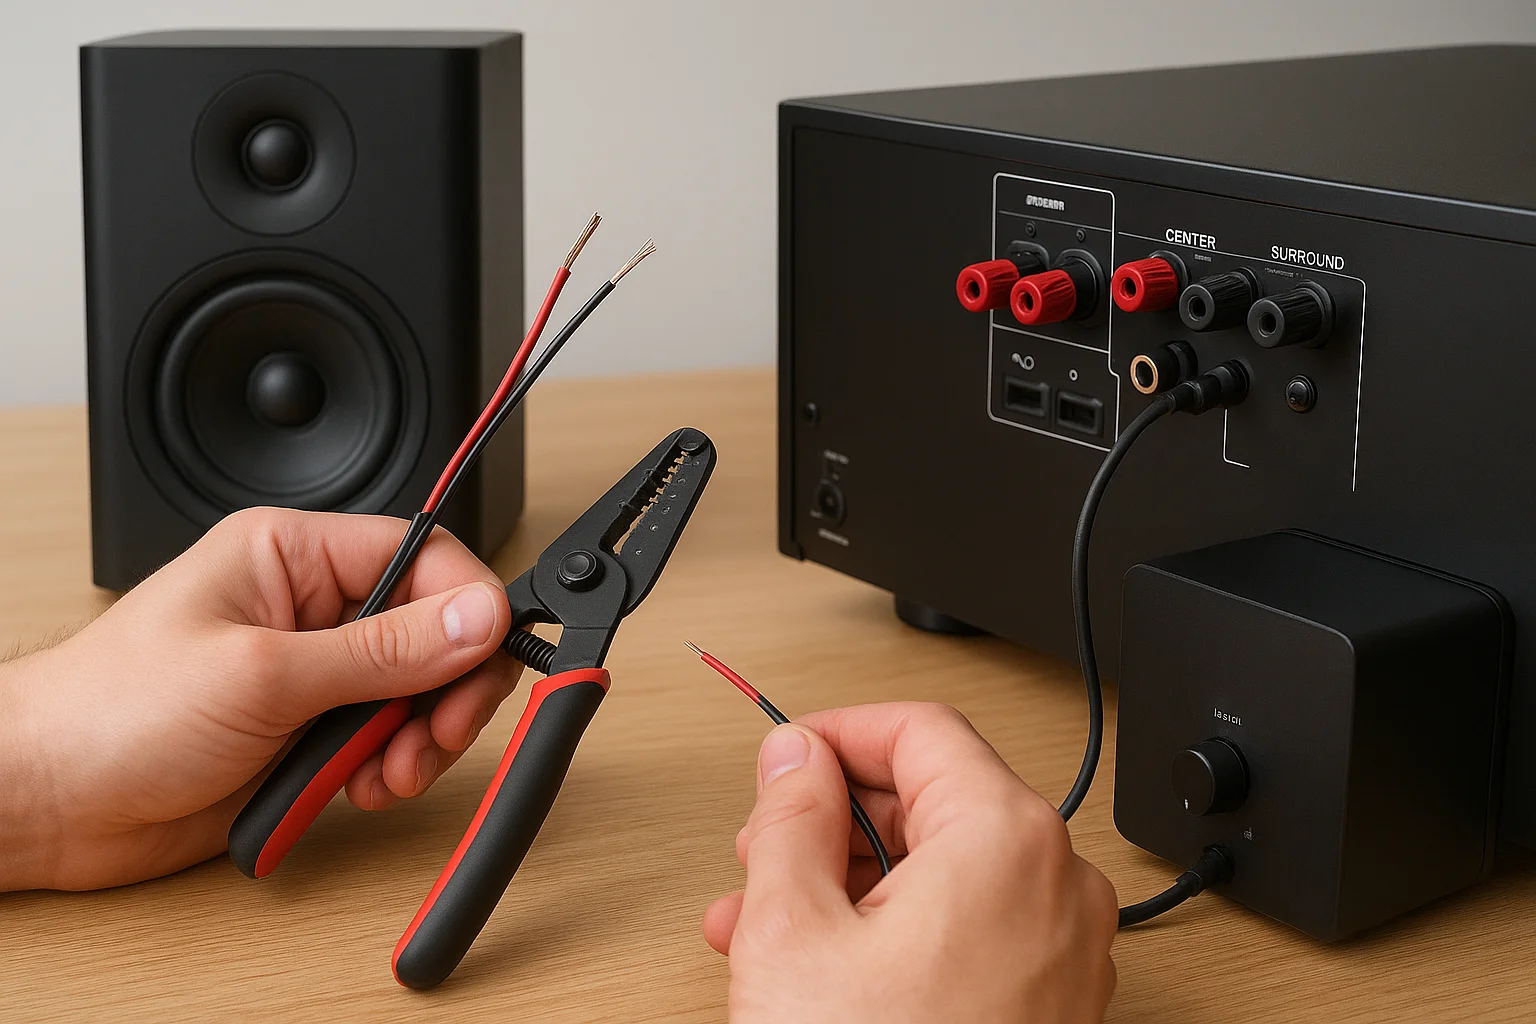
Connect your subwoofer to the receiver's LFE output using an RCA cable. Plug one end into the receiver's subwoofer output and the other into your subwoofer's line input. Power on your subwoofer and set its volume knob to the halfway position before running calibration.
Running calibration
Place the calibration microphone at your main listening position at ear height. Most AV receivers include this microphone, though some require separate purchases. Your receiver sends test tones to each speaker and measures how sound reaches your seating position, automatically adjusting volume levels and delays for each channel.
Run automatic calibration with the microphone at ear height in your listening position for properly balanced audio across all channels.
Follow your receiver's on-screen instructions to complete the calibration process. The system tests each speaker individually, adjusts the subwoofer crossover, and sets distances based on arrival times. After calibration finishes, play test content with surround sound and make manual adjustments if any channel sounds too quiet or overpowering.
Wrap-up and when to call a pro
You now know how to set up surround sound speakers for both 5.1 and 7.1 configurations. The steps cover speaker placement, proper angles, wiring connections, and calibration procedures that create immersive home theater audio. Following these guidelines delivers results that rival commercial installations when you have a straightforward room layout.
Complex rooms present challenges that go beyond basic setups. Vaulted ceilings, open floor plans, or homes with challenging acoustics need professional expertise to achieve optimal sound. Running wires through walls, mounting speakers on difficult surfaces, and integrating systems with existing smart home technology requires specialized tools and experience that most homeowners lack.
Treasure Valley Solutions designs and installs custom home theater systems across Idaho. We handle everything from speaker selection to final calibration, ensuring your system performs exactly as intended. Contact our team to discuss your home theater project and get expert installation that brings your space to life.