Telling your lights to turn on, dim to 40%, or shift to warm white, and having it actually happen, is one of those small upgrades that changes how your home feels every day. Google Home lighting contr...
Google Home Lighting Control: Setup, Voice, And Routines
Telling your lights to turn on, dim to 40%, or shift to warm white, and having it actually happen, is one of those small upgrades that changes how your home feels every day. Google Home lighting control gives you that ability through voice commands, app-based adjustments, and automated routines that run on schedule or respond to triggers. It's one of the most practical entry points into smart home technology, and setup is more straightforward than most people expect.
That said, getting everything working smoothly depends on choosing the right devices, configuring rooms correctly, and building routines that match how you actually live. Skipping steps or picking incompatible products leads to frustration fast. This guide walks you through the full setup process, from connecting your first smart bulb to creating multi-step automations that handle lighting across your entire home.
At Treasure Valley Solutions, we design and install smart lighting systems throughout the Boise and Meridian area, including Google Home setups tailored to each client's home. Whether you're handling this yourself or want a professionally configured system, this article gives you the knowledge to get it right.
What you need before you start
Before you set up google home lighting control, you need the right hardware and software confirmed and ready. Jumping straight to adding lights without these basics means you'll hit walls early: lights that won't pair, voice commands that don't register, or routines that break without explanation. Taking ten minutes to run through this checklist saves you significant troubleshooting time later.
Hardware you need
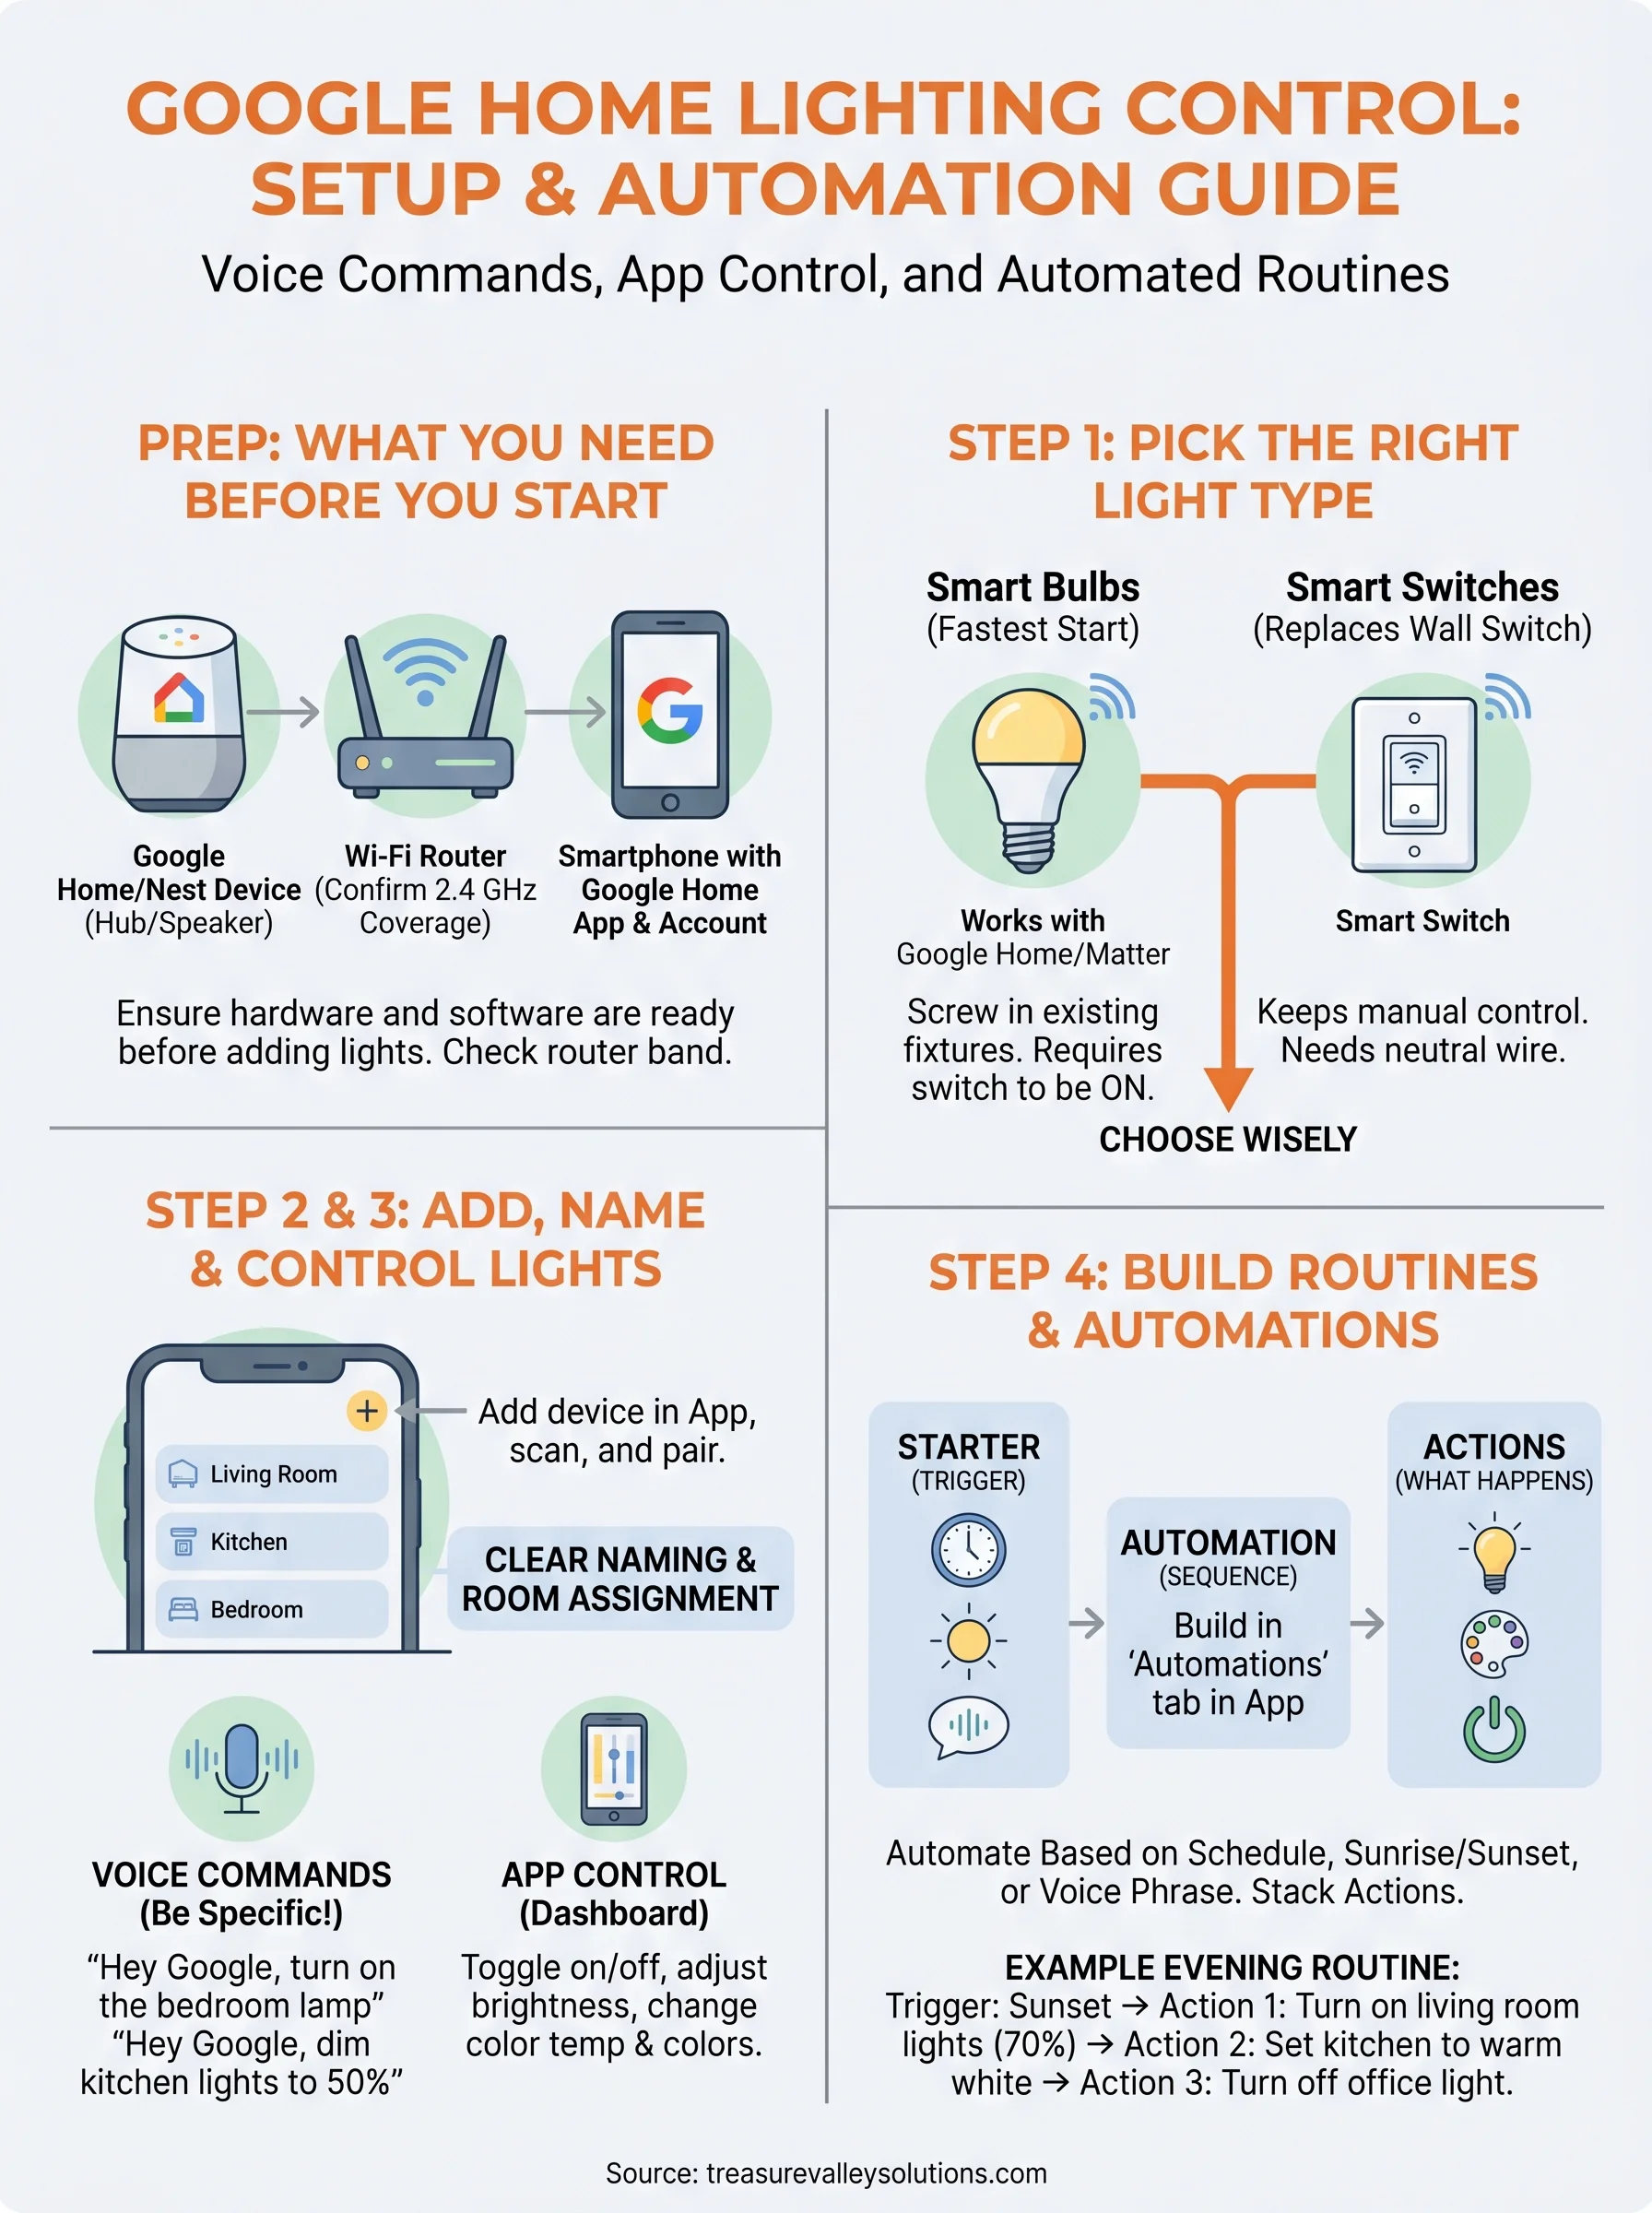
Three physical components are required to get started: a Google-compatible smart light, a Wi-Fi router, and at least one Google Home or Nest device to serve as your hub and voice controller. You don't need a dedicated smart home hub beyond the Google device itself for most setups, though some light systems like Philips Hue use their own bridge.
Your router's Wi-Fi band matters: most smart bulbs connect over 2.4 GHz, not 5 GHz, so confirm your router broadcasts both bands and that the 2.4 GHz signal reaches the rooms where you plan to install lights.
Here's what to have ready before you open the app:
- Google Home or Nest device (Nest Mini, Nest Hub, Nest Hub Max, or any Google Assistant speaker)
- Compatible smart lights carrying the "Works with Google Home" or Matter badge
- A Wi-Fi router with solid 2.4 GHz coverage throughout your home
- A smartphone running iOS 16 or Android 6.0 or later
App and account setup
You need a Google account and the Google Home app installed on your phone before anything else. During the initial app setup, you'll name and configure a "home," which acts as the container for every device, room, and automation you build going forward.
Some light brands require their own companion app for first-time pairing. Philips Hue, for example, needs the Hue app to connect its bridge before Google Home can detect any bulbs. Download those manufacturer apps in advance and have your brand account credentials ready so the pairing process runs without interruption.
Step 1. Pick the right light type for Google Home
Not every smart light works with Google Home lighting control, and picking the wrong product wastes both money and setup time. Your two main options are smart bulbs and smart switches, and the right choice depends on your existing wiring and how you plan to use your lights.
Smart bulbs vs. smart switches
Smart bulbs screw into your existing fixtures and connect over Wi-Fi or Zigbee without any rewiring. They're the fastest way to start, but they stop responding to voice commands if someone turns off the wall switch. Smart switches replace your existing switch and control any bulbs in that circuit, keeping normal switch behavior while adding app and voice control.

Smart switches require a neutral wire in your wall box; check before buying, because older homes often lack one.
What to look for on the box
Look for the "Works with Google Home" badge or a Matter certification logo on the packaging. Matter-certified devices connect directly to Google Home without a separate hub. Avoid uncertified generic bulbs, since pairing support is inconsistent and often breaks after firmware updates.
Wi-Fi bulbs need no extra hardware and suit most single-room setups. For a larger multi-room system, Zigbee-based products like Philips Hue use a hub that creates a more stable mesh network.
Step 2. Add lights to Google Home and name them
With your hardware ready and your Google account set up, you can start adding devices. Opening the Google Home app and tapping the "+" icon in the top-left corner starts the process. Select "Set up device," then choose "New device" if your light is brand new, or "Works with Google" if you're linking a third-party account like Philips Hue or LIFX.
Pair your light in the app
Each pairing flow varies slightly by brand, but the general steps stay consistent. Power on your bulb, open the app, and follow the on-screen prompts. The app scans your network and detects compatible devices automatically in most cases.
If your bulb doesn't appear during scanning, reset it by toggling power off and on five times quickly, which puts most smart bulbs back into pairing mode.
Here's the standard pairing sequence for a Wi-Fi smart bulb:
- Install the bulb in its fixture and power it on
- Open Google Home, tap "+" then "Set up device"
- Select your home and let the app scan
- Tap your bulb when it appears, then follow the prompts
- Confirm the Wi-Fi password when asked
Name and assign rooms correctly
Naming your lights clearly is what makes google home lighting control actually useful day-to-day. Name each bulb by its location and function, like "Bedroom Lamp" or "Kitchen Overhead," then assign it to the correct room. Accurate room assignments let you say "Hey Google, turn off the kitchen lights" and have only those lights respond.
Step 3. Control lights in the app and by voice
Once your lights are named and assigned to rooms, google home lighting control gives you two main methods to manage them: through the app and through voice. Both work at the same time, so use whichever fits the moment.
Using the Google Home app
The Google Home app shows all your lights on the main dashboard. Tap any tile to toggle it on or off, or press and hold to open a slider for brightness and color temperature adjustments. Tap a room tile to control every light in that room at once, which is faster than switching each one individually.
The app also lets you adjust these settings per light:
- Brightness: drag from 1% to 100%
- Color temperature: shift between warm white and cool white
- Color: pick any hue if your bulbs support full RGB
Voice commands that actually work
Voice control through Google Assistant handles most lighting tasks without picking up your phone. Use your light's exact device name when speaking to get consistent, reliable results every time.
The more specific your command, the better Google Assistant responds, so "dim the living room to 30%" works more reliably than "make it darker."
Here are common voice commands to try:
- "Hey Google, turn on the bedroom lamp"
- "Hey Google, set the kitchen lights to 50%"
- "Hey Google, turn off all the lights"
- "Hey Google, set the office light to warm white"
Step 4. Build routines and automations for lighting
Routines are where google home lighting control shifts from convenient to genuinely useful. Instead of issuing commands manually, you set up sequences that trigger automatically based on a schedule, a voice phrase, or another device's action. Open the Google Home app, tap "Automations" at the bottom, then tap "+" to start building.
Create a routine in Google Home
The routine builder gives you two blocks to fill in: a starter (what triggers the routine) and actions (what happens when it triggers). Starters include time of day, sunrise or sunset, voice commands, or another device reaching a certain state. Actions include turning lights on or off, setting brightness, and changing color temperature.
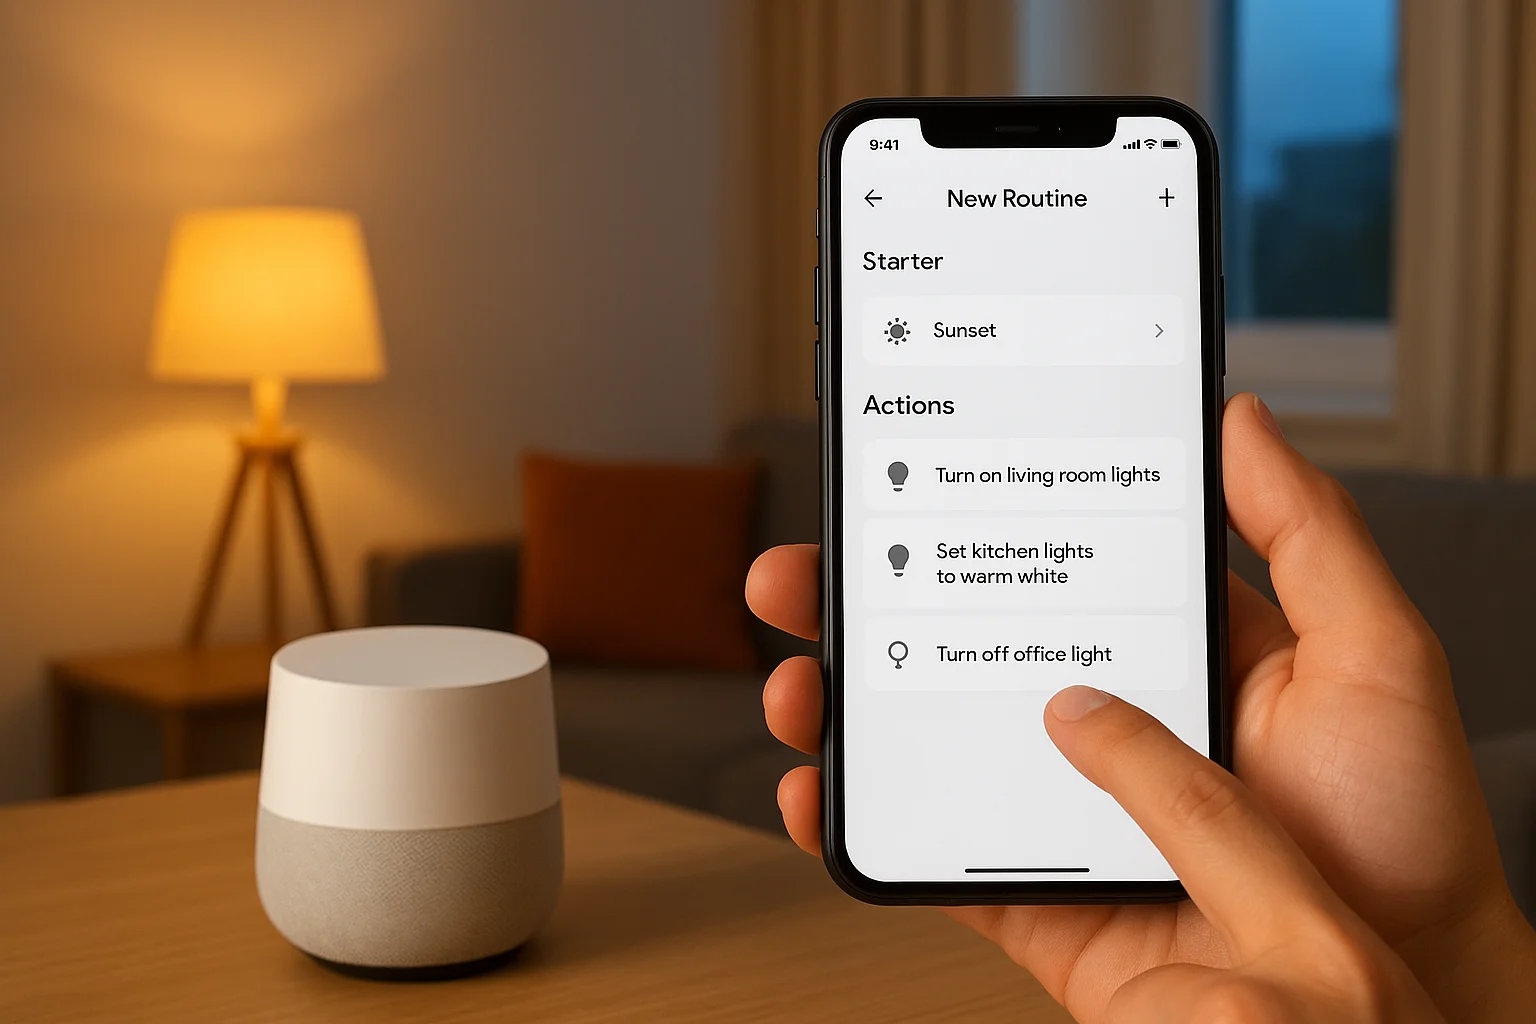
Linking your lighting routine to "sunset" instead of a fixed time means your lights adjust year-round without you editing the schedule.
Here's a practical evening routine you can build directly in the app:
- Trigger: Sunset
- Action 1: Turn on living room lights at 70%
- Action 2: Set kitchen lights to warm white
- Action 3: Turn off office light
Schedule a morning lighting sequence
A morning routine helps you wake up gradually without touching your phone. Set a time-based trigger for 30 minutes before you need to leave, then add actions that bring bedroom lights up to 50% and turn on kitchen lights at full brightness. Stacking multiple light actions in one routine keeps your mornings consistent without any manual input.
Bring it all together
Google home lighting control works best when you treat it as a layered system: start with one or two well-named bulbs, learn the voice commands, then build routines that match your actual daily schedule. Each step in this guide builds on the previous one, so rushing ahead to automations before your devices are correctly named and assigned to rooms will create gaps that are frustrating to fix later. Take it room by room and test as you go.
Once you have the basics running, the system mostly takes care of itself. Routines handle the repetitive stuff, voice commands cover the in-the-moment adjustments, and the app gives you full manual control whenever you need it. If you want a professionally designed and installed smart lighting system in your Boise or Meridian home, the team at Treasure Valley Solutions handles everything from wiring to programming. See examples of our smart home work to get a sense of what's possible.