Setting up a smart home with Google's ecosystem is one of the most accessible ways to start automating your space. The Google Home smart home setup process lets you control lights, locks, cameras, the...
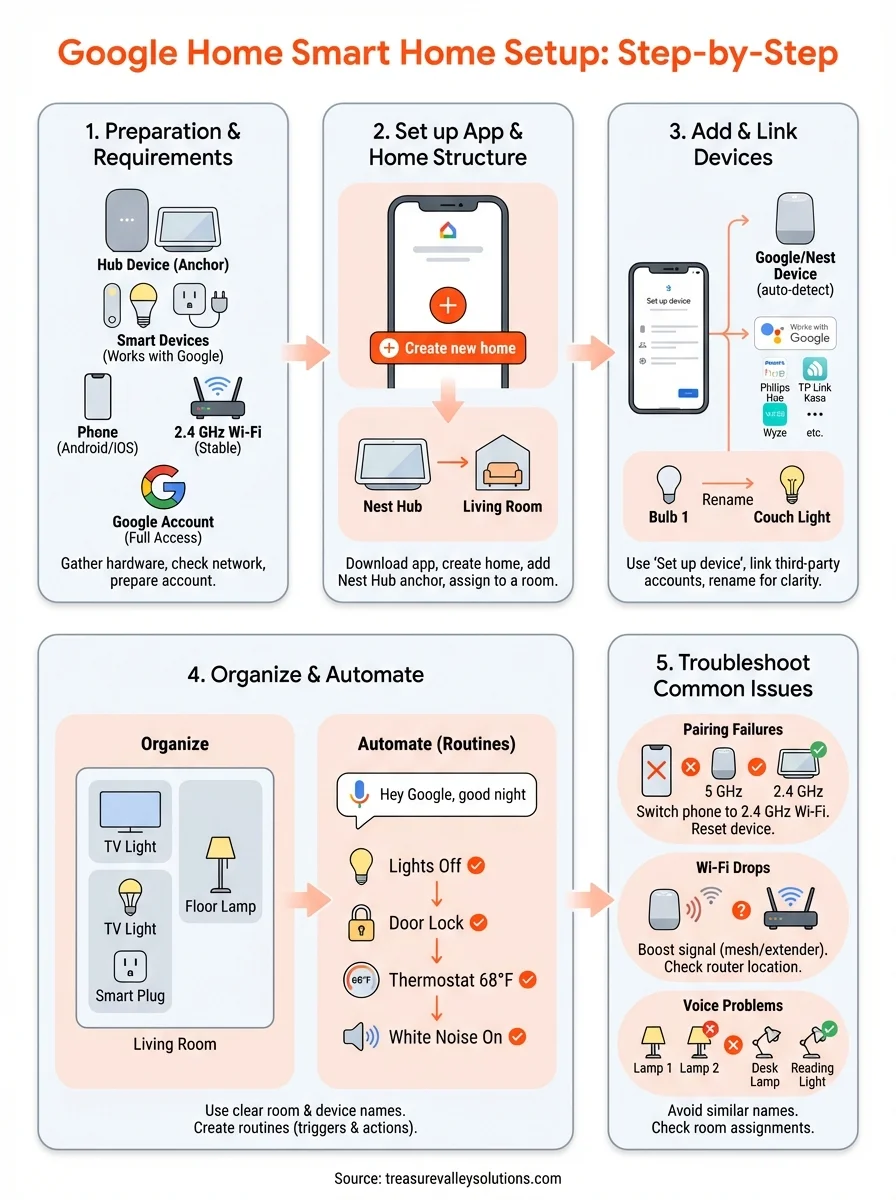
Google Home Smart Home Setup: Step-by-Step In Google Home
Setting up a smart home with Google's ecosystem is one of the most accessible ways to start automating your space. The Google Home smart home setup process lets you control lights, locks, cameras, thermostats, and more, all from a single app on your phone or through voice commands with a Nest speaker or display. It's straightforward enough for most people to get started on their own, especially with the right guide.
That said, there's a difference between connecting a few devices and building a system that actually works well together. At Treasure Valley Solutions, we design and install complete smart home systems across the Boise and Meridian area, and we work with Google Home-compatible devices regularly. We've seen firsthand how a solid foundation, proper device selection, network setup, and room organization, makes the difference between a smart home that's a joy to use and one that's constantly frustrating.
This guide walks you through the entire Google Home setup process step by step. You'll learn how to configure the app, add devices, organize rooms, set up automations, and troubleshoot common issues. Whether you're starting from scratch or adding to an existing setup, this article gives you everything you need to get your Google-powered smart home running smoothly.
What you need before you start
Before you touch the Google Home app, take a few minutes to make sure you have everything in place. Jumping straight into a google home smart home setup without the right hardware, network, and accounts ready is the fastest way to hit repeated roadblocks. Getting organized beforehand saves you time and keeps the entire process moving smoothly.
The hardware you'll need
Your first decision is which Google or Nest hub device will anchor your setup. Google Home works through a speaker or display, and the device you choose affects which features you can access. A Nest Audio or Nest Mini handles voice control well for basic setups, while a Nest Hub Max adds a touchscreen that makes it easier to monitor cameras and manage your home visually without picking up your phone.
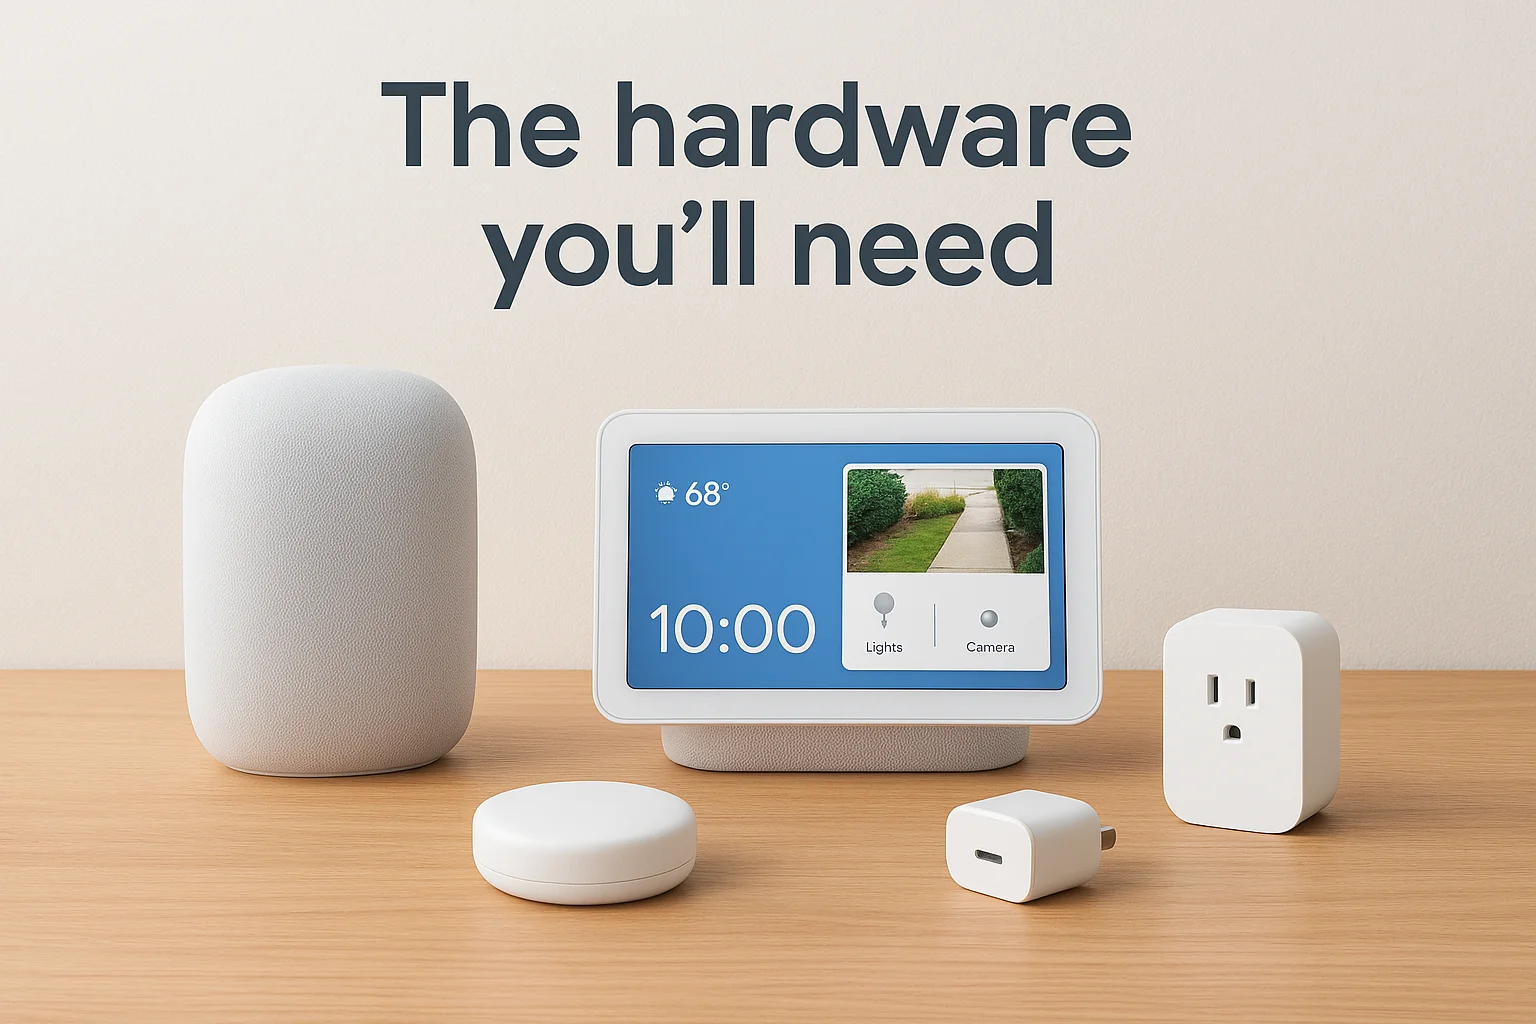
Beyond the hub, you'll need the smart devices you plan to control. Here's a solid baseline:
- A Google or Nest hub device (Nest Audio, Nest Mini, Nest Hub, or Nest Hub Max)
- At least one compatible smart device (smart bulb, plug, thermostat, lock, or camera)
- A smartphone or tablet running Android 6.0+ or iOS 16.0+
- A USB-C power adapter for your Nest device (usually included in the box)
Check that every device you buy carries the "Works with Google Home" badge on the packaging or product listing. This badge confirms the device passed Google's certification process, which significantly reduces pairing failures and compatibility headaches down the road.
Network requirements
Your Wi-Fi network is the backbone of your entire smart home. Most smart devices connect over 2.4 GHz Wi-Fi, though newer devices and Nest products also support 5 GHz. If your router broadcasts one combined network, that generally works fine, but you need a stable signal that reaches every room where you plan to place devices.
A weak or inconsistent Wi-Fi signal causes more Google Home problems than any other single factor. Fix your network first, and most pairing issues disappear on their own.
For larger homes, a mesh Wi-Fi system such as Google Nest WiFi Pro eliminates dead zones and gives every device a reliable connection. You'll also want enough internet bandwidth to handle streaming, voice commands, and camera feeds running at the same time without dropouts.
Account and app requirements
You'll need a Google account to use Google Home. If you already use Gmail, Google Drive, or another Google service, you can use that same account. Make sure it's one you have full access to and full control over, since your entire smart home infrastructure ties to it. Using a shared or work-managed account can create permission problems later.
Download the Google Home app from the Google Play Store or the Apple App Store before you start. Keep your phone's operating system fully updated, since older OS versions regularly cause app compatibility issues that look like device problems but are actually software conflicts. Once the app is installed and you're signed in with your Google account, you're ready to move into the setup process.
Step 1. Set up the Google Home app and your home
Open the Google Home app and sign in with your Google account. The first screen prompts you to create a home, which is the digital structure that organizes every device, room, and automation in your google home smart home setup. Take this step seriously because your home's structure is harder to reorganize later once you have several devices connected to it.
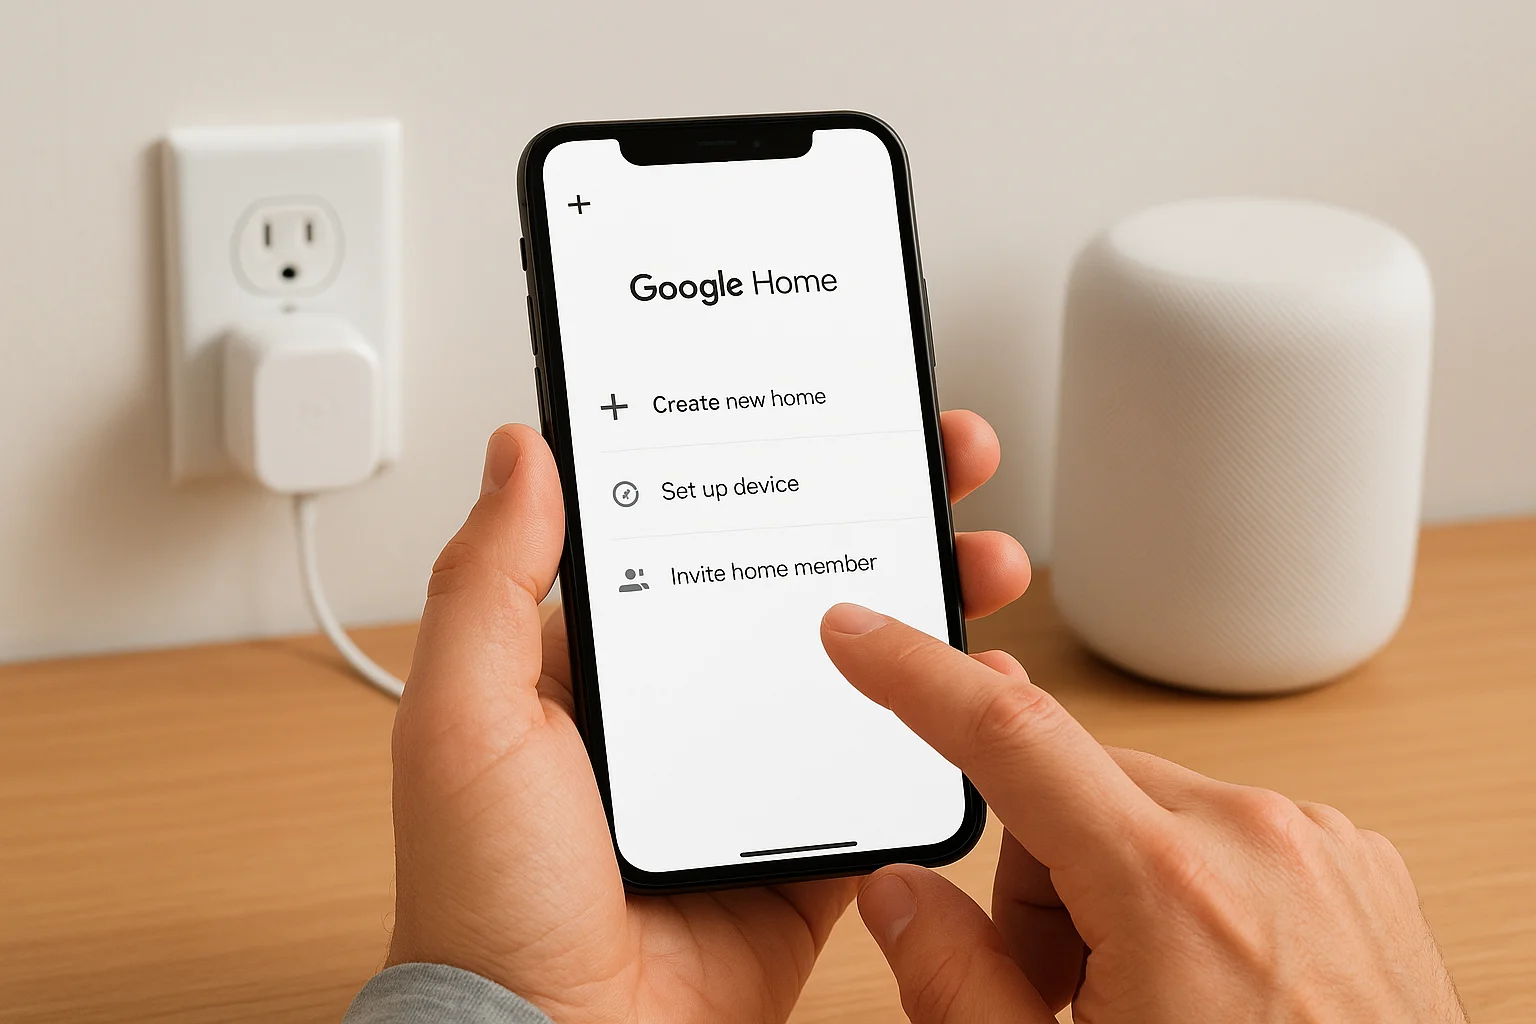
Create your home in the Google Home app
Tap the "+" icon in the top-left corner of the app, then select "Create new home." Give your home a name that makes sense, something like "Main House" or your street address. Avoid generic names like "Home" if you manage multiple properties, since the app lets you switch between homes and clear labels keep things less confusing.
Follow these steps in order to complete the initial home creation:
- Open the Google Home app and tap the "+" icon
- Select "Create new home"
- Enter a home name and your address
- Confirm your time zone and location settings
- Tap "Next" to finish and land on the main dashboard
Getting your address and time zone correct during setup matters more than most people realize, since Google Home uses this data to trigger location-based automations like turning on lights when you arrive home.
Add your first Nest device to anchor the home
Once your home structure exists, add your Nest speaker or display first before connecting any other smart devices. Plug in your Nest device and wait for it to signal it's ready (a chime or light ring confirms this). Back in the app, tap "+" then "Set up device" and follow the on-screen prompts. The app uses Bluetooth to detect your Nest device automatically in most cases, so keep your phone close to the device during this step.
Assign your Nest device to a specific room when the app asks. Select the room where the device physically sits, such as "Living Room" or "Kitchen." This room assignment isn't just organizational. It tells Google Assistant which speaker to respond from when you give a voice command from that part of your home, which prevents the wrong device from responding across the house.
Step 2. Add smart devices and link services
With your home structure and Nest device in place, you're ready to connect the rest of your smart devices. This step is where your google home smart home setup starts to take real shape. The Google Home app handles most device pairings through a consistent flow, but a few device types require extra steps to link their services correctly.
Add devices through the Google Home app
Tap the "+" icon in the top-left corner, select "Set up device," and choose whether the device is made by Google or is a compatible third-party product. For Google and Nest devices, the app finds them automatically via Bluetooth or your Wi-Fi network. For third-party devices, you'll select "Works with Google" and then pick the brand from the list.
Always put the device into pairing mode before opening the setup flow in the app, otherwise the app times out and you'll need to restart the process.
Follow these steps for each new device you add:
- Put the device into pairing mode (check the manual for the exact method per device)
- Open the Google Home app and tap "+" > "Set up device"
- Select "Works with Google" for third-party devices, or let the app auto-detect Nest hardware
- Follow the on-screen steps to connect the device to your Wi-Fi network
- Assign the device to the correct room when prompted
Link third-party services
Many smart home brands, including Philips Hue, TP-Link Kasa, and Wyze, require you to link their account to Google Home rather than connecting each device individually. Once you link the service, every device on that account imports automatically into your home structure.
To link a third-party service, tap "+" > "Set up device" > "Works with Google," search for your brand, and sign in with your existing account for that brand. After authorization, the app imports all devices tied to that account into your home. You can then move them into specific rooms and rename them to match how you actually refer to them in conversation, which makes voice commands far more natural and reliable when you're giving them from different parts of the house.
Step 3. Organize devices, rooms, and controls
How you organize your google home smart home setup directly affects how easy it is to use every day. Poorly labeled devices and mismatched room assignments turn a capable system into something you avoid. Taking 15 minutes to organize everything properly now saves you repeated frustration when you try to control devices by voice or through the app later.
Set up and name your rooms correctly
The Google Home app includes a built-in list of room types, but you can also create custom room names that match how you actually refer to spaces in your home. Tap on any device in the app, select "Settings," then "Room," and either choose from the list or create a new one. Keep room names short and clear, since you'll say them out loud when giving voice commands.
Here's a simple naming structure that works well for most homes:
| Space | Recommended Room Name | Avoid |
|---|---|---|
| Main living area | Living Room | Room 1 |
| Primary bedroom | Bedroom | Master |
| Home office | Office | Study/Den |
| Outdoor lights | Front Yard / Backyard | Outside |
| Garage access | Garage | Utility |
Consistent room naming between the Google Home app and your voice commands is the single biggest factor in whether voice control feels natural or frustrating.
Use device labels that match how you speak
Rename each device to something you'd actually say out loud. If you have three smart bulbs in the living room, don't leave them as "Bulb 1," "Bulb 2," and "Bulb 3." Instead, rename them "Couch Light," "Floor Lamp," and "TV Light" so your commands stay specific and predictable. Tap the device in the app, go to "Settings," and change the name field directly.
Group related devices using the "Add to room" feature so a single voice command can control multiple devices at once. Saying "Hey Google, turn off the living room" then shuts off every device assigned to that room simultaneously, which removes the need to control each device one at a time. Tight grouping by physical location makes the whole system feel faster and more intuitive to operate on a daily basis.
Step 4. Create routines and automations that work
Routines are where your google home smart home setup moves from simple device control to genuine automation. Instead of manually turning off lights or adjusting your thermostat every evening, a routine handles those actions automatically based on a trigger you define. The Google Home app lets you build routines tied to a schedule, a voice command, a sunrise or sunset time, or your phone's location.
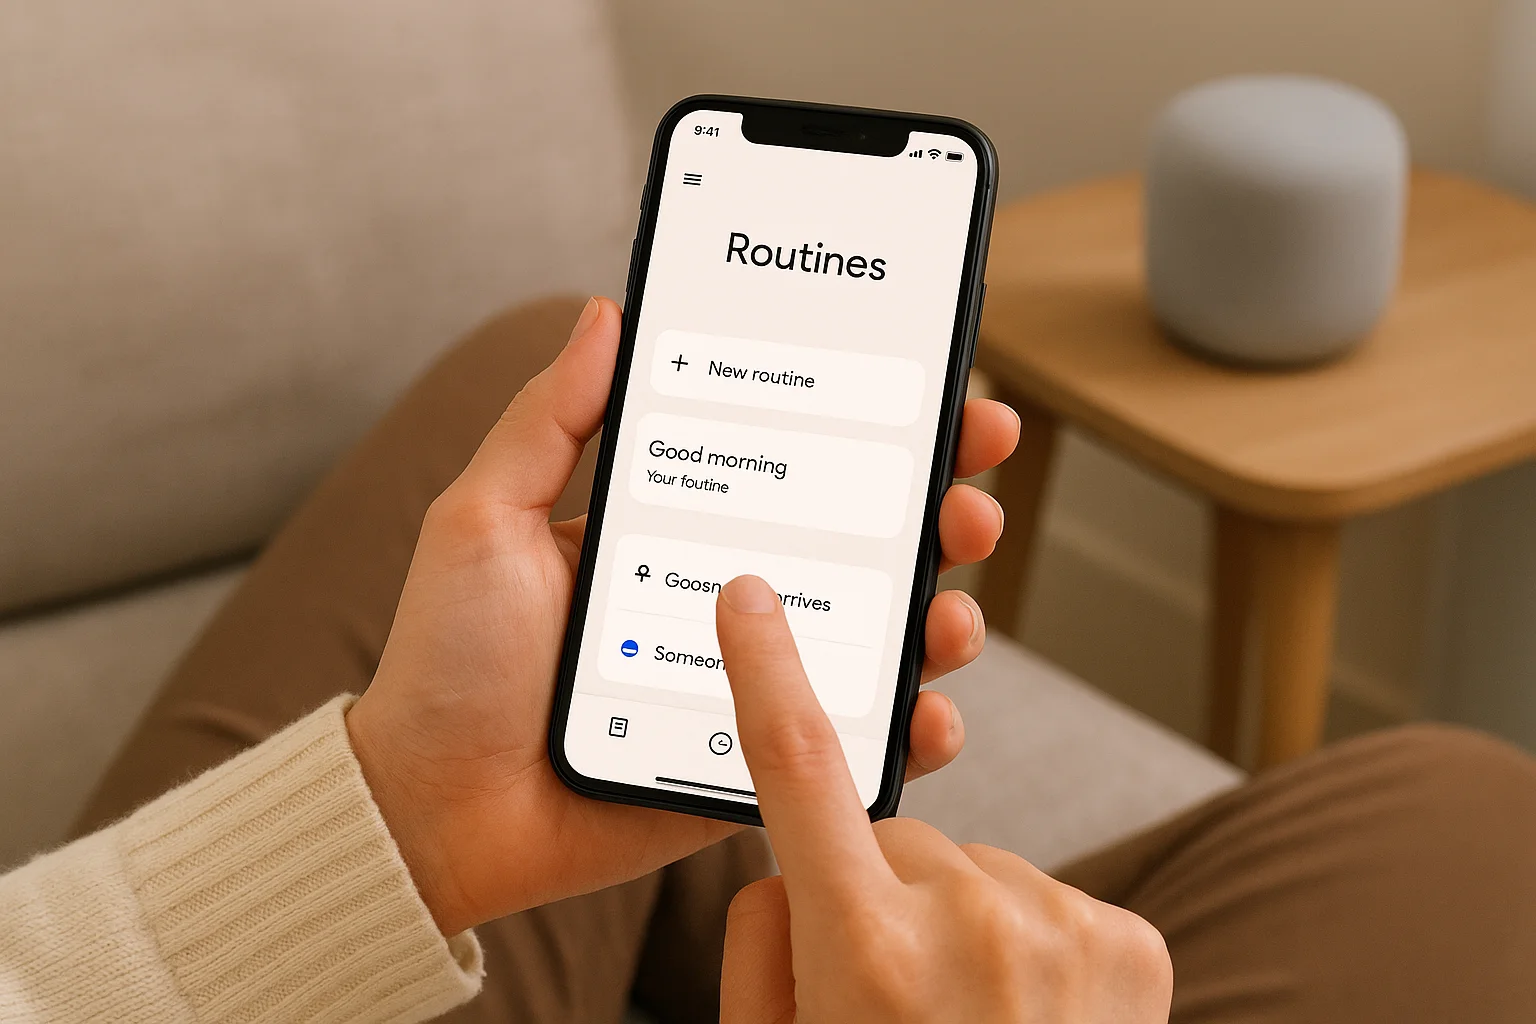
Build routines using the Google Home app
Open the Google Home app, tap the "Automations" tab at the bottom of the screen, then select "+" to create a new routine. Every routine has two parts: a starter (trigger) and actions. Choose your starter first, then stack as many actions as you need underneath it. You can mix device controls, Google Assistant announcements, and media playback within a single routine.
Here's a practical "Good Night" routine template you can build directly in the app:
Trigger: Voice command - "Hey Google, good night"
Actions:
- Turn off all lights (by room or individual device)
- Lock the front door (if you have a compatible smart lock)
- Set the Nest thermostat to 68°F
- Play white noise on the bedroom Nest speaker
- Dim the bedroom light to 10% for 5 minutes, then turn off
Build one routine at a time and test it fully before adding the next one. Stacking too many untested routines at once makes it harder to identify what broke when something does not trigger correctly.
Use time-based and location-based triggers
Time-based triggers work well for predictable daily patterns like morning alarms or evening wind-down sequences. Set these by choosing "Time of day" as your starter and entering a specific time or linking it to local sunrise and sunset, which the app calculates automatically using your home's address.
Location-based triggers fire when your phone enters or leaves a defined area around your home. Choose "Someone arrives" or "Someone leaves" as the starter to automate actions like turning on the porch light when you pull into your driveway or setting the thermostat to an energy-saving mode when everyone leaves. Make sure location permissions for the Google Home app are set to "Always allow" in your phone settings, otherwise the trigger will not fire reliably.
Step 5. Troubleshoot pairing, Wi‑Fi, and voice issues
Most problems in a google home smart home setup fall into three categories: a device that won't pair, a device that keeps dropping off the network, and voice commands that either don't trigger or control the wrong device. Each issue has a clear fix, and working through them in order saves you from restarting the whole setup process unnecessarily.
Fix pairing failures
Pairing failures happen most often because the device is not in pairing mode when the app starts scanning, or because your phone is connected to a 5 GHz Wi-Fi band while the smart device only supports 2.4 GHz. Before retrying, switch your phone's Wi-Fi to your 2.4 GHz network, factory reset the smart device, and put it back into pairing mode before opening the app.
If a device consistently fails to pair after two full resets, check whether the manufacturer has released a firmware update through their own app before attempting setup in Google Home again.
Use this checklist when a device won't pair:
- Confirm the device supports "Works with Google Home"
- Switch your phone to the 2.4 GHz network on your router
- Factory reset the device and re-enter pairing mode
- Disable your phone's VPN if one is active during setup
- Restart the Google Home app completely, then retry
Resolve Wi-Fi connectivity drops
A device that pairs successfully but keeps going offline is almost always a signal strength problem, not a device defect. Open your router's admin panel and check the signal level at the device's location. Anything below -70 dBm causes frequent dropouts. Move the device closer to your router or add a Wi-Fi extender or mesh node to cover that area.
Fix voice command recognition problems
When Google Assistant controls the wrong device or returns "I couldn't find that device," the issue is usually a naming conflict between two similarly labeled devices or a device assigned to the wrong room. Open the Google Home app, tap the problem device, go to "Settings," and confirm both the device name and room assignment match exactly what you say out loud. Rename any device with a name that sounds similar to another device in your home to eliminate the conflict entirely.
Next steps for your Google smart home
You now have everything you need to build a google home smart home setup that runs reliably from day one. Start with your core devices, get your rooms and labels clean, and add routines gradually as you learn what actually fits your daily patterns. A well-organized foundation makes every addition you make later faster and less frustrating to configure.
From here, the most common next step is expanding into areas like whole-home audio, smart security cameras, or automated lighting scenes that respond to time of day. Each of those layers adds real value without requiring you to rebuild anything you've already set up. The system grows with you when the groundwork is solid.
If you'd rather have a professional handle the design, installation, and configuration of a complete system built around your specific home and needs, explore our smart home installation work to see what a fully integrated setup looks like in practice.