The Samsung SmartThings WiFi setup combines a mesh WiFi router with a SmartThings hub in a single device, giving you whole-home WiFi coverage and smart home control without extra hardware cluttering y...
Samsung SmartThings WiFi Setup: Mesh Router + Hub Steps
The Samsung SmartThings WiFi setup combines a mesh WiFi router with a SmartThings hub in a single device, giving you whole-home WiFi coverage and smart home control without extra hardware cluttering your shelves. It's a solid foundation for anyone looking to automate lighting, locks, sensors, and more, all managed through one app.
But getting it configured correctly matters. A rushed setup can lead to dropped connections, devices that won't pair, or a mesh network that doesn't actually reach the rooms you need it to. We've seen it plenty of times working with homeowners across the Treasure Valley, a good system underperforms because the initial setup missed a few key steps. At Treasure Valley Solutions, we design and install smart home systems every day, and SmartThings is one of the platforms our clients frequently ask about.
This guide walks you through the full process, from unboxing to connecting your first smart device. Whether you're setting up a single hub or expanding with multiple mesh points, you'll have clear steps to get your SmartThings WiFi network running right the first time.
What you need before you start
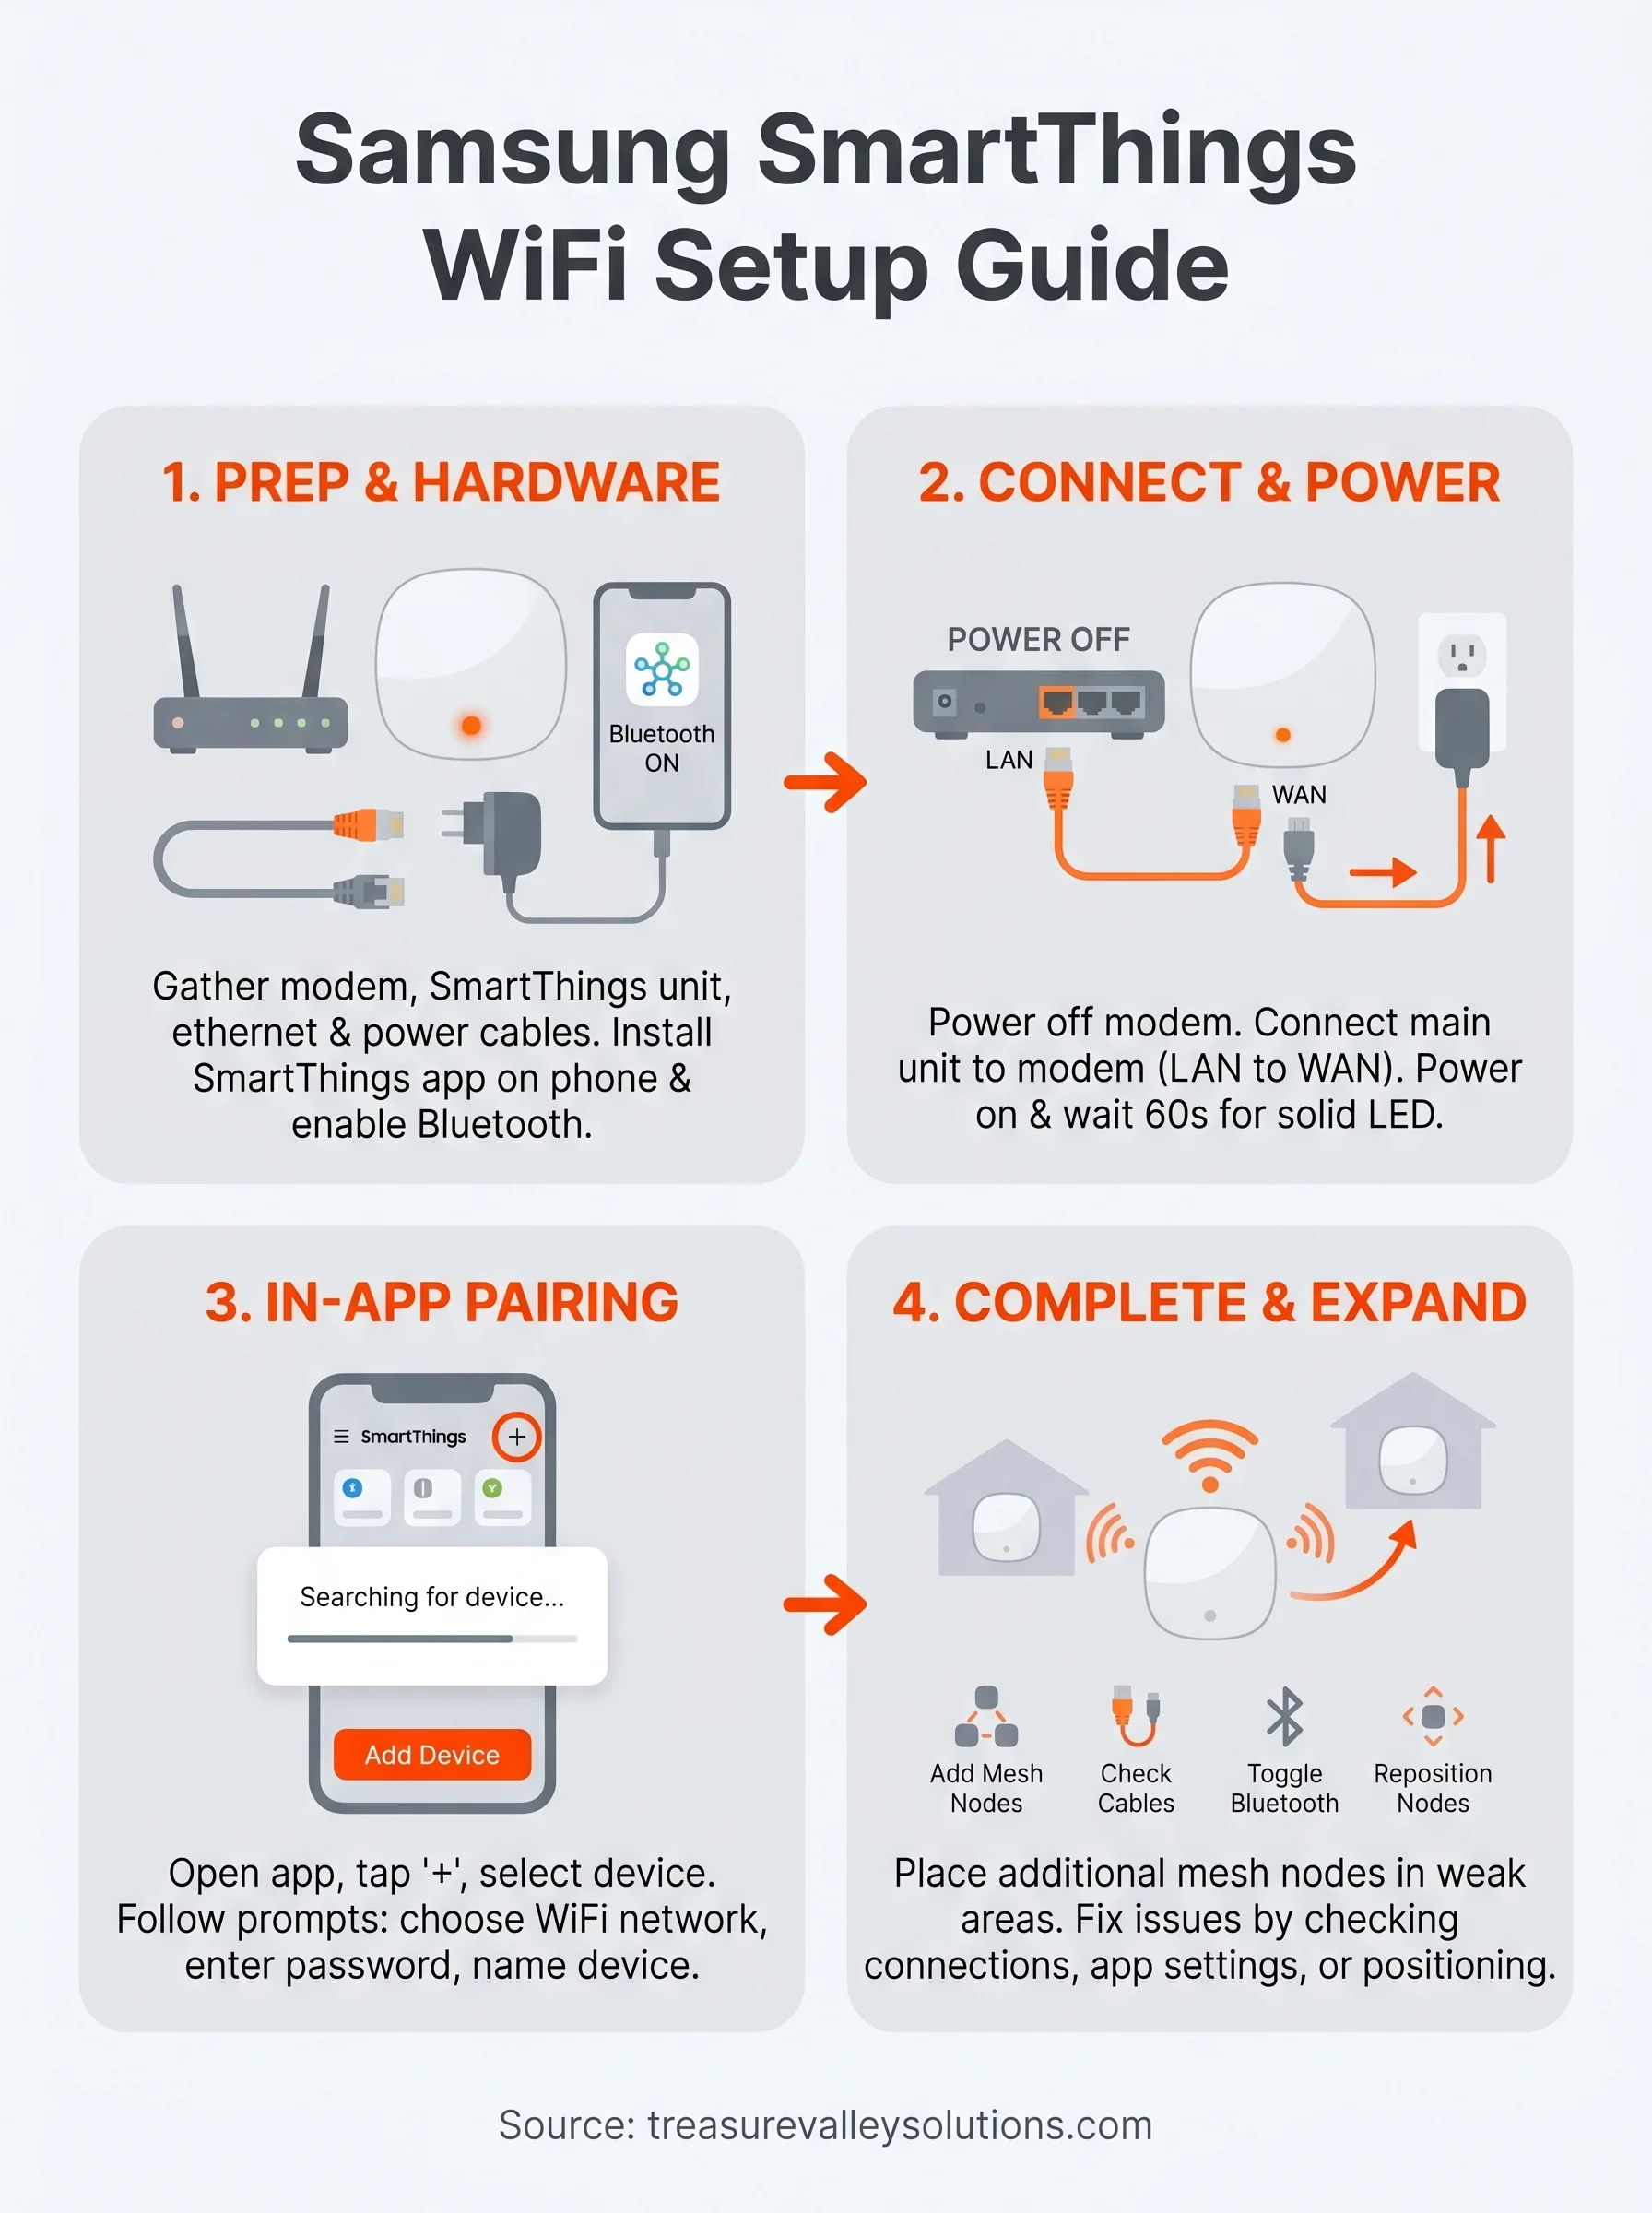
Before you start the samsung smartthings wifi setup, gathering everything in advance saves you from stopping halfway through to track down a missing cable or login credential. The setup process moves quickly once you begin, so a few minutes of preparation upfront makes a real difference.
Hardware you'll need
The physical components depend on which SmartThings product you have, but the core items stay consistent across models. Your modem needs to be active and working before you connect anything, and an ethernet cable must be available to link the SmartThings main unit directly to the modem during initial setup.
Here's what to have on hand:
- Samsung SmartThings WiFi unit (main node) and any additional mesh nodes
- Active modem from your internet service provider
- Ethernet cable (often included in the box)
- Power adapter for each unit
- A smartphone or tablet running iOS 16 or Android 8.0 or later
Do not place your main node behind a second router during setup. Connecting it directly to the modem prevents double NAT issues that cause persistent connectivity problems later.
App and account requirements
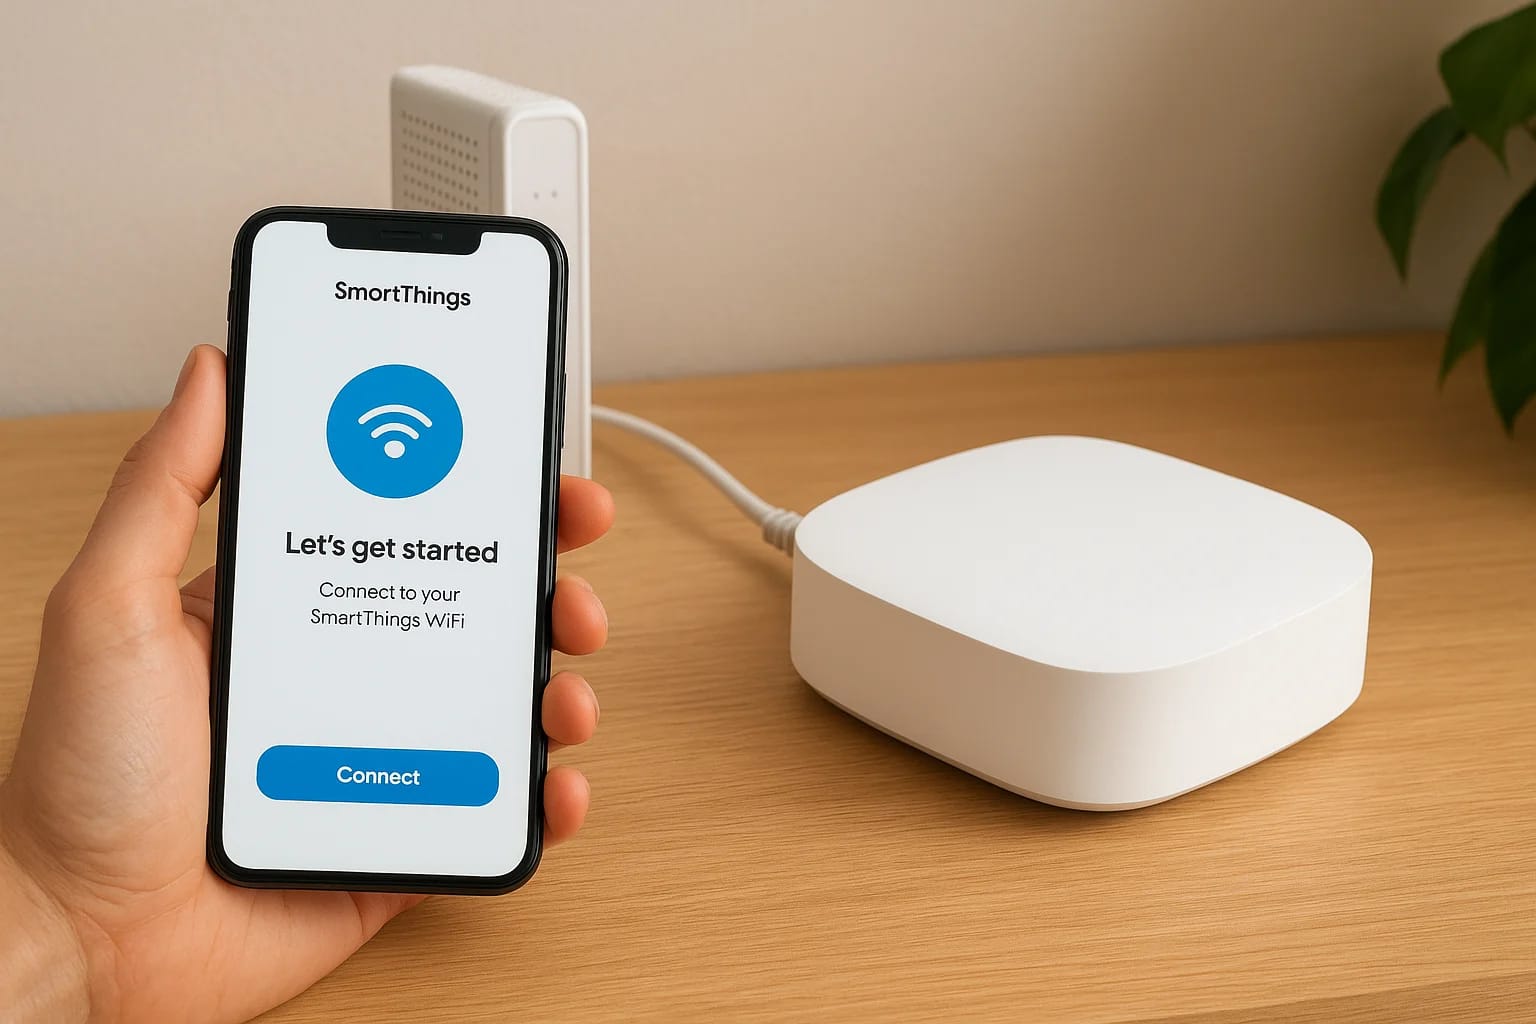
The SmartThings app is required to complete setup, and you'll need a Samsung account to log in. If you don't have one yet, create it at Samsung's account portal before you start. Having your credentials ready on your phone before unboxing saves time during the pairing steps.
Your phone also needs to stay connected to an existing WiFi network throughout the process. The app uses your phone's connection to locate the new device and guide you through pairing. Make sure Bluetooth is also enabled on your phone, since some SmartThings models rely on Bluetooth for the initial device discovery step before switching over to WiFi.
Step 1. Identify your SmartThings model and setup goal
Knowing exactly which device you have changes the steps you follow. Samsung has released several SmartThings products over the years, and mixing up the setup process for different models is one of the most common reasons people get stuck during the samsung smartthings wifi setup.
Which SmartThings device do you have?
Check the bottom or back label of your unit before opening the app. The model name appears clearly on a sticker alongside the serial number. Two main product types exist: the SmartThings WiFi (which combines a mesh router with a built-in hub) and the standalone SmartThings Hub (which connects to your existing router and handles only smart device control, not WiFi).
| Device | Built-in WiFi Router | SmartThings Hub | Needs Existing Router |
|---|---|---|---|
| SmartThings WiFi | Yes | Yes | No |
| SmartThings Hub (v2/v3) | No | Yes | Yes |
Match your model to your setup goal
Your setup goal determines how you proceed through the app. If you want whole-home mesh WiFi plus smart device control, the SmartThings WiFi is your device. If you already have a router you're happy with and only need to add smart home control, the standalone hub connects to it via ethernet.
Confirm your model before launching the app so you select the correct device type during pairing, skipping this check causes setup failures that are frustrating to undo.
Step 2. Connect the main unit to your modem and power
Physical placement and cabling make or break your samsung smartthings wifi setup before the app even opens. Getting the hardware connected correctly the first time prevents most of the network issues that show up during pairing.
Position the main node
Place your main SmartThings unit within a few feet of your modem to keep the ethernet cable tidy and the signal path clean. Avoid putting it inside a cabinet or behind large appliances, since both restrict the WiFi signal from spreading evenly through your space. Your goal is an open, central location that also stays close to the modem.
If you're adding mesh nodes later, position them where WiFi coverage is weakest, typically at the far end of a hallway or the floor above your main unit.
Make the physical connections
Follow these steps in order before touching the app:
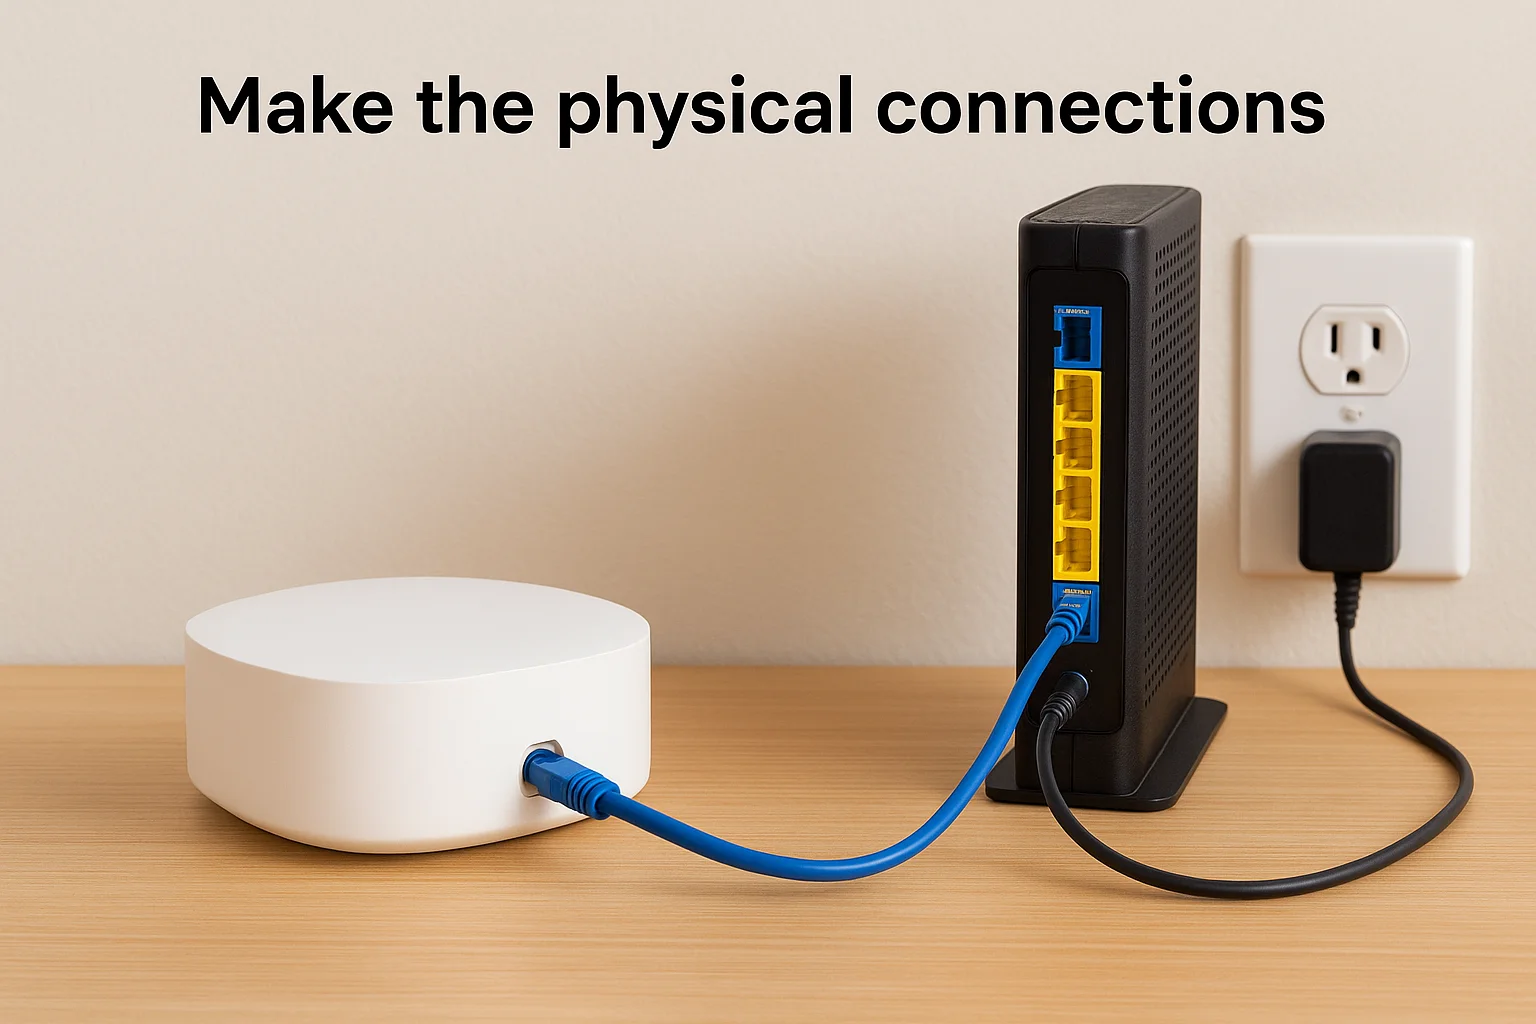
- Power off your modem by unplugging it from the wall outlet.
- Run an ethernet cable from your modem's LAN port into the WAN port on the SmartThings main unit (usually labeled or colored differently from LAN ports).
- Plug the power adapter into the SmartThings unit and connect it to a wall outlet.
- Power your modem back on and wait 60 seconds for it to fully restart before proceeding.
Your SmartThings unit's LED will cycle through colors as it boots. A solid white or blue light typically confirms it's ready for the app pairing step.
Step 3. Add the hub or WiFi system in the SmartThings app
With your hardware connected and powered on, the SmartThings app takes over for the rest of the samsung smartthings wifi setup. Open the app on your phone and confirm you're logged into your Samsung account before proceeding.
Walk through the in-app pairing steps
Tap the "+" icon in the top right corner of the app home screen, then select "Device." The app will prompt you to choose a device category. Select "Samsung" and then pick your specific SmartThings model from the list that appears. Make sure Bluetooth is active on your phone during this step, since the app uses it to detect the unit nearby.
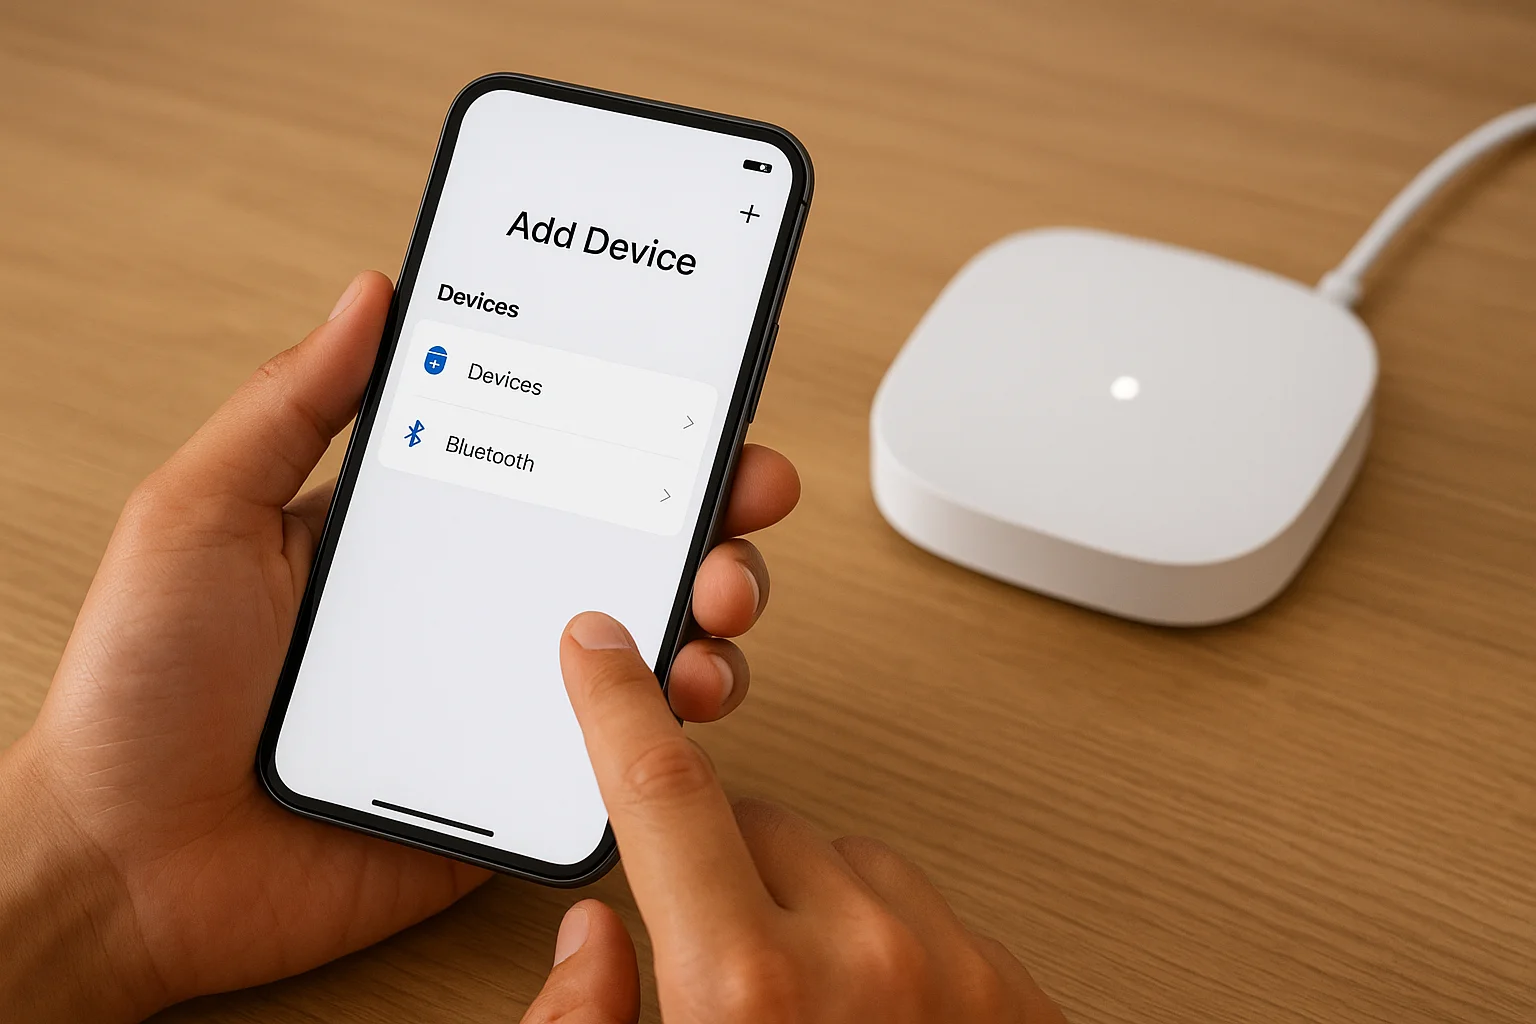
If the app doesn't find your device automatically, tap "Scan nearby" or enter the device's registration code printed on the bottom label.
Follow the on-screen prompts to:
- Select your existing WiFi network from the list displayed
- Enter your WiFi password when prompted
- Wait for the app to push the network credentials to your SmartThings unit
- Confirm the LED on your device turns solid to indicate a successful connection
- Name your hub or network when prompted so you can identify it easily later
Step 4. Finish mesh setup and fix common issues
Once your main unit is paired, you can extend your samsung smartthings wifi setup with additional mesh nodes and resolve any issues before adding smart devices to your network.
Add additional mesh nodes
Plug each additional node into a wall outlet in the room where you need better coverage. Open the SmartThings app, tap "+", select your SmartThings WiFi system, and choose "Add node." The app walks you through pairing each unit to your existing network automatically. Place nodes between 20 and 40 feet from the main unit to keep a strong backhaul connection between them.
Position each node where it can connect to at least one other unit in the mesh to keep your network stable throughout the home.
Fix common setup problems
Most setup failures trace back to a short list of causes that are simple to correct. Check these before restarting the entire process:
- No internet after pairing: Confirm the ethernet cable runs from the modem's LAN port to the SmartThings WAN port, not LAN to LAN.
- App cannot find the device: Toggle Bluetooth off and back on, then tap "Scan nearby" again.
- LED stays red: Hold the reset button for 10 seconds to factory reset, then restart from Step 2.
- Slow speeds on mesh nodes: Move the node closer to the main unit and away from microwaves or cordless phones.
Wrap-up and when to call a pro
Following these steps gets your samsung smartthings wifi setup running from hardware connections through mesh expansion and basic troubleshooting. The process breaks down into four clear actions: confirm your model, wire your modem correctly, pair through the app, and extend with nodes where coverage drops. Most setups complete in under 30 minutes when you have everything ready before you start.
Some situations genuinely benefit from professional help. If your home has thick walls, multiple floors, or a layout that kills WiFi coverage no matter where you place nodes, a professional assessment saves you from buying equipment that won't solve the problem. The same applies if you want your SmartThings system integrated with lighting, locks, and security cameras in a way that actually works together reliably. If you're in the Treasure Valley and want a setup done right the first time, contact Treasure Valley Solutions to talk through your project.