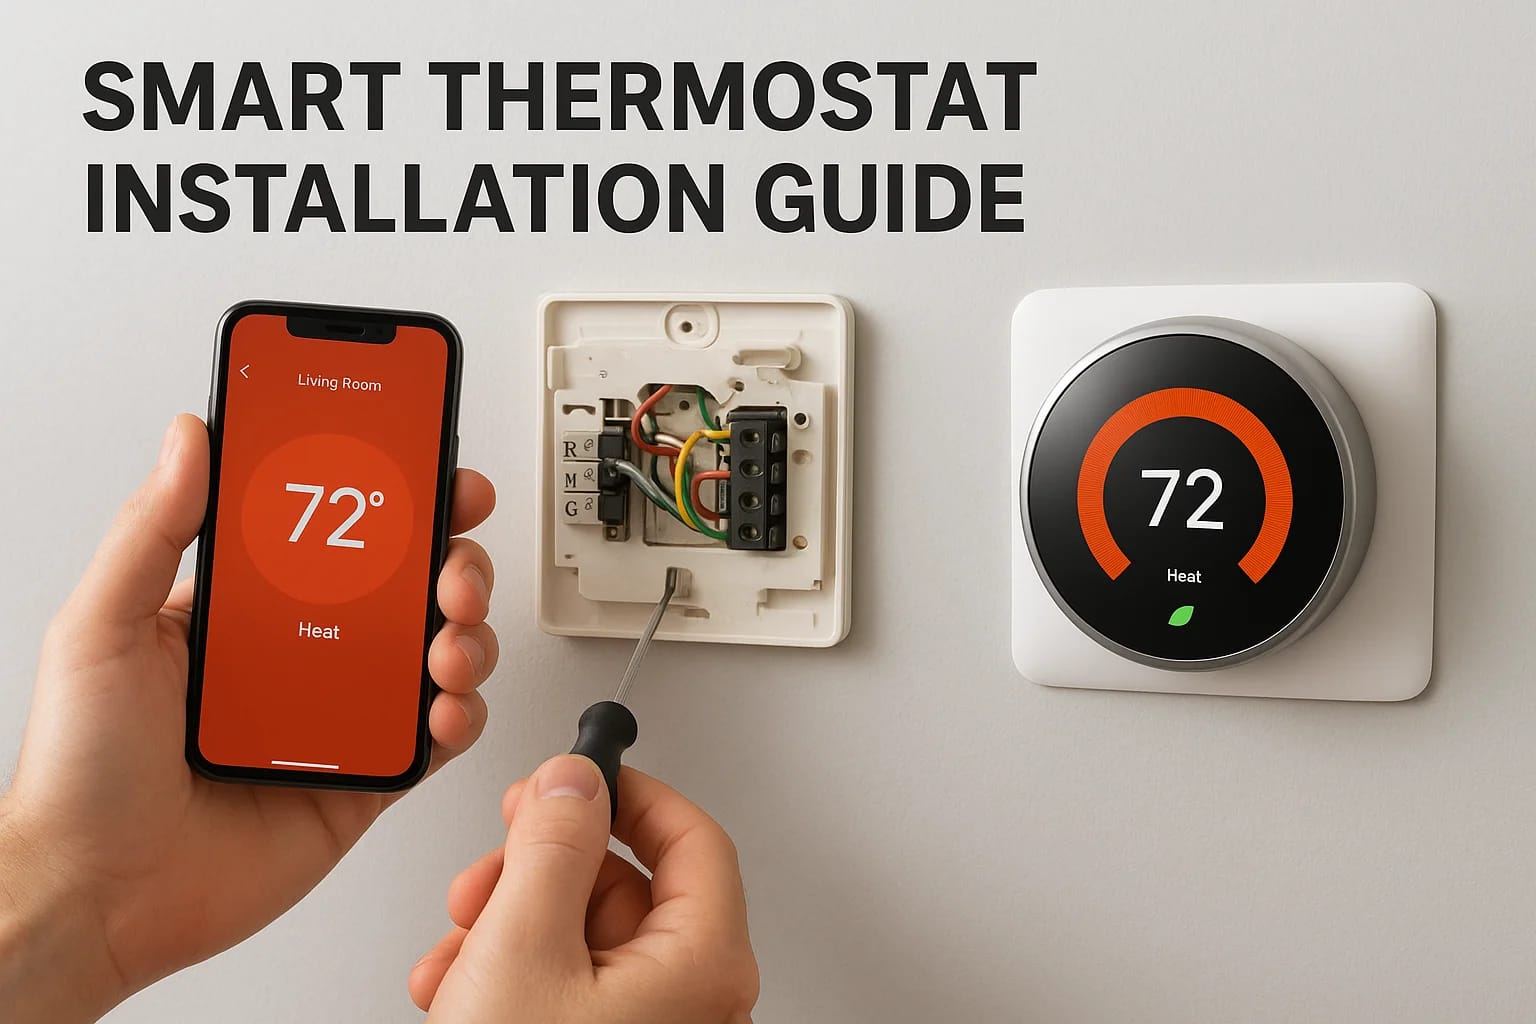
You bought a smart thermostat to save money on energy bills and control your home's temperature from anywhere. Now you need to install it. The process looks intimidating when you open the box and see...
Smart Thermostat Installation Guide: Wiring, C-Wire, Costs
You bought a smart thermostat to save money on energy bills and control your home's temperature from anywhere. Now you need to install it. The process looks intimidating when you open the box and see wires and terminals. You wonder if you need an electrician or if smart thermostat installation is something you can handle yourself. Most homeowners face this exact moment of uncertainty.
The good news is that installing a smart thermostat takes about 30 minutes for a straightforward replacement. You need basic tools and careful attention to wiring. The tricky part is understanding your current system and whether you need a C-wire for continuous power. Some homes have everything ready to go. Others need minor adjustments or professional help.
This guide walks you through each step of the installation process. You'll learn how to check compatibility, remove your old thermostat safely, and connect the new one correctly. We'll cover C-wire solutions and explain when to call a professional. You'll also see typical costs for both DIY and professional installation so you can make the right choice for your situation.
What you need before you start
You need basic tools and proper preparation before you begin your smart thermostat installation. Most installations require items you already own. The specific requirements depend on your current system and the smart thermostat model you purchased. Having everything ready prevents mid-installation trips to the store.
Tools and materials
Gather these items before you start:
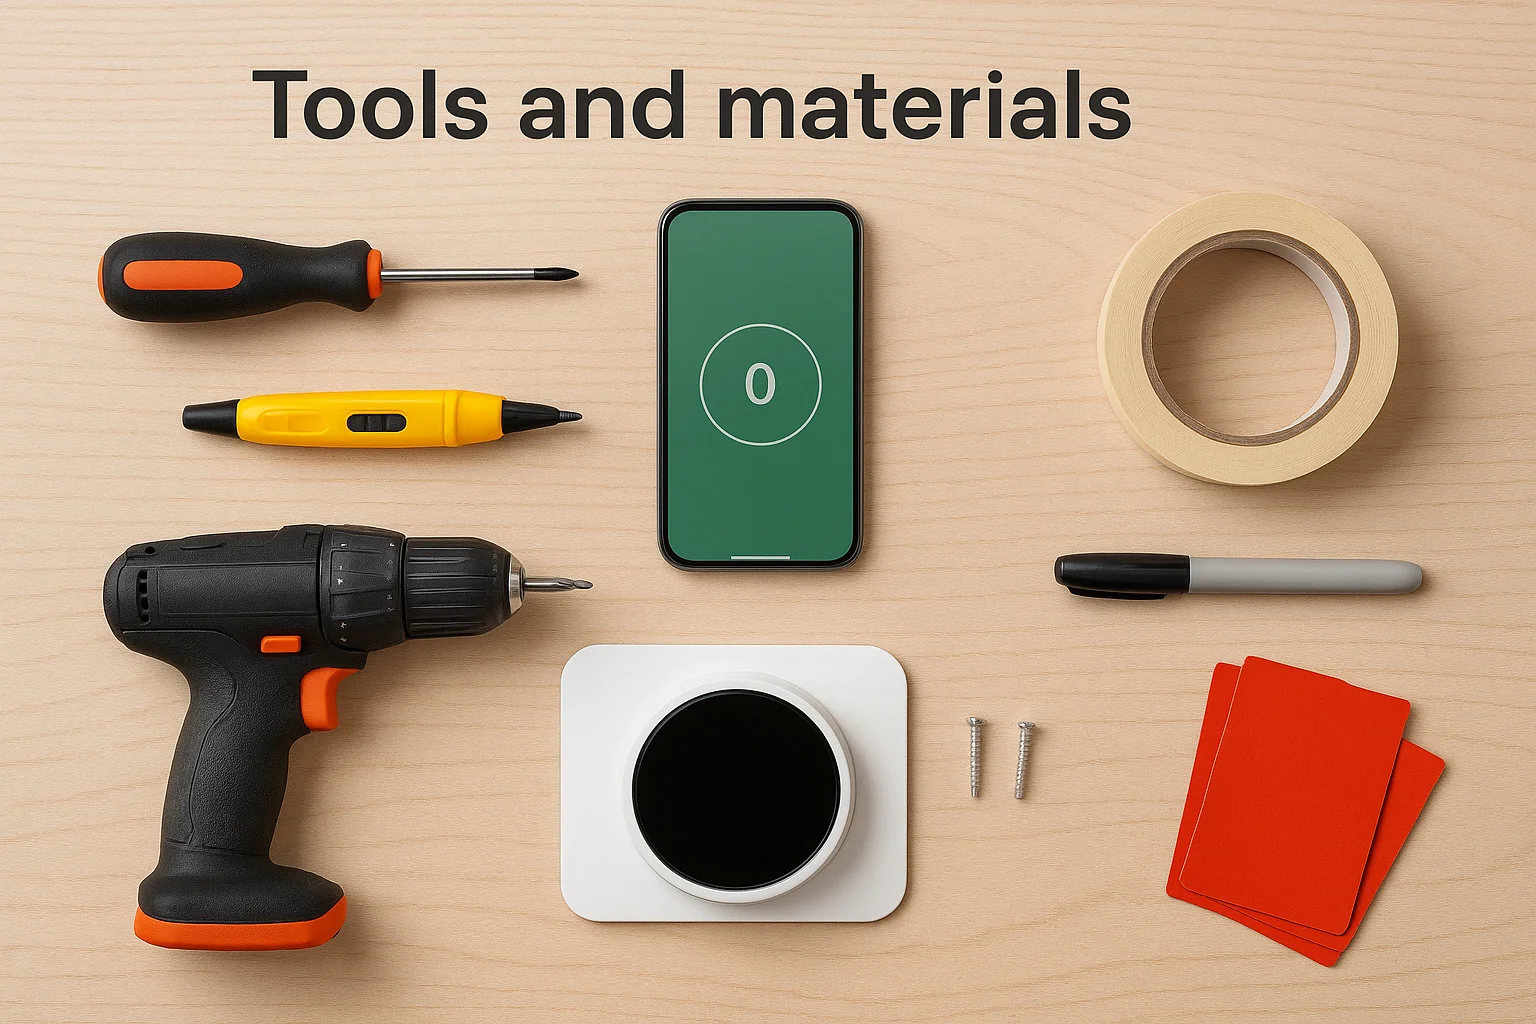
- Small screwdriver (Phillips head)
- Smartphone with camera
- Voltage tester (optional but recommended for safety)
- Level tool or smartphone level app
- Drill with small bit (if mounting holes don't align)
- Wire labels or masking tape for marking wires
- Your new smart thermostat with included mounting hardware
- Pen or pencil for marking drill holes
Your thermostat package typically includes the mounting plate, screws, wire labels, and installation guide. Some models include a C-wire adapter if your system lacks one. Read through the installation manual completely before starting work.
Check your thermostat's manual before starting to identify any model-specific requirements.
Turn off power at your breaker panel before touching any wires. This protects you and prevents damage to your HVAC system during installation.
Step 1. Confirm compatibility and plan wiring
Your smart thermostat installation starts with confirming your HVAC system works with your new device. Most thermostats have online compatibility checkers on their manufacturer websites where you enter your current wiring setup. Take this step seriously because incompatible systems lead to failed installations or damaged equipment. You can also check compatibility using your old thermostat's wiring configuration.
Check system compatibility
Remove your old thermostat's faceplate to see the wiring underneath. Count how many wires connect to terminals and note their colors. Most smart thermostats work with standard systems that have R, W, Y, and G wires (for heating, cooling, and fan control). Systems with heat pumps or multi-stage equipment may have additional wires like O, B, or AUX.
Look for a C-wire (common wire) at your current thermostat. This wire provides continuous power to smart thermostats. You'll typically see it connected to a terminal labeled C or Common. If you don't have a C-wire visible, check your furnace's control board to see if an unused wire exists in the cable bundle.
Take clear photos of your wiring before disconnecting anything to reference during installation.
Document your current wiring
Use your smartphone to photograph the wiring configuration from multiple angles. Capture close-up shots showing which colored wire connects to each terminal letter. Take a wider shot showing the entire thermostat and surrounding wall area. These photos become your reference guide throughout the installation process.
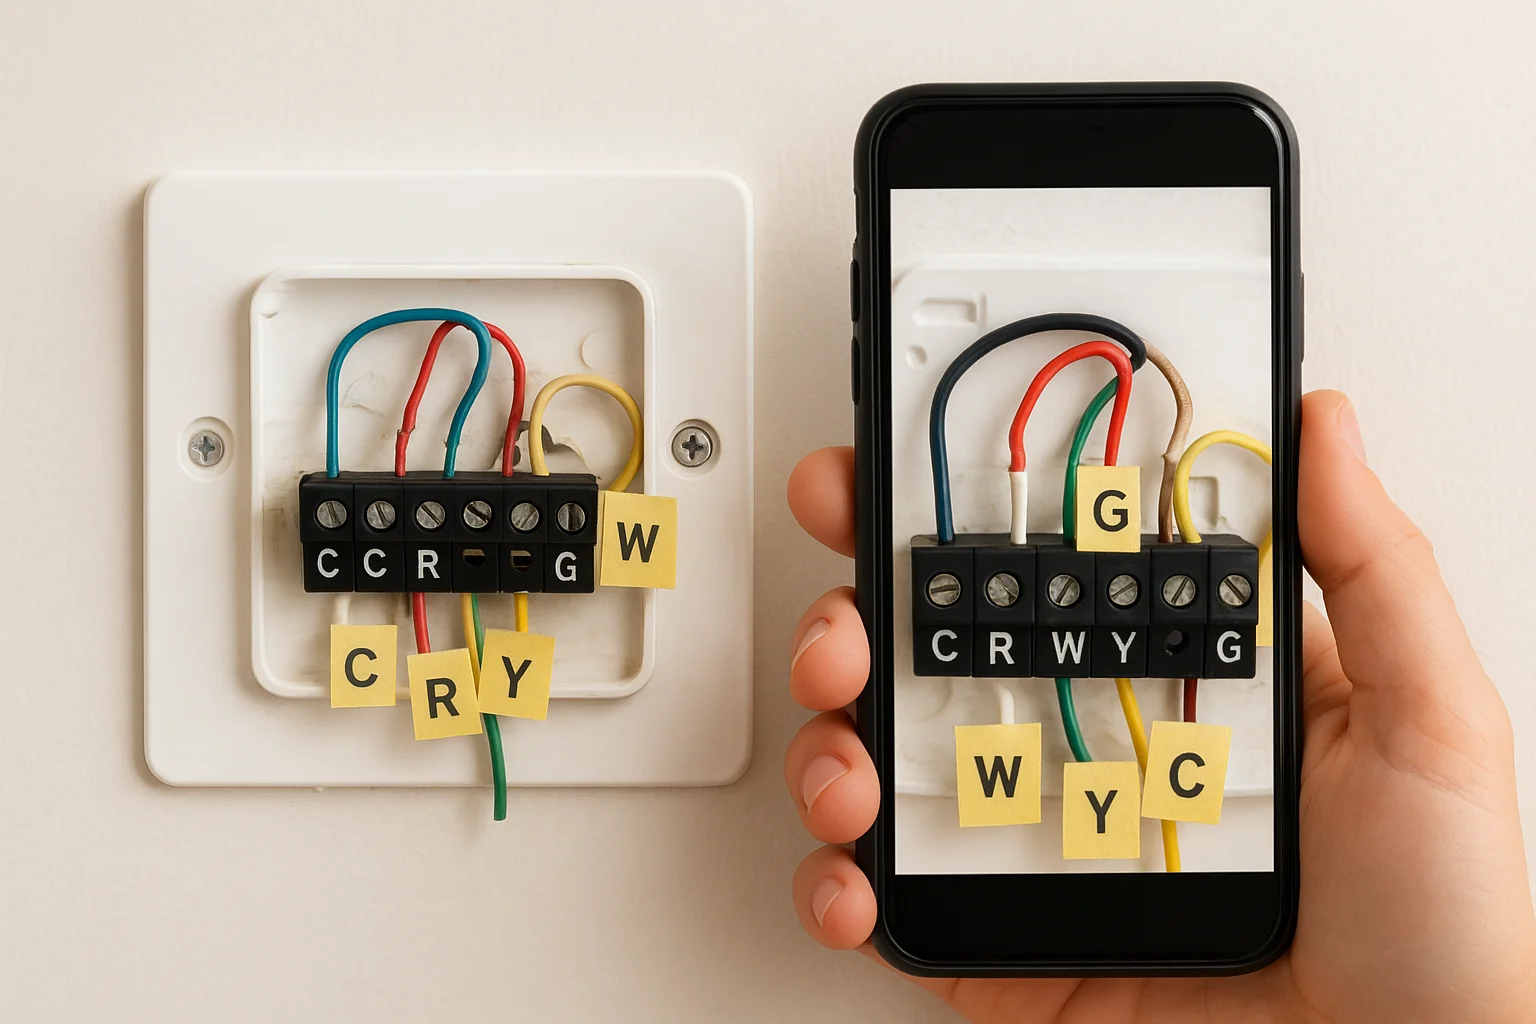
Label each wire with masking tape or wire labels from your thermostat kit before disconnecting them. Write the terminal letter (R, W, Y, G, C) on each label. This simple step prevents confusion and misconnection when you install the new thermostat. If your system lacks a C-wire, note whether your new thermostat includes an adapter or if you need to purchase one separately.
Step 2. Remove the old thermostat safely
The power shutoff step is critical for your safety during smart thermostat installation. Your HVAC system runs on low voltage, but you still risk damaging equipment or getting a minor shock if power remains on. Taking the time to shut off the correct breaker protects both you and your system from potential problems during the swap.
Turn off power at the breaker
Locate your electrical panel and identify the breaker labeled for your furnace or HVAC system. Flip this breaker to the off position. Some homes have multiple breakers for heating and cooling equipment, so turn off all HVAC-related breakers to be safe. Test your old thermostat by trying to adjust the temperature. If the screen goes blank or the system doesn't respond, you've successfully cut power.
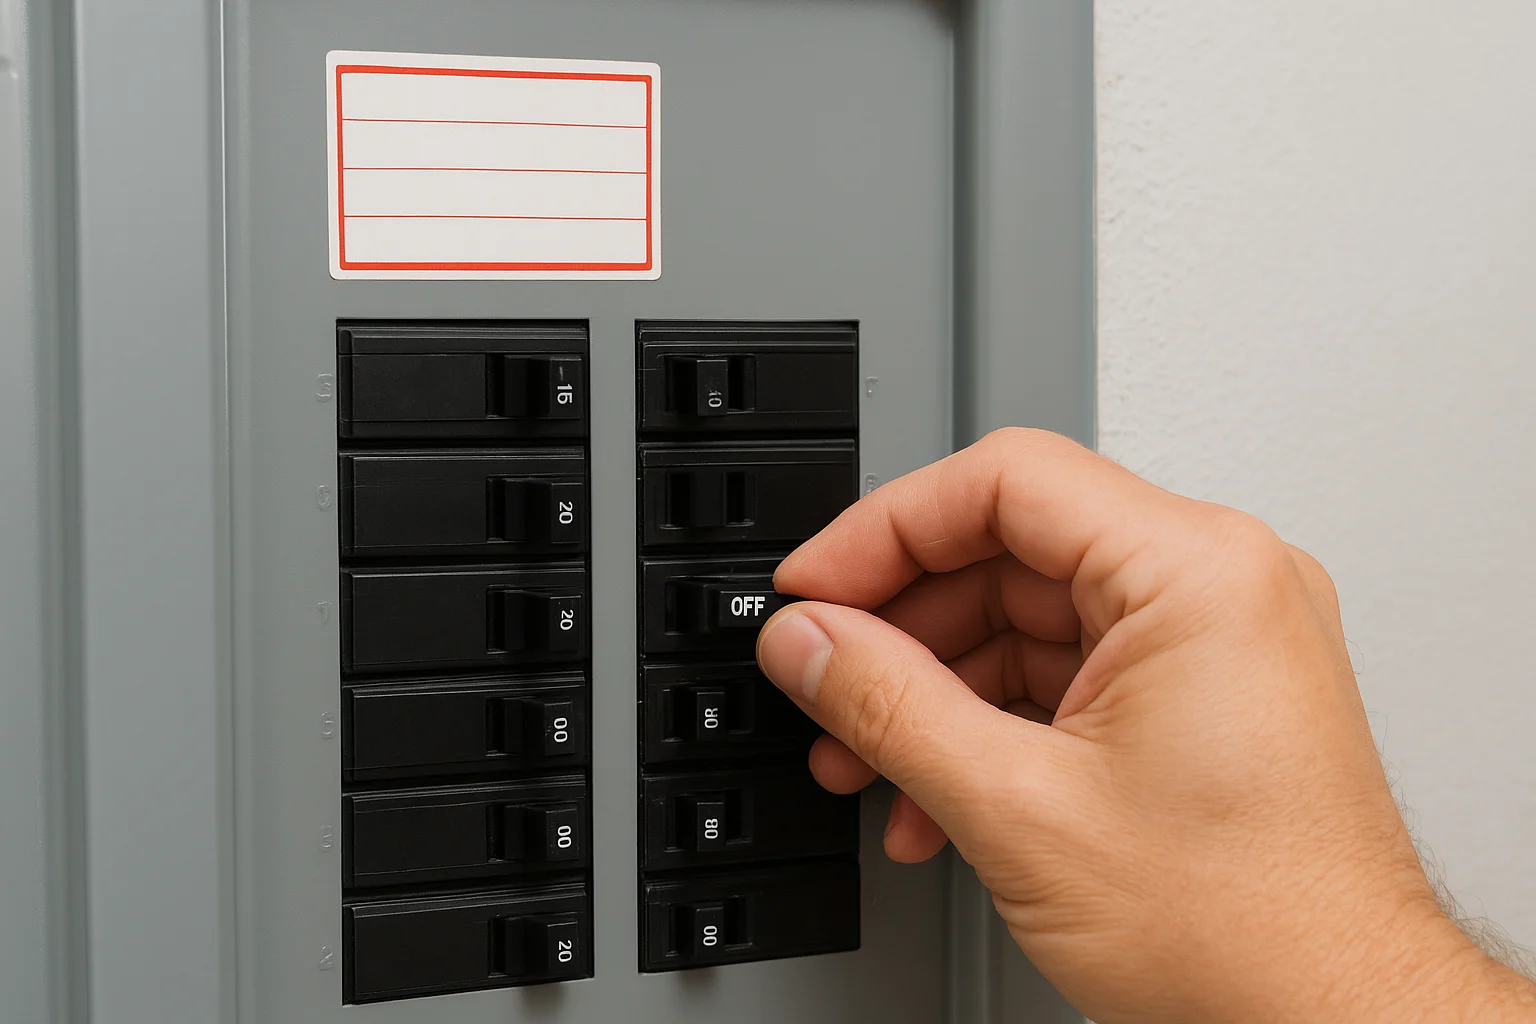
Always verify power is off before touching any wiring to prevent equipment damage or injury.
Remove components and protect wires
Pull the faceplate straight off your old thermostat. Most snap off easily, though some models have small screws underneath. Unscrew the wire terminals on the baseplate to release each wire. Wrap a pencil or small rod through the wire loops before pulling them free. This prevents wires from falling back into the wall where you can't reach them. Remove the baseplate screws and lift it off the wall.
Step 3. Install, wire, and power the new thermostat
Your new thermostat's baseplate serves as the mounting point and wiring interface for the device. This step requires precision to ensure proper alignment and secure connections. The entire smart thermostat installation depends on correctly matching each wire to its corresponding terminal on the new baseplate. Take your time and reference the photos you captured earlier.
Mount the new baseplate
Thread your thermostat wires through the center opening of the new baseplate before positioning it on the wall. Hold the baseplate against the wall where your old thermostat was mounted. Use a level to confirm the plate sits perfectly horizontal. Mark the screw hole locations with your pencil. If the new baseplate holes don't align with existing anchors, drill new pilot holes at your marks. Secure the baseplate firmly with the included screws but avoid overtightening, which can crack the plastic.
Connect wires to terminals
Match each colored wire to its labeled terminal on the baseplate using your reference photos. Most smart thermostats use straightforward terminal labels that correspond to your old system:
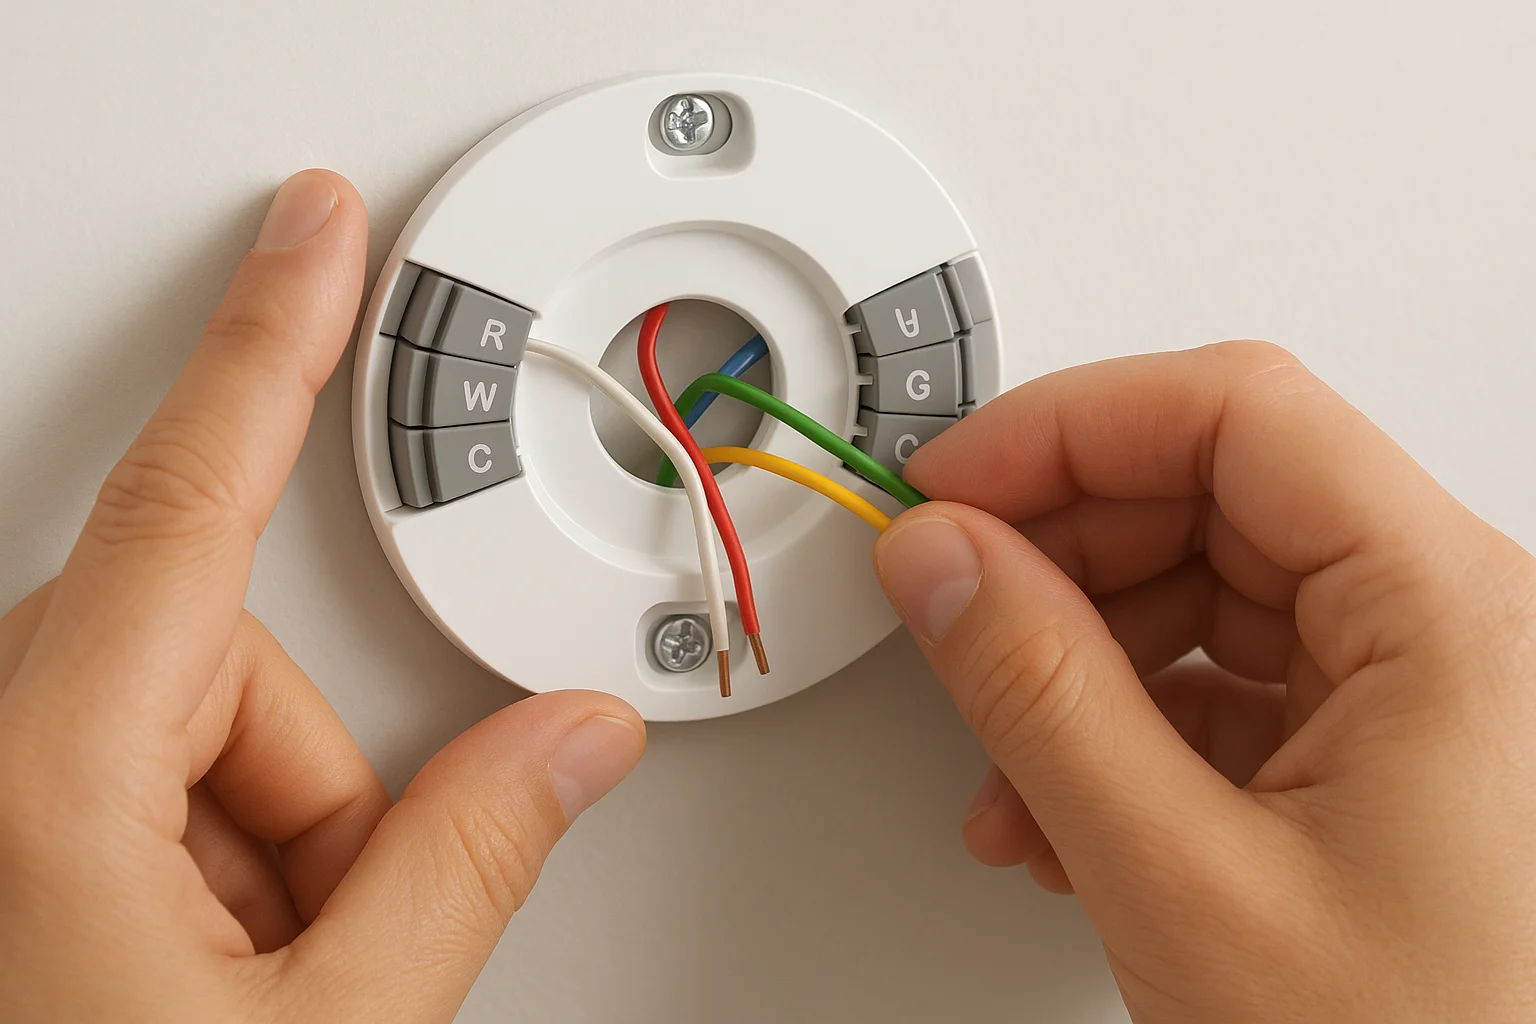
| Wire Color | Terminal | Function |
|---|---|---|
| Red | R or Rh | Power (24V heating) |
| White | W | Heating |
| Yellow | Y | Cooling/AC |
| Green | G | Fan |
| Blue | C | Common (power) |
Press each wire firmly into its terminal until you hear a click or feel resistance. Many modern thermostats use push-in connectors instead of screws. Gently tug each wire after insertion to verify it's secure. If your system has additional wires (O, B, AUX), consult your thermostat's wiring diagram for proper placement.
Always verify each wire connection twice before attaching the faceplate to avoid having to disassemble everything.
Resolve C-wire issues
Your thermostat needs a C-wire for constant power to operate WiFi and the display. If you lack a C-wire at the thermostat but have an extra wire in the bundle, connect it to the C terminal at both the thermostat and furnace control board. Use a C-wire adapter if no spare wire exists. Install the adapter at your furnace following the manufacturer's instructions, which typically involves connecting two wires to your furnace board and running new wires to the thermostat.
Test the installation
Snap the thermostat faceplate onto the mounted baseplate. Return to your breaker panel and restore power to your HVAC system. The thermostat screen should illuminate within seconds. Follow the on-screen setup prompts to connect to WiFi and configure your system type. Test both heating and cooling modes by adjusting the temperature settings and listening for your system to activate.
Smart thermostat costs and pro installation options
Your smart thermostat installation comes with costs that vary based on whether you handle it yourself or hire a professional. Understanding these expenses helps you budget appropriately and decide which route makes sense for your situation. The equipment itself represents just one part of your total investment.
DIY vs professional installation costs
DIY installation costs only the price of your thermostat, which ranges from $70 to $250 for most models. You avoid labor charges completely by following the steps in this guide. Professional installation adds $100 to $300 in labor costs depending on your location and the complexity of your system. Here's what you can expect:
| Installation Type | Cost Range | Time Required |
|---|---|---|
| DIY basic swap | $0 (thermostat only) | 30-45 minutes |
| DIY with C-wire adapter | $0-$25 (adapter) | 45-60 minutes |
| Professional installation | $100-$300 | 1-2 hours |
When to hire a professional
Call a licensed HVAC technician if your system lacks a C-wire and running new wire through walls seems beyond your skill level. Complex systems with multi-stage heating, heat pumps, or zoned controls benefit from professional expertise. Hire help if you feel uncomfortable working with electrical systems or if your initial installation attempts fail to power the thermostat correctly.
Professional installation guarantees proper setup and protects your HVAC equipment from wiring mistakes.
Technicians also verify your system operates efficiently after installation and can identify underlying issues you might miss.

Next steps for your thermostat
Your smart thermostat installation is complete, but optimization takes time. Spend the next few days adjusting temperature schedules to match your daily routine. Most thermostats learn your preferences automatically after a week of use. Check your energy app monthly to track savings and identify patterns where you can reduce heating or cooling costs further. Update your thermostat's firmware when prompted to access new features and security patches.
Complex installations or systems that won't power on correctly require professional expertise. If your thermostat displays error codes or your HVAC system cycles incorrectly, you need a trained technician to diagnose the issue. Treasure Valley Solutions specializes in smart home technology integration throughout the Boise area. Our team handles everything from basic thermostat installations to complete home automation systems. Contact us for professional installation services that guarantee proper setup and reliable operation.