
Your garage door opener works fine, but you have to be standing right there to use it. You cannot check if you closed it from work. You cannot let someone in while you are away. Smart garage door open...
Smart Garage Door Opener Installation: How to Do It Yourself
Your garage door opener works fine, but you have to be standing right there to use it. You cannot check if you closed it from work. You cannot let someone in while you are away. Smart garage door opener installation changes that by adding remote control and monitoring to your existing system without replacing the entire motor.
The good news is you can install most smart garage door controllers yourself in about 30 to 60 minutes. These devices attach to your current opener and give you phone based control, alerts, and scheduling. No need to hire an electrician or replace expensive equipment.
This guide walks you through the complete process from mounting the hardware to testing the automatic features. You will learn what tools you need, how to connect the controller to your opener, and how to set up the mobile app. By the end, you will have full control of your garage door from anywhere.
Tools and compatibility requirements
You need minimal tools and supplies for a successful smart garage door opener installation. Most smart controllers work with standard garage door openers manufactured after 1993, but you should verify compatibility before purchasing. The installation typically requires basic household tools you already own and takes less than an hour to complete.
Essential tools and supplies
Your installation goes smoothly when you gather everything beforehand. You need a screwdriver set (both Phillips and flathead), wire strippers for connecting wires, and a drill with bits if you mount to drywall or concrete. Most kits include adhesive strips for sensor mounting, but having additional mounting tape or screws helps with difficult surfaces.
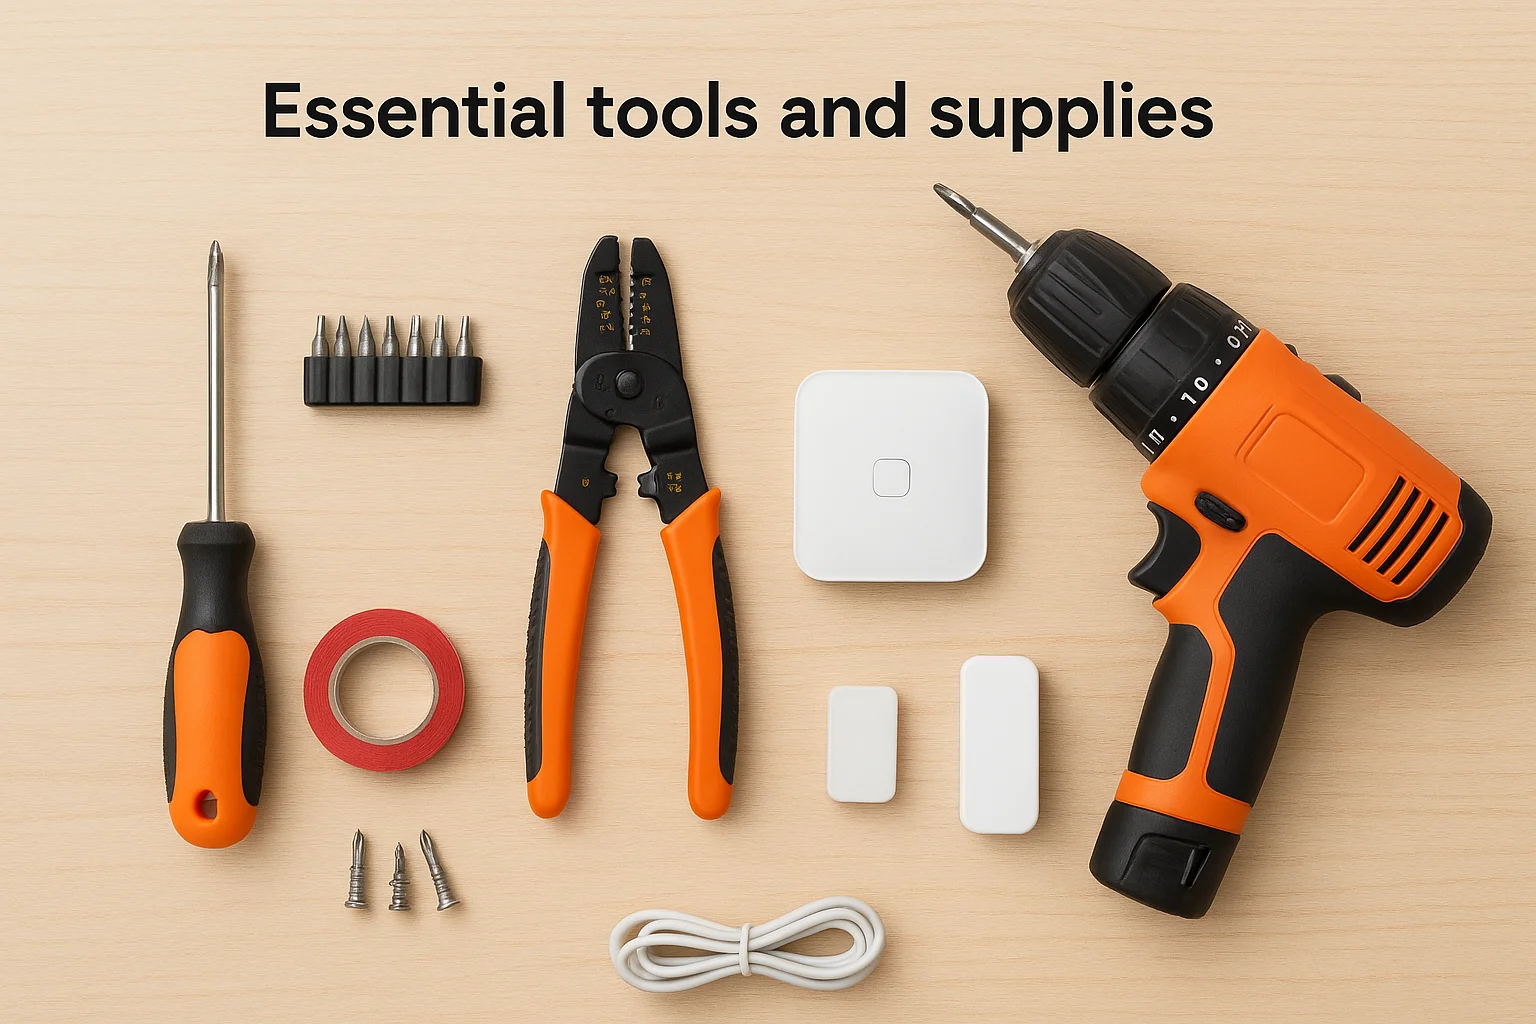
The smart controller package should contain the main control unit, door sensor, and power adapter. Some brands include a tilt sensor instead of a magnetic door sensor. You also need a stable Wi-Fi connection in your garage and the manufacturer's mobile app downloaded on your smartphone before starting.
Make sure your garage has reliable Wi-Fi coverage, or the controller cannot communicate with your phone.
Compatibility check
Check your existing opener's compatibility before buying any smart controller. Most devices work with chain drive, belt drive, and screw drive openers from major manufacturers. Your opener needs accessible wiring terminals on the motor unit where the wall button connects. Look for two terminals typically labeled with numbers or symbols.
Older openers from before 1993 may lack the standard terminal connections required. You can identify incompatible systems by checking if your wall button has more than two wires or if the opener uses a proprietary control panel. Security 2.0 openers with rolling codes work fine with smart controllers, but verify your specific model on the manufacturer's compatibility list before purchasing.
Step 1. Mount the smart controller and sensors
The first step in your smart garage door opener installation involves mounting the main control unit near your existing garage door motor. You position this unit close enough to reach the motor's wiring terminals with the included cables, typically within three to six feet of the opener. The controller needs power, so plan your placement near an electrical outlet or use the provided power adapter.
Position the main controller
Mount the controller on a clean, flat surface such as the wall beside the motor or the ceiling near the opener housing. Most units attach using adhesive strips or mounting screws. Wipe the surface with rubbing alcohol before applying adhesive strips to ensure a strong bond. If you use screws, drill pilot holes first to prevent the plastic housing from cracking during installation.
Install the door sensor
Attach the door sensor to the top section of your garage door using the provided adhesive strips or screws. Place it on a flat area where the door does not flex or bend during operation. Position the sensor so it reads correctly whether the door is open or closed.
The sensor must remain firmly attached during all door movements, or you will receive false notifications.
Install the corresponding magnet on the door frame directly across from the sensor, maintaining a gap of less than one inch when the door is closed. Test the alignment by slowly closing the door and verifying the sensor light activates when the magnet aligns properly.
Step 2. Link the device to your opener
This step connects your smart controller to the existing opener's control terminals where your wall button currently connects. You run two wires from the controller to the opener motor unit, creating a parallel connection that allows both your wall button and the smart device to operate the door. The process takes about ten minutes and requires no electrical expertise.
Locate the opener terminals
Find the terminal block on your garage door opener motor unit, typically located on the back or side panel. The terminals appear as two screw posts labeled with numbers like "1 and 2" or symbols. Your wall button wires already connect to these same terminals, and you add the smart controller wires alongside them without removing the existing connections.
Both the wall button and smart controller share the same terminals, so you do not disconnect anything that already works.
Connect the wires
Strip one quarter inch of insulation from each wire end using wire strippers. Loosen the terminal screws with a screwdriver, insert the controller wires next to the existing wall button wires, and tighten the screws firmly. The wire color does not matter for this connection because the circuit works in either polarity.
Press the test button on the smart controller after securing all connections. Your garage door should activate, confirming successful wiring. If nothing happens, verify all terminal screws are tight and the controller has power.
Step 3. Connect to Wi-Fi and configure the app
Your smart controller needs a Wi-Fi connection to communicate with your phone and send notifications. This step completes your smart garage door opener installation by linking the hardware to the manufacturer's mobile app. You configure settings, create your account, and establish remote access during this process, which takes approximately ten to fifteen minutes.
Download and pair the app
Download the manufacturer's app from the App Store or Google Play using the name printed on your controller's packaging. Open the app and create an account using your email address and a secure password. The app guides you through adding your device by scanning a QR code on the controller or entering a serial number manually.

The pairing process puts your controller in setup mode, usually by pressing and holding a button for three seconds.
Complete the Wi-Fi connection
Select your home Wi-Fi network from the list in the app and enter your network password. The controller connects to your router and displays a confirmation light or message when successful. Your garage door opener now responds to commands from anywhere with internet access.
Configure basic settings like door name, notification preferences, and access schedules in the app. Test the connection by tapping the open or close button while standing near the garage. The door should respond immediately, confirming your installation succeeded and remote control works properly.
Step 4. Test the automatic features
Testing the automatic features ensures your smart garage door opener installation works reliably for daily use. You verify that schedules, notifications, and automated closing function correctly before depending on them. This testing phase reveals any configuration issues and gives you confidence in the system's performance.
Set up automated schedules
Create a test schedule in the app to close your garage door at a specific time, such as ten minutes from now. Navigate to the scheduling section, set the parameters, and wait for the door to activate automatically. Your door should close exactly at the scheduled time without any manual input from you.
Test the auto-close feature by opening the door and configuring it to close after a set duration, typically five to ten minutes. Walk away and observe whether the door closes on its own. Some systems provide a warning beep before automatic closure, which helps prevent accidents.
Verify notifications and alerts
Trigger the door sensor by opening and closing your garage door manually. Your phone should receive immediate notifications showing the door status changes. If notifications arrive late or not at all, check your phone's notification settings and ensure the app has proper permissions enabled.
Test notifications at different times to confirm reliability before trusting the system for security monitoring.
Try opening the door from various locations, including inside your home and away from the property, to verify remote access works consistently. Your system now provides complete control and monitoring of your garage door.

Final thoughts on smart garage upgrades
You now have complete control of your garage door from anywhere using your smartphone. Your smart garage door opener installation gives you remote access, automatic scheduling, and instant notifications without replacing your existing motor. The entire process requires basic tools and about an hour of your time, making it one of the most accessible smart home upgrades you can tackle yourself.
While this DIY approach works well for standard installations, some situations require professional expertise. Complex wiring configurations, older openers, or integration with whole-home automation systems benefit from experienced technicians who handle the technical details. Professional installation also ensures warranty coverage and eliminates troubleshooting headaches if problems arise after setup.
If you prefer a professionally installed system or want to integrate your garage with other smart home features, contact our team for a custom solution. We design and install complete smart home systems throughout the Treasure Valley area, including garage automation that connects seamlessly with your security, lighting, and voice control systems.