
You want to place your TV in a corner but standard wall mounts don't reach. Corner spaces can be tricky because you need a mount that extends far enough while staying secure, and you're working with t...
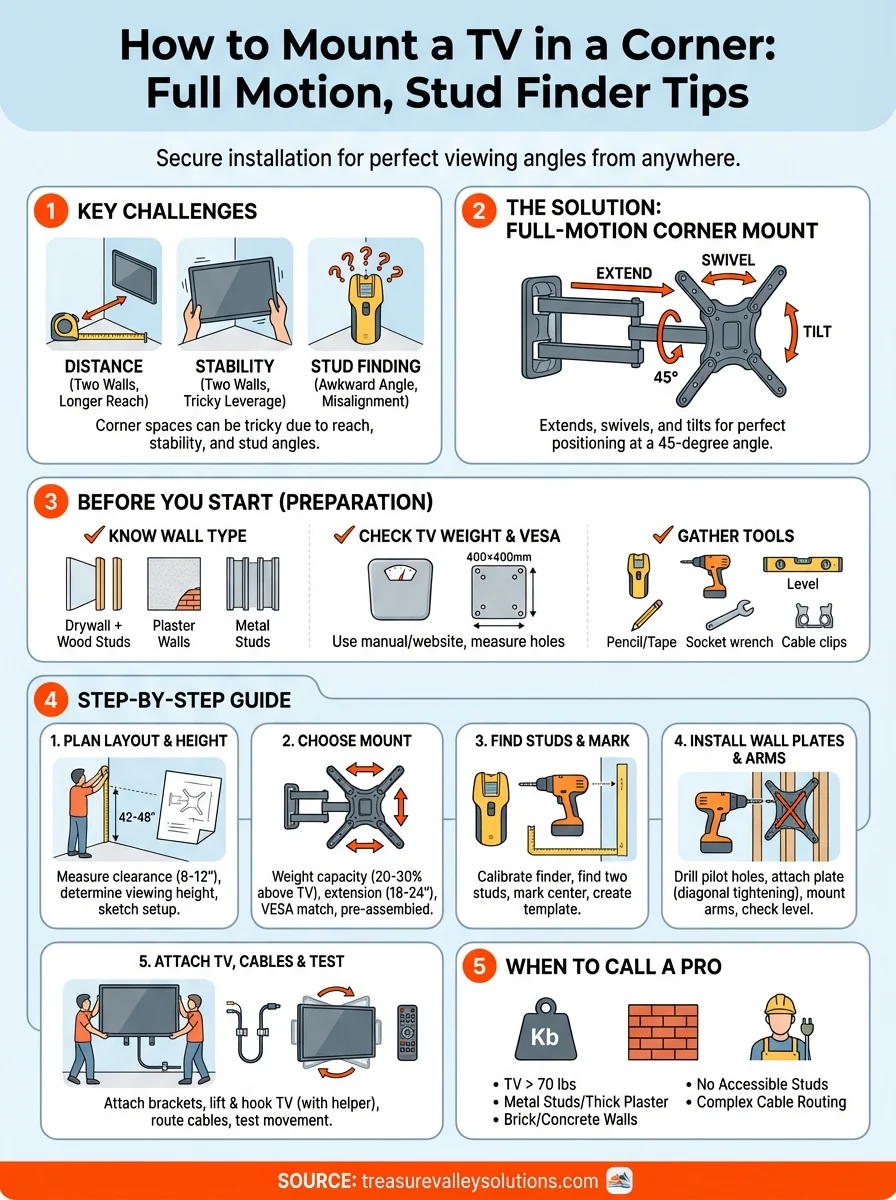
How to Mount a TV in a Corner: Full Motion, Stud Finder Tips
You want to place your TV in a corner but standard wall mounts don't reach. Corner spaces can be tricky because you need a mount that extends far enough while staying secure, and you're working with two walls instead of one. Plus, finding studs at the right angle adds another layer of complexity. Many homeowners avoid how to mount a TV in a corner because they worry about stability or drilling in the wrong spot.
The good news is that a full-motion corner mount solves these challenges. These mounts extend, swivel, and tilt so you can position your TV perfectly at a 45-degree angle. With the right tools (especially a reliable stud finder) and a clear plan, you can mount your TV securely and enjoy better viewing angles from anywhere in the room.
This guide walks you through every step of corner TV installation. You'll learn how to choose the right mount, locate studs accurately, mark your mounting points, install the hardware, and manage your cables for a clean finish. We'll also cover when to call a professional if your project needs extra hands. By the end, you'll have the confidence to tackle this project or know exactly what to expect if you hire help.
What to know before you start
Corner TV mounting requires more preparation than a standard flat-wall installation. You need to understand your wall construction, verify your TV's weight and VESA pattern, and gather the right tools before you drill a single hole. Skipping these steps can lead to a wobbly mount, damaged walls, or worse: a fallen TV. Taking 20 minutes to check these details now saves hours of frustration later.
Wall type and stud spacing
Your wall type determines which anchors and screws you'll use. Drywall with wood studs is the most common setup and the easiest to work with when you learn how to mount a TV in a corner. You'll drill directly into the studs for maximum support. If you have plaster walls, they're harder and may crack more easily, so you need to drill pilot holes and work slowly. Metal studs require special toggle bolts or snaptoggle anchors since standard lag bolts won't grip metal properly.
Check your stud spacing before you buy a mount. Most homes have studs 16 or 24 inches apart, measured from center to center. Corner installations can be tricky because the studs closest to the corner may not align with your mount's hole pattern. Use a stud finder to locate at least two studs on the wall where you'll attach the main mounting plate. If your mount spans both corner walls, you'll need to find studs on each side.
Mark stud locations with painter's tape so you don't lose them while measuring and leveling.
TV weight and VESA pattern
Look up your TV's exact weight in the manual or manufacturer's website. Full-motion mounts have weight ratings (usually 50 to 100 pounds), and you need a mount rated at least 20 percent above your TV's weight for safety. A 60-pound TV should use a mount rated for at least 75 pounds, especially since corner mounts extend farther from the wall and create more leverage.
Your TV's VESA mounting pattern is the square or rectangle of holes on the back, measured in millimeters (like 200×200 or 400×400). You'll find the VESA size in your TV's documentation or by measuring the distance between the mounting holes yourself. Write down both the weight and VESA pattern before you shop for a mount. Most full-motion corner mounts support multiple VESA patterns, but confirming compatibility prevents returns.
Tools and materials checklist
Gather everything before you start so you don't pause mid-installation. You'll need:
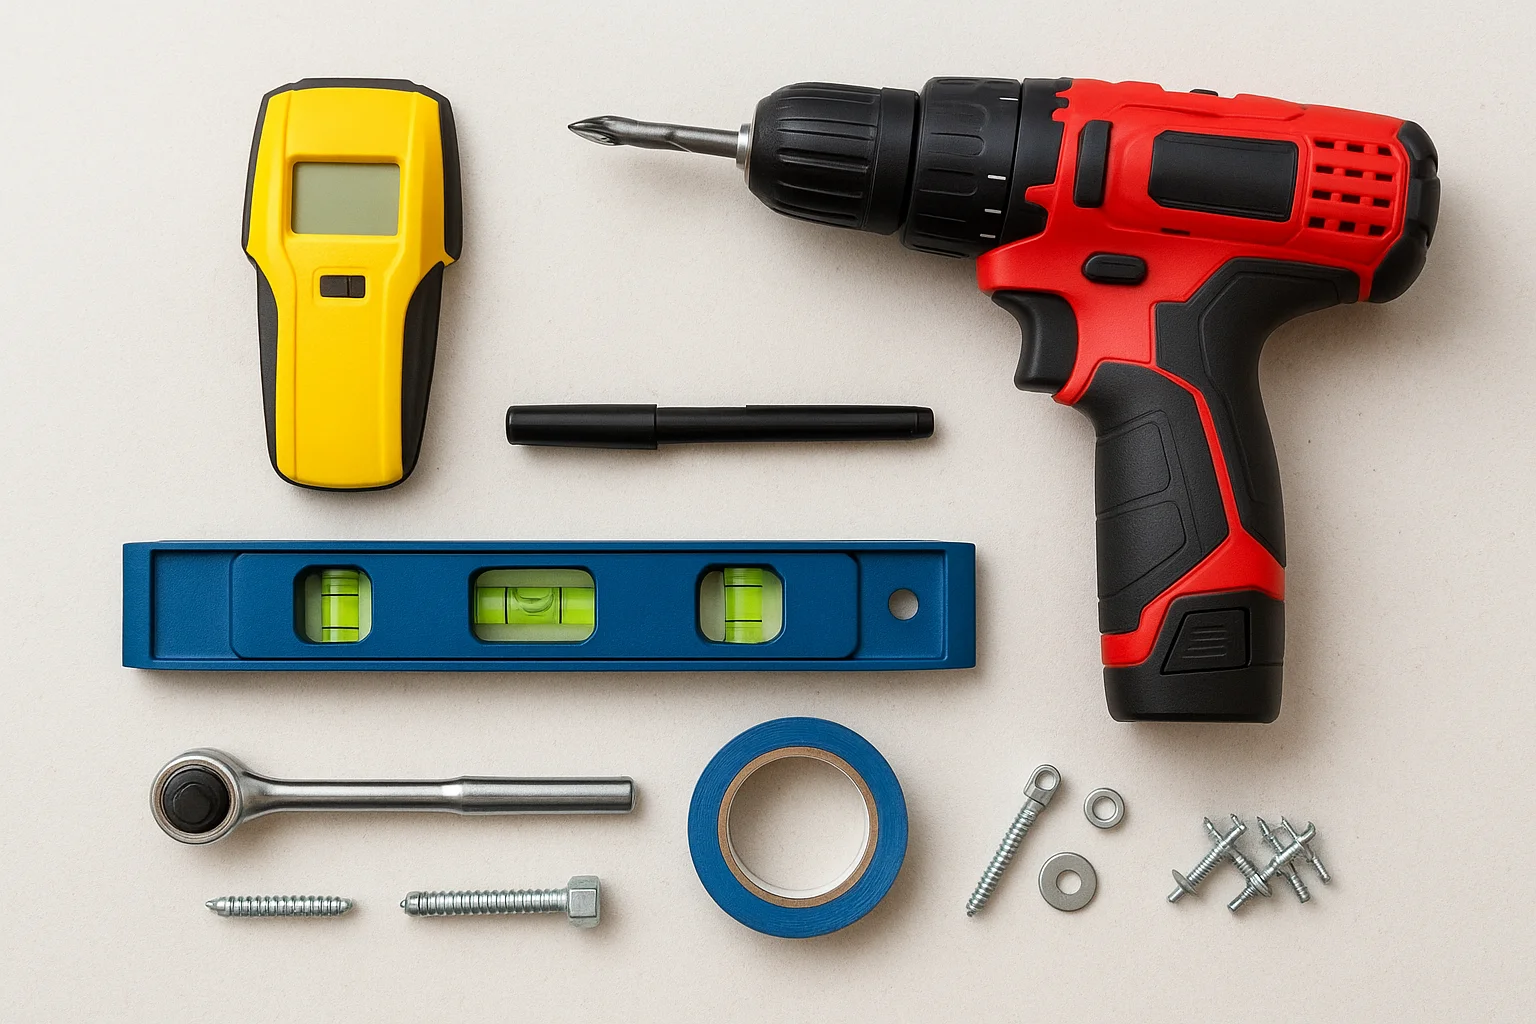
- Stud finder (magnetic or electronic)
- Drill and drill bits (wood bits for studs, masonry bits if you hit concrete)
- Level (at least 24 inches long)
- Socket wrench or power screwdriver
- Pencil and painter's tape for marking
- Lag bolts or wood screws (usually included with the mount)
- Cable management clips or conduit
Double-check that your mount includes all mounting hardware. Most kits provide lag bolts, washers, and spacers, but you may need to buy longer bolts if your wall has thick plaster or tile.
Step 1. Plan your layout and viewing height
The first step in learning how to mount a TV in a corner is mapping out exactly where your TV will sit and how far it will extend into the room. You need to measure your corner space, calculate the ideal viewing height, and sketch your setup before you touch a drill. This planning phase prevents you from mounting too high, too low, or too far forward. Spend 15 minutes measuring now and you'll avoid repositioning holes later.
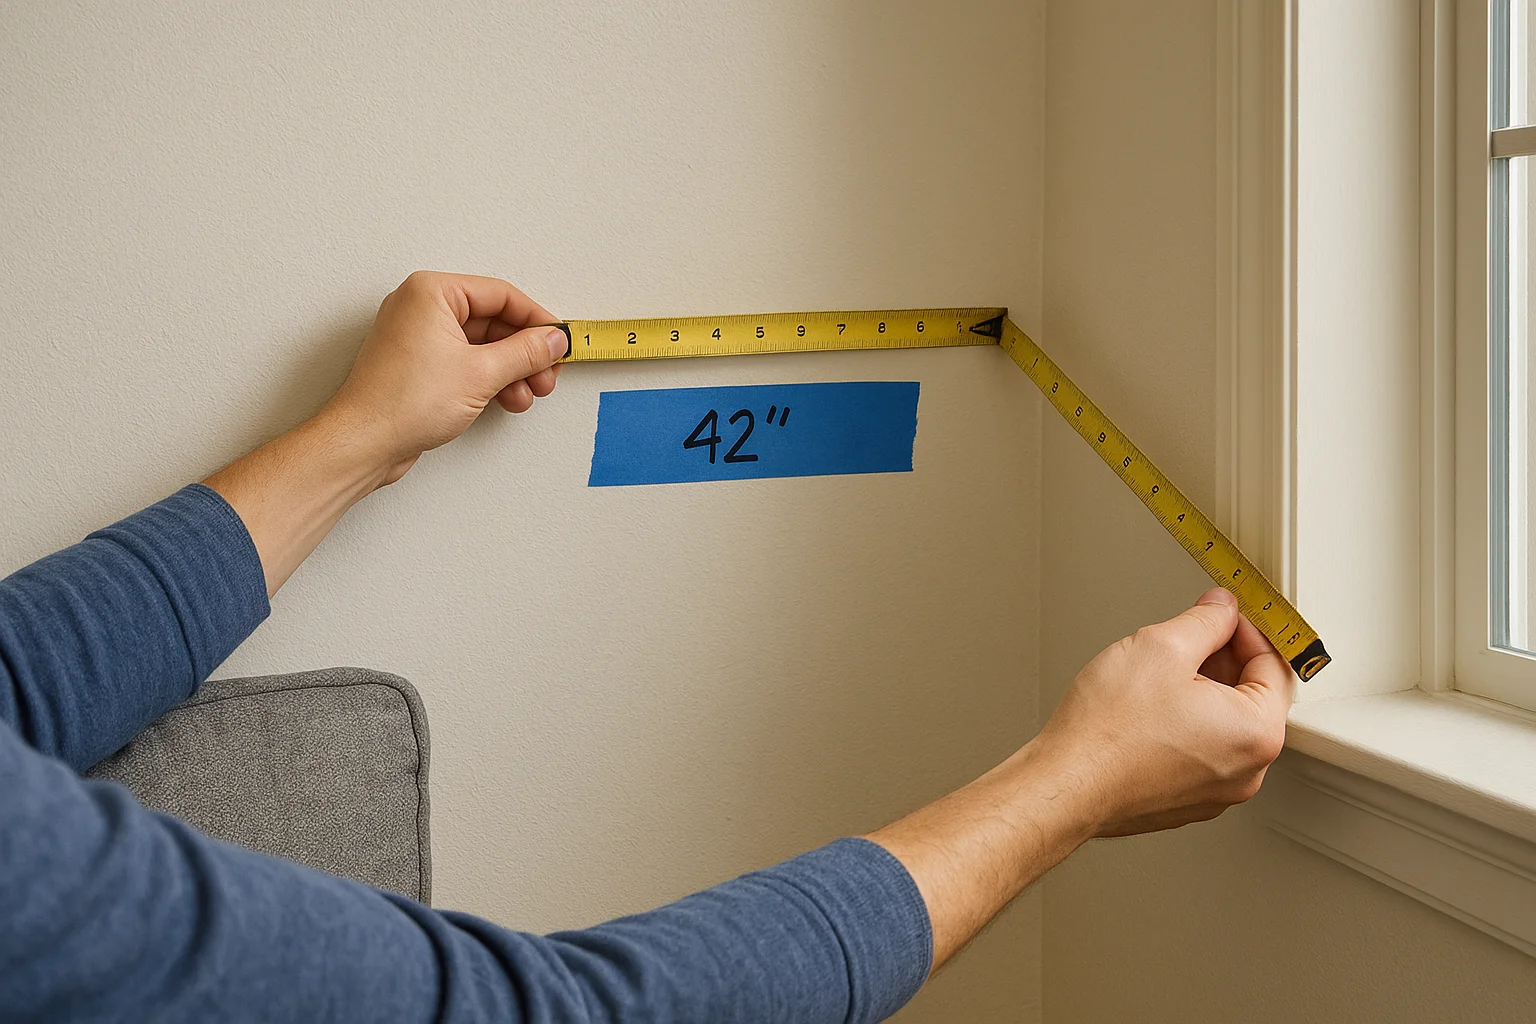
Measure your corner space
Walk up to your corner and measure how much clearance you have on both walls. You need at least 8 to 12 inches of wall space from the corner edge to accommodate most full-motion mount plates. If you have furniture, windows, or doorways close to the corner, measure those distances too. Your TV will swing out when you adjust it, so make sure it won't hit a couch arm or block a doorway when fully extended.
Measure the distance from your main seating area to the corner. Multiply this distance by 0.55 to find your ideal TV size (in inches). For example, if you sit 8 feet (96 inches) away, you want a TV around 53 inches. This formula helps you avoid a screen that's too big for the space or too small to see comfortably. Write down all these measurements because you'll use them to choose the right mount in the next step.
Determine optimal viewing height
The center of your TV screen should sit at eye level when you're seated. For most people, this means the center of the screen is 42 to 48 inches from the floor. Sit on your couch and measure from the floor to your eye level, then add or subtract a few inches based on whether you prefer looking slightly up or down. Mounting too high (above 55 inches) forces you to tilt your head back and causes neck strain during long viewing sessions.
Corner mounts let you tilt the screen down if you mount slightly higher, but starting at proper height gives you the best flexibility.
Mark this center height on the wall with painter's tape. You'll use this mark to position the mount's center bracket later. If your corner will serve multiple viewing areas (like a kitchen and living room), choose a height that works for the primary seating spot.
Sketch your layout
Draw a simple overhead view of your corner on paper. Mark where the TV will sit when centered at 45 degrees and where it will swing when you pull it toward different viewing angles. Sketch in your furniture, windows, and any obstacles within 3 feet of the corner. This sketch helps you visualize cable routing and confirms you have enough clearance for the mount's full range of motion. Take a photo of your sketch so you can reference it while shopping for mounts and during installation.
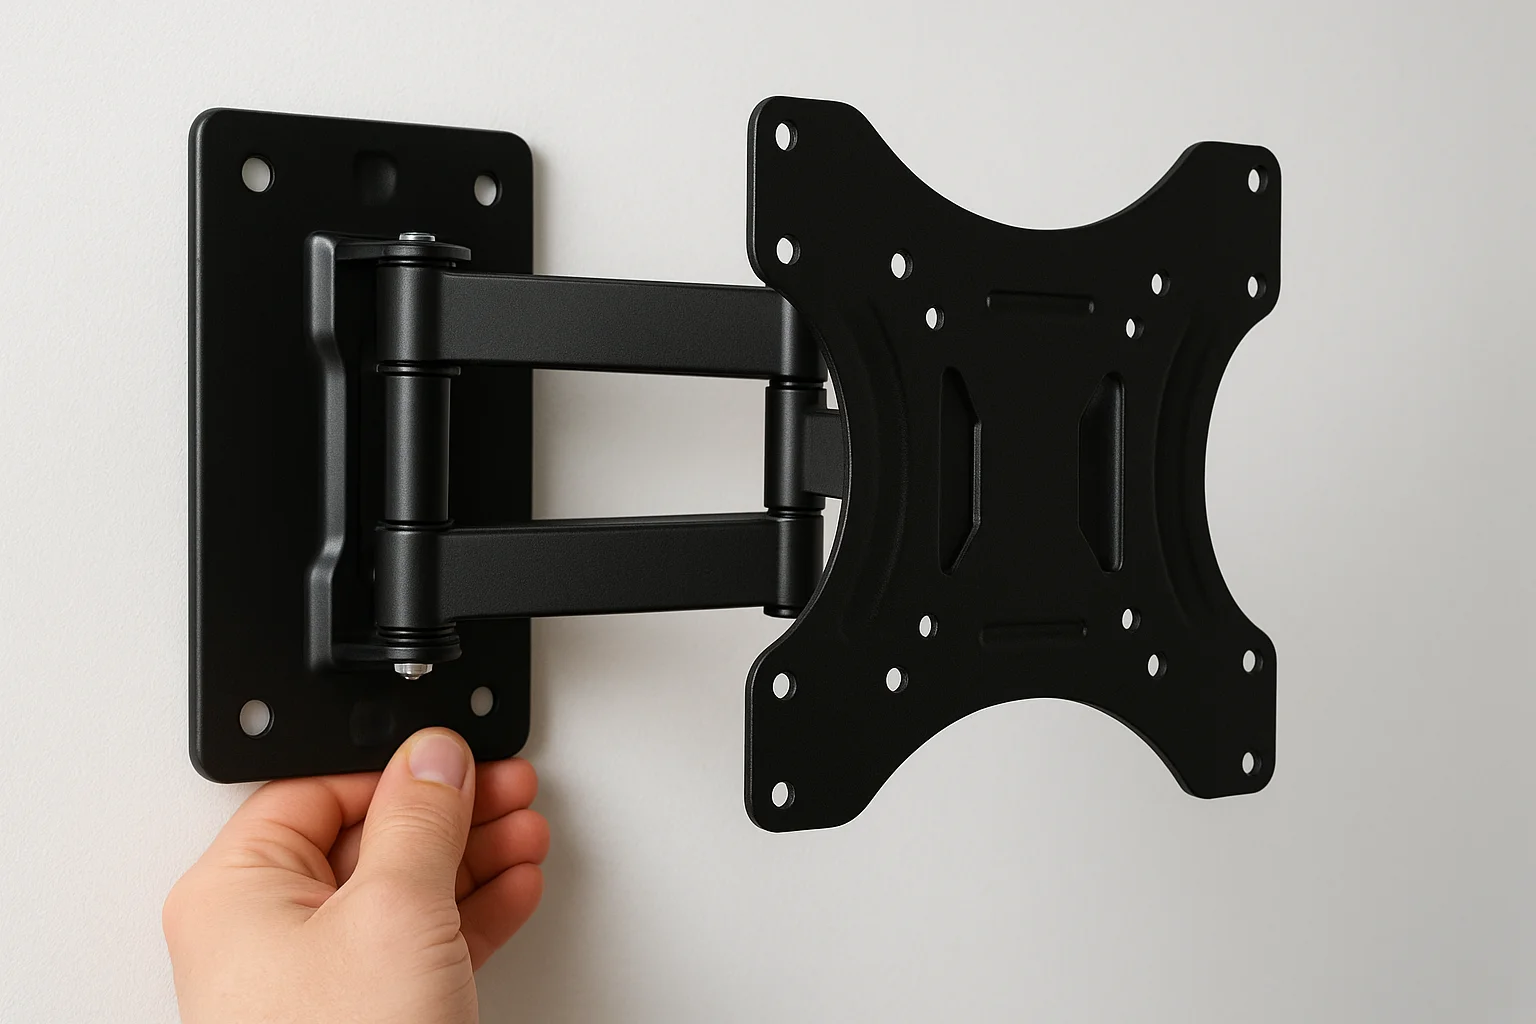
Step 2. Choose a full motion corner mount
Shopping for a corner mount feels overwhelming when you see dozens of options online. The key difference between learning how to mount a TV in a corner successfully and ending up with a wobbly setup comes down to choosing a mount rated for your specific TV and space. You need a full-motion mount (not a fixed or tilting-only model) because corner installations require swivel and extension to position the screen at the right angle. Focus on three critical factors: weight capacity, extension range, and VESA compatibility.
Weight capacity and extension range
Start by checking the mount's maximum weight rating and comparing it to your TV's weight. Look for a mount rated at least 20 to 30 percent above your TV's actual weight. A 50-pound TV should use a mount rated for 65 to 75 pounds minimum. Corner mounts create more leverage than flat-wall mounts because the TV extends farther from the wall, so you need that extra capacity buffer for safety and longevity.
Extension range determines how far the mount pulls away from the wall. Measure the depth of your corner space and choose a mount that extends at least 18 to 24 inches. This range lets you swing the TV out for better viewing angles and tuck it back against the wall when not in use. If you plan to view from multiple seating areas, look for mounts with 180-degree swivel capability so you can rotate the TV left or right after pulling it forward.
Choose a mount with at least 15 degrees of tilt adjustment so you can angle the screen down if you mount it slightly above eye level.
VESA compatibility
Your TV's VESA pattern (the mounting hole spacing on the back) must match the mount's bracket. Common VESA sizes include 200×200mm, 400×400mm, and 600×400mm. Most full-motion mounts support multiple VESA patterns through adjustable brackets, but confirm your TV's specific size is listed in the mount's compatibility range before you buy. You'll find your VESA measurement in your TV manual or by measuring the hole spacing yourself with a tape measure.
Features to prioritize
Look for these features when comparing mounts:
- Pre-assembled arms: Save installation time by choosing mounts that arrive mostly assembled
- Built-in cable management: Clips or channels that hide HDMI and power cables along the arm
- Locking mechanisms: Prevent accidental swiveling when you bump the TV
- Bubble level indicators: Built into the mounting plate to help you hang it straight
- All-metal construction: Stronger and more durable than plastic-composite mounts
Verify that your chosen mount includes all necessary hardware (lag bolts, washers, spacers, and wall anchors). Read the product description carefully because some budget mounts ship without installation hardware and force you to buy bolts separately.
Step 3. Find studs and mark your mounting points
Locating studs accurately separates a secure installation from a disaster waiting to happen. When you learn how to mount a TV in a corner, this step becomes more complex because you're working with two walls that meet at an angle. You can't simply find one stud and measure 16 inches to find the next one. Corner studs don't always align with the regular spacing on either wall, and you need to verify each stud location independently. Plan to spend 10 to 15 minutes on this step to get it right the first time.
Use your stud finder correctly
Start by turning on your electronic stud finder and calibrating it against a section of wall where you know there's no stud (usually 6 inches away from any corner). Slowly slide the finder horizontally across the wall while watching for the indicator light or beep. When it signals a stud, mark the spot with painter's tape. Move the finder 2 inches left and right to find both edges of the stud, then mark the center point between those edges. This center mark shows you where to drill.
Verify each stud location by knocking on the wall with your knuckles. Studs sound solid and dull, while hollow spaces between studs sound hollow and echo slightly. You can also push a finishing nail through the drywall at your marked spot to confirm you hit wood. If the nail slides through easily without resistance, you missed the stud and need to search again. Mark confirmed stud locations with a vertical line of painter's tape from floor to your mounting height.
Always verify stud locations with two methods (finder plus knock test or nail test) before drilling large holes.
Mark both walls in a corner installation
Corner mounts typically attach to one primary wall (the wall that holds most of the TV's weight) and sometimes use the adjacent wall for stabilization. Locate at least two studs on your primary wall that align with your mount's hole pattern. Measure the distance between your mount's attachment holes and compare it to the distance between your marked studs. If they don't match, you may need to reposition your mount slightly up or down to catch different studs.
Place your mount's wall plate against the wall at your marked viewing height. Use a 24-inch level to ensure the plate sits perfectly horizontal, then mark each mounting hole with a pencil through the plate's screw holes. These marks show you exactly where to drill. If your mount requires attachment points on both corner walls, repeat this process on the second wall, making sure your marks align at the same height.
Create a drilling template
Draw a simple diagram on paper showing your stud locations, mounting holes, and TV center point. Include measurements from the corner edge and from the floor. This template acts as a reference if you need to pause installation or if someone else helps you. Take a photo of your marked wall before you drill so you have a visual backup of your stud locations. If you drill in the wrong spot, you can refer back to your original marks.
Use the following checklist before drilling:
- Confirmed at least 2 stud locations with finder and knock test
- Marked mounting holes at correct viewing height
- Verified mount plate sits level
- Measured distances from corner and floor
- Created backup template or photo
- Cleared area below mounting zone for safe drilling
Double-check that your lowest mounting hole sits at least 2 inches above any electrical outlets or light switches. If your marks land too close to electrical boxes, you risk hitting wires when you drill. Move your entire mount up or down by a few inches if needed.
Step 4. Install the wall plates and arms
This step transforms your marked wall into a secure mounting surface. You'll drill into studs, bolt the main wall plate in place, and attach the articulating arms that let your TV swing and tilt. Precision matters here because any misalignment now multiplies when you add the TV's weight later. Work slowly and verify each bolt sits flush and tight before moving to the next one. The entire process takes 30 to 45 minutes when you follow these steps carefully.
Drill pilot holes and attach the wall plate
Put on safety glasses and insert a drill bit slightly smaller than your lag bolts (usually 1/4 inch for most mounts). Hold your drill perpendicular to the wall and drill 2 to 3 inches deep into each marked stud location. Pilot holes prevent the wood from splitting when you drive the lag bolts and make installation much easier. Clear away drywall dust with a dry cloth before you proceed.

Position your wall plate over the pilot holes and align it with your level marks. Have a helper hold the plate steady while you hand-thread the first lag bolt through the top hole into the stud. Don't tighten it completely yet. Add the second bolt at the bottom opposite corner, then fill in the remaining holes. Once all bolts sit in their holes, use your socket wrench or power drill to tighten each one in a diagonal pattern (top left, bottom right, top right, bottom left). This pattern distributes pressure evenly and keeps the plate level as you tighten.
Tighten lag bolts until they feel snug and the washer compresses slightly, but don't overtighten or you'll strip the threads.
Check your plate with a level one more time after tightening all bolts. If it shifted during tightening, loosen the bolts slightly and tap the plate back into position before retightening. The plate should sit completely flush against the wall with no gaps or wobbling when you push on it.
Mount the articulating arms
Your full-motion mount includes extension arms that attach to the wall plate with large pins or bolts. Locate the arm assembly in your mount kit and identify which end connects to the wall plate versus the TV bracket. Most mounts label these connections clearly or use different-sized attachment points. Slide the arm's wall-side connection onto the wall plate's mounting pins until you hear or feel a click.
Secure the arms by tightening the connection bolts at each joint with your socket wrench. These bolts control how smoothly the arms extend and retract, so adjust the tension based on your TV's weight. Heavier TVs need tighter bolts to prevent sagging, while lighter TVs work fine with moderate tension. Test the arms by pulling them away from the wall and swinging them left and right. They should move smoothly without dropping suddenly or feeling sticky.
Level and secure all connections
Walk through each connection point and verify that every bolt sits tight and every pin locks fully into place. Grab the extended arms with both hands and try to wiggle them up and down. You should feel zero movement at the wall plate connection. Any looseness now becomes worse when you add your TV's weight, so retighten any suspect connections immediately.
Complete this final checklist before moving to the TV attachment:
- All lag bolts tightened in diagonal pattern
- Wall plate sits flush with no gaps
- Arms extend and retract smoothly
- No wobbling when you shake the arms
- Tension adjusted for your TV's weight
- All locking pins fully engaged
Take a photo of your installed mount from multiple angles. These photos help you troubleshoot later if you notice any issues and serve as proof of proper installation if you ever need to make a warranty claim. Understanding how to mount a TV in a corner means completing each step thoroughly before adding the TV itself.
Step 5. Attach the TV, manage cables, and test
Now you're ready to connect your TV to the mount and complete your corner installation. This step requires careful handling because you're working with expensive equipment at an awkward angle. Recruit a helper to hold the TV while you secure it to the mounting brackets, and take your time routing cables before you test the full range of motion. Most TV damage happens during mounting when people rush through these final steps. Follow this sequence exactly and you'll finish with a secure, professional-looking installation that lets you enjoy perfect viewing angles for years.
Attach the TV brackets
Locate the mounting brackets (also called TV plates or adapters) that came with your mount. These brackets bolt to the back of your TV and then hook onto the arms you installed on the wall. Place your TV face-down on a soft blanket or towel on the floor to protect the screen. Identify the four VESA mounting holes on the back of your TV (you measured these earlier) and align the brackets with these holes.
Insert the included bolts through the bracket holes into your TV's mounting points. Hand-tighten each bolt first to make sure they thread correctly, then use your socket wrench to snug them down. Most mounts include spacers or washers to keep the brackets level with curved TV backs. Add these spacers before tightening if your TV needs them. Check that both brackets sit flat and parallel to each other because any angle here throws off your TV's alignment on the wall.
Tighten TV bracket bolts firmly but don't overtighten or you'll damage the TV's internal mounting threads.
Lift and hook the TV
Ask your helper to lift the TV from the bottom while you support it from the sides. Walk the TV over to your wall mount and position it so the brackets on the back align with the hooks or slots on the extended arms. Most full-motion mounts use a hook-and-slot system where you lift the TV up slightly and then lower it onto the mounting hooks until you hear a click or feel it lock into place.
Verify that both sides of the TV connected securely by gently pulling the TV forward. You should feel zero movement at the connection points. Some mounts include safety screws or locking clips at the bottom of the TV brackets that prevent the TV from lifting off accidentally. Install these now if your mount has them. The final step in learning how to mount a TV in a corner successfully comes down to making sure these connection points lock properly.
Route and secure cables
Plan your cable path from the TV down to your power outlet and devices. Run cables along the mounting arms using the built-in cable management clips if your mount includes them. If not, use zip ties or adhesive cable clips to attach cables to the arms every 8 to 10 inches. Leave some slack in the cables where the arms bend so they don't pull tight when you extend the TV away from the wall.
Plug in your HDMI cables, power cord, and any other connections before you tuck cables into their final position. Test each device to confirm the connections work while you can still reach them easily. Bundle excess cable length with velcro straps and hide it behind the TV or inside a cable raceway along the wall.
Test movement and viewing angles
Pull the TV away from the wall and swing it left and right through its full range of motion. Watch for cables that pull tight or prevent smooth movement. Adjust cable routing as needed to eliminate any binding. Tilt the TV up and down to find your preferred viewing angle, then tighten the tilt adjustment screws if your mount has them.
Sit in your main viewing spot and check the screen position. The center should sit at eye level when you're seated. Make final adjustments to the tilt and swivel until the picture looks perfect from your couch. Walk around the room to verify you can see the screen clearly from other seating areas. Push the TV back toward the corner and confirm it clears the walls on both sides without rubbing.
When to call a pro installer
Some corner installations require professional help. Call an installer if you're mounting a TV heavier than 70 pounds, working with metal studs that need special anchors, or dealing with plaster walls over 1 inch thick. Brick or concrete walls need masonry bits and concrete anchors that most homeowners don't own, and drilling into these materials takes experience to avoid cracking.
You should also hire a pro if your corner lacks accessible studs within 6 inches of where you need to mount. Professionals carry structural-grade toggle anchors and know how to distribute weight safely across drywall when studs aren't available. If you're running power or ethernet cables inside walls, most areas require licensed electricians for code compliance. Learning how to mount a tv in a corner yourself saves money, but complex installations justify the $150 to $300 cost of professional mounting.
Wrap up and next steps
You now know how to mount a TV in a corner from start to finish. You've learned to plan your layout, choose the right full-motion mount, locate studs accurately, install the hardware securely, and manage cables for a clean look. Follow each step in order and verify your work at every stage to avoid costly mistakes. The result is a professional-looking installation that gives you perfect viewing angles from anywhere in your room.
Your next step is to buy your mount and gather tools based on the specifications you measured. Set aside a Saturday morning when you have help available and good lighting. Take your time drilling and double-check level before tightening bolts. If you run into metal studs, thick plaster, or heavy TVs over 70 pounds, don't risk it. Contact our team for professional TV mounting that includes warranty coverage and same-day service throughout the Treasure Valley.