
Your business assets, employees, and customers deserve protection that actually works. Whether you're running a retail store, managing a warehouse, or overseeing an office building, commercial securit...
Commercial Security Camera Installation: Costs For Businesses
Your business assets, employees, and customers deserve protection that actually works. Whether you're running a retail store, managing a warehouse, or overseeing an office building, commercial security camera installation is one of the most practical investments you can make, but understanding what it costs and how to get it right takes some homework.
The price of a surveillance system varies widely based on camera quality, number of units, storage solutions, and installation complexity. A small office might spend a few thousand dollars, while a multi-location retail operation could invest significantly more. Beyond the dollar signs, choosing the right hardware and installation partner determines whether your system becomes a reliable security asset or an expensive headache.
At Treasure Valley Solutions, we've designed and installed commercial surveillance systems across the Boise area since 2014. This guide breaks down real-world costs, key equipment decisions, and what to look for in a professional installation, so you can protect your business without overpaying or cutting corners.
What commercial camera installation includes
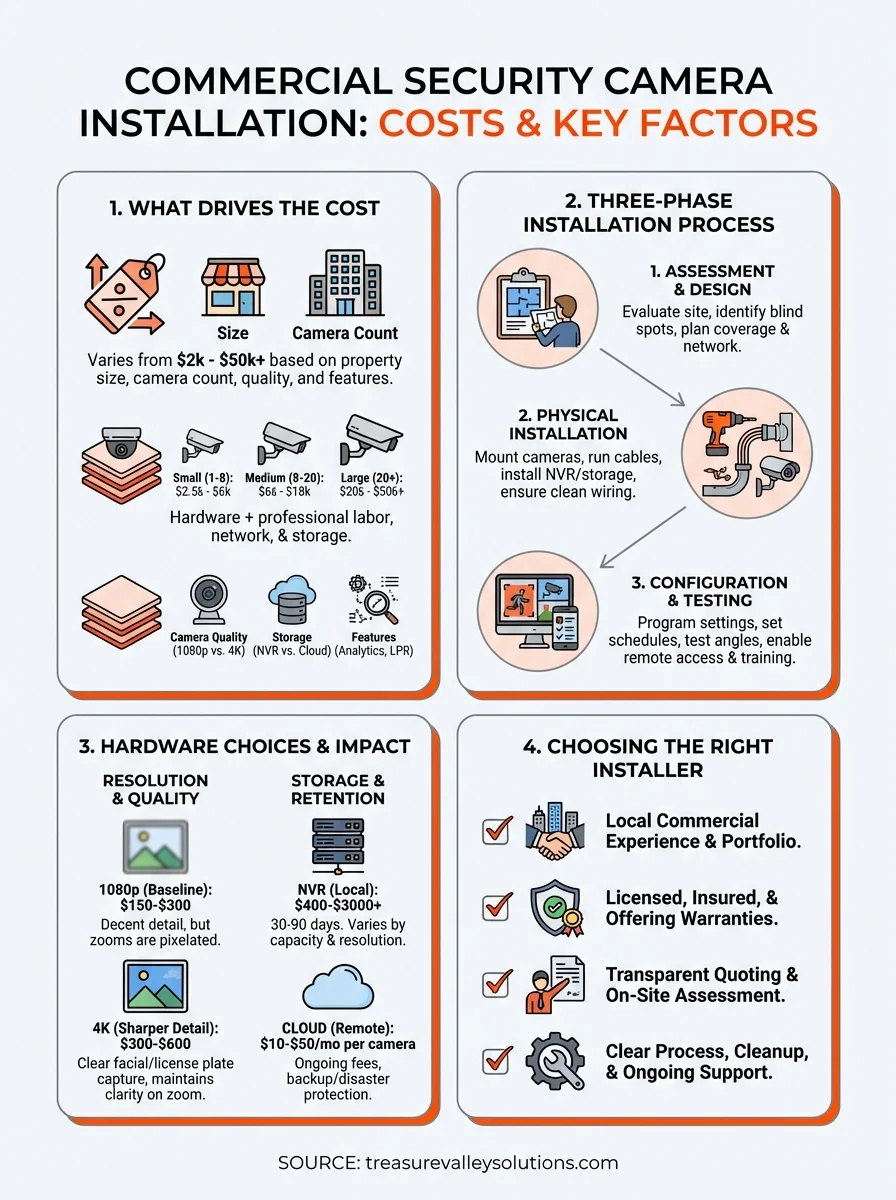
Professional commercial security camera installation goes far beyond mounting hardware on walls. You're paying for site-specific planning, skilled labor, system programming, and the expertise to create a surveillance network that actually protects your property. A complete installation involves three distinct phases: pre-installation assessment, physical installation work, and system configuration. Each step requires technical knowledge and experience with commercial environments.
Site assessment and design
Your installer should visit your property before quoting a final price to evaluate camera placement, network infrastructure, and power requirements. This walkthrough identifies blind spots, lighting challenges, and areas that need extra coverage like cash registers, loading docks, or entry points. The assessment also determines whether your existing network can handle video traffic or if you need dedicated cabling.
During this phase, you'll discuss recording duration, storage options, and whether you need features like license plate recognition or facial identification. Your installer should map out camera locations, cable runs, and where the recorder will live. This blueprint prevents costly surprises during installation and ensures every corner of your property gets proper coverage.
A proper site assessment prevents the frustration of discovering after installation that you can't see critical areas or that your network can't handle the video load.
Physical installation and wiring
The actual installation work includes mounting cameras, running cables, and installing network equipment throughout your building. For commercial properties, this often means working with conduit, drilling through concrete or metal studs, and routing cables through ceilings or exterior walls. Professional installers use weatherproof housings, secure mounting brackets, and tamper-resistant hardware to protect your investment from weather and vandalism.
Cable management makes the difference between a clean installation and a messy eyesore. Your installer should label every cable, secure runs properly, and ensure connections meet commercial building codes. Power over Ethernet (PoE) cameras simplify installation by carrying both data and power through a single cable, but some systems require dedicated power supplies at each camera location. The installer also sets up your network video recorder (NVR) or connects cloud-based storage, ensuring your system has enough capacity for your retention requirements.
System configuration and testing
After the hardware is in place, your installer programs the system to match your security needs and operational schedule. This includes configuring motion detection zones, recording schedules, and alert notifications for after-hours activity. You'll get training on how to review footage, export clips, and manage user access so your team can operate the system confidently.
Testing verifies that every camera captures usable footage day and night, motion detection triggers properly, and remote access works from your phone or computer. Your installer should demonstrate the system, answer questions, and provide documentation of your setup including login credentials and camera locations. Quality installers also explain your warranty coverage and what ongoing support looks like if cameras fail or you need system adjustments down the road.
What it costs in 2026 and why prices vary
You can expect to invest anywhere from $2,000 to $50,000 or more for commercial security camera installation, depending on your property size, camera quality, and feature requirements. Most small businesses spend $3,500 to $8,000 for a basic system, while larger operations with advanced needs easily exceed five figures. The price reflects not just hardware costs but also professional installation labor, network infrastructure, and ongoing storage expenses that protect your footage long-term.
Small business systems (1-8 cameras)
A basic setup for a small retail store, office, or restaurant typically runs between $2,500 and $6,000 installed. This includes entry-level commercial-grade cameras with 1080p or 4K resolution, a network video recorder with 30 days of storage, and professional installation. You'll spend around $150 to $400 per camera for decent indoor models, while outdoor weatherproof units cost $250 to $600 each depending on night vision quality and durability.
Installation labor for straightforward projects adds $800 to $2,000 to your total, covering mounting, cable runs, and system configuration. Properties with easy attic access or drop ceilings cost less than buildings requiring extensive conduit work or outdoor trenching. If your business needs Power over Ethernet switches to support the cameras, budget an additional $300 to $800 for network equipment that wasn't previously in place.
Medium and large installations
Businesses installing 8 to 20 cameras should budget $6,000 to $18,000 for a complete system with professional-grade equipment and proper coverage. This scale often requires upgraded storage solutions, managed switches, and more complex programming to handle multiple viewing zones and user permissions. Labor costs increase proportionally because installers spend more time running cables, configuring networks, and testing each camera location thoroughly.
The difference between a $5,000 system and a $15,000 system often comes down to image quality during critical moments and whether your footage actually helps identify incidents or just documents blurry shapes.
Large properties with 20 or more cameras easily reach $20,000 to $50,000 or higher, especially when you add features like license plate recognition, analytics software, or integration with access control systems. Warehouses, multi-building campuses, and retail chains need enterprise-grade recorders with redundant storage, higher bandwidth network infrastructure, and often cloud backup solutions that add monthly costs. Installation complexity increases dramatically with exterior mounting, long cable runs, and coordination with building management or tenants.
How to plan coverage that fits your building
Effective commercial security camera installation starts with strategic planning that matches your property's layout and security priorities. You need to identify vulnerable areas, anticipate criminal behavior patterns, and design a system that captures useful evidence rather than just recording random footage. Most businesses make the mistake of either under-covering critical areas or wasting money on cameras pointed at low-value zones. Your coverage plan should prioritize entry and exit points, cash handling areas, and anywhere valuable inventory or equipment sits unattended.
Map your entry points and high-risk areas
Start by walking your property and identifying every door, loading dock, and window where someone could enter. These locations need camera coverage that captures clear facial features and identifying details, not just distant figures. Place cameras to record people as they approach entrances, giving you footage of their face before they reach the door, and position backup cameras to cover the same area from different angles when possible.
High-risk zones deserve concentrated coverage with overlapping fields of view. Cash registers, safes, inventory storage, and equipment yards need cameras that eliminate blind spots where theft or vandalism could occur undetected. Consider camera height carefully because mounting too high produces overhead shots that miss facial features, while mounting too low makes cameras vulnerable to tampering or spray paint.
Criminals often case properties before attempting theft, so cameras capturing parking lots and building perimeters help you spot suspicious behavior before actual crimes occur.
Account for lighting and weather conditions
Your cameras need to work 24/7 in varying light conditions, which means planning for darkness, glare, and backlit doorways. Areas with no ambient lighting require cameras with strong infrared capabilities or supplemental lighting to capture usable footage at night. Avoid pointing cameras directly at bright lights or windows where exposure settings struggle to balance extreme contrasts, leaving important details washed out or too dark.
Outdoor cameras face additional challenges from rain, snow, direct sunlight, and temperature swings. Your installer should specify cameras with proper weatherproof ratings and wide operating temperature ranges. Plan camera placement that minimizes direct sunlight hitting the lens during peak hours, and ensure mounting locations keep cameras away from sprinklers or roof runoff that could obscure the view.
Plan for future expansion
Your security needs will likely grow as your business expands, so design systems with upgrade capacity built in. Choose network recorders with extra camera inputs and storage that accommodates additional units without replacing the entire system. Running extra cable drops during initial installation costs far less than retrofitting later when you need cameras in new locations or want to upgrade resolution.
Hardware choices that drive price and results
The equipment you choose determines whether your commercial security camera installation delivers clear evidence or blurry footage when incidents occur. Camera quality, storage capacity, and special features create the biggest price variations, with entry-level systems starting around $150 per camera and professional-grade units exceeding $600 each before installation. Your hardware decisions directly impact image clarity, how long you can retain footage, and whether your system handles specific challenges like license plate capture or facial recognition.
Camera resolution and image quality
Resolution separates useful security footage from pixelated images that fail to identify suspects or document incidents properly. 1080p cameras represent the baseline for commercial installations, offering decent detail at $150 to $300 per unit, but you sacrifice clarity when digitally zooming footage. 4K cameras cost $300 to $600 each yet provide dramatically sharper images that let you zoom into license plates or facial features while maintaining readable detail.
Beyond resolution, sensor quality and low-light performance matter enormously for nighttime coverage. Cameras with larger sensors and better infrared illumination capture usable footage in near-darkness, while cheap units produce grainy black images that document nothing. Look for cameras with starlight technology or color night vision if you need to identify clothing colors or vehicle paint after dark.
Spending an extra $200 per camera for better sensors and resolution pays off the first time you need to identify someone from your footage, not just prove that a person-shaped blur existed.
Storage capacity and retention
Your network video recorder needs enough capacity to store footage for your required retention period, whether that's 30, 60, or 90 days. Storage costs vary dramatically based on camera count, resolution, and how long you keep recordings. A 4-terabyte NVR handles four to eight 1080p cameras for 30 days, costing $400 to $800, while 16-terabyte systems supporting high-resolution cameras reach $1,500 to $3,000 or more.
Cloud storage offers remote backup and disaster protection but adds ongoing monthly fees of $10 to $50 per camera. These costs compound quickly across multiple cameras, making hybrid solutions popular where critical cameras back up to the cloud while others store locally.
Advanced features worth considering
Motion detection, facial recognition, and license plate readers add $200 to $1,000+ per camera depending on sophistication. Analytics software that counts customers, detects loitering, or alerts you to perimeter breaches costs extra but transforms passive recording into active security monitoring.
How to choose a Treasure Valley installer
Selecting the right commercial security camera installation partner determines whether your surveillance system becomes a reliable asset or an expensive source of frustration. The Treasure Valley has dozens of installers, but not all bring the commercial experience and technical expertise needed for business environments. You want a company that understands local building codes, handles permit requirements, and stays available for support long after installation wraps up. Your installer should demonstrate proven experience with commercial projects similar to yours, transparent pricing without hidden fees, and clear communication from initial consultation through final handoff.
Local experience and commercial portfolio
Look for installers with documented commercial work in the Treasure Valley rather than residential-focused companies dabbling in business systems. Ask to see examples of retail stores, offices, or warehouses they've equipped with surveillance systems. Companies experienced with commercial properties understand challenges like three-phase power, structured cabling requirements, and working around business operations without disrupting daily activities.
Your installer should visit your property for a detailed site assessment before quoting a final price. Companies offering quotes over the phone or through photos miss critical details about network infrastructure, mounting challenges, and coverage gaps that drive costs higher mid-project. Request references from businesses they've served and verify they're licensed and insured to work on commercial properties in Idaho.
An installer who rushes through site assessment or provides instant quotes without understanding your property's specifics will likely underestimate complexity and either cut corners or hit you with change orders later.
Licensing, insurance, and warranties
Verify your installer carries general liability insurance and workers compensation coverage that protects your business if accidents occur during installation. Idaho requires electrical contractors to hold proper licensing for low-voltage work, and you should confirm credentials before signing contracts. Ask about equipment warranties and installation guarantees that cover both hardware failures and workmanship issues for at least one year after project completion.
Installation process and support
Quality installers explain their installation timeline, cleanup procedures, and what disruption you should expect to normal operations. They should provide written documentation of camera locations, system specifications, and login credentials after finishing work. Confirm the company offers ongoing support for troubleshooting, firmware updates, and system modifications as your needs evolve. Local companies based in the Treasure Valley respond faster to service calls than regional chains routing support through distant call centers.
Next steps for your business
Protecting your Treasure Valley business with commercial security camera installation requires balancing budget constraints with coverage needs that actually deter crime and document incidents. You've seen how costs vary based on camera count, resolution, storage requirements, and installation complexity, but the right investment depends on your specific property and security priorities. Don't rush into purchasing systems without professional assessment or choose installers based solely on lowest price, because poor planning costs more when you need additional cameras or experience system failures down the road.
Start by identifying your high-priority areas and realistic retention requirements, then request quotes from experienced local installers who understand commercial environments. At Treasure Valley Solutions, we design and install surveillance systems for Boise area businesses that match your coverage needs without overpaying for unnecessary features. Contact our team to schedule a property assessment and get transparent pricing for a security camera system that protects what you've built.